I have been doing a mix of art journaling, junk journaling, and bullet journaling for the past couple of months. Each one has its unique way that it helps my mental health. Art journaling gives me something to look forward to every day (I do one page per day) and junk journaling/bullet journaling gives me a way to express my feelings and talk about my day in a fun and creative way.
Since talking about both, art journaling and bullet journaling would make for a long post, I’m going to be talking about bullet journaling today and then art journaling in another post.
Why Bullet Journal?
I started bullet journaling because I wanted a more creative way to get my thoughts and ideas out. I didn’t want to be limited to just writing about my day. I wanted to have some fun. Bullet journaling gave me an outlet to track my day and thoughts, and still break free and add some artistic elements.
It helps me with being mindful, which is something I struggle with. When anxiety or depression hits, I crack open my journal and just start writing whatever is on my mind, no matter how mundane. I’ve lost track of time working in my bullet journal and losing myself in the process of making a page or getting my thoughts down.
Basics of Bullet Journaling
You can do anything you want in a bullet journal. There are no rules. The basic elements of a bullet journal are table of contents, page numbers, and content. Bullet journals are used for everything from daily/weekly/monthly planning, habit tracking, long-form journaling, and junk journaling.
Junk journaling is where you take whatever “junk” from your day you would normally throw away and you put it in your journal in a fun and creative way. I do a mix of junk journaling with both my bullet journal and my art journal.
The trick is being happy with what you do in your journal. Social media is full of posts with these elaborate and beautiful spreads, but they’re not practical for the average person who is just starting out. Not to mention the cost of making some of those spreads. Let’s keep it simple for the sake of our self-esteem. Your journal doesn’t need to look like it belongs on the cover of Vogue.
Getting Started — Picking a Journal
Some things to think about when picking a journal are what you plan on doing in the journal (do you plan on just writing and doodling or throwing in stickers or paint?) the thickness of the pages (you want them to stand up to your materials/tools), special features like page numbers and table of contents, and if you would rather have dot, lined, or blank pages to work with. If you plan on doing any watercolor or painting in your journal, I highly recommend you get 120 gsm (grams per square meter) or higher thickness.
Some people like the dot paper because it frees them from the restraints of the lines. Some people prefer the lines to keep them in an orderly fashion. Others forgo both and go with blank pages to give them ultimate freedom. Whatever you pick, make sure you are happy with it. You’re the one using it, after all.
Journals I’ve Personally Checked Out
There are a ton of journals out there with different paper weights and cover styles. I have looked at Moleskin (avg. $18), Leuchtturm1917 (avg. $24), and Artist Loft by Michaels Craft (avg. $9). My favorite of the bunch has been, thankfully, also the cheapest: Artist Loft. The Artist Loft has the thickest paper of the three (129 gsm) and none of my favorite markers or mediums bleed through it.
Artist Loft journals come in dotted, lined, and blank, giving you the ultimate freedom in choosing your journal. They also come in a variety of colors and cover styles.
Some of my favorite features of the Artist Loft journals include:
- Elastic band for closure
- Pocket in the back
- Table of contents
- Numbered pages
- Pen loop
- Two ribbon bookmarks
- Material test pages in the back
Did I mention they are low-cost as well? Yeah, that’s my favorite feature. (These frequently go on sale, so it’s easy to stock up for cheap!)
Bullet Journal Supplies

When it comes to supplies, TikTok and other platform influencers might have you thinking you need to break the bank to do this write (hehe, I made a pun). You only need a few things and you can probably get most of them at your local dollar store. I’ve linked Amazon for now so it’s easier to add-to-cart and get started.
Basic Shopping List
- Journal (This is the closest I’ve found on Amazon to the Artist Loft journal.)
- Writing tool (I prefer the Bic BU34 Grip and Stabilo Fine Point Markers.)
- Pouch (To hold your supplies when taking your journal out with you.)
- Post-It Notes (More on these in a minute.)
If you want to decorate your planner, check out these additional supplies:
- Stickers in your favorite characters or theme (Check out The Creepy Cute Sticker Book by Gaynor Carradice and Woodlandia by Sticker Emporium.)
- Washi tape
- Pencil and eraser (Get separate pieces, not an all-in-one.)
That will get you started. Now, if you want to dive in a little deeper, here are the advanced supplies I started using after I got my feet wet.
Advanced Shopping List
- Canon Selphy QX10 Printer (Of all the printers I’ve tried, this is by far the best.)
- Tombow markers (These are pricy but you can do a lot with them.)
- Cutouts by American Crafts
- Adhesive of some kind (I prefer Tombow Aqua Mono Liquid Glue.)
- The Art of Playful Lettering (This helps you up your handwriting game.)
- Watercolors by Arteza
- Water brushes (These make doing watercolors easy when journaling away from home.)
- Scissors
- Stamps
- Something to store your growing collection of supplies (A rolling cart works great.)
Setting Up Your Bullet Journal
If you are using the Artist Loft journal, the setup is mostly done for you. Otherwise, you will need to designate pages for your table of contents, number the first few pages, and mark a page for testing out materials. Some people also like to use a special key with symbols in their journals. I find that complicates things, and I keep things simple, so I won’t be covering that here.
For your first spread, use your pencil and eraser to draft out your layout so you can make changes before you cement it in ink. If you know you want a page for something but don’t have any idea how you want it set up, put a Post-It note on the page with the idea so you don’t forget.
Note on Table of Contents: This is an important part of the process because, unless you only plan to do long-form journaling, you will want to know on what page you put what. It’s a hassle to flip through 200 pages looking for the one page you need at the moment. I don’t list all my spreads in my Table of Contents, just the important ones.
Now it’s time to decide what you want to use your journal for. Do you want to do long-form journaling? How about cute sticker spreads? Pages to remind you about favorite memories or things you want to do?
The important thing here is that, when you are working on your journal, you are happy with it. If you want to use it as a personalized planner, go for it! If you want it to be a mash-up of all the above, hurrah!
Take into account how much time and effort you want to put into the planner each day. This will help you not go overboard with elaborate spreads that make you want to throw your planner after the first day. (I’m speaking from experience here.) If you have more than one idea and don’t want them in the same journal, start a second journal. Again, there are no rules here.
The Dreaded First Page
I actually skip the first page of all my journals. I used to put my name and date, but now I just leave them blank. That’s my choice. I’ve seen other people make this the centerpiece of their journals with pictures, lettering, and so on. My favorite idea I’ve seen has been to put a picture of yourself when you started the journal, your name, and your phone number in case you lose it.
For my first official page, I was overthinking it (I can hear GeekMom Karen W. rolling her eyes now), and to put a stop to it, I wrote in sloppy script, “STOP OVERTHINKING IT! YOU CAN’T MUCK UP JOURNALING.” When I start to overthink a spread, I go back to that reminder. It works for me.
A Word on Planner TikTok
Some people find it helpful to look at what others are doing on various social media sites. I’ve ended up on planner TikTok and, personally, I find that to be a rabbit hole that sucks endless amounts of my time. It can also screw with your self-esteem when you want to have those perfect spreads that look like they belong in a museum.
Instead of spending hours on planner TikTok, I take time to write down all the things I want in my perfect planner and I design my spreads to match. If I don’t have the energy for a full, complex spread, I have an alternate spread for when I want to do the bare minimum.
Remember, this is supposed to help your mental health, not harm it!
Favorite Bullet Journal Page Ideas

I have pages I’ve made that track my favorite TikTok series, Hells Belles, as well as pages about my day in general. If you are looking for some ideas to get started, here are a few of my favorite ideas I’ve done:
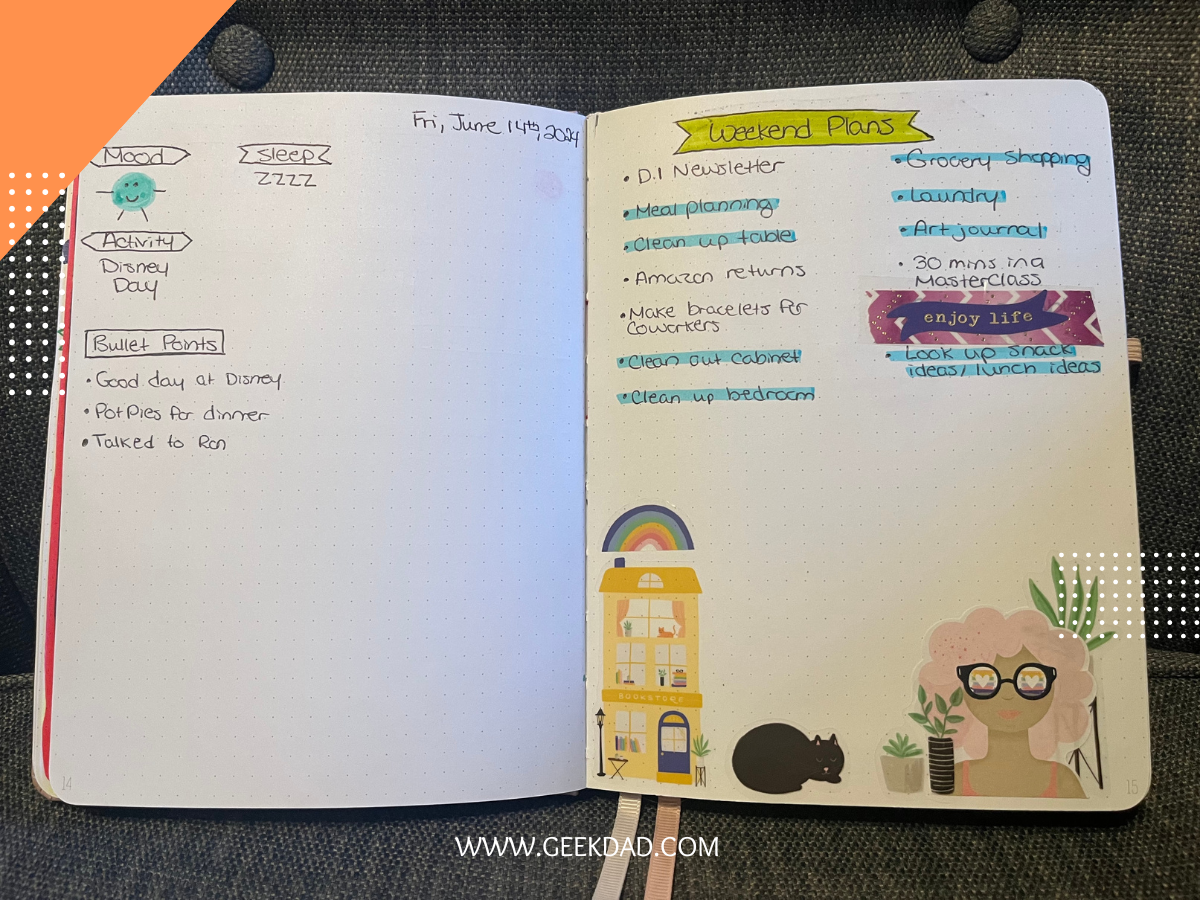
- Day planning – Include things like the weather, mood, tasks you completed (track your successes!), or other tidbits you need for the day.
- Things I Enjoy Doing
- Monthly Goals or Recap — This is a great way to separate the months in your journal.
- Books I’d Read Again
- What I Wish and Then What I Can Do — What I wish was happening and what I can do about it, on two facing pages.
- Things to Look Up — This is a running list and I reserve two to four pages for it.
- Current Obsessions — Tracking those hyper-fixations helps me see where I was at the time.
- Current Playlist — Take this a step further and put an NFC tag and program it to open the playlist on your phone when tapped.
- Things I Love in 2024
- Fears
- Pet Appreciation Photo Page
- Habit Tracker — You google “Habit Tracker” and find all sorts of printables you can put in your journal to make this easier and less daunting.
Something I started doing in my journal once I got my feet wet was watercolors. Using watercolor paints, I would free-paint a page and then write a saying over top of it once it dried. If you plan to use water-based markers to write on top of the watercolors, make sure you use transparent gesso to seal the paint first. And don’t worry, the paper in the Artist Loft journals is thick enough that it won’t warp or go through the page while you work.
Get to Journaling!

No matter how you use your bullet journal, the most important part is to remember it is yours and it’s meant to help, not hinder your mental health. The moment you start stressing over the perfect layout or spread, you’re doing it wrong. If you want some ideas on how to grow your bullet journal habit without it sucking up your time, check out Creativebug’s courses on journaling. I’ve been watching them and found the material to be quite useful.
But Wait! What About the Junk Journaling Aspect?
If you want to incorporate junk journaling in your bullet journal, start keeping anything you would normally throw away for your journal. Napkins with restaurant logos on them, ticket stubs, dollies from soup bowls, scraps of junk mail—if you can tape it down or glue it down, save it. When you go in to write about your day, paste those things in with a note.
Coming up next, I’ll be covering the “art” of the art journal. This will be a great one for those who want a little less writing in their journal and a bit more art.