xTool’s latest machine, the M2 Color Craft Laser Cutter & Engraver (retail starting at $569), combines full-color printing, laser cutting, and engraving in a single desktop system.
As a crafter and small business owner, I’ve accumulated more than a few crafting machines over the years. I have a printer for stickers, a laser for cutting projects, and multiple Cricut machines for various needs.
xTool recently sent me the M2 with a 10 W laser head module, desktop air purifier, print module, and rotary attachment, along with a large assortment of materials to see how well it would fare for a small-business owner and self-proclaimed ADHD crafter.
What Am I Covering Today?
After two weeks of using the M2 for everything from stickers and notebooks to market displays and anxiety tools, I have a lot to say, so much so that this is going to be a series instead of a one-and-done review. Today, I’m going to talk about the basics of the machine, who it’s for, and my first impressions.
In the following parts, I will go over the software, projects, and everything you can do in more detail.
Let’s get into it!
What Is the xTool M2?
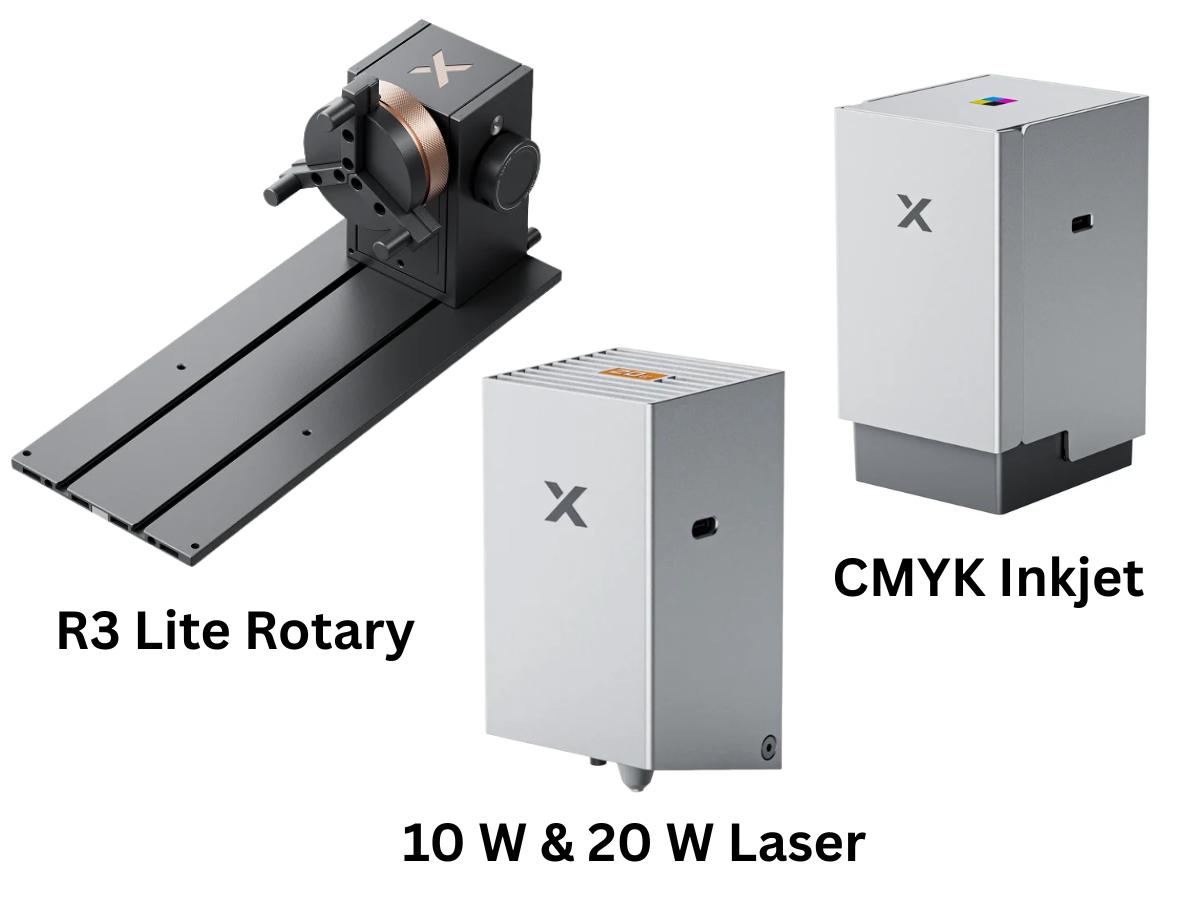
The xTool M2 is a hybrid crafting machine that combines a full-color inkjet printer with quick-swappable laser modules for cutting, engraving, and transforming over 300 compatible materials.
To give you an idea of a simple project, you can print your pet’s photo onto a piece of wood and use the diode laser to cut it out, and then switch over to engrave a custom pet tag. All on the same machine.
You can purchase the M2 with the 10 W or the 20 W laser head (both are blue diode lasers). 10 W is best for thinner materials. 20 W cuts thicker materials and works a bit faster.
If you would like the ability to do fine marking on metal and certain plastics, you can purchase the 3 W 1064 nm infrared laser module separately. Both the 10 W and 20 W can engrave on certain types of metal; the 3 W infrared laser can give you darker results on materials that don’t play well with the blue diode laser.
You can quickly swap the laser and print heads without having to power down the machine or do any fancy footwork. I was able to print and cut stickers for a project in under 10 minutes, including swapping the heads.
Who Is the xTool M2 For?
The groups that are likely to get the most use out of the M2 are small business owners and crafters.
Small Business Owners
Small business owners will appreciate the machine’s flexibility.
I’m just getting started with my business, and the xTool M2 has helped me expand my product offerings by leaps and bounds. The ease of creating new product ideas and executing them is almost a problem for my ADHD brain.
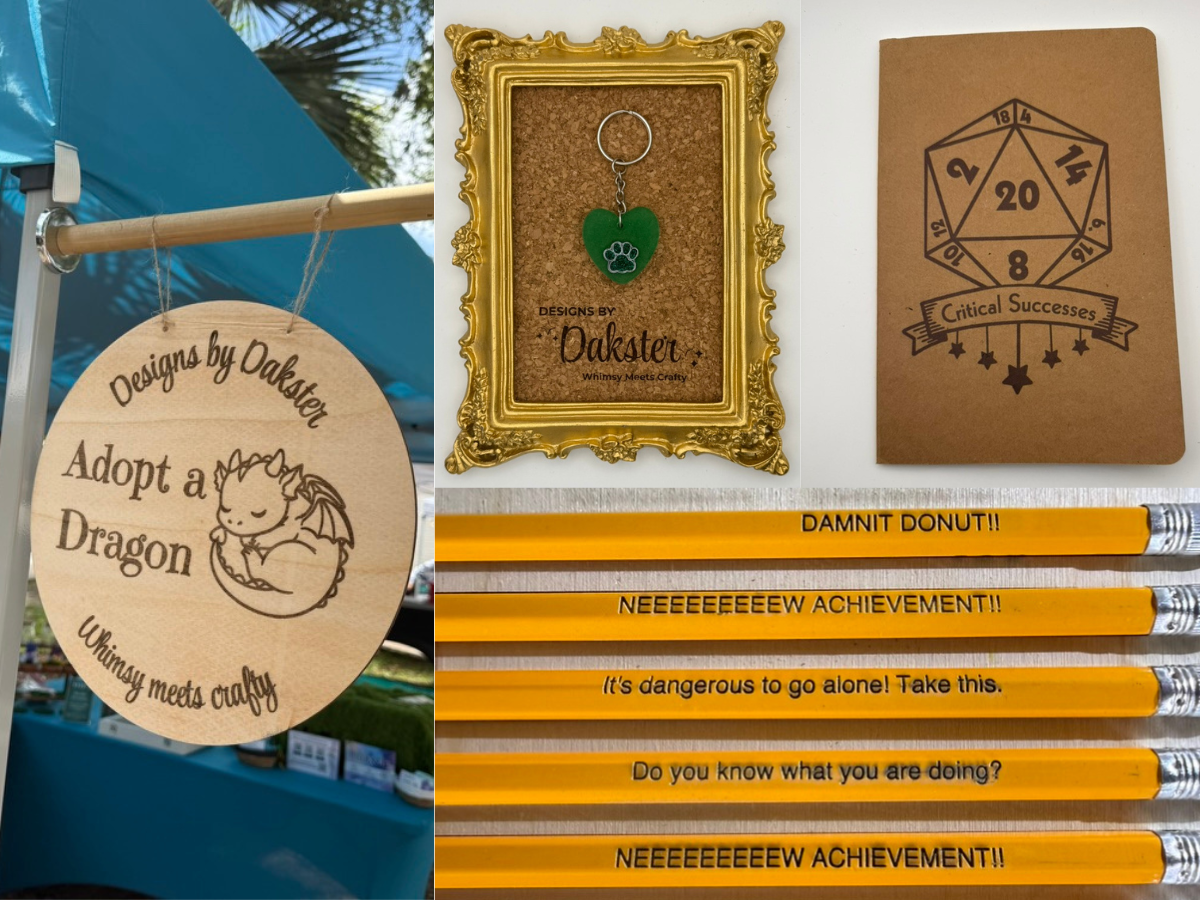
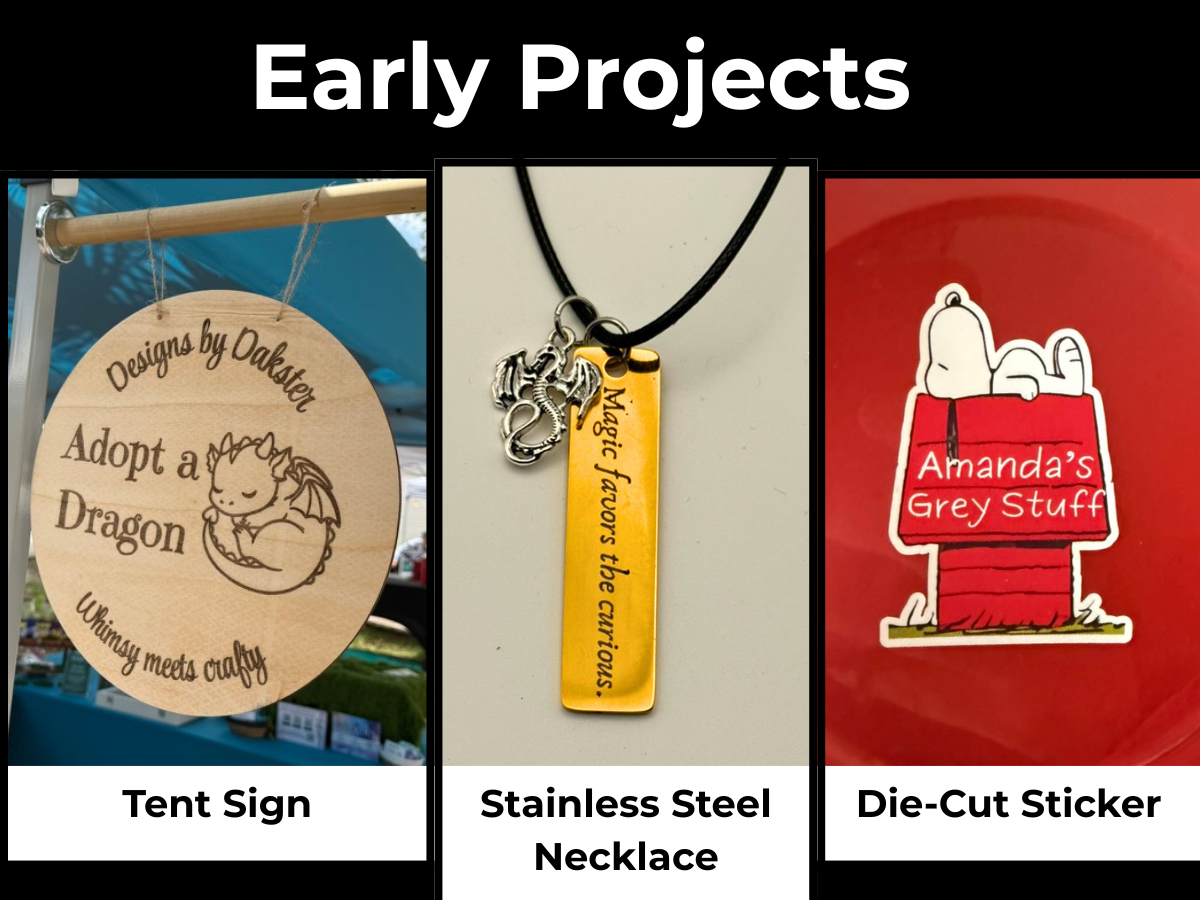
I make custom kraft notebooks, pencils, and stickers to sell at markets alongside my resin art. I also use MDF board to make keychains. The print feature lets me print and cut my displays, including a really cool outside tent sign to draw in the crowds.
Crafters
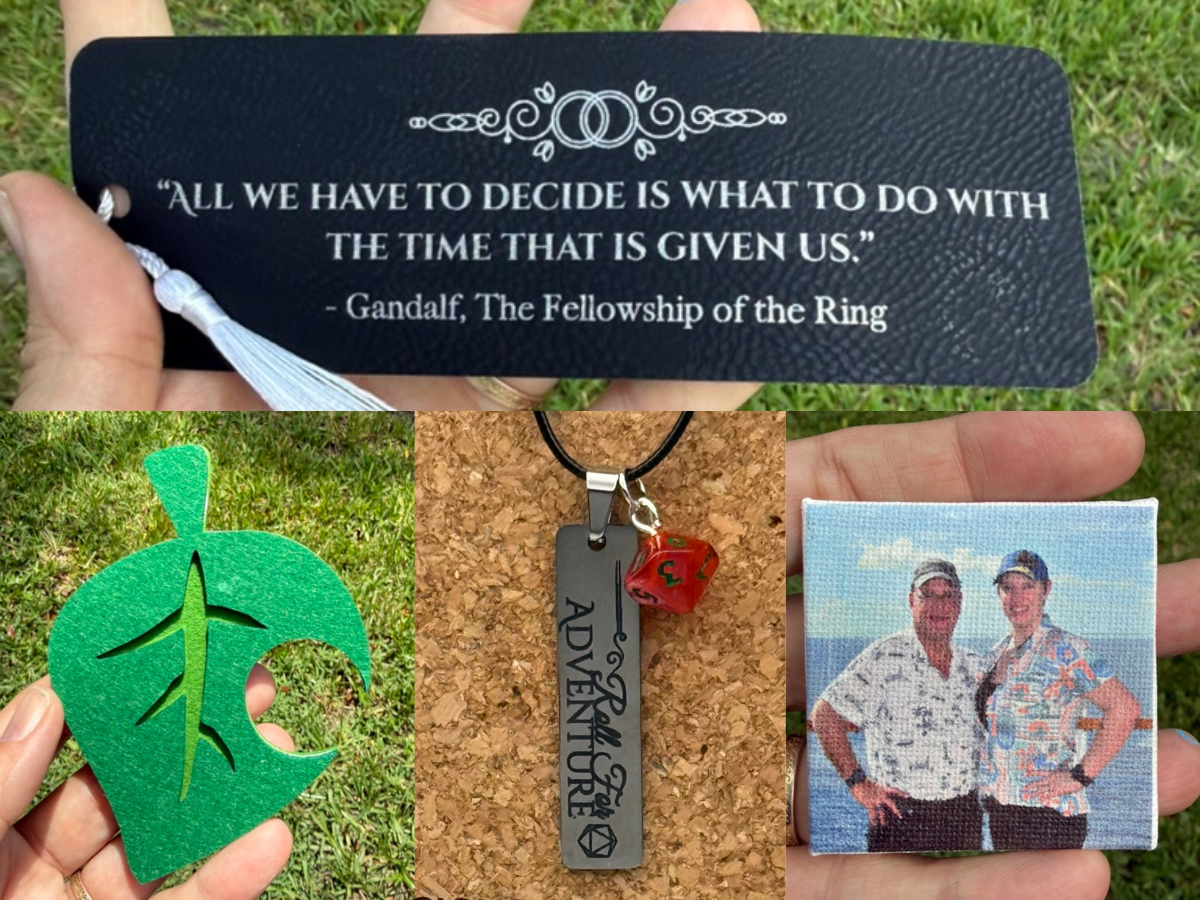
Craft enthusiasts will enjoy the variety of materials they can play with and the countless projects they can make. It’s fun to experiment with the different materials and come up with gifts for my friends and family.
I’m mildly addicted to engraving the stainless-steel necklace tags that xTool provided. I’ve enjoyed coming up with different phrases that suit my mood and, in under 10 minutes, have a new accessory to wear. I do my design work in Canva, but I could easily do it in the xTool software.
Who Is It Not For?
It’s difficult to say who this machine is not for. A few demographics that come to mind are:
- Crafters who primarily cut adhesive vinyl or heat-transfer vinyl (*see PVC note below)
- Anyone who lives in an environment where proper ventilation isn’t possible
- The “set it and expect it to work on the first try” crowd
The last is important because you should do a grid test with new materials you haven’t worked with before. This helps you dial in your settings so you don’t waste precious time or materials on figuring out the settings. You need to be open to experimenting and looking at a project that didn’t quite turn out right as a learning moment.
When it comes to deciding if you need one in your home, I view the M2 the same as a 3D printer. You don’t realize how much help you would find it until you have access to one. Once you have one, though, you will be engraving, cutting, or printing on everything.
* Important PVC Note: PVC-based materials should not be cut with a diode laser because it can put out toxic fumes that are harmful to you and potentially damage the machine. Always check with your material manufacturer to ensure that there is no PVC in the mix. It can be found in faux leathers, sticker paper, vinyls, and more. According to Google, if you see Recycling #3 on their information sheet, you can assume it has PVC. Always check with the manufacturer to be sure.
What Can the xTool M2 Do?
Depending on the installed module, the M2 can transform over 300 materials, including my favorites: wood, leather, fabric, paper, glass, and metal. You can also work with certain types of acrylic and ceramics.
A few projects I’ve enjoyed making are:
- Personalized notebooks
- Custom stickers
- Engraved cork display for my market table
- Stainless steel necklaces
- Canvas prints of my favorite photos
- Wood tent sign for markets (this was one of my first projects)
- Name tag holder keychain for my husband
- Engraved mirror, created by using the laser to remove the coating from the reverse side so the design shows through the front
You can also cut certain colors and types of acrylic. Acrylic is not my favorite because even with the desktop filter system, you can still smell some of the fumes, so I don’t work with it that often.
My favorite project so far has been engraving my logo onto a cork board for displaying necklaces. I put it in a gold frame, and it instantly upgraded my setup.
What the xTool M2 Can’t Do
While the xTool M2 is a lovely versatile machine, it’s not for every project. Even with the variety of laser heads and materials, there are restrictions right out of the box. Some can be overcome with accessories, and others are a bit more challenging.
Blue Diode Laser Facts
The 10 W and 20 W laser heads are blue diode lasers, so they cannot cut clear acrylic and are unsuitable for certain light-colored or reflective materials. Clear, white, and some blue acrylics do not absorb the wavelength effectively.
Height Restriction
Flat projects have a 1-inch height restriction. If you have the rotary attachment, you can work with taller compatible objects.
xTool Studio Learning Curve
If you have never worked with a laser before, there is a bit of a learning curve with xTool Studio. I’ve worked with one other laser brand in the past, and while that machine taught me the basics, it didn’t fully prepare me to dive into this machine.
When you first get into the software, xTool does a great job of walking you through the steps to your first project. If you forget something, it’s easy to find your way back to the tutorial (or if you skip it by accident like I did, whoops). xTool also has an academy linked in the software for you to follow and learn the machine and software.
My First Impressions
The first hour with a product can tell me whether the machine will become part of my workflow or not.
After I opened the box, the meticulous care with which it was shipped, along with the QR codes on all boxes and materials, gave me clear instructions on how to get up and running quickly.
Overall, I’d say it took about 45 minutes to go from opening the box to having it in place and ready to do my first project. Keep in mind, I did some reading on what to expect before it arrived. I wasn’t walking into this blind.
When I got into the software, it walked me through everything, including a laser safety module that is strongly recommended that you complete before working with your first project (I love this attention to detail for safety).
My first project kind of flopped because I assumed when I loaded it in that it would have the correct settings already selected. Instead of cutting it out, the software just scored the edges, leaving me with a keychain engraving on a piece of wood.
Lesson learned: check my settings when importing a project and don’t assume it’s all correct.
Once I realized my mistake and double-checked the settings for the second project, it went smoothly and a lot faster than I anticipated. xTool communicates directly with your device over Wi-Fi or a cable connection, which helped to speed things up.
My Favorite Feature So Far
My favorite feature so far has been Print-then-Cut.
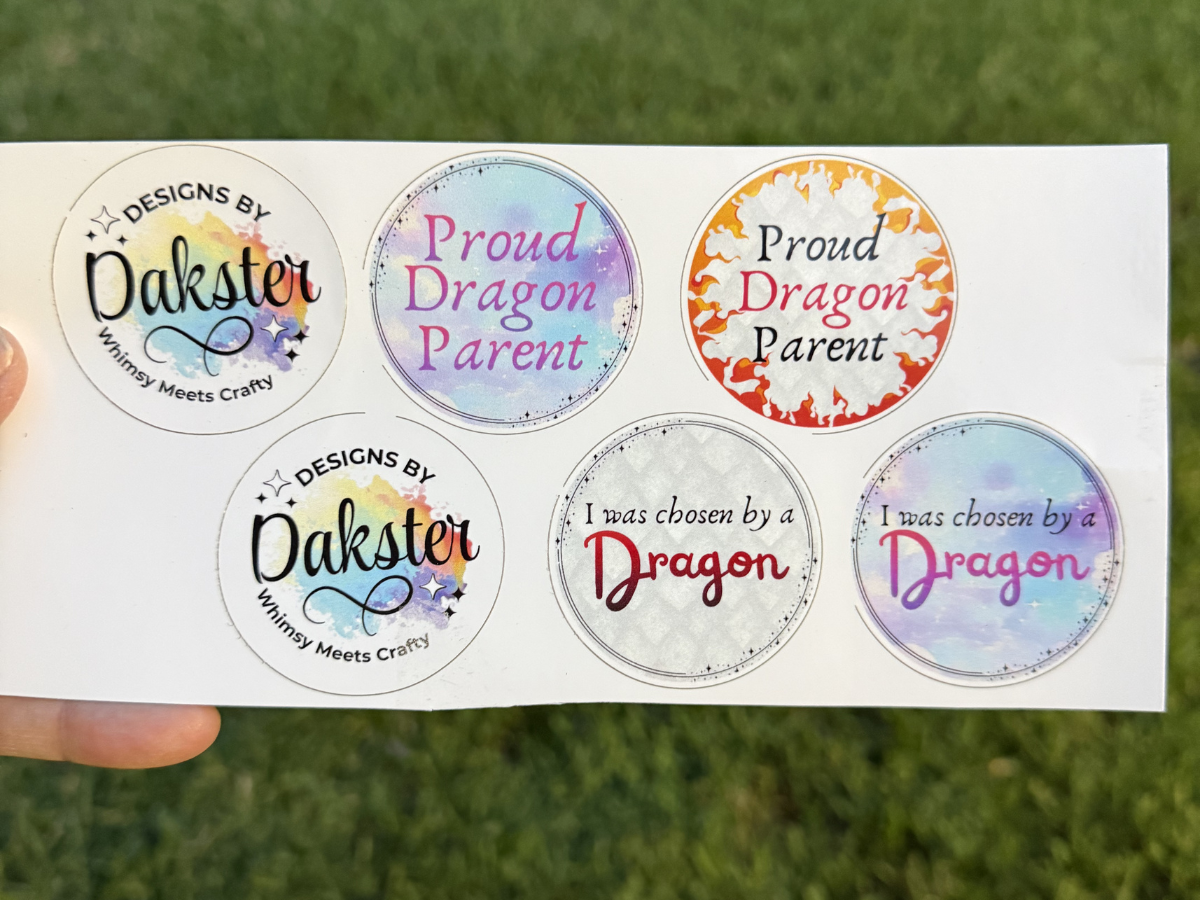
Before the M2, I had to use my Cricut and desktop printer combined to do custom die-cut stickers and packaging for my business. It wasn’t the easiest setup because of my limited space and the cost of the ink cartridges for my HP printer. Cricut’s Print Then Cut also wastes quite a bit of material, so I never found it a practical way of getting things done.
I’m absolutely loving how I can design a sticker sheet, print it out, and have the machine cut it for me in one shot. I’ve made custom stickers for my husband’s co-workers’ birthday treats, as well as products for my business, with less stress and fewer headaches than before.
The best part is that the ink is cheaper than my HP DeskJet printer. Replacing my inkjet cartridge costs about $65 for tricolor and $64 for black. The xTool print cartridge is $100 (at the time of this post) and, depending on your ink coverage settings, can get you up to 800 pages out of it.
What I Want to Test Next
It’s safe to say this isn’t the last you’ll read about the xTool here on GeekDad. I have a series of posts planned leading up to Christmas, including a gift guide of projects to make for friends and family.
I plan on answering questions like:
- What accessories are worth adding on?
- What are realistic expectations for making and selling with the M2?
- What blanks are worth the money, and projects to make with them (complete with settings to test out)
I’ll also be doing a deep dive into the xTool software and everything you can do with it.
We will be covering more than the basics with tutorials on how to set up, execute, and finish projects that are not just for fun but could help you earn a little extra money (we are going to make the M2 earn its rent).
In the near future, I’ll also be checking out xTool’s latest release, the xTool O1 Omni Printer, and seeing how well it works with the M2 workflow.
Final Thoughts
These past two weeks, I’ve made fun projects and useful tools for my business. The strongest advantage the M2 has is that it lets me print, laser-cut, and engrave a wide range of materials.
For my personal and business use, the M2 has helped reduce a multi-machine workflow into a single workspace. In my next post, I’ll be covering whether that reduced workflow translates into products that can help the M2 earn its place in my workshop.
The xTool M2 Color Craft Laser Cutter & Engraver is available on xTool’s website with a range of bundles starting from $569. For this series of posts, I’ll be using the materials found in the xTool M2 Deluxe Bundle and M2 Multi Material Starter Pack.
See you in part two!
Disclaimer: GeekDad was sent a machine and materials to use for this review.