
I’ve long been a fan of Heroforge for its superior ability to create a character in custom gear, poses, and even the ability to add spells, animals, and color to your miniatures. I have had some trouble over the years, however, as many items, poses, and effects can create unwanted effects. Wands held like pencils, dresses which don’t connect in the midriff, and an inability to alter shape, scale, and position freely meant that some designs just weren’t possible. But there’s good news to be had: Kitbashing has come to Heroforge, allowing users to add effects like you’ve never seen on Heroforge! This tool is in Alpha and available to Heroforge Pro Subscribers.
What is Kitbashing?
Kitbashing is a term from the toy and model-making communities which refers to taking more than one kit (such as model car kits) to build a new, customized option. If you want a toy of your OC (original character), you might start with one toy as a base, and add elements from other toys to customize your character. For example, you might want a pistol-wielding ninja in a white/light theme. You might start with a G.I. Joe Storm Shadow model which has a white ninja-like costume. Since this toy doesn’t have pistols, you would need to kitbash (use another kit’s parts) to provide a pistol, holster, and ammo packs if desired. Kitbashing can get much, more detailed, including painting, soldering, and casting or molding original parts. This can be a huge investment of both time and money, which is why I’m so excited that Heroforge offers it as a feature now, so I don’t have to destroy another mini to glue its weapon, head, or other parts onto another figure to make what I want.
Design Like a Pro
The only requirement to being able to design Kitbashed figures is being a Heroforge Pro subscriber. This also grants the user access to exclusive design elements, tools, token generators, and more. Check the Subscriptions page for full details and pricing.
Kitbashing Core Features
There are a number of core features that make the Kitbashing feature actually worth using on Heroforge, and we’ll dive into each of them. The first is an all-new figure skeleton. The second is vector manipulation, including changing scale, distance, and position in a fully 3-dimensional capacity. The third is the ability to add individual items, creatures, and spell effects without restriction to location. Finally, we have the ability to remix items into new items, creating things not previously possible with Heroforge’s library.
Skeleton
The skeleton is a newly customizable structure inside the model’s head, body, limbs, and clothing. This skeleton allows us to change the creature from the inside, meaning we have seriously detailed control over what our minis will look like. It also can help us place gear, spell effects, or other items and attach it to one of the visible joints in the skeleton. For example, I can attach a knee pad to a knee, and when I move that leg in further customization the knee pad will move with the piece, and retain its orientation in relation to that point. Likewise, a spell effects placed through kitbashing can be attached to an item, finger, or other point on the figure, securing that part of the design while you play with other elements.

When an item or creature has a skeleton, it can look a little different. For example, wings on familiars require using the normal posing tools, but their head, neck, legs, and tails are all controlled with the skeleton feature. Cloaks, capes, dresses, skirts, and other large pieces of fabric have their own skeletons, each of with requires a little experimentation to master. Each of these types of skeletons are useful if you’re trying to get just the right look for your character.
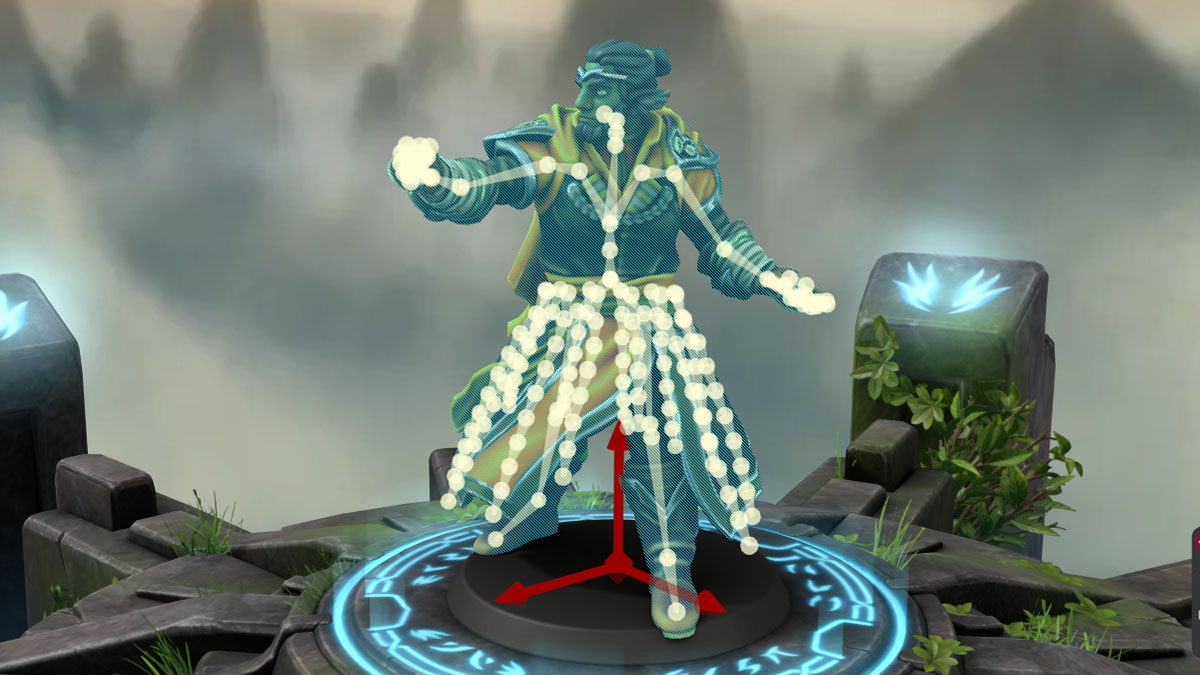
Vector Manipulation

The vector manipulation feature allows you to select a point on the skeleton, or an item, and change the orientation, location, size, and relative position of that piece. In the picture above, you can see that the default position for a wand is to be held like a pencil, even when a spell effect is added to it. If you don’t like that, just unequip that item, and drop it in with kitbashing. You can customize the handshape of each hand in the pose section, so just give yourself a grip and move the wand into the orientation and location you like, as shown in the middle. Finally, this is a Forestguard base model, which is larger than usual, which means the wand appears very small. To fix this, we switch to scale, and voila! No more pencil-pose. Our wizard has an appropriately scaled, posed, and positioned wand. It’s even connected to the hand in the skeleton menu, which means it will follow that hand unless we detach it. This means we can add spell effects or other customizations without fear of them all being left behind when we adjust the height of the arm.
Adding Items
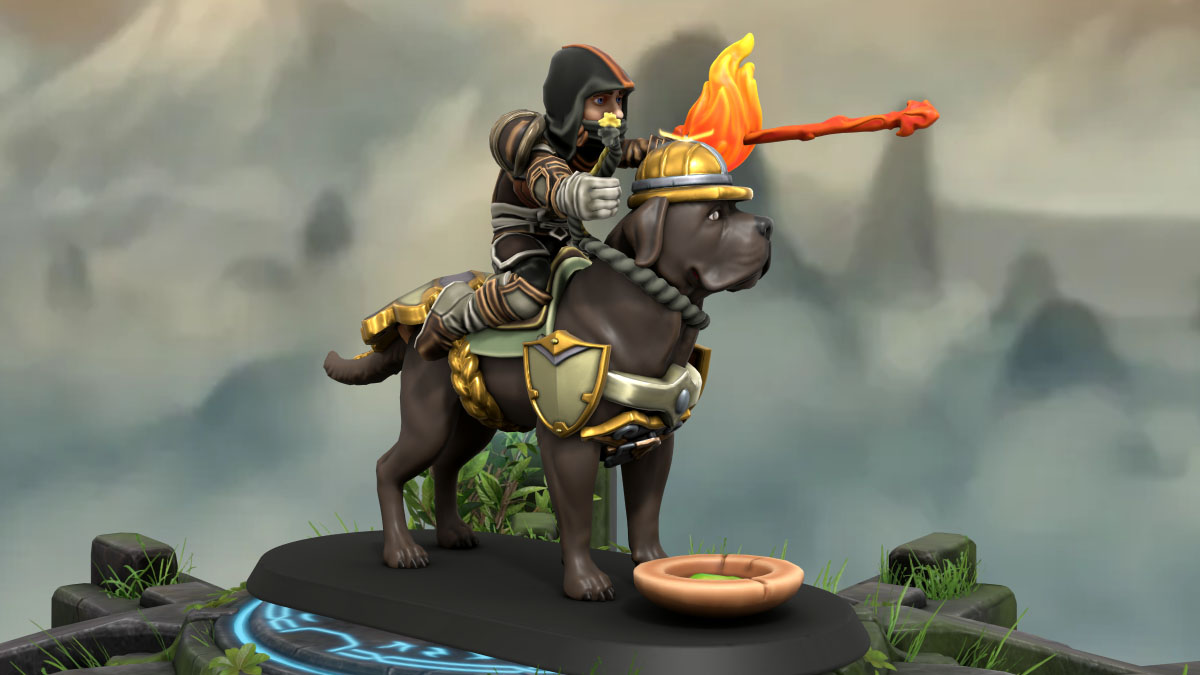
The item library on Heroforge is expansive, but not all items are able to be placed through Kitbashing currently. This is mostly due to each item needing to be recreated in a way that makes it compatible with kitbashing, so I expect that there will eventually be 100% overlap. As it is, most items are available to add, including pets, familiars, weapons, pauldrons, and more. I will note that you can’t place an infinite number of pieces, so anything you can place through the regular equipment panels will save you precious slots. For example, the above image includes over a dozen added items to create the double spell effect, mount barding, etc. If I had placed the fire ball, saddle, or character equipment using the kitbashing menu, I wouldn’t have had enough slots to include everything.
Remixing Items

If we want an item that is not available from the Heroforge, you can create your own by remixing other pieces. In the photo above, you can see a couple of examples of this. I wanted a gem belt buckle, which is not currently available, so I enlarged a gem, and placed it at the belt line. You can see on the right that I was able to also attach it to the spine, meaning it will move with the figure. Unfortunately, I’ve also attached the remixed sword-summoning effect to the same point. This is very easy to fix, as you just drag it to the point to which you do want it to be attached, or you can just detach it from all other pieces, and attach the smoke effects to the sword, so they stay together but aren’t connected to the figure. You can also see a pair of journals in the right hand. This is actually a remixed item! The model is holding a playing card equipped through the Gear menu, which gives me the hand shape I wanted. Then I placed the journals, and scaled them, so that they encompass the card, fit in the hand, and are settled the way I like. I show this because using the default model behavior can sometimes give you results which are tricky to recreate on your own.
Example: Snow White
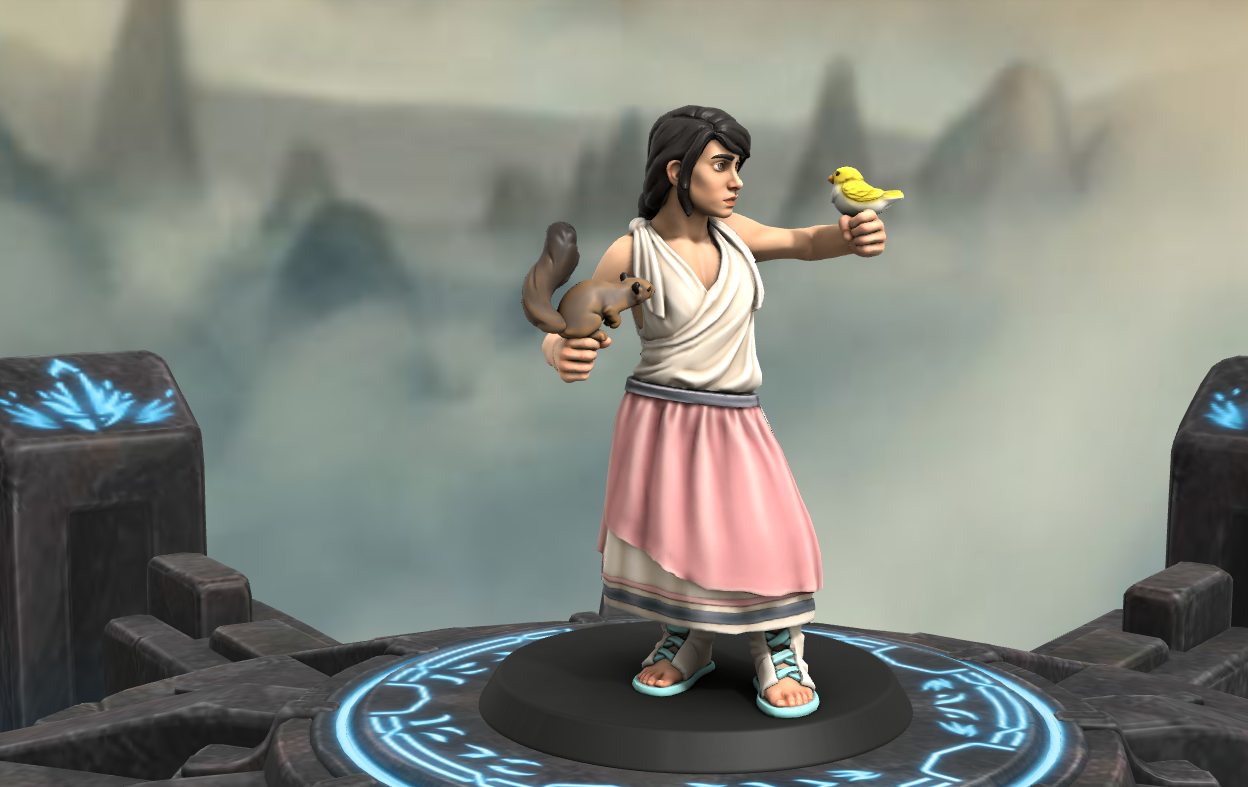
Here I’ll show how these features can come together to create something impossible with the normal design process, using Snow White as my inspiration. In the image above, you can see that we have a girl dressed as a peasant, holding two animals. Since Snow White was known for singing and speaking to animals, this is a solid start. Peasant clothes are a natural choice since she’s in hiding, but there’s not a lot of magic in this image, so let’s create a piece which can tell more of the story using Kitbashing.
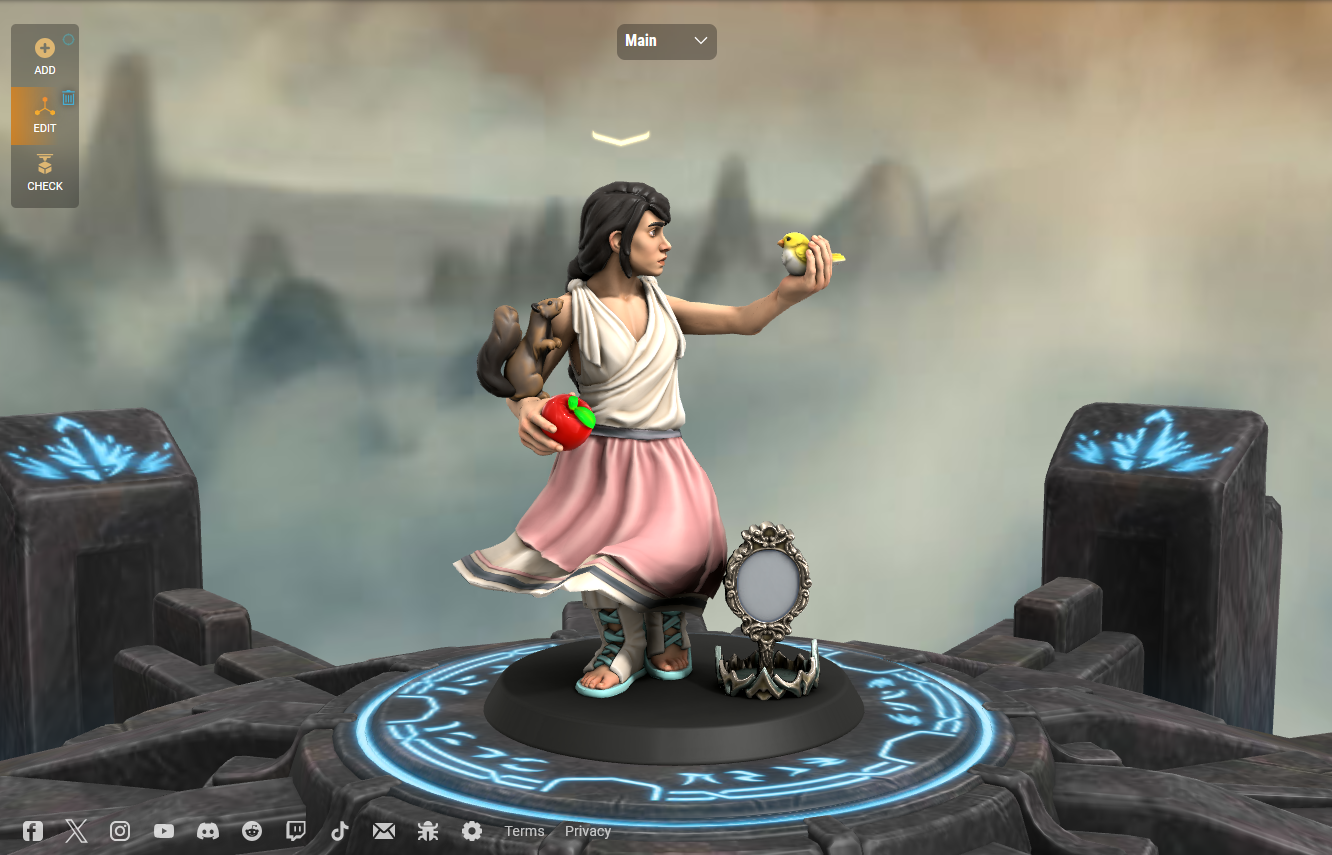
In this image, you can see that I’ve used the dress’s skeleton to create movement, because spooky wind is big part of the suspense in a few scenes. I put an apple in her hand for obvious reasons, but I kept it red since Snow White doesn’t know it’s a poisoned apple, but I gave the leaves a too-bright green to hint at the supernatural nature of it. I was able to place the animals in new ways, so Snow White is holding the bird, and the squirrel is climbing her. The squirrel itself is stretched a bit by manipulating its skeleton, so it looks more eager, and less passive. I turned the bird to face Snow White directly, so it looks like it understands her. Finally, I added two iconic items which tell parts of the story. The crown is on the ground because Snow White doesn’t care about her crown, she cares about being safe and happy. The mirror is polished, but blank to represent how uninterested in her appearance Snow White was. The thing the Queen wanted so desperately was entirely beneath Snow White’s notice, because she’d rather experience the world outside herself.
All in all, the kitbashed version of this model is a much more narrative-driven design, able to capture more of the complexity of the character being portrayed, and the themes that character will have to face.
Example: Gall Tannic, Druid
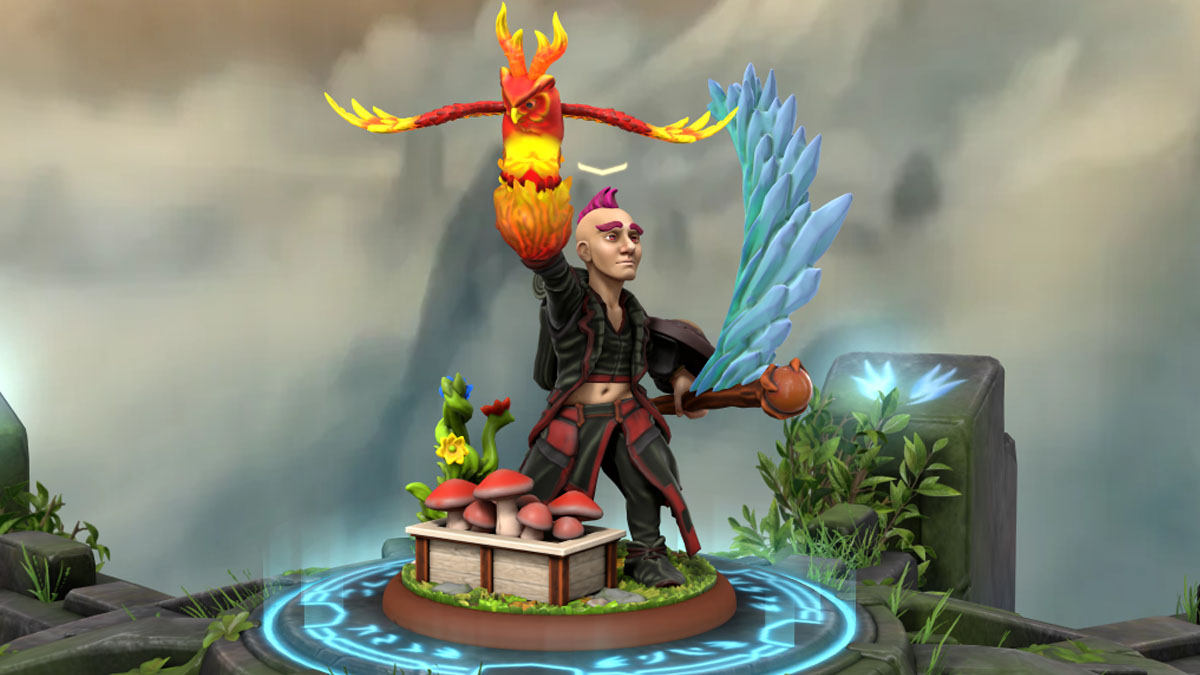
In this example, I took a standard halfling and kitbashed it to illustrate my original character idea. Gall Tannic is my small human druid (using the new species traits from the PHB 2024), and is a highlight of his powers as a nature priest. The pose is more of a twist than is usually possible, and the clothes (especially the skirt) are adjusted to hang naturally. I set the character off-center to make space for a planter box and several bunches of mushrooms I was able to arrange into said box. I have a plant spell effect coming up from the ground behind the character, which normally has to be connected to a hand or weapon. As for Gall’s actual gear, I kitbashed a simple shield to create a buckler, which is an item I’ve always wanted in Heroforge customizations, and placed a water spell effect which normally doesn’t look good on staff items, but re-positioned it to create the sense of motion I wanted to capture. Because gall is a Wildfire Druid, I wanted the Produce Flame effect on the right hand, along with the wildfire spirit I’ve bonded with. I used a couple of fire effects to create the fireball, and customized the owl to have the wings, horn, and pose I desired, and I had my character ready to print.
Printing
I want to note that there are inherent risks when printing a kitbashed figurine. If your kitbashed figure has items, poses, or arrangements which are extra delicate, they may break or fail to print. Because of this, Heroforge reviews kitbashed designs to ensure the piece is likely to succeed before printing and shipping. However, this does not mean they are guaranteed to survive shipping.
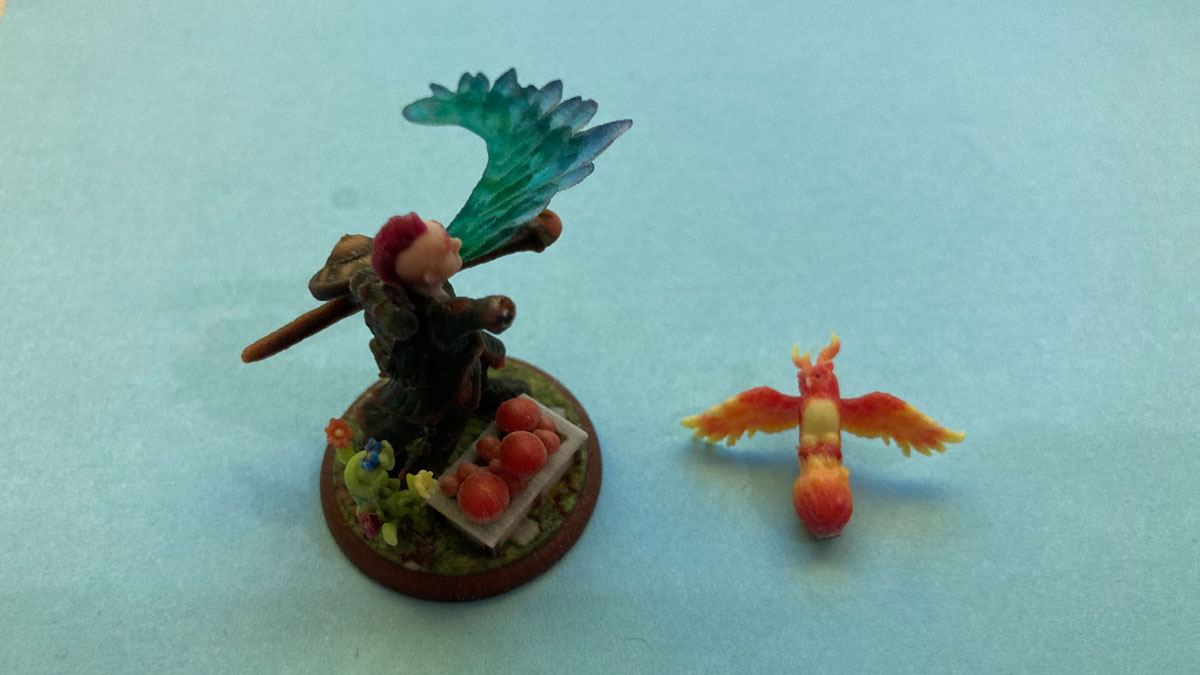
As you can see, the print of Gall Tannic was damaged in shipping, which will require me to reattach the fire elements. This is not typical, however. My box was nearly destroyed during shipping, which Heroforge could not have predicted or controlled. As this was a review unit, I did not ask for a replacement, but their team has a reputation for treating people fairly. Just double-check your designs before ordering them, because thin places, especially long thin areas, are more likely to break during shipping even when packed well.
TL;DR
Heroforge’s new kitbashing feature gives unparalleled customization options to figurines which can be printed, rendered digitally, or turned into tokens. Remix items, create unique scenes, and much, much more with this powerful new tool. Just be sure to create solid connections to prevent breakage, and get to bashing. This feature is available on Heroforge now, but the tool is limited to Pro Subscribers. Anyone can print a kitbashed mini from a link, however, so you can share your builds with your friend even if they aren’t subscribers. Get out there and enjoy the fact that the most customizable D&D mini is now even more versatile.


