
At the end of my last post, I told you that we had failed at the last scenario of Deck 2, but we were going to try again. Well, it went much better the second time around. It turns out that having the Banner of Valor (which we got during the first attempt) is a huge help, because it gives you a boost when fighting demons. This time around, when we went to close the Chasm of Shadows, we had the Banner of Valor to help against the Demonic Platoon, making it so much easier.
We took down big bad Eustoryiax, though we did not manage to close the Corruption Forge a second time to redeem Ekkie’s other corrupted weapon. Balazar got the Ring of Forcefangs loot, which can be used either to protect from damage before or after you act, or can be used for combat. In combat, the ring recharges to use Arcane and two d4, plus you can recharge any number of additional cards to add a d4 per card. Although those aren’t huge dice, it’s a great way for Balazar to churn through his deck–normally he puts a lot of cards back onto his deck and so he doesn’t get through everything until he’s almost dead.
Okay, then: on to Deck 3: Demon’s Heresy.
Please note: Spoilers ahead.
One interesting thing we noticed as soon as we opened up the box to sort out the cards was that, in addition to the usual sets of cards, there was a new character: Arueshalae. I didn’t see anything in the scenario rules about why she was in there, so I did a little searching. It turns out that there’s a location, the Tower of the Fourth Sphere; if you permanently close it and succeed at the scenario, then you “unlock” Arueshalae and she’s a playable character. More on her later.
The other significant difference for this adventure is that you can play the first four scenarios in any order you wish, and then you must play the Ivory Tower last. Since Wink had expressed some interest in playing as Arueshalae, we decided to start with “The Demon’s Redoubt.”
Scenario 1: The Demon’s Redoubt
In this scenario, we’re after the hag cleric Jaruunicka, backed up by Derakni henchmen, who are like giant flying scorpion demons. Scary stuff.

The setup for this one is a little different. There’s one fewer location to start with (in our case, 6 instead of 7), and the Tower of the Fourth Sphere shows up after you permanently close 2 locations. The other nasty part is that, after you build the decks as normal and shuffle in the villain and henchmen, you put a Grimslake henchman on top of every deck.
The Grimslake is not a nice creature: it’s a giant maggot-like thing, but with a spiky tail and creepy mandibles and a whole lot of teeth. And did I mention there’s one in every location? It also forces a Constitution/Fortitude check for every character at your location–fail, and you bury cards from the bottom of your deck–you know, those really great cards that you can recharge when you use them. And if you don’t defeat it, you bury the top card of your deck, too. Like I said, nasty. It’s a hefty Combat 22, or Survival 12–and unfortunately for us, our party is bad at Survival checks, because only Adowyn is able to pull it off.
We did pretty well with this scenario, though. Adowyn had a whopper of a first turn at the Guardpost–she used her Fortune Teller ally to encounter the Grimslake for free, defeating it with Survival. Her first explore was a Sickle weapon, which she didn’t get (and didn’t want), and then the next was the Derakni Henchman, which she was also able to defeat. Finally, she summoned and encountered the Corrupted Soldier, permanently closing the location.

After that, we knew that both the Grimslake and the Derakni were not creatures we wanted to encounter while a bunch of people were at the same location (particularly with our poor Wisdom skills), so we spread out. We were able to close out a second location quickly, adding the Tower of the Fourth Sphere, which we wanted to finish so we could gain the Arueshalae character. Since there are no henchmen in it, you have to plow through the entire location to close it, but it was worth it for the reward.

We did encounter Jaruunicka, the villain, before we got enough locations closed, so she escaped, but we managed to find her at the Citadel when we closed it (by fighting another henchman). We still had plenty of time in the Blessings deck to set ourselves up and cover the other locations, and then sent Ekkie after her with lots of additional Blessings and a shot from Adowyn’s bow.
The loot from this scenario is best-suited for Arueshalae, the succubus spy we rescued from the tower. They all have the Desna trait, and have various abilities when you reveal Desna cards in your hand. If you choose to take Arueshalae, you get to level her up to match the rest of the party, and also pick a Mythic path for her. Wink decided to swap her out for Shardra, and we built her deck and leveled her up. She’s a ranged fighter with a lot of Charisma (and Diplomacy!), and has some immunity against Electricity, Fire, and Poison. She can also evade encounters automatically. Her big bonus is a Cohort card called Arueshalae’s Gift–she can display that in front of another character, placing a token on it to boost any of the core skills by a d4, and then return it to her hand at the start of her turn.
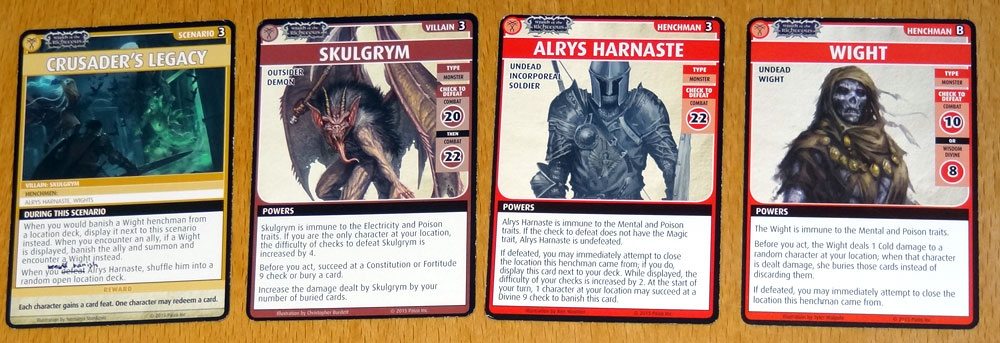
Scenario 2: Crusader’s Legacy
In this scenario, we’re up against Skulgrym, an ugly winged demon. The story is that Alys Arnaste was a crusader who died near his family crypt, and his ghost has been trying to get to its rest for centuries, while Skulgrym chases him around the ghost town of Sesker’s Gully. The way this plays out is that Arnaste is one of the henchmen (along with a bunch of Wights), and if you would banish Arnaste, he just gets shuffled into a random open location, running around until you finally beat the scenario.
The other special rule is that if you would banish a Wight henchman, it goes next to the scenario card instead—and from then on, every time you would encounter an Ally card, you banish it and face the Wight instead. It truly is a ghost town. We were hoping to find and acquire some allies before encountering a Wight—Ekkie went to the Cell, where there are three allies. But instead, she ran into the Wight. Since it was so early, we decided to use her evade ability—that meant the Wight got shuffled into a random other location and we would have to plow through the entire Cell, but at least we had a chance at getting some allies first.

Well, then on the second turn Adowyn went exploring the Wounded Lands and found Skulgrym—too soon! He’s a double-fight villain, and gets even harder if you’re the only person at your location, and forces you to bury a card unless you can pass a Constitution Fortitude check. He also does extra damage for every buried card you have—combined with the Wight’s card-burying effects, we could see that this could be a very nasty scenario. Fortunately, we were able to defeat Skulgrym by throwing a lot of resources at him. He fled.
Arueshalae was able to close the Abyssal River after defeating a Wight (too bad—no more allies for us!) and discovered that Skulgrym had fled there. So we spent some time getting other locations closed or at least covered before taking him on again. Ekkie ran into Alrys Arnaste in the Cemetery, appropriately enough—but if you close the location after defeating Arnaste, then he haunts you: instead of getting banished, he just follows you around, making all your checks harder until somebody at your location does a Divine 9 check to banish him… at which point he just goes back into some other random open location.
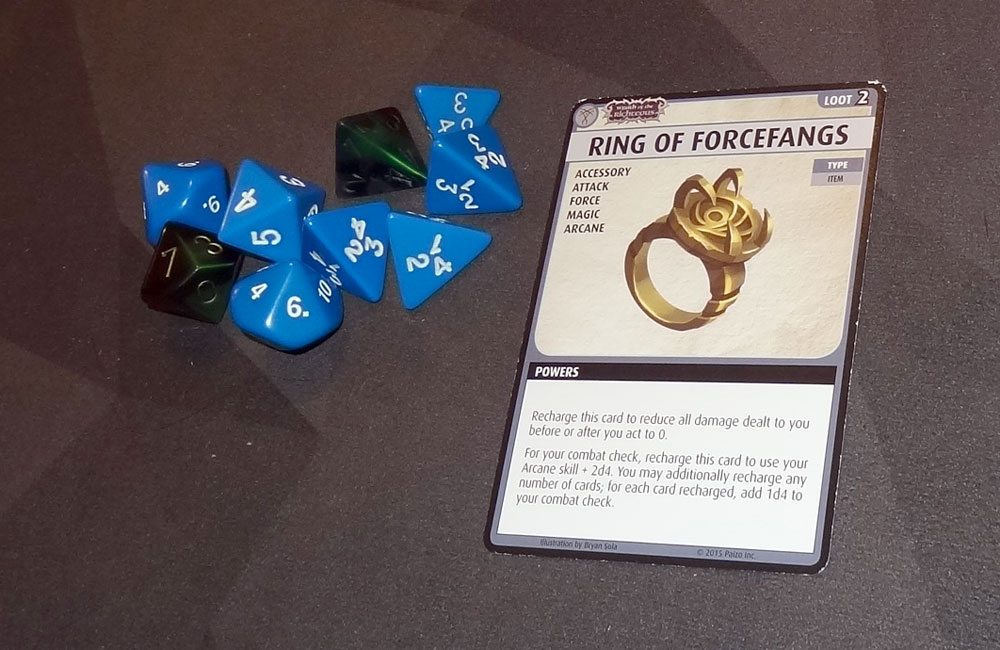
Once we had Skulgrym’s location, though, it was just a matter of getting things lined up. As Balazar, I did get a chance to use my Ring of Forcefangs: it uses my Arcane skill and 2d4, plus I can recharge any number of cards from my hand to pile on even more dice. Between that, the Banner of Valor, some blessings, and a big boost from Glibness spells, I was able to do some massive damage.
The reward for this scenario was that everyone got a card feat (one more card in the deck!) and Ekkie was able to redeem the Soulshear weapon.
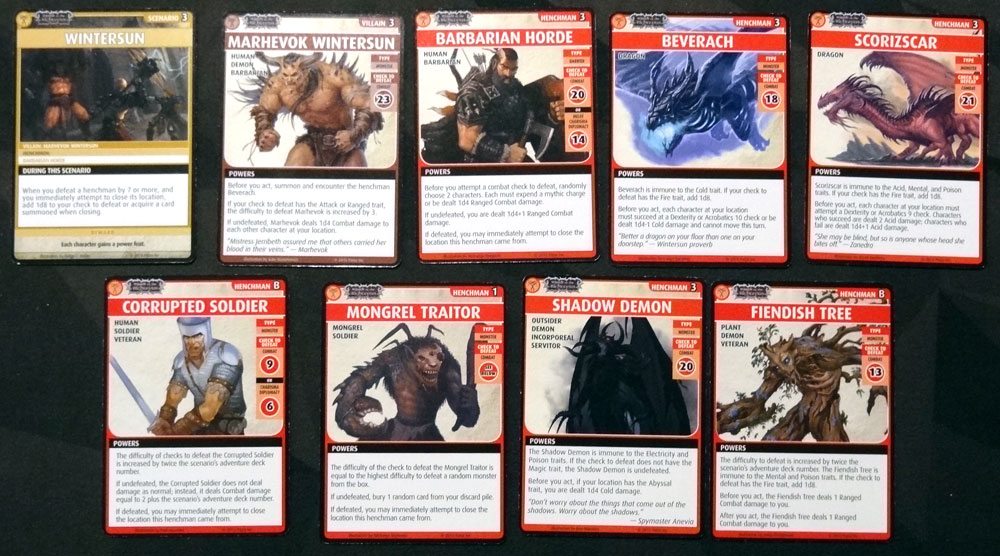
Scenario 3: Wintersun
The Wintersun barbarians stayed in their homes when the Worldwound opened, and the years have not been kind. Marhevok Wintersun, their leader, is a bit… prickly. This scenario also includes two dragons! The special rules in this scenario are that if you defeat a henchman by 7 or more, you get an extra d8 if you have to defeat or acquire a card to close the location. That’s nice, because 5 of the 7 locations we had required summoning and defeating a henchman in order to close.

The scenario wasn’t too bad overall, just a lot of fighting involved. We sent Adowyn to the Woundwyrm’s Lair: any time you encounter a boon there, you have to summon and encounter Scorizscar the dragon first, but Adowyn is very good at evading summoned monsters. I like the idea thematically, too. You’re digging around in the dragon’s lair? Of course it’s going to show up whenever you try to get some loot. What’s funny is that even after the location is closed, if you stick around, you must summon and encounter a random item, and then summon and encounter Scorizscar at the end of your turn.

The Barbarian Horde is a nasty henchman: before the combat check, you randomly choose two characters, who each must spend a mythic charge or be dealt 1d4 Ranged Combat damage. They’re slightly easier to defeat with Melee, Charisma, or Diplomacy (Barbarians aren’t impressed with your Ranged Weapons).
Thanks to Adowyn’s power, we were able to avoid a lot of the extra summoned monsters—Adowyn can evade on her own by recharging cards, and let other characters evade by discarding cards. Marhevok, for his part, summons Beverach (another dragon) before you get to fight him, but it’s a lot easier to discard one card than gear up for a fight.

Once we got Marhevok pinned down, Ekkie went after him with her Un-Unholy Aspergillum (one of the corrupted weapons that we’d redeemed) and spent all of her mythic charges just to rub it in. Done! Our reward: everyone got a new power feat.

Scenario 4: The Fallen Fane
In “The Fallen Fane,” Zanedra is trying to summon something bad. So of course it’s up to us to stop her.
The hardest part of this scenario is getting everything closed—there are several Abyssal locations (including the Abyssal Rift, which is never permanently closed), and whenever you encounter a henchman or villain at an Abyssal location, you have to do an Intelligence Knowledge check or else you get sent to a random non-Abyssal location and the fight is evaded. Arueshalae has a staff that allows her to ignore the Abyssal trait on a location, so we decided we should send her to the Abyssal locations first. Enora is also really good at Knowledge checks, so we figured she could also work on those, but the rest of us tried to stick with the non-Abyssal locations first.
Arueshalae did find an Ivory Templar at the Befouled Altar and got that closed. But then we ran into an Arboreal Blight barrier, summoning a bunch of Fiendish Trees, which is always unpleasant.
The henchmen for this scenario are the Ivory Templars. They’re human paladins, pretty tough at a Combat 20. What makes them tougher, though, is that if the top card of the blessings discard pile is Corrupted, you can’t play blessings against it. Also, if undefeated, you have to recharge your hand and reset it before taking damage. Why is that bad? Well, if you have no cards to discard, you don’t actually take any damage, so sometimes we fight even when we don’t have much left in our hands since we know we have nothing to lose. In this case, though, you’ll draw a new hand of cards, so you have plenty of damage to take.
One particularly funny incident was when Ekkie encountered a Mongrel Wizard:
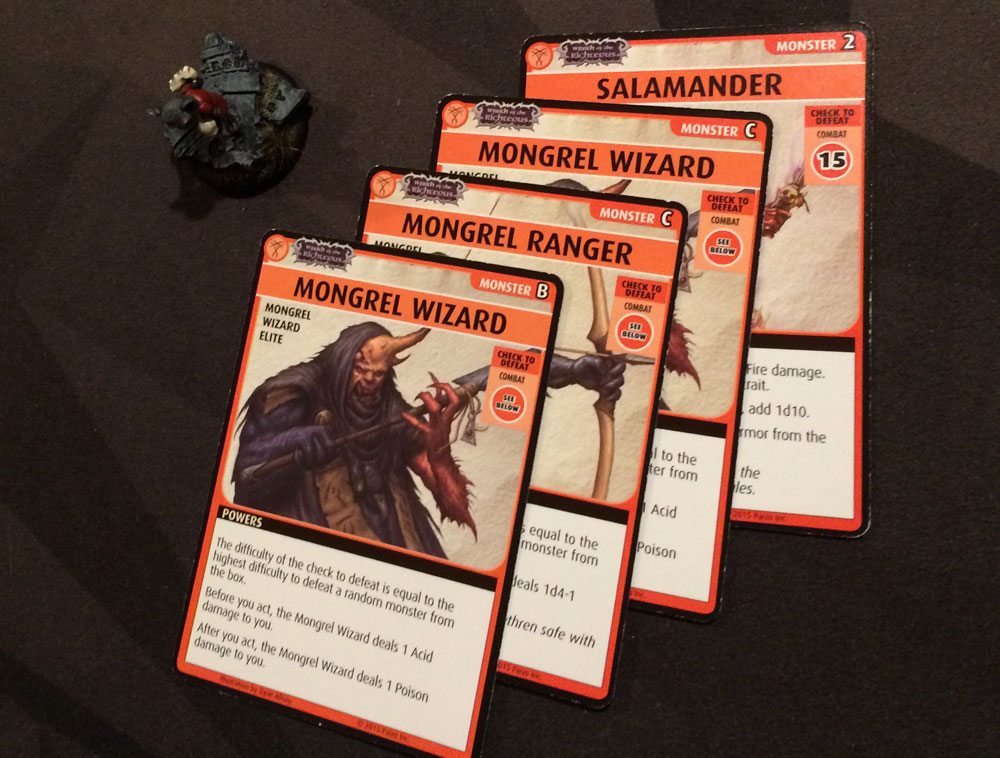
Mongrels don’t have their own difficulty levels—instead, you draw a random monster from the box, and the highest number on that card is its difficulty level. In this case, we ended up with a chain of three Mongrels before we finally drew a monster with a number on it.
Eventually, Ekkie encountered Zanedra at the Armory. Zanedra is actually three fights: first, a random character at the location gets a random monster. Then, you have to fight Zanedra’s eidolon, and then Zanedra herself. Fortunately, Adowyn can help out evading that first random monster, but Ekkie was by herself and had to do the other two fights by herself. But, hey, there’s a reason Ekkie is a Mythic Champion. Ekkie defeated Zanedra, chasing her to the Abyssal Rift.
Besides being unable to permanently close, the Abyssal Rift has a nasty habit of switching between open and closed sides, Abyssal and not. When it’s on the Abyssal side, blessings played by characters there only add a d4. But when it’s on the non-Abyssal side, blessings played add a d12. So the timing on this boss fight had to be carefully planned, but we managed to emerge victorious.
Our reward: everyone got a skill feat, and one person could redeem a card. Sadly, none of us had any corrupted cards to redeem, so we wasted that reward.
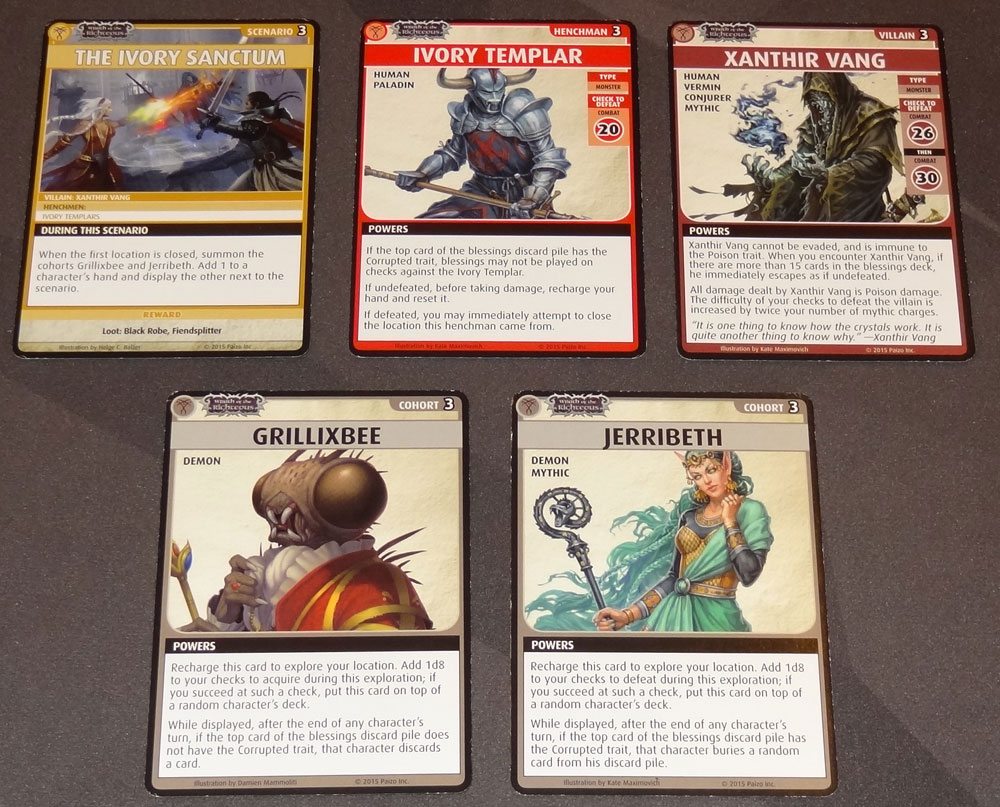
Scenario 5: The Ivory Sanctum
Finally, we came to the last scenario of the deck. In this one, the two demons Jerribeth and Grillixbee are at odds with each other, which plays out in an interesting way. After you close your first location, you get the two cohorts Jerribeth and Grillixbee. You pick one to give to a player, and the other is displayed. Each one has a bonus that it can give to a player, but each one also has a penalty when displayed. Jerribeth can give a bonus to checks to defeat cards, and Grillixbee can give a bonus to checks to acquire cards. When displayed, each has an effect at the end of your turn if the top of the blessings deck is corrupted: Grillixbee discards a card from your hand, and Jerribeth buries a card from your discard pile.
Ekkie started out in the Cavern, and thanks to her ability to draw a card whenever she discards one (and some luck in both the cards she encountered and the ones she drew), she was able to plow through most of the deck until she found the henchman, the Ivory Templar. Enora displayed her Knight’s Pennon, which was in her starting hand, and by revealing the Scribe (a Hireling Ally), she was able to add +2 to every fight. That bonus holds until somebody loses a fight—and we managed never to lose a fight in the entire scenario, in part because of that extra +2 throughout.
After the Cavern was closed, we picked Jerribeth to keep and Grillixbee to display, because none of us were keen on the idea of burying cards. As it turned out, we only encountered three corrupted blessings during the scenario, and Enora was able to use her Blackwing Librarian to ignore the corrupted trait on her turn, so in the end Grillixbee only cost us two cards. It probably helped that a lot of the blessings we’ve kept in our decks are corrupted ones.
We gave Jerribeth to Adowyn, who got partway through the Great Hall thanks to some allies—but Jerribeth did not find a card to defeat, which mean she was recharged instead of going to another player. That was the last we’d see of her for the rest of the scenario, actually. (We forgot that Adowyn could retrieve any Cohort, not just Leryn. Ah, well.)
Arueshalae also had a productive first turn. She was loaded up with a bunch of weapons and her staff, so she wasn’t going to get many chances to explore. Fortunately, she found an Ivory Templar. At Eagle Rock, all monsters count as Demons, so she was able to use her Demonbane Crossbow (extra effective against Demons), and then again to defeat the Shadow Demon to close out Eagle Rock. Two locations closed.
Enora started off in the Laboratory, and for whatever reason it just took a long time to wade through it, even with the help of her Fiery Glare spells to burn through boons she didn’t want.
Ekkie closed out the Sanctum, thanks to a Corrupted Helm she picked up somewhere, and then went to work on the Cell while Balazar and Arueshalae worked on the Cathedral of Chaos—that’s a new location in this deck, only used in this scenario, though it’s not a particularly exciting one. When you encounter a boon, you draw a random boon of the same type from the box and choose which one to encounter. To close it, you have to banish a weapon. Balazar had picked up an aspergillum and was hanging onto it to banish when the time came.
Finally, Ekkie managed to close out the Cell, finding the Ivory Templar one card from the bottom, and Adowyn closed out the Great Hall after defeating the Ivory Templar as the last card in the deck. We found the villain, Xanthir Vang, hiding in the Laboratory after all this time. The Cathedral of Chaos was the only location left that wasn’t permanently closed, so we took care of that easily. Arueshalae took on both combat checks against Xanthir, and thanks to her Mythic Champion effects she was able to ignore his powers that make him harder to fight.

Our rewards for this scenario were the Fiendsplitter and the Black Robe. The Fiendsplitter is an axe, one that adds a hefty d12+1, and can be further boosted by recharging a Blessing of Torag. It can also be discarded to check for a demon at the top of your location deck. We gave this to Ekkie, who’s our only real melee fighter. The Black Robe was tougher: it adds to your Divine or Arcane checks or protects you against 2 damage, or it can be used to bring a spell back from your discard pile. However, it’s corrupted, and every time you use it, you have to bury a random card from your discard pile. Balazar and Enora were both eyeing it, but neither of us had a lot of item slots we wanted to give up.
The other big reward for finishing the whole adventure path is that now we get to pick a role card, and check off a power feat. Each character has two potential roles, with slightly different abilities. Once you pick one, it’s a permanent choice for the rest of the game. Three of us have decided already.

Ekkie is now a Poodle-killer. I mean, who are we kidding? We knew from the start that Ekkie couldn’t turn down becoming a Poodle-killer. Sure, the Guttersnipe has some interesting abilities, but Poodle-killer. The thematic ability there is that when Ekkie acquires an Animal card, she can banish it to heal d4 cards. Yep, she grabs a potential ally, and eats it instead.
Balazar is a Tyrannomancer. Both role options looked like fun: the Eidolomancer lets Balazar use his Padrig-powered abilities for other skills, not just Strength. But the Tyrannomancer gives a whole lot of options for what you can do with those defeated monsters, plus you get even more random monsters from the deck. It seemed like a really fun way to play with cards that don’t normally go into your deck at all.
Enora is an Occularum Scholar, with lots of book-based powers. She’ll be able to use books to add to any of her checks, or use them to peek ahead at her location (and rearrange them). She’ll also be able to use books to prevent various types of damage. The other option, the Eldritch Savant, had more spell-based powers, like being able to get more spells out of your deck or swapping types of damage on spells you cast.
Arueshalae has to decide between being Fallen or Redeemed. The Fallen version gets some benefits from Corrupted cards, and is also able to acquire any allies that the rest of the party fails to acquire. The Redeemed version is better able to help the rest of the party with healing and more flexibility with Arueshalae’s Gift.
Adoywn is deciding between being a Pack Leader and a Blight Scout. The Pack Leader gets a lot of bonuses for Animal cards, and Adowyn has been collecting a lot of those already. The Blight Scout is better at combat and, well, scouting ahead, and picks up some bonuses while at Abyssal locations.
So, that’s the end of Deck 3: Demon’s Heresy. We had a fun time with this one, though I think overall it didn’t feel quite as difficult as the previous one with all of those army barriers. It was interesting to introduce a new character partway through the story. But we’re all excited about trying out our new roles for Deck 4: The Midnight Isles.