Over the last few years, I have had the opportunity to test many personal scanners. Besides using a scanner to reduce the paper clutter in my house and office, it’s also useful for converting print photos to digital files. I’ve managed to scan just about every photo I have, little by little… a couple dozen here, a couple dozen there. I don’t remember exactly when I purchased my first digital camera, but based on the photos I have converted, it must have been sometime around 2000-2002. Since then, 99% of the photos I have taken have been digital photos with the occasional ones printed out to put into albums for gifts or other special occasions. The fact is that I just don’t have any more photos to scan in, and this problem had me scratching my head as I opened the new Doxie Flip scanner and wondered just how I could best put it to the test.
Doxie is well known for its range of portable scanners. I’ve owned a couple over the last few years, and they’ve really been convenient on those occasions where I needed to scan in materials that I couldn’t take home with me for whatever reason (I have a home office). Doxie’s most popular scanners come with built-in memory so you don’t even need to take a computer with you — just connect it to your computer when you’re ready to download all the scans. The Doxie Flip offers this same capability in a portable scanner, but it has a few distinguishing characteristics that really make it shine.

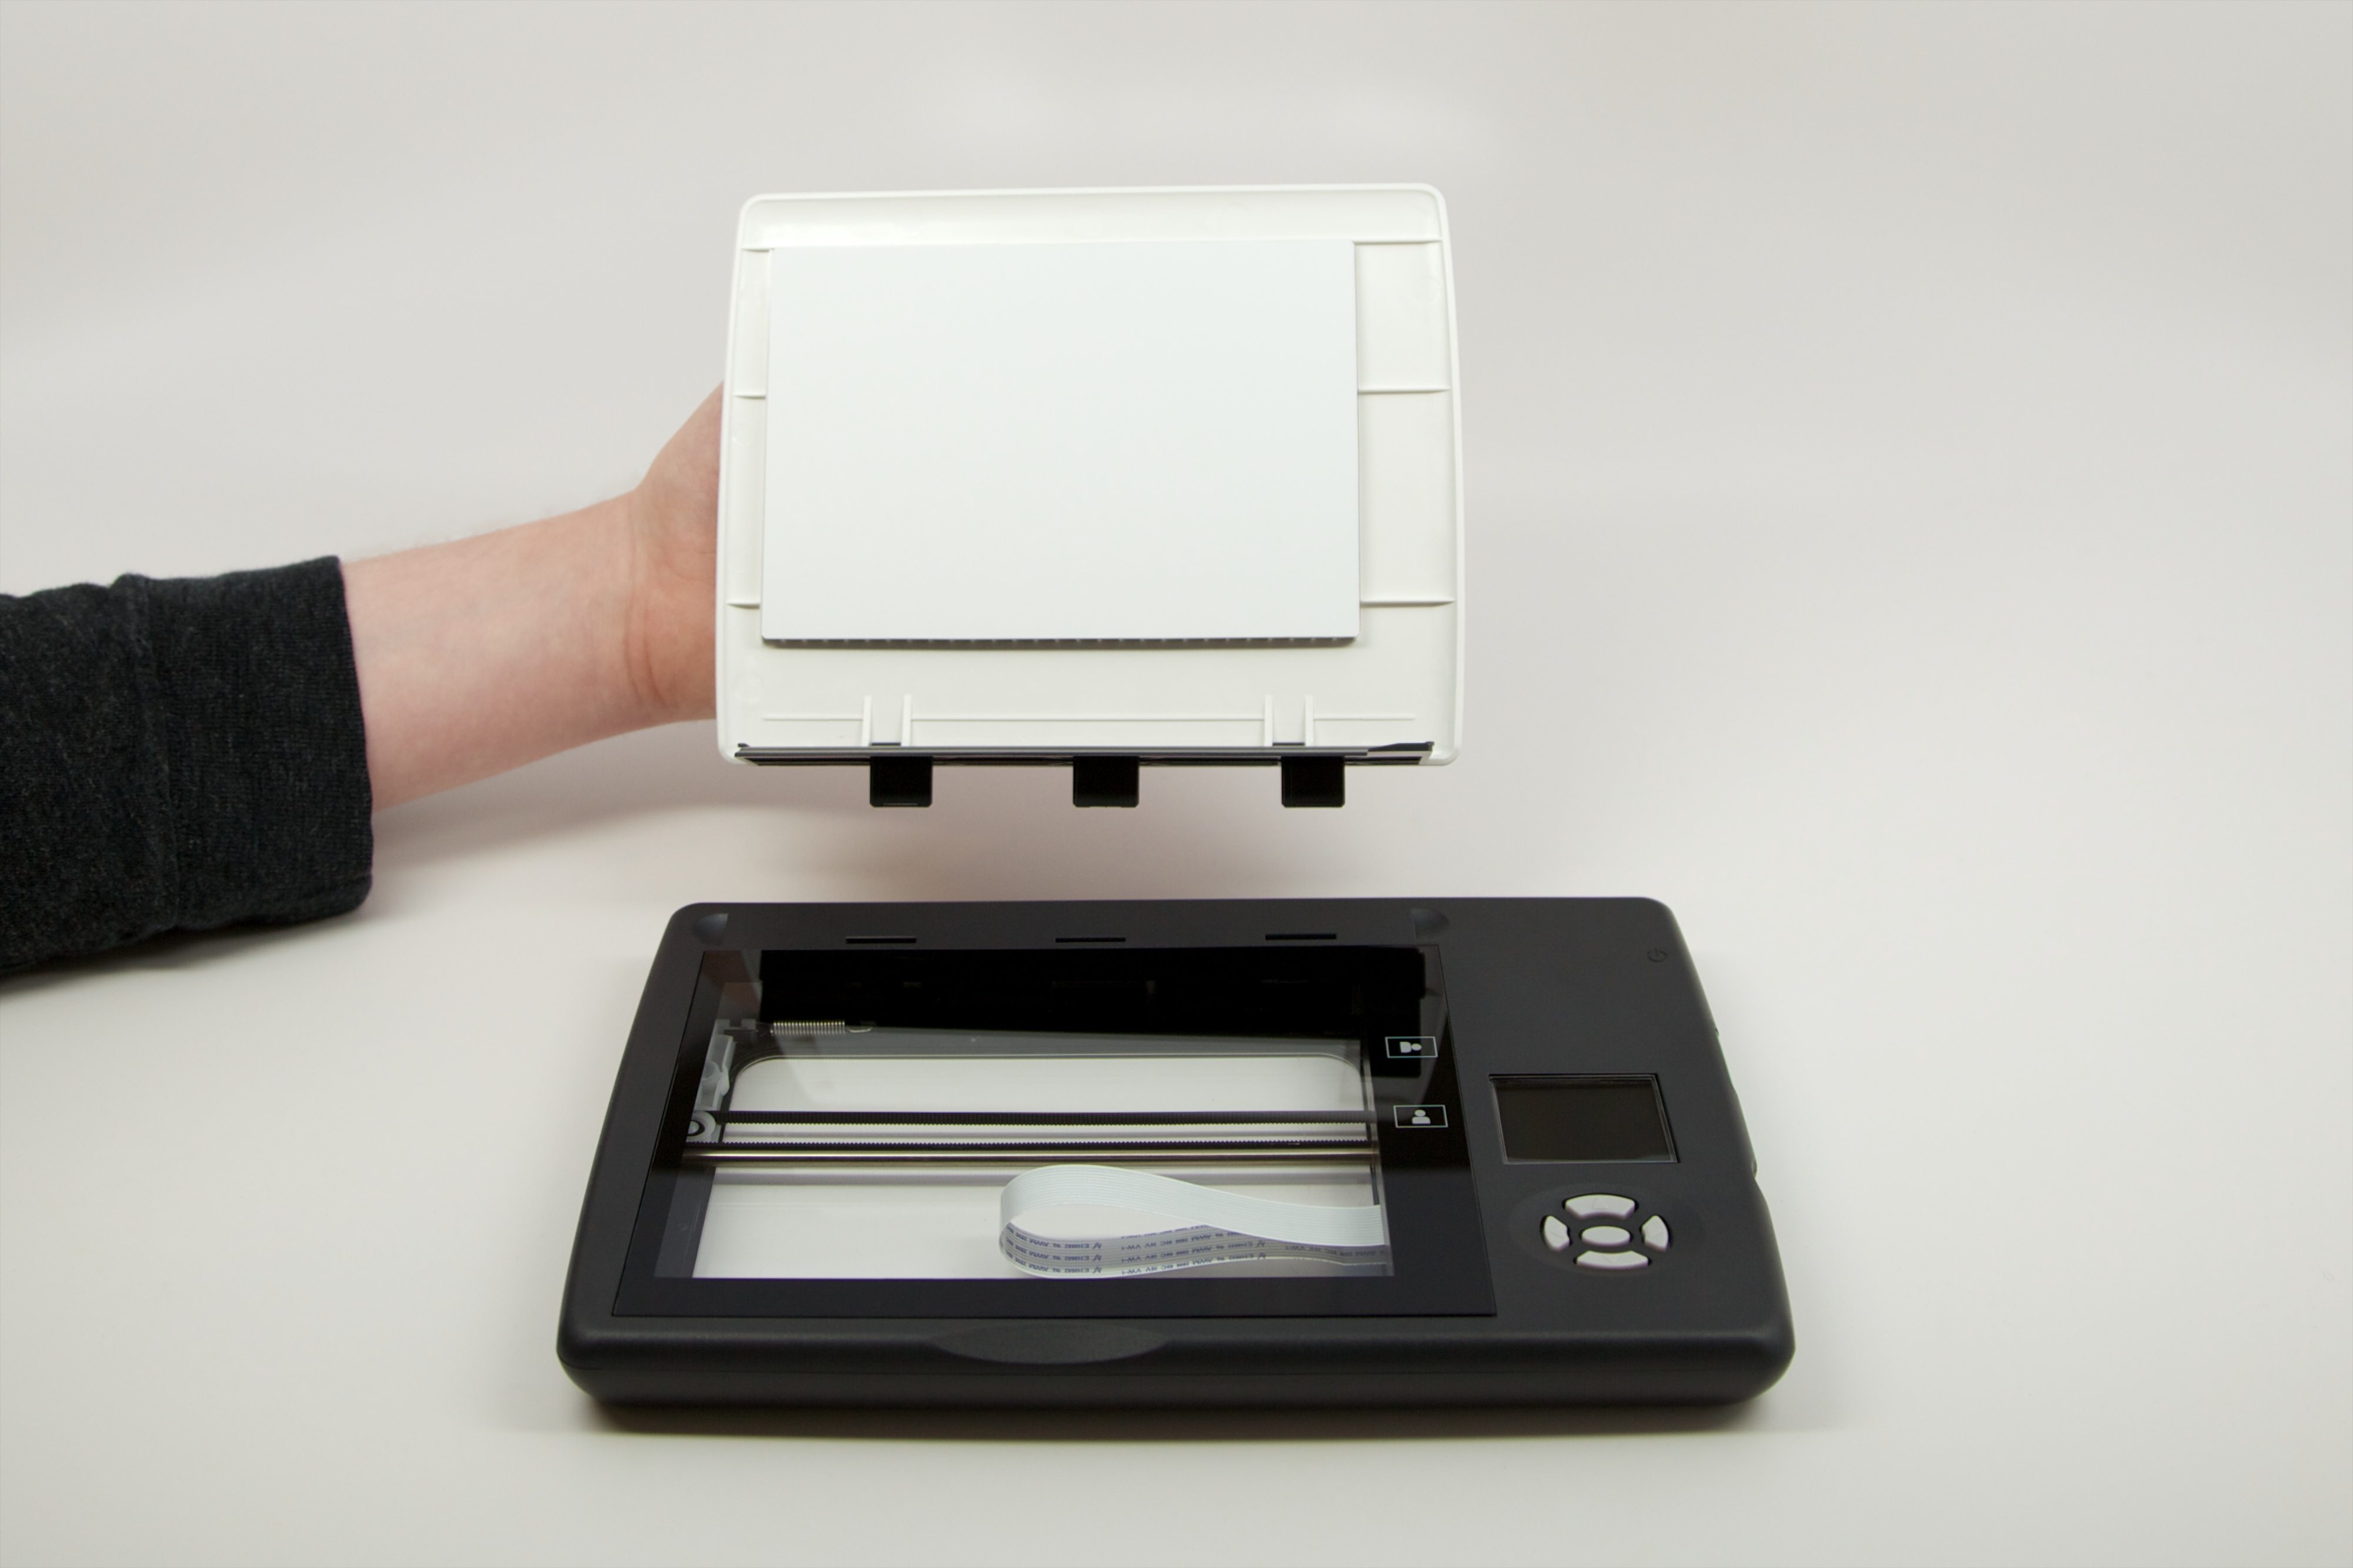
First, the Doxie Flip is specifically designed to scan photos, journals, and small notebooks. Unlike scanners where you feed in a piece of paper or photo to a feeder, the Doxie Flip has a glass window and lid like the old traditional flatbed scanners — place a photo or other item over the glass, close the lid, and press the big green Scan button on the side. You can view what you’ve just scanned (or scan through the library of images stored) using the small LCD screen on the top of the scanner and the various navigation button controls. But here’s where Doxie has improved on the flatbed scanner approach — the lid is completely removable, allowing you to FLIP the scanner over (thus the name) and use to scan photos and other items larger than the traditional 4×6 glass surface offers.
But wait, you say… how can it possibly scan in a 5×7 or 8×12 photo? Coming in December, the Doxie software (that is compatible with all Doxie portable scanners) will be offering a Stitch button. You first select multiple scanned images in the software by holding down Shift and clicking on the thumbnails of each image. Then, you click on the Stitch button and the software examines all selected images and pastes them together to make one larger image. The only caveat to using this feature is that you must use the Doxie Flip to take multiple scans of your larger photo or other item and have at least 1″ overlap (about 2.5cm). Because you’ll be looking through the glass window (with the lid removed), it’s super-easy to just pick up the Doxie Flip (or slide it) and take multiple scans of a larger image.

The Doxie Flip box comes with the scanner, a 4GB SD card, and an SD-to-USB adapter. The adapter looks like a standard USB pen drive with a slot cut into the side that will hold the SD card. When the SD card is inserted into the Doxie Flip, the LCD screen on front will give you a countdown of how much storage space remains. With no scans, the number showed a count of 2500 when I first began testing the scanner. I took two scans of a 5×7 photo and the counter dropped to 2497. So, three “ticks” for two photos. Not bad. This was at 300DPI, however, and the scanner is fully capable of scanning at 600DPI, so expect the “ticks” to be a bit higher for a higher resolution photo.
By the way, changing any of the settings is as easy as tapping the UP button on the front panel to gain access to the small menu system. The menu bar at top provides a battery strength icon, DPI icon (six dots for 300, nine dots for 600), counter, and a Help option. The rest of the LCD window allows you to change the DPI setting and the Sleep Timer (1m, 2m, or 10m before Doxie turns off from inactivity). The Sleep Timer setting is nice because the Doxie Flip runs on 4 AA batteries (and those are included and pre-installed!).
Scans can be saved as JPEG, PDF, or PNG, and this is done via the Doxie software that is available for both Windows and Mac. (Support for iPads running iOS6 and higher is built-in but requires the special iPad SD card adapter.) You can save scans locally or to various cloud services such as Dropbox or Flickr. Evernote and iPhoto support is also available.

The Doxie Flip works great right out of the box. It comes with the batteries already installed (just pull out the little plastic piece on back) and the SD card inserted. Turn it on, set the date/time if you like, and start scanning. Remember I mentioned earlier that I wasn’t sure how best to test the Doxie Flip because I had already scanned all of my own print photos? Well, I have an aunt that lives here in Atlanta who is sort-of the family’s unofficial historian. She has thousands and thousands of old photos, newspaper clippings, legal forms, and much more. For some time now, I’ve been wanting her to get all of these items converted to digital so we could have a backup and not lose all this valuable family history. I called her up, asked her to pick a few photo albums and newspaper items and come over. After she arrived, I pulled out the plastic battery cover, turned on the scanner, set the date/time, and we scanned the first image. All of this was done in less than 60 seconds and that was mostly me reading the very thin and easy-to-follow manual to make certain I wasn’t doing anything wrong. We scanned a 4×6 and viewed it on the display… looked fine.

Next, we scanned in some larger photos. I let her do it, because my goal was to send her home with the scanner and let her start scanning on her own time. My promise to my aunt was that she could scan as much as she liked and could then provide me with the SD card so I could burn it all to DVDs and make a copy on an external hard drive. It’s going to take some time, but she’s quite comfortable with the scanner and I have no doubt she can use it. (Look, if my 70+ year old non-technical aunt can work this thing, anyone can… no insult intended, Aunt Kay!)
After a few scans, we tested the SD-to-USB adapter and it worked great. The Doxie software successfully imported all the scans and displayed them for us in full color. Double-clicking on any thumbnail opened up the full-size scan for us to examine. (The only thing we were not able to test was the Stitch capability — remember, that update to the software won’t be available until December, but I will post a follow-up once we give it a try.)
All in all, I’m quite impressed. But more importantly, the small size, light weight, and simple operation (one button to scan) impressed my aunt. I didn’t know how she would respond to my offer to take the Doxie Flip home to use, but she didn’t blink… I think she does see the value in converting all this family history into a digital format that can be saved and shared with the entire family.
The Doxie Flip is $149.00 and comes with everything you need to begin scanning immediately. I did test the scanner with a 16GB SD card (just to make certain it could handle a higher capacity card) and it worked just fine — scanned a handful of images and used the adapter to import the scans into the software. Also, the removable lid snaps right back into place with no risk of breaking anything; there are four small black tabs that can only fit one way back into the top of the scanner, so you can’t insert it incorrectly.
Besides genealogy buffs, I can totally see this little scanner being a great gift for college students, business travelers, and anyone else that could benefit from a small portable scanner that doesn’t require a constant computer connection. With the Stitch capability, users can quickly scan larger documents and combine them later. (The software also offers a Staple option that groups a selection of scans and saves them into a single document.) The ability to flip the scanner over and place it directly over an item is also nice — you know exactly what you’re getting in the image (viewing it through the glass window) and can tell easily if it’ll require one or more additional passes to scan the entire item. Other uses that Doxie recommends include scanning coin and stamp collections, photos inside albums (no need to remove from under the protective film), and even scrapbook and journal pages. Toss the Flip in a backpack or briefcase or luggage and it’s ready to go — no cables required. Unlike the Doxie scanners that require you to feed in the item, the Doxie Flip offers you the ability to scan in items that would normally not fit into the feeder, and that alone makes it a powerful little piece of technology for the price.
Note: I’d like to thank Paul for providing the Doxie Flip. My aunt assures me she’ll be done with all her scanning in 2015 and will promptly return the scanner when finished.


