This is a recap of our game sessions of Pathfinder Adventure Card Game: Wrath of the Righteous. Spoilers abound.
Last time, I had to stop partway through our playthrough of “The Midnight Isles” because our summer schedule meant that we weren’t going to get together for a while. We’ve finally managed to wrap up the last two scenarios in the deck, and will be ready to start Deck 5 the next time we get together.

Scenario 4 was “Landfall on Colyphyr”: we’ve got Nocticula’s attention now, and she’s opened a portal to Colyphyr. There’s a demon there named the Fulsome Queen, made of living filth, and we’ve actually been sent to help her out. The mines here are guarded by a flayed, decapitated angel, which—not gonna lie—looks pretty disgusting. For this one, the special setup rules are to add the henchman Kestoglyr Mantiel into the Abyssal River, and everyone starts at the Abyssal River and can’t leave until it’s closed. Also, when we close the Qlippoth Runestone location, we get the Fulsome Queen cohort.
So, we all started at the Abyssal River, but we figured, hey, there are two henchman, so we have twice as many chances to find one and close the location, right? Well, not so fast.
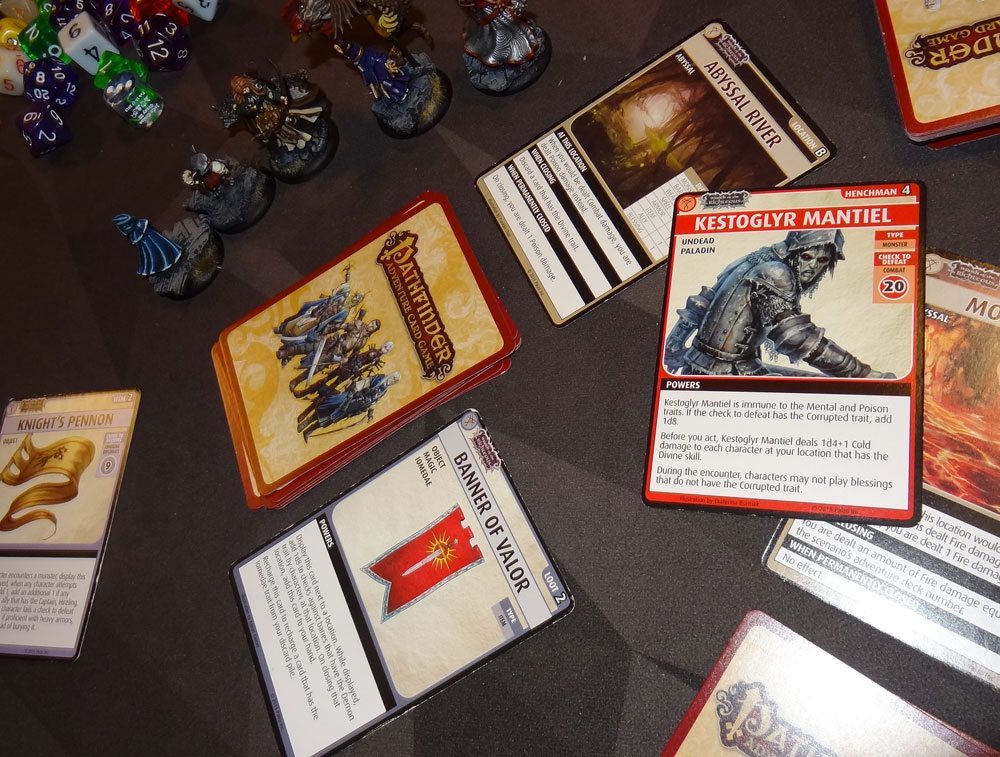
Adowyn started us off—she had a Pegasus ally that she’d just acquired and was pretty proud of … until she met the Celestial Unicorn. Sorry, Pegasus: you’re so last scenario. Using Adowyn’s scouting ability with Leryn, we found Kestoglyr, the undead paladin, and defeated him—but he actually does not allow you to close the location. Boo. Eventually, though, Ekkie was able to find the henchman, a Demoniac of Baphomet. The Demoniac first requires a Charisma/Diplomacy 12 check—if you fail, then instead of taking damage, you’ll discard cards from the Blessings deck if you lose. That’s okay—Ekkie wasn’t planning on losing. She then closed the Abyssal River—though not before spending a lot of cards.
Adowyn moved over to the Dark Forest, and cast the Pillar of Life so that Ekkie could go get some healing. We were able to clear out most of the Dark Forest before Ekkie finally found the Demoniac—but wasn’t able to pull off the Wisdom/Survival check to close it. That’s Adowyn’s job. Adoywn closed the Dark Forest, and then flew to the Wounded Lands on Pegasus, but fell to the Mythic Glyph barrier.
Ekkie, meanwhile, went to the Collapsing Bridge, hoping to find some animal allies … to eat. She found and killed yet another Demoniac, closed the location, thus acquiring all 5 allies. Three of them were animals—she ate Kolo and the vulture for healing, and kept the others.

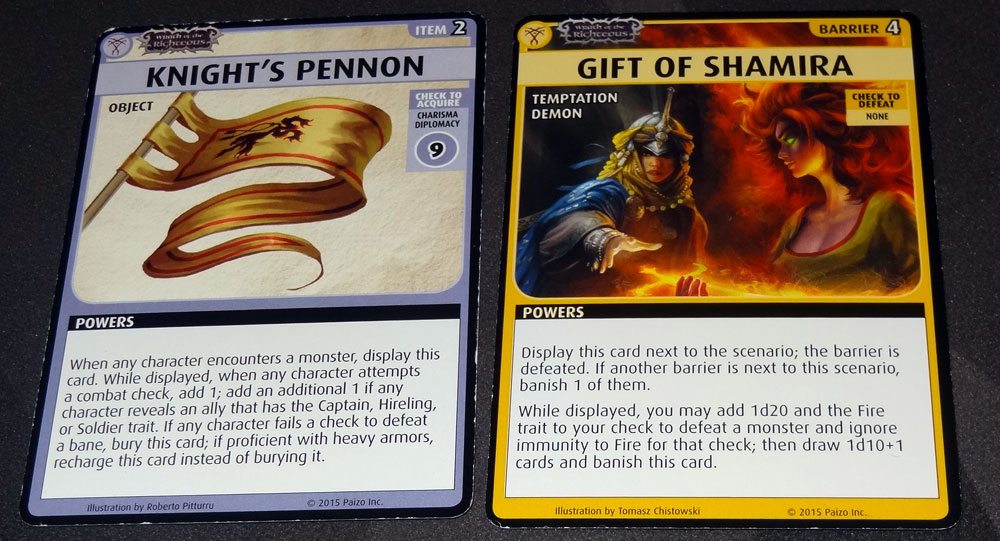
Balazar, who had been chipping away in the Cavern, found the villain, the Defiled One. He’s two Combat 28 checks, and if you don’t defeat him, then a random other character has to summon and fight him as well. Well, it just so happened that we had the Gift of Shamira temptation barrier displayed. When the barrier shows up, you just display it next to the scenario. You can banish it to add 1d20 and Fire to defeat a monster, and then draw d10+1 cards. It’s sort of a Hail Mary move in most cases, because if you draw that many cards it’s likely that you’re not going to survive much longer. However, Balazar was holding the Ring of Forcefangs, which lets him recharge any number of cards to add dice to an attack. He took the chance, rolled the die, and drew 10 cards from his deck. Fighting the Defiled One wasn’t too difficult after that, and most of the cards went back into the deck. Unfortunately, not all the locations were closed, so the villain escaped—but the Cavern was closed.
Ekkie spent some time at the Qlippoth Runestone and ran into a Demonic Horde—one of our least favorite barriers. We spent a lot of time trying to figure out whether we were in a position to fight a bunch of demons, or how many cards Adowyn would have to spend to help us all evade, when we realized that Ekkie has the ability to evade any encounter anyway, and it gets shuffled into a random open location. Goodbye, horde.
Adowyn found another henchman in the Wounded Lands and defeated it, and by this time we had pinned down the villain and had enough people to temporarily close everything else. Ekkie and Balazar teamed up to take out the villain for the win. Our reward for this scenario was getting power feats for everyone. I didn’t mention Enora and Arueshalae in this scenario—they were definitely there helping us plow through things, but neither encountered any henchmen this time around. Arueshalae was able to use her gift to boost everyone else on their turns, and Enora used her own scouting ability to peek ahead at cards, which was also very handy.

Finally, we came to Scenario 5: “The Nahydrian Mine.” With the guards defeated, we entered the mine where Nahydrian crystals are found, only to come across an army of minotaurs led by Hepzamirah, Baphomet’s daughter. This scenario was notable for the sheer number of different henchmen we encountered: there were three types of henchmen mixed into the decks, but also several others who were summoned for closing locations. Oh, yes, there was also the Harvester. The special rules for this scenario say that when you close a location, you summon and encounter the Harvester, who looks a bit like those Rathtars from The Force Awakens—lots of teeth, lots of tentacles. First, it pulls everyone to his location (unless they can pass a Strength 12 check), and then any damage it deals hits every character at that location. Finally, every time a corrupted blessing is flipped in the Blessings deck, a random character takes 1 Poison damage.
We sent Adowyn to the Locust Shrine, where you have to summon a Derakni every time you encounter a barrier, because Adowyn can evade summoned monsters. Her new power (gained from the last scenario) is that when she discards an ally, she can recharge a random card from her discard pile. With that power, she was able to explore 6 cards deep, finding the Fiendish Minotaur henchman and then closing it. And then she evaded the Harvester, because nobody wanted to deal with that.
Balazar started at the Forsaken Cloister, where Enora had peeked and found the henchman Kralisq. We decided Balazar was probably a better choice to fight it. Kralisq forces everyone else at the location to summon and encounter the Lust Demon. Then it is two Combat 24 checks, and if you win, you still must bury a non-Basic card in order to try to close the location. Balazar defeated Kralisq, then buried a card and had to fight the Vulture Demon to close the Forsaken Cloister. And then, with Adowyn’s help, evaded the Harvester.

Arueshalae found Hepzamirah, the villain, in the Cavern, but evaded her. (Hey, we remembered she had an evade ability!) Knowing that the villain was in the Cavern, we were able to work around and close other locations first. Adowyn found a Fiendish Minotaur in the Abbattoir, which Balazar then encountered and defeated. Enora defeated one in the Cell, and Ekkie plowed through the entire Harvester’s Pit to find one, and then actually faced a Harvester to close the location. At the Torture Chamber, Adowyn scouted ahead and found Melazmera, a mythic dragon who makes everyone spend mythic charges—and if you win, you shuffle Melazmera into a random other open location so that you can try to close your own. We decided, nope, let’s just leave Melazmera there and have somebody camp out at the Torture Chamber so we can temporarily close it.
With everything in place, Balazar and Enora went to find Hepzamirah in the Cavern. She’s a Combat 34 and then a Combat 30—plus, anyone at a different location who plays cards or uses powers to help you has to take damage. Plus (since that apparently wasn’t nasty enough), the player who attempts the first check to defeat has to discard cards from the top of their deck. Fortunately, we were able to set things up ahead of time—we kept some armor handy for those who had to take damage to use powers. Since it was the last fight, we threw everything we had—spending mythic charges to roll d20s. Hepzamirah was defeated, and we were done with the Midnight Isles.

Our reward for this scenario was two pieces of Loot: Blancher and Fasciculus Labyrinthum. Blancher is a melee weapon, a big pickaxe wielded by Hepzamirah, but none of us actually wanted it. Fasciculus Labyrinthum is a corrupted magic book that gives you extra dice against Minotaurs, and can prevent you from being moved to a random location. There’s no big penalty for the corrupted trait, other than that you can’t recharge it until it’s been redeemed. With the next scenario being the “Herald of the Ivory Labyrinth,” we figured that there are probably going to be plenty of Minotaurs, and probably a lot of moving to random locations. Enora took the book, since she is an Occularum Scholar and has several powers that use books.
And, finally, for completing the entire adventure path, we each got a card feat.
That’s the end of Deck 4: The Midnight Isles. Next up: lots of mazes…