
If you watched any of our Star Wars: Edge of the Empire RPG Twitch or follow me at all on social media, you’ll most likely know that the dewback from Star Wars is my favorite creature in the entire franchise.
And not just any version. While the Special Edition’s CGI lizard was interesting, it wasn’t the pill-shaped riding lizard of my youth. For all of its realistic coloration, it didn’t capture the toy from Kenner that I used to terrorize all my other Star Wars action figures.
So when my friends at GeekDad saw an unpainted dewback deployed in my Star Wars Imperial Assault game, they were dismayed and insisted that I get him to the table immediately.
Priming

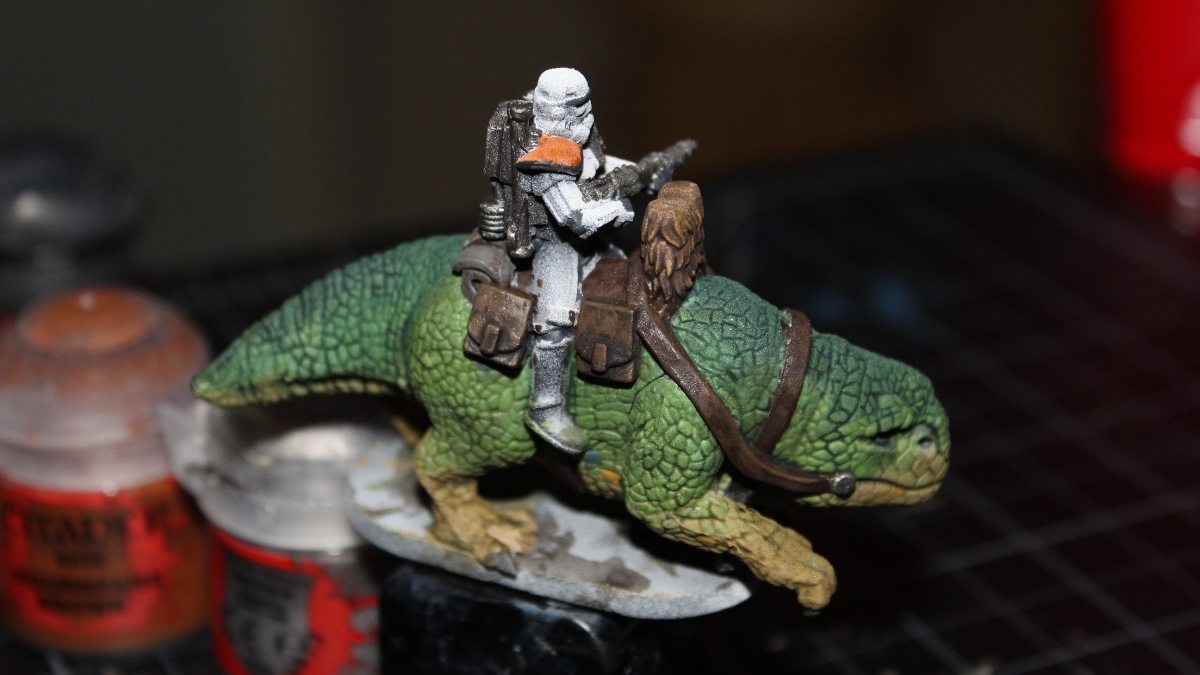
I went with a Zenithal preshade for Captain Terro and the Dewback Trooper. This helped roughly define the various regions I’d be using for each of my wet blended colors. It also gave me a leg up on the Sandtrooper’s white armor, leaving the recesses dark and whitening the upturned parts. While I shaded with the trooper attached, I wouldn’t glue him into place until after the dewback was complete.
Just shaded, the figure already looked more visually interesting than the flat grey of the base figure. If you wanted to go for a poor man’s Sundrop effect on your Imperial Assault set, you could throw some thinned Nuln Oil on the figure at this stage and call it a day. But that’s not why you’re here, is it?
Dewback

Inspired by Sorastro’s results from his Captain Terro video, I decided to wet blend my dewback as well. Instead of the darker tones he chose, however, I went with slightly lighter greens and tans so as to better emulate my beloved Kenner toy. For the feet, underside, and front of the snout, I went with Zandri Dust. Followed by Nurgling Green (which I was afraid was going to be too pale at first). For the mid-tone, I chose Warboss Green, then for the ventral stripe, I picked Waaagh Flesh. I prepped all the paints by using Vallejo Glaze Medium to thin them down instead of using water or Lahmian Medium. The Glaze Medium extends the drying time and gives you a chance to blend the shades on the figure.

It turns out, I didn’t need to worry about the Nurgling Green at all. After painting the Zandri Dust layer, I followed it up with a thin stripe of Nurgling Green, rinsed my brush, then used short cross-hatching motions to blend the two layers together where they met. The Warboss Green was next and, using the same technique, I almost lost any pure Nurgling Green. This actually was perfect, as it provided a base color to create transitional tones between the green of the body and the tan of the feet.
A thick stripe of Waaagh Flesh at the top was next. I took a bit of extra time here, as it’s easy to pull too much of the darker green into the bright Warboss Green layer, losing that vibrant tone.
With the body done, it was time to focus on the head (helpfully demarcated by the harness). I used the same four paints, but used the Zandri Dust all around the mouth for focus, Nurgling Green around the eyes, and so on. When I was happy with everything, I used some of the leftover paint and picked out individual scales around the mouth to add some unblended pops of color, as well as additional scales around the body.
A quick shade with a mix of Nuln Oil, Agrax Earthshade, and Camoshade brought the pebbling of the skin out nicely and really made the dewback pop.
Harness and Saddle

The harness and saddle and saddlebags were rather satisfying to work on since the “worn leather” effect is achieved by layering on increasingly lighter paint tones, followed by shade. It looks sketchy at first, but after three or four layers, the plastic really does take on the appearance of old leather.
I got the base shade by mixing Mournfang Brown, Rhinox Hide, and just a little Abbadon Black. After the first coat, I used a 2-to-1 mix of Agrax Earthshade and Nuln Oil. After it dried, I adding some XV-88 into the base mix. I went back and forth between highlight and shade for a few rounds, adding a little more XV-88 each time, until I was happy (though I would end up adding edge highlights later out of necessity).
To finish, I scored a few spots on the harness with pure XV-88 and added the shade to all the leather parts (as well as the pommel, where I wet-blended my leather base tone and Steel Legion Drab). I also painted the bedroll and dewback claws with some Stormvermin Fur and Nuln Oil shade before moving on to Captain Terro.
Captain Terro
I grabbed a couple of new paints for the Captain (OK, I grabbed a lot of paints, but only three of them were for Captain Terro) Vallejo Ivory, Vallejo German Grey, and Citadel’s Skaag Brown. The latter was to provide a base coat for the shoulder pad, which I lightened up with Troll Slayer Orange in stages to build a highlight. I painted the backpack and weapons in Leadbelcher combined with a little black, then used some Lothern Blue for the cylinder (mixed with a little white for the highlight). I finished the accessories with a little Nuln Oil.
I used the German Grey to pick out the dark portions of the armor a little bit more, mostly the spots already shaded by the preshade. Then the Ivory was pressed into service to paint the lower portion of the Captain (since my spray can preshade did a poor job of catching the legs) and brighten the head and torso. It was here that I had to bust out my XV-88 for some emergency edge highlights on the saddlebags, as I unintentionally nicked them with the Ivory.

I applied a very thinned shade with a mix of Nuln Oil, two parts Agrax Earthshade, and 3-4 parts Lahmian Medium. Then went back with the Ivory to highlight the top of the helmet, and any upturned portions of the armor that were shaded too much.
At that point, I realized I never did paint the eye of the dewback and went back with my Troll Slayer Orange (that I mixed with a bit of yellow), shaded it with Fugan Orange, then added a German Grey pupil and an Ivory spot of light “reflecting” off the eye.
A More Civilized Weapon

My secret weapon in all of this was my new Rosemary & Co. Series 33 Size 2 brush. After seeing the kind of insane detail work Sorastro was able to achieve with the same brush in his videos, I knew I needed to try it out. The point is so precise on this brush, I was able to actually cross-hatch the paint to blend it, rather than just smear it around. And I never would have been able to get to the obscured portions of Captain Terro if the bristles were shorter. I worry about its durability (I’m hard on brushes, so I’m glad I got a few), but it’s the best brush I’ve used since I started painting minis.
Rosemary & Co. has a Workbench Warriors Miniature set which contains the fabled Series 33 Size 2, as well as several smaller brushes, plus five other series brushes suited for everything from stippling on texture to base work and applying overall shade (the Series 42 Squirrel brush is amazing for this).

Speaking of, that’s exactly the brush I used to finish the Captain and his dewback. After I painted the base with Steel Legion Drab and a thick layer of Agrellan Earth dried, I shaded the base with a thinned mix of Agrax Earthshade and Seraphim Sepia. The yellowish tone was perfect for emulating the Tatooine desert. I also added this very sparingly to Captain Terro’s boots and shins. I added a few small spots of Typhus Corrosion to his armor as well and Captain Terro was complete.
Final Thoughts

Honestly, I’ve had Captain Terro in my backlog for a long time, waiting to “level up” enough until I felt I could do the dewback justice. After all, I didn’t want to ruin my favorite Star Wars creature! But seeing how easy he came together with wet blending, I wish I hadn’t waited so long. This was the most fun I’ve had painting Imperial Assault so far. The technique is easy enough that it allows for a whole host of skill ranges and the results are extremely satisfying.

If you’ve been holding off like me, bump Terro and his mount to the top of your “To Be Painted” queue. You’ll be glad you did.
Want more? Check out the rest of my Imperial Assault painting series.
Thanks to Rosemary & Co. for supplying discount materials for this series. Opinions are my own.


5 Star Work Anthony!
Awesome work! Great wet blending. I have Jabba. I really must give him a go. And I really need to jump back on the GeekDad Paints! wagon.
In the 16th century, England’s Queen Elizabeth I kept pocket beagles, so-called because they were small enough to fit inside a saddlebag when she joined with the hunt.