If you are like me (and millions of other people) you are getting ready to pre-order the new iPhone X in a few days. Or, maybe you are reading this article after the pre-order date and after the initial backlog of orders have cleared (kudos to you for having the patience that many of us did not have). Typically this means setting an alarm and being a bit sleep deprived on pre-order day, but this year there is another thing that some of us have to worry about…iPhone X storage capacity. There are only two iPhone X storage options, 64 GB and 256 GB. That’s quite a difference in capacity and this year because of the scarcity of flash storage it is also a significant difference in cost. Here in the United States there is a $150 price difference between the 64 GB capacity and the 256 GB iPhone X storage capacity. I’m going to help you save $150 by giving you some options to squeeze into 64 GB of iPhone X storage (instead of having to spring for the 256 GB version).

Identify The Problem
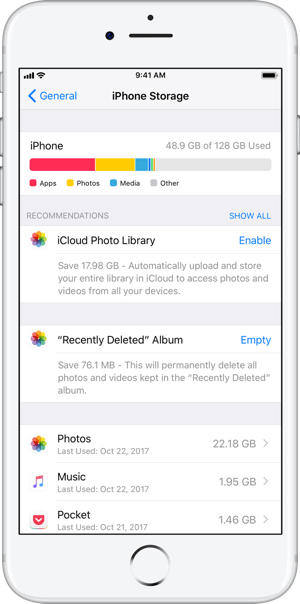
The first step in this process is figuring out how much space you are currently using on your iPhone so you can identify how much space you have to free up in order to squeeze into only 64 GB of iPhone X storage. Over the years as I have started using my iPhone for more and more things. So I currently have the 128 GB Jet Black iPhone 7 Plus using 64 GB of my 128 GB storage, so I definitely need to skinny down the data on my iPhone 7 Plus if I want to squeeze into 64 GB of iPhone X storage. Here is how to find out how much storage you are currently using on your iPhone. What follows are directions and screenshots from my iPhone 7 Plus running iOS 11. iOS 11 has some new data management features built into it, so I highly recommend you upgrade to iOS 11 if you can to take advantage of these features. Go into the Settings app on your iPhone, then into “General” and towards the bottom of the page there will be an option called “iPhone Storage.”
Get Rid Of Large Text Message Attachments
At the bottom of the image above from my iPhone’s storage screen you see an item called “Messages” and it shows that Messages is using 2.53 GB of data. Messages may show up closer to the top or further down the list on your iPhone, it just depends on how much data your Messages app is using compared to other apps on your specific iPhone. Either way, find it on the list and select it. This takes you to a Messages app data management page that gives you a few options to reduce to the amount of data Messages is using. Select the option called “Review Large Attachments.” This option presents you with all of the attachments that are in your iMessages (photos, videos, GIFs, stickers, etc…) and lists them with the largest items at the top of the list. It will only present you with about 100 items at a time. You can select each item individually and view them and if you decide an item is something you want to keep you can select the share icon (the image of a rectangle with an upward arrow) and save the item to your local photos library or send it to another location. You can also press the “Edit” button in the upper right corner and select just the items you want to delete. This is what I chose to do so I could save off old photos and videos that other people had texted me. This was a very manual and time-consuming process, but I found quite a few things I wanted to save so for me it was worth spending some time doing this. I was able to free up about 4 GB of data by doing this.
Deleting Old iMessage Conversations
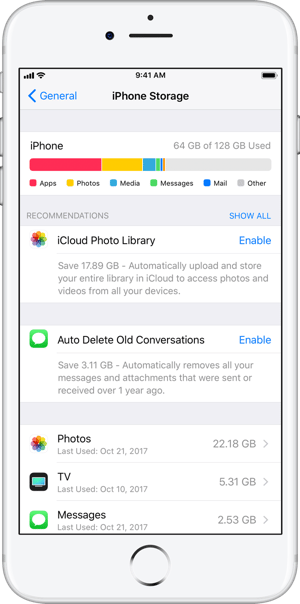
This is another area where iOS 11 adds data management features. If you go back to the main “iPhone Storage” screen I navigated you to earlier you will see an option called “Auto Delete Old Conversations.” This is a setting in iOS 11 that will automatically delete any iMessages and their attachments that are older than one year. For the most part I try to treat text messages as a temporary form of communication, but I still have text messages dating back 5 or 6 years or more. So I’m glad I took the time to go through my previous step to make sure I saved off any old text message attachments before I enabled this feature.

Delete Unneeded Movies and TV Shows
Video takes up a considerable amount of storage space, so you want to make sure you aren’t carrying around a bunch of old movies, TV shows or home videos that you really don’t need or use. In my case I had 5.31 GB of workout and cycling videos. Do I still use these videos? Yes. But I had 20 of them on my iPhone and even on a good week I might use only one or two of those videos. For convenience I had just loaded all of them onto my iPhone because I had plenty of space. Since I don’t want to pay the $150 premium for 256 GB of iPhone X storage… these videos had to go. So I deleted them and saved another 5.31 GB. To delete this content go into the same “iPhone Storage” screen I reference above and scroll down to towards the bottom of the screen until you see the “TV” app icon and select it. This will take you into a data management screen for all of the content within the TV app and allow you to view all of that content and delete the items you wish to delete, just like you could with the attachments within the iMessage app.
Offload Unused Apps
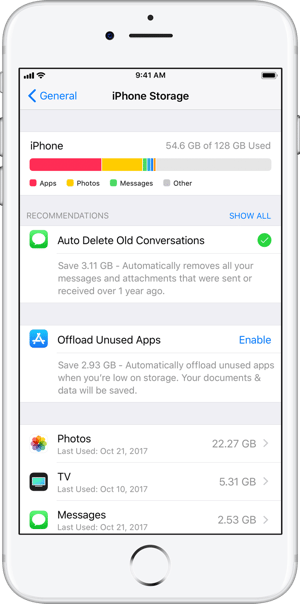
This is another great new automatic data management feature that was added into iOS 11. Again, navigating back to the “iPhone Storage” screen you may or may not see the “Offload Unused Apps” option under the “Recommendations” section of the page. The reason you may not see this is there may be more impactful options for you to save space on your device and if offloading unused apps isn’t in the top two then it won’t show up here. Since this was 4th thing on my list and I’ve already performed some of the bigger space-saving options, the “Offload Unused Apps” shows up as an option on my iPhone.
If this option doesn’t show up for you in the “Recommendations” section of the “iPhone Storage” screen in settings than navigate to “Settings -> iTunes & App Store” and scroll to the bottom of the page and you will see a toggle switch for “Offload Unused Apps.” This option will delete apps automatically from your device that you have not used in a while. This sounds scary at first, but it doesn’t delete your app data and the icon still stays on your device (just grayed out) as well. If you want to use the app, just touch the grayed out icon and you will be prompted to download the app. Once enabled it will automatically delete the apps you haven’t used for quite some time, and then later if your device available storage reduces even more iOS will delete more apps that you haven’t been using. The only downside to doing this is if you aren’t near wi-fi very often and don’t want to be caught in a situation where you can’t re-download a large application when you really need to use it. If that is a concern for you then you can still go in and delete unused applications yourself manually by navigating (again) to the “iPhone Storage” screen in settings and scrolling down to the bottom. You will see all of the applications that are installed on your iPhone with the applications that are the largest (which is a combination of the size of the app and all of its data) at the top. As you go down the list the total space used by each app decreases. Listed under each app is the date you last used that application, so you can scroll through this list and manually delete apps you don’t regularly use.
I enabled the “Offload Unused Apps” option on my iPhone and it immediately saved me about 3 GB in storage space. But this automatic feature isn’t perfect. For example, once I enabled the app I still had the Garage Band app on my iPhone even though I had never used the app and it was taking up 1.4 GB of storage on my iPhone. I suspect it was left on my iPhone because I have about 70 GB of free space. After all, my iPhone doesn’t know I’m trying to trim it down to fit onto 64 GB iPhone X storage. So it still helps even after enabling the “Offload Unused Apps” feature to do a bit of manually offloading and deleting yourself.
Enable iCloud Photo Library
Last and most impactful (at least for me) is enabling the iCloud Photo Library feature. I have 17.89 GB of photos and videos on my iPhone and if I were to use Apple’s iCloud Photo Library service I could save most if not all of that space (depending on how I chose to set up the service on my iPhone). I’m not going to go into much detail on this service other than to say that if you enable it your photos and videos will now live in the cloud (iCloud) and not on your device. You can set it up such that they stay on your device as well, but in reality the “originals” will all be in iCloud. The advantage of this is that it saves space on your device and it keeps you from getting into the situation of losing a bunch of photos because your device was destroyed (remember the originals are now in iCloud and not your device). The downside to enabling this and moving all your photos and videos to iCloud is that you will be uploading and downloading a lot more data over either wi-fi or cellular. The other drawback is that you must have enough storage in iCloud. If you are still relying on Apple’s free iCloud storage then you only have 5 GB of data. I outgrew that a long time ago and opted for the 200 GB storage plan, which I am only using a fraction of right now. So for me it didn’t cost me anything to go ahead and start using the iCloud Photo Library feature. But remember when I said I was going to try to save you $150? Be careful here. That $150 savings will decrease significantly if you have to buy a monthly iCloud data storage upgrade just so you have enough space to enable this feature. This may or may not make sense depending on your exact situation, so just be aware of the monthly costs before you decide. I said I wasn’t going to go into great detail on iCloud Photo Library, but I will point you to a great resource. iMore has a great set of articles that will explain everything you will ever want to know about using the iCloud Photo Library, so head over there and read up on it before deciding for yourself.
How Well Did I Do?
Well, after everything I just listed above I am down to using just 49.2 GB of my current 128 GB of storage. So even without me enabling the iCloud Photo Library, which I still intend to do, I have slimmed down the data on my iPhone enough to squeeze into 64 GB of iPhone X storage. By going one step further and enabling the iCloud Photo Library I will save even more space making the act of staying within the confines of a 64 GB device even easier. Hopefully I am able to help a few of you do the same thing and keep you from having to spend the extra $150 for the 256 GB iPhone X.