
In case you haven’t heard, we here in North America are in for a treat later this summer. On August 21, 2017, we’ll get the opportunity to see a total solar eclipse, displaying two to two-and-a-half minutes of glorious totality, when the (part of the) Earth we’re standing on will be shrouded in shadow. Next week I’ll be publishing a post about how to prepare for the event, but to get the science-based drooling started, here is a review for a fantastic tool that will augment your total solar eclipse viewing experience, whether you’re traveling to the path of totality or just experiencing the partial eclipse at home.
The Celestron EclipSmart Travel Scope 50, sold by our friends at ThinkGeek, is a perfect starter solar scope and an ideal tool for eclipse viewing. It is extremely light and compact, affordable, high-quality, and versatile enough to keep using in the future. I got the chance to review it recently, and couldn’t be happier with the experience.
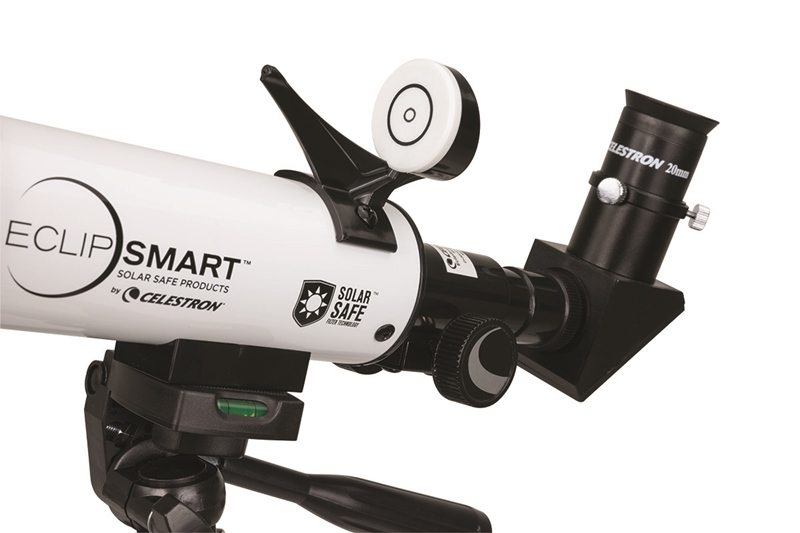
To get the specs out of the way up front, this kit includes full aperture ISO-certified glass solar filters, solar safe finderscope, photo style alt-azimuth mount and tripod, 20 mm (18x) eyepiece, and nylon backpack. It’s also got a 360 mm focal length (f/7.2), fully coated glass optics, an angular field of view of 2.25 degrees (at 18x), and a linear field of view of 118 feet (at 18x).
Open up the box (which is themed with eclipse facts!) and the telescope comes already packaged inside its backpack, which is slightly padded and has padded shoulder straps and a hanging loop. There are several compartments and dividers inside, with plenty of additional room for things like astronomy books, a jacket, a hat, and a few additional accessories. A (very) little bit of assembly is required for the telescope itself, which is all laid out clearly in the included manual. The manual also covers information about eclipses as well as other solar phenomena, and it encourages you to view Mercury’s next transit of the sun in 2019. (I’m marking my calendar now. I saw Venus’s transit of the sun a few years ago, and it was spectacular.) The kit also includes a lens cloth and a code for a free download of the Starry Night astronomy software. The whole setup isn’t very heavy, and it can be carried by anyone old enough to know how to not to bang it around. Know your children to determine at what age that might be.
To set up the kit, I started with the included light tripod. It goes from a table-top usage height of 16 inches to a max of 43 inches, perfect for standing use outside. If 43 inches isn’t enough, the center of the tripod can be extended an additional 6 inches, reaching a total of 49 inches tall. This is generally tall enough, but we tried it around midday with the telescope pointed almost straight up. In that position, 49 inches isn’t quite tall enough to view comfortably, but since you’ll likely be alternating viewing with others, it works out well enough. Complete instructions for setting up the tripod are included, but if you’ve ever used a tripod, this one works just like any other I’ve tried.
Next, attach your telescope tube to the tripod. This is also easy, and also like every other tripod/camera setup you may have used. There is also a leveling bubble. Unlike me, be sure to attach the telescope tube to the tripod in a way that allows you to use the panning handle from behind the telescope rather than from the front. But if you do it wrong, like I did, it’s easy to turn the telescope around.
Next comes the star diagonal. Simply take the caps off of the end of the telescope tube and the star diagonal, insert, and tighten the screw. This fancy mirror attachment allows you to look at the sun in a position that is more comfortable than crouching near the ground to look straight through the telescope (though, like I said earlier, if the sun is overhead, there will be a small amount of bending over). Another bonus here is that your face isn’t aimed directly at the sun either. This helps protect the vision in the eye you’re not using for the telescope as well as being more comfortable.
Last comes the eyepiece. Insert it just as you did the star diagonal and tighten down. This kit comes with a high-quality 20mm eyepiece that will serve you well to look at sunspots, transits, and eclipses. But it also accepts any 1.25″ diameter eyepiece between 5mm and 32mm focal length, so you can play around with it if you have or want to buy other eyepieces.
Now, take the thing outside and get oriented! Use the solar finderscope to line it up with the sun, following the instructions in the manual. Then, look through the eyepiece and use the focusing knobs to bring the sun into focus. Finally, enjoy the splendor of the source of much of Earth’s heat and energy.
Here are my first impressions of the telescope: this thing is tiny. I’m not sure what I was expecting, since the whole thing, tripod included, easily fits in a small backpack. But the photos made it seem larger. And I’m used to my 6″ Dobsonian reflecting telescope. To me, though, this solar telescope’s small size is a plus. If you’re lugging camping gear around, or are just taking a long trip in your car to reach the eclipse, you want to travel as lightly as possible.

After questioning its size, I took the telescope outside to look through it, taking my trusty astronomy partner in crime (AKA my daughter) along. I’d looked through solar telescopes before, but never one this small. I wasn’t sure what to expect. But I looked through and saw the whole sun. A boring, featureless sun, but the entire sun, nonetheless. Was I doing something wrong? Was it out of focus? A quick check to NASA’s SOHO site to see their daily sun photos and, no, I wasn’t doing anything wrong. The sun was in focus. There just wasn’t much going on in regard to the sun’s surface on my observation day. It’s good to have confirmation of what I was (not) seeing, though. So we kept looking and enjoying seeing the sun. We can’t wait for some sunspots. The SOHO site is also a good site to check on the “weather” conditions for the sun to see if it’s worth aiming your solar telescope at it on any given day.

Despite its plainness, the sun looked great. It was easy to see the whole ball of fire in the field of view, but it also filled up most of the field, making it very good for eclipses. With the included eyepiece, you can’t zoom in on the sunspots or see too much detail, but if this kind of thing interests you, investing in an eyepiece with a stronger magnification would be a good next step. This one is ideal for the eclipse this August, and for every other solar eclipse and general solar study thereafter. Its $99.99 price tag puts it in the realm of a lot of science-oriented families.
Don’t forget, if you’re looking at the sun through this telescope for more than a minute or so, the sun will drift out of the field of view. Do not be alarmed. Nothing is wrong. This is merely due to the Earth’s rotation. Simply adjust the direction of the telescope and look again. #science
My daughter and I were both very happy with what we were able to see through the telescope, and I look forward to trying it again when there are some sunspots to note. We can then track them as they cross the sun. With a solar telescope this portable, it will be easy to pull it out at a moment’s notice and look whenever we want. But I’m especially looking forward to having it during this year’s eclipse, and for all future eclipses, be they total, annular, or partial. Seeing an eclipse through inexpensive eclipse glasses is very cool, but to witness the event in much more detail will be an out of this world experience.
If you want to see if a solar telescope is right for your family, the Celestron EclipSmart Travel Scope 50 is a fantastic entry scope. Or, if you just want to use it for the upcoming eclipse (or future eclipses), I also recommend it. It’s also good to have around even if you already have a larger solar telescope, to allow more people to view the sun at once. In any case, I recommend it to all science-oriented families. It’s also affordable enough for school classrooms or homeschool co-ops to all chip in and get one. Now, go do science!
Stay tuned for my article next week on how to prepare for viewing this year’s total solar eclipse!
Note: I received a sample for review purposes.


Thanks for the review, I got mine last week and set it up and immediately saw two sunspots that I mistook for specs on the lens (amateur, I know). Thanks for the link to SOHO, I didn’t know about it and it’s an awesome resource. I am looking to expand on some different eye pieces, but I could not be happier with this scope, and I can’t wait for next month!