In my previous Photography Snapshot, I discussed the importance of light and how it bounces to create images. We discovered that the most primitive form of photography was the camera obscura, which works by excluding all light rays that don’t create an image. While this method does create an image, that image is usually very dim because so few light rays create the image. In this Snapshot we will discuss the difference between reflection and refraction, how a lens focuses light and how a lens’ focal length will impact an image.

Light is a form of energy, and while it can bounce and be conserved, it can also bend by being slowed down. I bet you are thinking to yourself, “But light travels at a constant speed!” Light only travels at a constant speed in the perfect vacuum of space where it doesn’t encounter any opposing forces. You can slow light down by having it pass through materials like air or water. According to Snell’s Law, the degree of refraction depends on the ratio of the two materials’ different refractive indices. Most materials have a refractive index greater than one, which means that as light enters the material from air, the angle of the ray in the material will be more nearly “normal” (perpendicular) to the surface than it was before it entered.
Give it a shot: shine a flashlight through a jar of water. Does the beam look straight? Put a pencil in a dish of water; it looks like it bends where the water and air meet.

Image from WikiCommons
The diagram to the right shows the refraction of light as it passes from one medium to another. The red line is normal (perpendicular) to the surface of the material. As the light passes through the second material, the light bends towards the normal because density of the second material is greater than the first. The angle between the incoming ray and the normal is the angle of incidence. The angle between the refracted ray and the normal is the angle of refraction.
So why is learning about refraction important? Lenses are all about refraction. If you want to create an image you need to be able to focus all of the incoming rays into a single point. If we can direct each beam of light by bending it slightly – a little right for the light in the left side of the beam, a little left for the light in the right side of the beam – then the light will focus into a single point. This is exactly what a lens does.
When a lens is created, there are two main factors in its design. The refractive index of the material, which is how much the material it’s made out of slows down the beam, and the angle of incidence. The greater the angle of incidence, the more bending occurs. This is why wide-angle lenses, which need to bend the light a long way, have such a bulging appearance.

As a simple experiment, let’s prove that light bends to a single image as it passes through a lens. In a dark room, set up a lit candle, a magnifying lens and a sheet of paper as a screen. With the magnifying glass between the candle and the screen, move the lens back and forth until a focused image of the candle appears on the screen.
Notice that just as with the camera obscura, the image of the flame is upside down. Also, do you notice that the shadow of the glass is dark, even though you can see through the entire glass? This happens because the curve of the lens causes all of the light that passes through it to focus into the image on the screen.
The candle experiment is the ideal case where all of the light is entering the lens in parallel rays. These types of ideal systems converge light into a single perfect point. The distance from the lens to this focus point is called the focal length, and is measured in millimeters (mm). Camera lenses are normally described by their focal length. The mm number translates into the distance from the front of your lens to the chip of your camera. Telephoto lenses are described by a range of focal lengths that they cover. This is achieved by a set of lenses that move with respect to each other to achieve the desired focal length. This focal length is also why a 300 mm telephoto lens will be significantly larger then a 35 mm wide-angle lens; the barrel of the lens is longer to accommodate the increased focal lengths.
Of course in the real world, light never hits a lens in perfectly parallel rays. The closer an object is to the lens, the less parallel the rays become, and the longer focal length you will need in order to create a focused image. This change is most noticeable in macro photography where objects are very close to the camera and the depth of field is drastically diminished. (Don’t worry, I’ll explain what “depth of field” means in a future Snapshot.)

Image from Jeffrey J Hemphill UCSB Intro to Remote Sensing Lecture Notes
In order to focus an image you need to move the lens back and forth relative to the screen, till a sharp image of your object shows up. When you are focused at this particular distance, look around at items that are closer and further then your original object. Are they in focus or out of focus? Most likely the other items will be out of focus, because the focal lengths to focus them are different than your original object. The most common way to increase the number of items in an image that are in focus is to reduce the number of non-parallel rays hitting the lens, i.e. reducing the size of the aperture, like in the pin-hole camera. Of course this still means that we have to balance our desire for focus with our desire for brightness as we learned in the last Snapshot.
Next time we will talk more about how lenses use aperture and focal length to effect magnification and brightness. In the mean time, you can watch these vintage Assignment Discovery videos about reflection and refraction of light: Reflection and Refraction video (Part 1) and Refraction video (Part 2).
If you are interested in learning more about the optics of refraction, this applet is an AMAZING tool that allows you to see what happens in an optical system if you alter the incoming lights angle of incidence and the refractive index of a material. Click on the image below to open it.
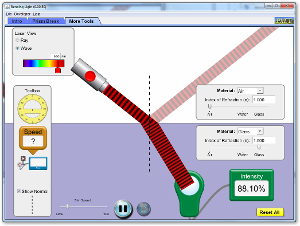
| Click Applet to Run |