
Little plastic skeletons haunt every dollar shop and carnival prize basket in the fall.
Take advantage of their abundance to make a to make an easy seasonal decoration that’s just a little different from the normal fare: a fairy specimen display.
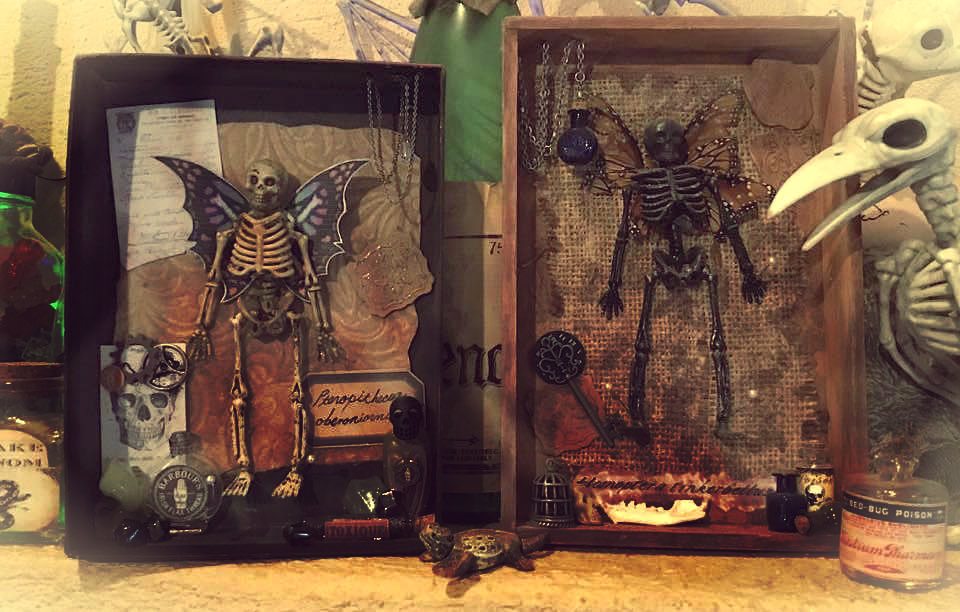
This simple shadowbox creation needs only a little plastic skeleton, a flat cardboard or wooden box or shadowbox frame, and “wings.” Everything else consists of whatever objects you can find around the house that would add to a mildly macabre display.
First, find one side of a flat box compatible with the plastic skeleton you want to use. The top of a greeting card or shoebox works well. I’ve also used those flat wooden boxes holiday gifts like nuts or fruit come in, as they are often plain with no glass or ridges on the top.
Paint the box black or antique it brown if using a cardboard one. Stain it or leave it bare for a wooden one.
Glue a small piece of burlap, felt, terry cloth, or thick paper in the center, leaving some space around the edges for a base.
Next, place—but don’t adhere—the skeleton in the center of the box. Place your finger behind the skeleton, between its shoulders, before removing the skeleton, then draw a small dot where the tip of your finger is. This is where the wings will go.
For wings, I’ve used real butterfly or dragonfly wings we’ve found on nature walks, as well as just craft store feathers or printable butterfly and fairy wings. The site Ravensblight has a perfect set of free, downloadable Flutterbats that would make excellent paper wings for your fairy. Pinterest, Etsy, and even Google are also filled with endless printable wing images.

Using the dot as a center point, place a small amount of craft glue or use a glue gun to tack the wings in place. Now, take another small dab of glue on top of the wings in the same spot and replace the skeleton. This time, adhere it in place on with small amounts of glue on its hands, feet, and behind its skull.
Now, you have your specimen. To give is a more authentic look, place some straight pins on the hands and feet, like you would with a high school bug collection or frog dissection project.
Now, here’s the fun part: embellish it. Find some old spooky novelty bugs, spider rings or tiny glass jars, vintage medicine bottle labels, pieces of jewelry chain, moss, wood or other items found on nature walks, or even little plastic beads, keys, or clock pieces to give it some personality. This is where you can really get creative. You can also leave the background plain for a more “authentic” looking oddity.

Finally, your specimen needs a name. Hand-write or type and print out a genus and species for your specimen, such as Homoptera tinkerbellus, on a small strip of paper, and place it under the specimen.
These can be mounted on a wall or set among other seasonal décor for a mad scientist set up wizard’s apothecary.
You are now the owner of a rare mounted example of a common household fairy, wood sprite, or other migrating pixie. Those nasty little buggers* who fly around and spring dust everywhere will think twice before twinkling around your lab.

*No actual fairies were harmed in the making of this craft. Also, the author’s opinion on the fairies infesting her home does not necessarily reflect the views of the remainder of the GeekMom and GeekDad writers.


