I’m a bit particular about making sure I back up all of my important files. And, to me, they are all important. Baby photos, things I’ve written, movies, songs… I worry about losing it, so I’m always on the lookout for the perfect backup storage solution.
A number of years ago, I learned about RAID systems from a friend of mine who knows way more about computer hardware than I do. They made it sound easy, but, of course, there was plenty to know that they weren’t mentioning. When I looked into getting something like that to back up my data, it was like reading a foreign language.
I’ve had other useful external hard drives that worked well, but weren’t protected against drive failure. Thus, I still felt like my data wasn’t as secure as it wanted to be. And as someone who works on the internet, that’s important. But I have finally found the solution.
I recently got a chance to try out a Drobo product. Drobo offers external storage from portable/desktop solutions to entire racks. While my ideal solution is a Network Attached Storage unit attached directly to the router so that all of my family members can access it, I was able to test a really nice desktop unit with four drive bays. Drobo also shipped two 1TB drives so I could try it out, leaving plenty of room for expansion in the future.
At first I was skeptical that I could figure out how to make it work without help. Boy, were those fears unfounded. While traditional RAID setups can be complicated, Drobo has perfected the art of making it simple. There are very clear, quick start instructions for the whole process right inside the box, which is really helpful for someone like me who isn’t too knowledgeable about hardware.
- Go to drobo.com/start to get documentation and to download the Drobo Dashboard.
- Install the Drobo Dashboard on your computer.
- Insert the drives into the Drobo unit. You need to begin with at least two 3.5″ drives, but the regular Drobo desktop unit will take up to four drives. Any size or brand will do.
- Connect Drobo to your computer using the included USB cord.
- Turn on Drobo, after attaching and plugging in the included power supply.
- Format Drobo. Once you run the Drobo Dashboard, it asks you to format it, so there’s no hunting for options.

Then it’s ready to use. That’s it. Through the whole process, I was continually surprised at how easy it was. You don’t need any special trays or tools to insert the drives, either. You literally just pop off the front panel, which is held on by magnets, and then push the drives in, snapping them into place, like an Atari cartridge.
Only add more drives when you need to. When you need more space, just pop a new one in an empty bay, or swap out a smaller one for a larger one. No need to reformat anything, turn the device off, or make any other changes. Drobo will adjust, keeping your data safe and secure. You can even keep using it while it is busy optimizing. Or if one of your drives has gone bad, pop it out and put in a new one. Drobo immediately optimizes how your data is stored, rearranging and reallocating space to make sure it is secure.

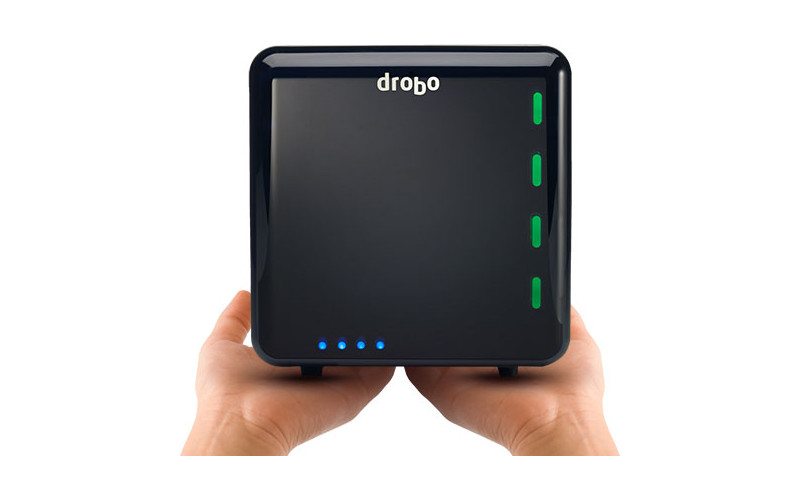
Inside the front panel is a guide to the lights next to each drive. These tell you whether everything is going fine with them, or if they need attention. They usually show green when the drives are healthy with plenty of room. At 85% capacity, a drive’s light will turn yellow. At 95%, it will turn red. There are other light combinations that indicate drive failure, or that a drive is busy optimizing. There are also other lights that serve as a gauge, showing the drive’s current capacity. Each one of those symbolizes 10% of Drobo’s capacity.
Drobo has options for single or dual redundancy for data as well, though I believe you’ll need more than two drives for dual redundancy. It’s easy to change the setting, though, and the dual redundancy keeps your data even more secure. The unit also comes with a one year warranty from date of purchase.
At risk of sounding like an infomercial, I immediately fell in love with this storage solution. It’s like someone made a redundant storage solution for me. Hardware technology has developed much faster than my knowledge has been able to keep up. So I, for one, appreciate this peace of mind without risking my sanity or my data. And I’ve done it all without needing to call my more-techie friend for help. Seriously, it was so simple. Just follow the directions on the box and/or the screen, and it steps you through. I was blown away how quickly it formatted the drives, though I guess I haven’t formatted a disk since the 3 1/2″ days.
So what makes it so much easier than a regular RAID solution? Drobo uses their BeyondRAID technology, which is very simple to use. If you have a drive failure, Drobo automatically redistributes your data so it’s still secure. Regular RAID systems have a higher learning curve, which is what has always kept me from getting one. You would have to make all kinds of adjustments when wanting to expand or change your storage. The Drobo drives can be changed out on the fly without any delays, and in the case of drive failure, it automatically optimizes and rebalances your data, keeping redundancy in effect. No downtime until you replace the defective drive.

The Drobo Dashboard program makes it easy to manage your Drobo (or Drobos, if you have great need for external storage and backup). You can also change all of your settings, monitor drive health, and update the firmware.
I was concerned about having the Drobo on all the time, even when my computer is turned off (you do have to jump through a few hoops to shut down the Drobo). But the cooling fans are a variable speed and only speed up when necessary, and during times when the drives are not being accessed, there is a setting to allow them to spin down to save wear and tear and electricity. Problem solved.
I evaluated the regular unit (just called “Drobo“), but there are many models to choose from, depending on your needs and your budget. Some allow for SDD drives as well. Going on my wishlist is the Drobo 5N, which can attach directly to your network for use by all in your household!

If you’re not sure which model is best for you, the Drobo website can help you decide with their virtual test drives. You can also compare models on your own. If you’re not sure how much storage you need, Drobo has a storage calculator as well.
I recommend the Drobo BeyondRAID solutions to anyone who needs external storage and wants redundancy storage of their data. I especially recommend them to people who really want a simple solution that doesn’t take any special knowledge to operate or set up. If you’re sick of losing data because of hard drive failure, or you’re just looking to diversify your storage options, you can’t go wrong with a Drobo. Redundant data storage is available to everyone. Keep those photos, videos, and documents safe!
Note: A sample was provided for review.