
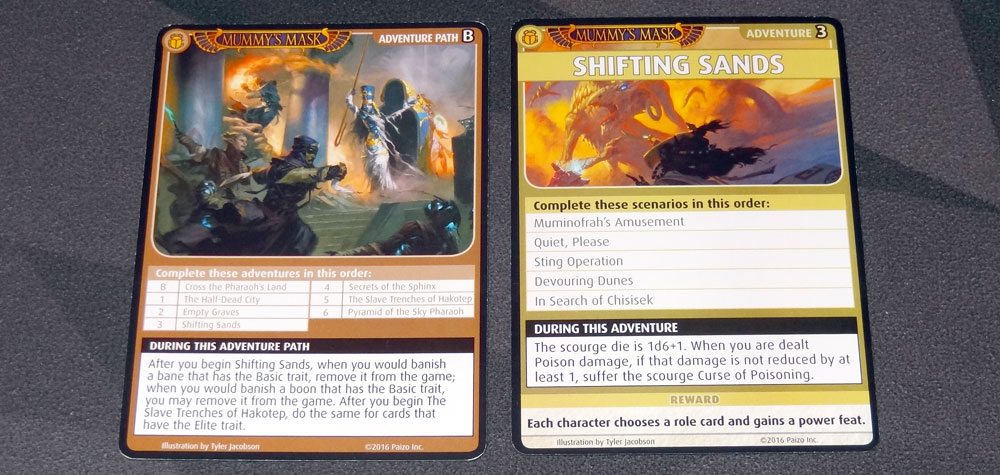
Our adventures in the Pathfinder Adventure Card Game: Mummy’s Mask continue! Having dealt with “Empty Graves” and the Forgotten Pharaoh Cultists, we move on to Deck 3, “Shifting Sands” … and, uh, more Forgotten Pharaoh Cultists. There are a lot of them.
The scourge die increases again, this time to 1d6+1, so you may suffer more harmful scourges. As with the other adventures, if you suffer Poison damage and can’t reduce it, you suffer a Curse of Poisoning. The other change when starting this deck is that we can start removing Basic cards from the game—Basic banes are automatically removed when banished; Basic boons we can decide whether to remove or not when banished. It means that the mix of banes will level up and we won’t keep encountering easy, low-level monsters and barriers, and that we can start weeding out the less-powerful boons. However, there are some we like to keep around, like Cure spells or a few of the basic blessings, at least until we’ve acquired a better replacement.
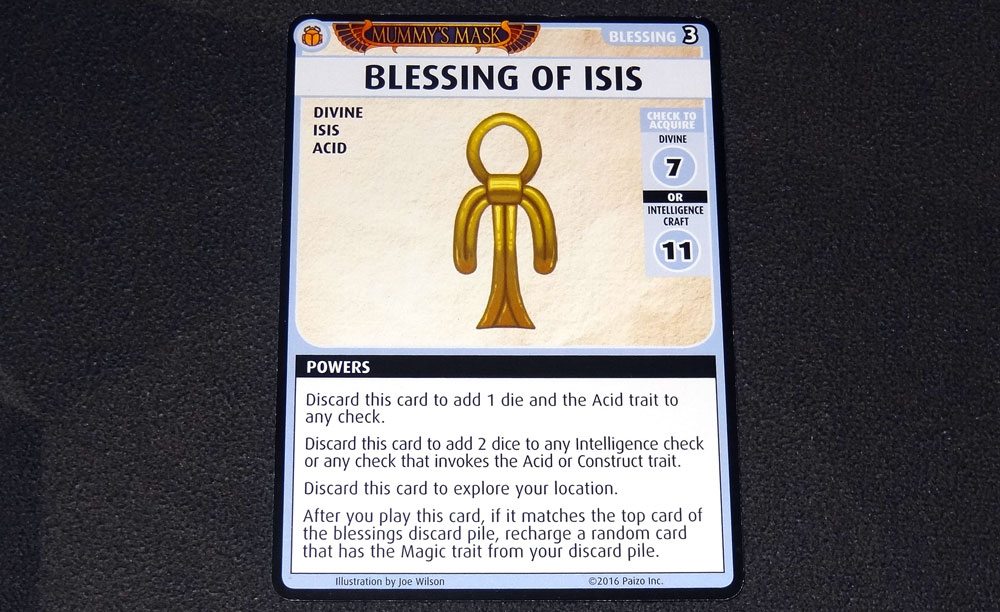
The new blessing in this deck is the Blessing of Isis, which has the Acid trait: it can add a die and Acid to any check, or 2 dice to any Intelligence check or a check that invokes Acid or Construct. You may also use it to explore. If it matches the top of the blessings discard pile, you recharge a random Magic card from your discard pile.

Scenario 1: Muminofrah’s Amusement
To gain access to the library, we have to put up with Muminofrah, an obstreperous noblewoman with a lot of power. On a whim, she decides she’ll grant us access … if we can win a camel race. (Estra: “Well, could’ve been worse. Last week it was a—” I’d tell you, but this is a family blog.)
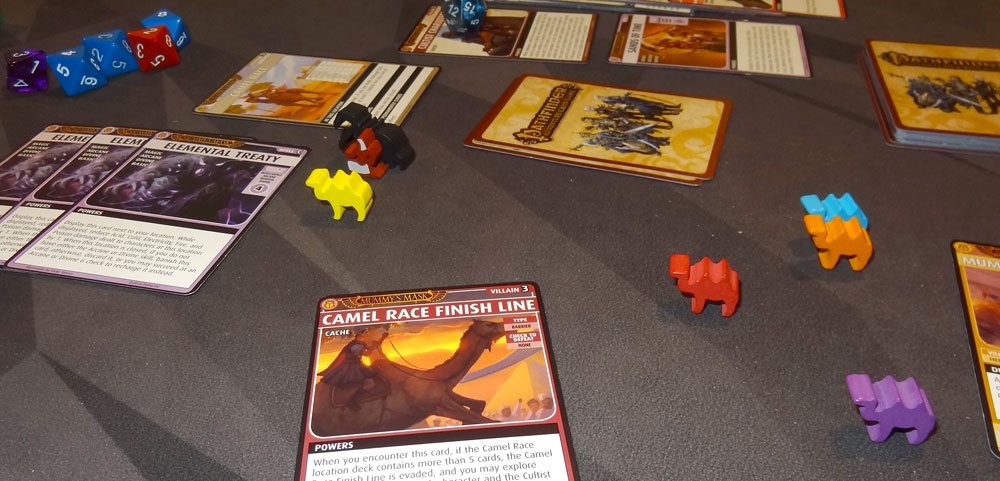
This scenario has only one location, the extra-large Camel Race deck, which has a little bit of everything, plus the “Camel Race Finish Line” villain card shuffled in. The blessings deck has three “Cameltrops” villains shuffled into it, and then there’s your competition—it seems the Forgotten Pharaoh Cultists are still looking for a chance to defeat us.

In this scenario, whenever you encounter a card and make a check to defeat or acquire it, the cultists get a chance to outrun you. Every player rolls a d6 and d8, and you take the highest value, and then add 1 for every player (in our case, 5), and then 5 more if it’s a combat check. If your check to acquire/defeat isn’t at least as high as theirs, then the card goes into their trophy pile. If you meet or exceed their roll (and, of course, pass the check), then the card goes into your own trophy pile. One of the tricks, then, is that you won’t actually acquire cards during this scenario, because everything goes into a trophy pile instead—so you need to watch how many cards you burn through from your deck.
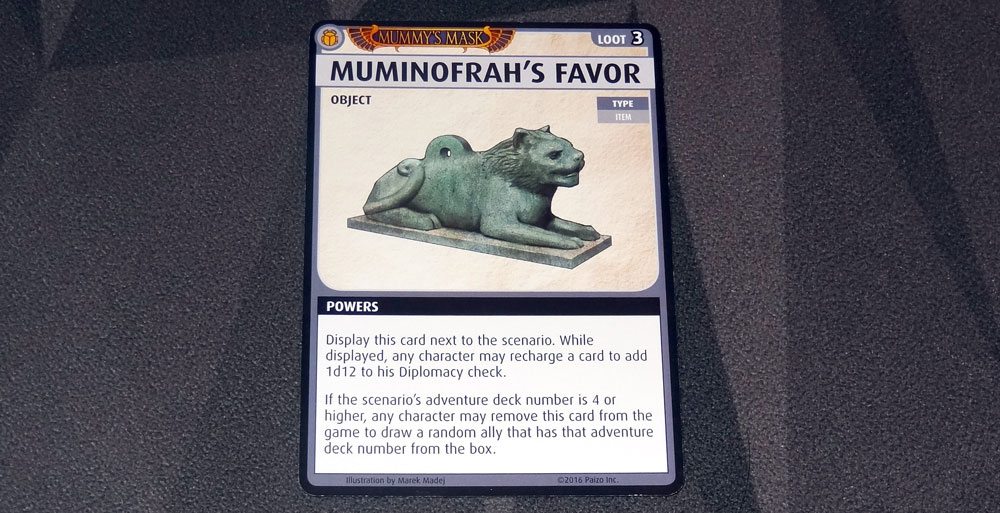
When you encounter the Camel Race Finish Line, you check how many cards are left in the location: if there are fewer than 5, the race is over, but otherwise the card gets shuffled back in and you may explore again. Essentially, you’re going to have to plow through most of the deck—once you actually do encounter the finish line, you compare trophy piles and the characters (and the cultists) each add a d6 + d8 to their trophy piles. Whoever has the highest wins the race, along with the Muminofrah’s Favor loot card.

We played a round or two and soon realized that the cultists were pulling ahead quite a bit. (We used some camel meeples from Sailing Toward Osiris and a giant spider meeple as a visual aid for how many cards were in each trophy pile.) The problem was that each of us could only move forward (earn trophies) on our own turn, but the cultists could move forward on every turn. We decided it probably made the most sense to focus on one or two players, and everyone else should not explore and just reset their hands to assist the racers. Tup and Ahmotep were ahead at the time, so we decided we’d try to help the two of them win.
But then on the next turn, Tup drew both of his Elemental Treaty spells, and Ahmotep had already played one—it meant that Tup could use his power to add 4 to any check by recharging a card, but we no longer had to worry about everybody risking fire damage when that happened. So we decided at that point to focus on Ahmotep, since Tup could add 4 and Ahmotep could also add 2 after dice were rolled.
All the other players passed cards to Ahmotep as well, just so she would be able to take more explorations—though the downside was that because she had so many cards in hand, she wasn’t drawing from her own deck as much, and failed to get some good melee weapons for the second half of the game. And despite all the help, Ahmotep and the cultists were still neck-and-neck a couple rounds later, and we were approaching the finish line.
We did some quick figuring and realized that there was only 1 boon left in the deck, an item, and the rest were all monsters and two barriers that Estra had shunted to the bottom of the deck with an Augury spell. Ahmotep used her Locate Object spell, which lets her examine cards until she reaches a boon, and then encounter it—figuring that she would be able to grab that boon, and then use an Augury spell to find the finish line. Unfortunately, first she examined three monsters in a row … all with trigger effects! And here she is with no weapons. Well, she did manage to defeat the monsters but most of them went into the cultists’ trophy pile, and then she did acquire the item for her own trophy pile.

By the time we reached the finish line (with only 2 barriers left in the deck), Ahmotep and the cultists were tied at 7 cards each in their trophy piles. We all rolled a d6 + d8 to add to the trophy numbers, and Ahmotep rolled a 14, while the cultists rolled a 13. It was a photo finish, but Ahmotep won by a nose, and gained the Favor of Muminofrah. Our reward was that every player acquired all the cards in their trophy piles.
We didn’t ever draw any of the Cameltrops in the blessings deck—they have a rubber-banding effect, taking a card from the leader’s trophy pile and putting it into the trophy pile with the fewest cards.
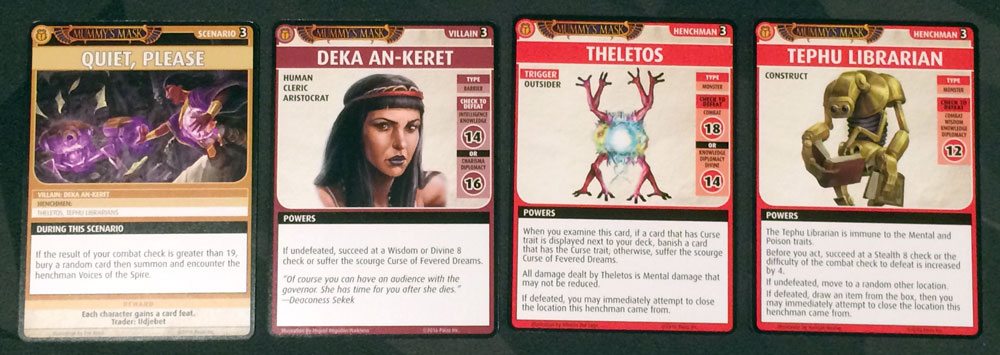
Scenario 2: Quiet, Please
Having won the camel race and secured Muminofrah’s favor, we’re off to the library to do some research about this forgotten pharaoh. But those librarians are pretty sensitive about noise. In this scenario, if your combat check ever exceeds 19, then you have to banish a random card from your hand and then summon the Voices of the Spire. Fortunately, you can try to use Charisma/Diplomacy against the Voices—otherwise, if you fight them, not only do you risk triggering the effect again, but you also suffer the inherent penalty for fighting the Voices rather than speaking nicely to them.
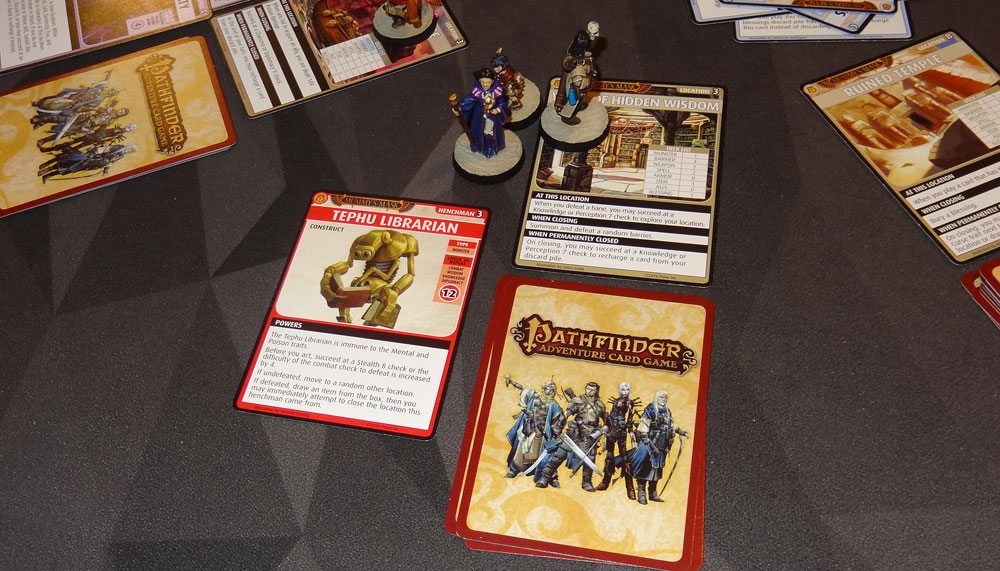
Right at the start, Mavaro made a lot of noise fighting the Rukh in the Vault of Hidden Wisdom and had to bury a card—oops, there goes his Cure spell … But at least the Rukh was dead. He got a good scolding from the Voices but managed to avoid any further harm. Soon, though, he also found a Tephu Librarian henchman—fortunately there are other options besides fighting them, and Mavaro defeated it, and then closed the location. When you defeat the librarian, you get an item from the deck—because the librarian helps you out!
Estra found another Librarian at the Glass Pavilion, but not before triggering a Symbol of Fear barrier. She couldn’t pass the check to avoid it, so she was stuck with it. At the start of each turn, she had to recharge her hand and then redraw 1 fewer card, which made it harder to plan ahead. She did still manage to defeat the Librarian and close the Glass Pavilion, though.
The third Librarian was spotted on the Pleasure Barge by Tup, who was just there to scope things out, honestly! Fortunately, Tup is very good at Diplomacy and the Librarian was no problem. Sorry, folks, the Pleasure Barge is closed.
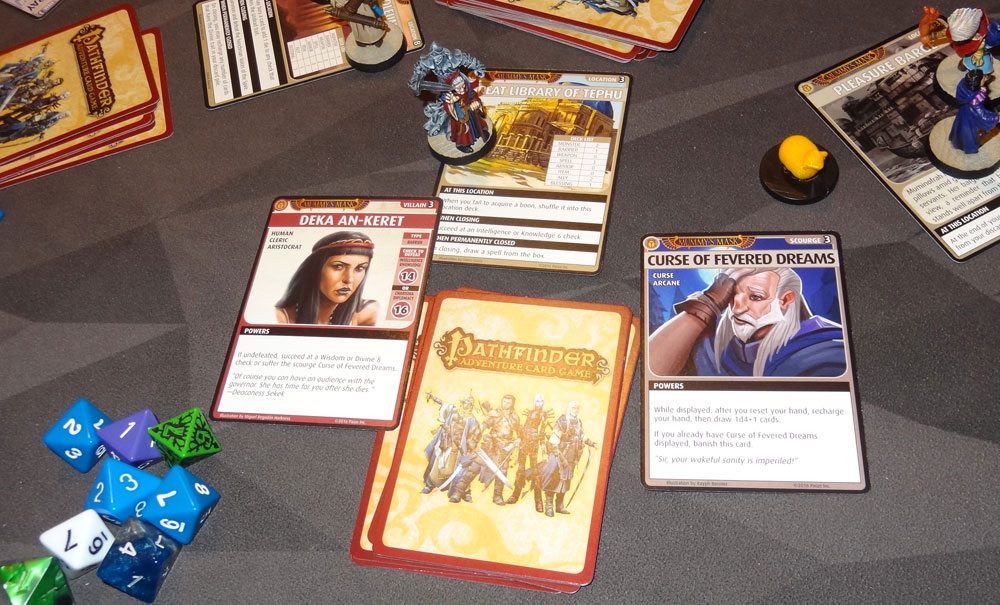
Estra came across the villain, Deka An-Keret, in the Great Library of Tephu. She doesn’t fight—instead, you need Intelligence/Knowledge/Charisma/Diplomacy, and she might cause a Curse of Fevered Dreams if you fail. This is a nasty curse: when you reset your hand, you recharge everything and then draw 1d4+1 cards, so you might end up with only 2 cards. Estra defeated her, but she ran away—we narrowed it down to either the Ruined Temple or the Dilapidated Plaza.
Tup went to check out the Ruined Temple and found another Librarian, but he got a little cocky and failed.

Ahmotep went to the Dilapidated Plaza, and found the henchman Theletos, an outside that looks like a ball of light with eight frog legs sticking out of it. Interestingly, if you examine Theletos, it will banish a Curse if you have one, or else give you a Curse of Fevered Dreams. Fortunately, Ahmotep encountered it through exploring and didn’t trigger that effect. Theletos was defeated, the Dilapidated Plaza was closed, and we found Deka An-Keret hiding there.
Yoon went to the Ruined Temple to help temporarily close it, and then Mavaro took on the villain with a Knowledge check. She only needed a Knowledge 14, but with everyone’s blessings and help, she got to roll 9 dice and totally overwhelmed Deka with her incredible knowledge.
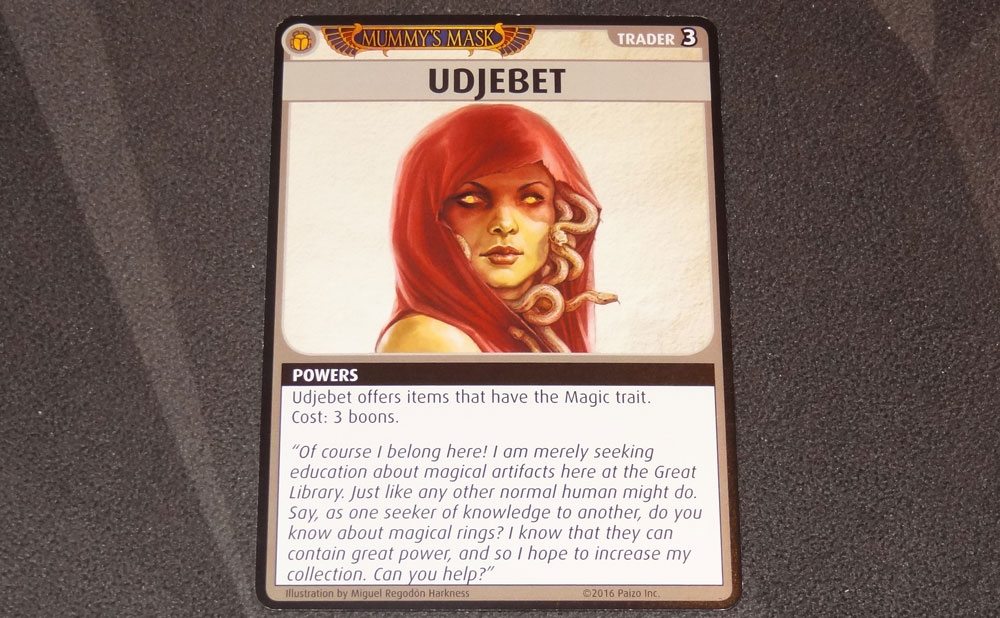
Our rewards were card feats and access to Udjebet, a trader who deals in magical items.

Scenario 3: Sting Operation
We discovered that the Forgotten Pharaoh Cultists are trying to breed Thriae, giant humanoid bees. Our mission is to rescue the stolen larvae, which will put the Thriae on our side. The scenario has a villain and only one henchman (the rest are random monsters), but then on top of that we put one Stolen Larvae henchman card in each location as well. To win, we have to have all of the larvae in our hands—which means that our hands start getting full. Anytime we take damage, we have to lose the larvae first, and they get shuffled into random open location decks, which means we have to go rescue them again. Fortunately, in this scenario we did not have to corner and defeat the villain. The Thriae Dancer and the Thriae Soldier are both summoned when needed.
Estra started at the Towering Obelisk, and used her Unwrapped Harmony ally to peek at the top three cards—one was the larvae, but the two others both had triggers. She lost all her cards fighting a hyena, but then put the larvae on top. When you encounter the larvae, you first must summon and encounter the Thriae Dancer henchman. Succeed, and you get the larvae. Fail, and you can still claim the larvae with either a Strength 5 or Constitution 4 check. Estra failed against the dancer, but did manage to pick up the larvae. One down, six to go!
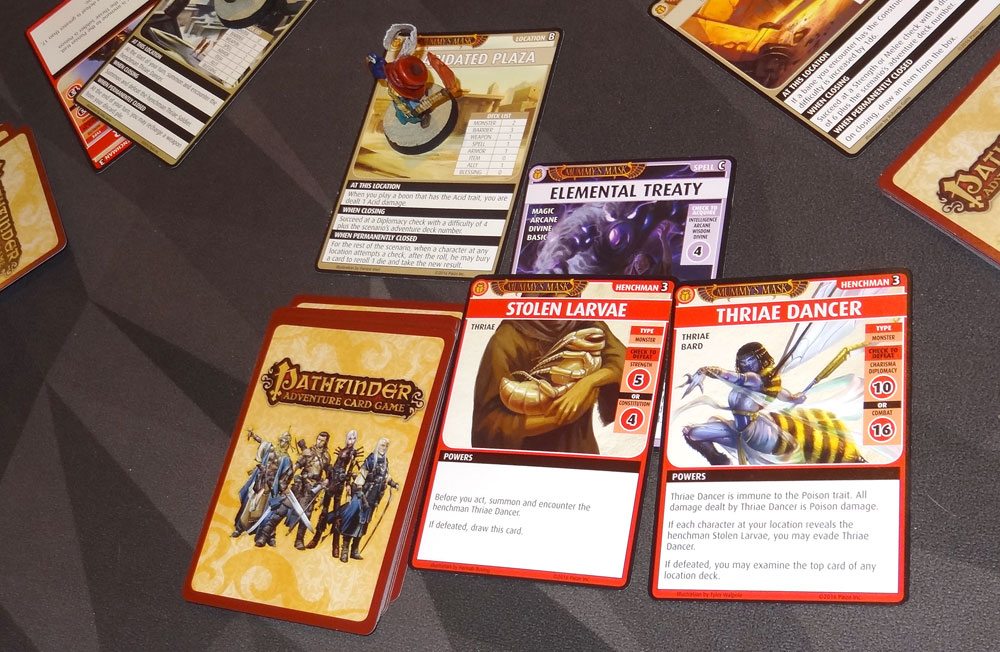
Tup went to the Dilapidated Plaza, and found the larvae right away. He used his diplomacy skills to sweet-talk the Thriae Dancer, and claimed the larvae. Two down! Mavaro also found some larvae at the Thriae Hive and “rescued” them, though he did not manage to talk his way past the dancer. Ahmotep was the next to find some in the Thornscrub, and then decided to use her Locate Object spell to dig for another boon … and hit two monsters with trigger effects. Again. She’s starting to think this Locate Object spell is a dud. But at least we were up to four larvae.

Yoon went to the Howling Sands, where she encountered the one henchman, Xerippe. She wasn’t carrying any Stolen Larvae, so she wasn’t able to evade her—after first summoning and encountering the Thriae Soldier, which is two Combat checks. She did manage to fight them off, but they don’t help you recover a Stolen Larvae.
Mavaro found a Stolen Larvae at the Volcanic Vents, but he failed against the Thriae Dancer and his Strength/Constitution check, so we lost the larvae and had to shuffle them back into the deck. Meanwhile, Estra came across the Guecubu monster, an undead carcass beast. Since she was carrying Stolen Larvae, we really needed to prevent her from taking any damage, or we’d have to go digging again, so we overdid it a bit helping her.
Yoon finally found the larvae at the Howling Sands, and decided to fight the Thriae Dancer instead of talking to her—she failed, and took Poison damage, which meant that she also got a Curse of Poisoning. We thought, well, that’s not terrible, because Yoon still managed to acquire the larvae. But then when she had to recharge a random card from her hand for the curse, it was the larvae! We only had a couple turns to get that back into Yoon’s hand if we wanted to win the scenario. Fortunately she has a power that lets her shuffle a card into her deck, so at least the larvae might not be at the bottom.
Ahmotep got the larvae at the Volcanic Vents—Tup had finally drawn Muminofrah’s Favor, which meant that we could get extra d12 for Diplomacy checks. That made talking to the Thriae Dancer a lot easier. Six down, one more to go!
Yoon, desperate to get that larvae from her deck, pulled off a nice move. She used her Pard ally to peek at the Thornscrub, which was full of monsters, and found the Ubashki Swarm, which has a trigger. She lost the fight on purpose, discarded a bunch of cards, and then reset her hand—which included the larvae. We drew a random card from her hand for the Curse of Poisoning, and it was not the larvae. And there was much rejoicing.
The blessings deck was running out by this point, but Tup found the last Stolen Larvae at the Precious Mine. With Muminofrah’s Favor displayed, he had no trouble at all charming the Thriae Dancer, and we had all seven larvae in hand and won! Fortunately, we never had to face the villain Zizzira, who summons Thriae Soldiers if you don’t have Stolen Larvae with you.
Our rewards for this scenario were a skill feat, and the loot Scarab of Mummy Defense. Nobody really wanted the Scarab, though, so we threw it back into the box.

Scenario 4: Devouring Dunes
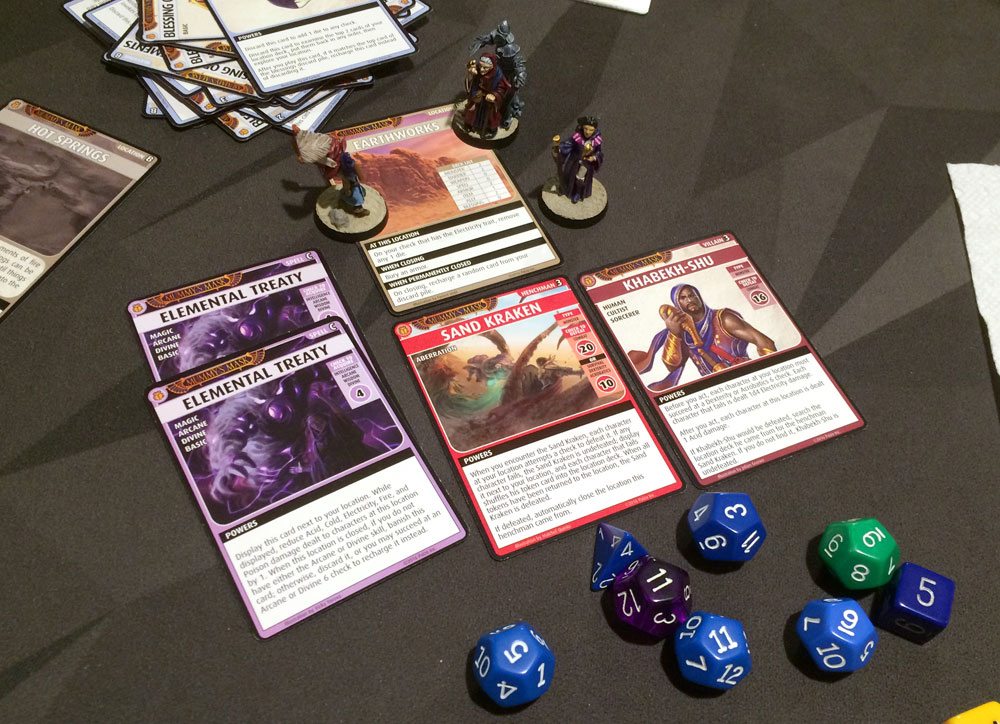
You know from the title that this isn’t going to be pleasant. I mean, either the dunes are going to be devouring us, or it’s some sort of sand-eating competition. Turns out it’s the former: there’s a Sand Kraken lurking in them thar hills. But we’re also being pursued by Khabekh-Shu, a sorcerer with a pet sphinx, so it seems like our best option.
“A few more steps and we’ll be safe in the devouring dunes!”
“We’ll never survive!”
“Nonsense! You’re only saying that because no one ever has!”
In this scenario, two special rules apply: first, every time you move, you take 1 Electricity damage. Also, if you defeat the Sand Kraken, it doesn’t go away—you put it in another open location, either at the bottom or shuffled in.
Ahmotep finally had both her Locate Object and Symbol of Pain spells in hand at the same time. Symbol of Pain gives an extra die for checks against cards with triggers for an entire turn. Between her regular explore, Locate Object, and a Blessing of Nethys, she was able to pull all of the boons out of the Scorched Ruins, and determine that the henchman there was a Forgotten Pharaoh Cultist. But that’s about the best thing that happened in this scenario.
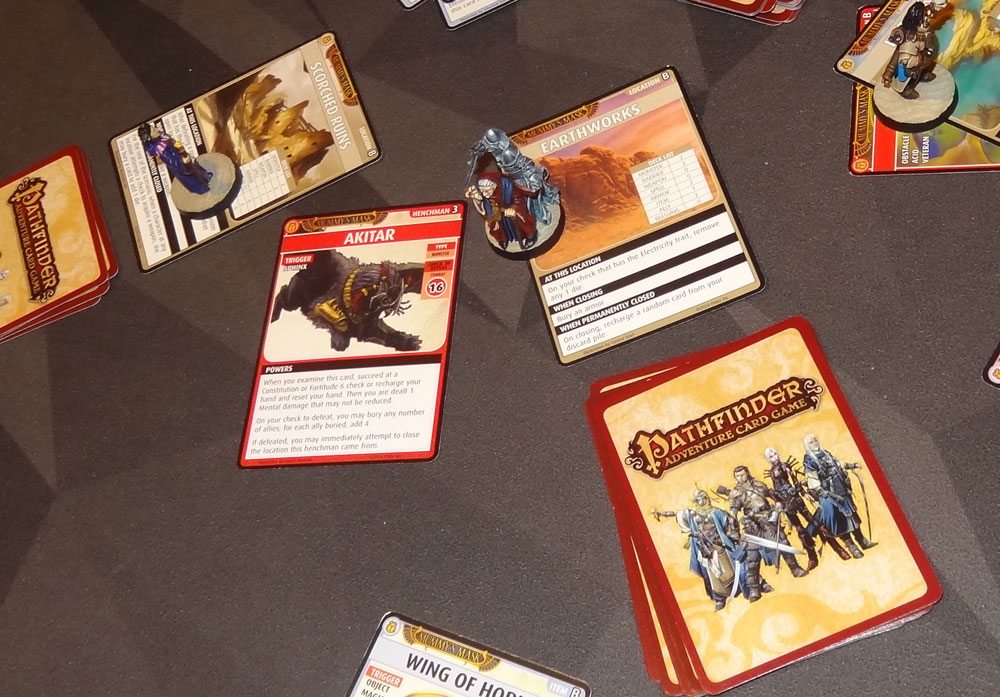
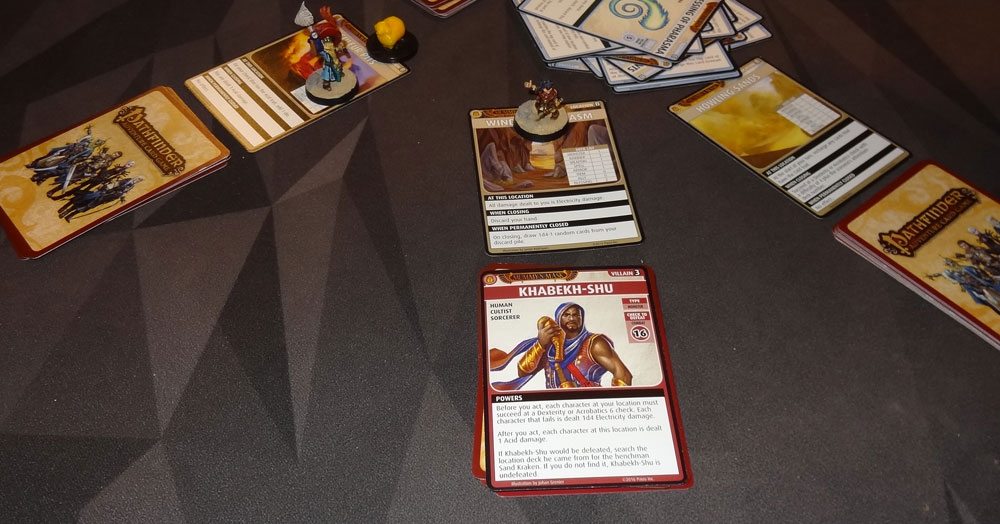
Estra found Akitar (the sphinx henchman) at the Earthworks, but wasn’t able to defeat it—and didn’t have the armor to close the location anyway. Ahmotep ran into a Blast Glyph barrier, took 4 Cold damage, and then got moved away from the Scorched Ruins. Mavaro was defeated by a Forgotten Pharaoh Cultist. Yoon finally found our villain at the Windswept Chasm and fought it, but it turns out that Khabekh-Shu is only defeated if the Sand Kraken is in the same location deck. Since it wasn’t, he got away, and took 4 cards from the blessings deck with him.
We did finally track down the Sand Kraken at the Shifting Sands. Yoon and Ahmotep were both there, so they both had to fight it, defeating it. We put the Sand Kraken at the Earthworks, one of the possible places the villain had escaped to, but then when Estra came across the Kraken, she got caught and had to shuffle her token card into the location deck.
We simply didn’t have enough time to chase the Kraken into the same location as the villain, so we failed the scenario, and had to try it again the next week.
Devouring Dunes, Take 2
This time around, with some more knowledge about how the Sand Kraken and the villain interact, we split up so that we could cover more locations—if somebody ran into the villain, at least we wouldn’t lose so many blessings. We also made sure somebody started at the Shifting Dunes, because when you defeat the Sand Eel to close the location, it goes to another open location, giving us a second opportunity to close it without running into the villain.
Tup found Akitar the sphinx at the Sulfur Pits early on, defeated it, and closed the location. Then Yoon managed to get all of the boons out of the Howling Sands on her first turn, and then encountered the Pharaoh Cultist. She defeated it, and closed the location.
Mavaro came across the Sand Kraken at the Hot Springs—no sign of the villain yet, but that’s good, because we really want to chase the Sand Kraken around. He defeated the Kraken, which automatically closes the location, and we sent it to the Windswept Chasm (since we get to choose).
Meanwhile, Estra found a Forgotten Pharaoh Cultist at the Shifting Dunes and defeated it, and then to close the location she defeated the Giant Sand Eel … and it also ran to the Windswept Chasm. Well, I guess now there were three potential ways to close that location: the Kraken, the Eel, and whatever henchman or villain was there in the first place.
Ahmotep had a rough time at the Scorched Ruins. She’d picked up a Curse of Poisoning earlier, which meant that every time she reset her hand she also had to recharge a card at random. Then she encountered the Mummified Sphinx monster, which forces you first to reset your hand, and then bury a card—not too bad the first time, because she only had two cards in her hand, so the Sphinx actually resulted in her having more cards in hand (at the cost of burying one). She fought, but lost. She used her Unwrapped Harmony ally to peek at the top three cards, and found the Mummified Sphinx again: she encountered it (resetting her hand again, burying a card again, recharging a card again) … and lost again. But at least she did see that the Forgotten Pharaoh Cultist was in the location, which meant that the villain was not.
Mavaro found a Forgotten Pharaoh Cultist at the Windswept Chasm, so then we knew for sure the villain wasn’t in that deck (with the Kraken and the Eel). He defeated it, and then had only 1 card left in his hand, which he discarded to close the chasm. Now we knew the villain was in the Earthworks, so we chased the Sand Kraken there and put it at the bottom.
Mavaro and Yoon camped out at the Scorched Ruins because they were good at acquiring weapons for temporarily closing it, and the rest of us went to the Earthworks to chase down the villain. Estra was the one who located him—we went through the entire deck, and he was on the bottom, just above the Kraken we’d chased there. She hit him with a Holy Light (while Mavaro closed the Scorched Ruins). Khabekh-Shu was blinded by the light and we shoved him into the path of the Kraken—just like Boba Fett and the Sarlacc. The end.
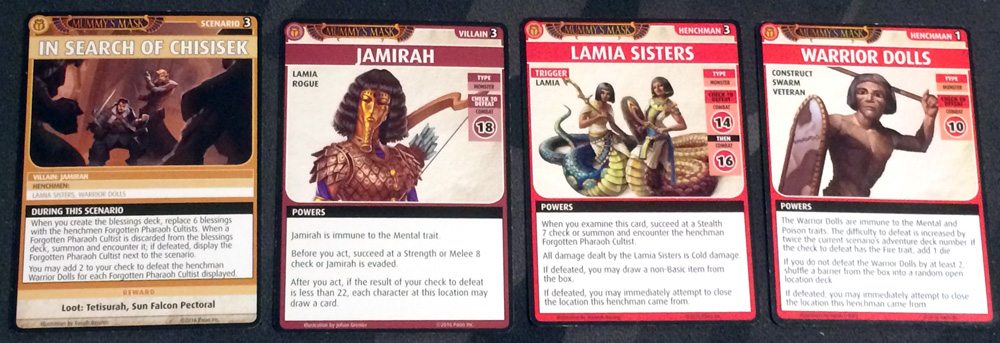
Scenario 5: In Search of Chisisek
We were now trying to track down Chisisek, the architect of the Forgotten Pharaoh. Did I mention he’s dead? The lamias are trying to hunt us down, and the Warrior Dolls are protecting the tombs. But we are hoping to break the spell over Tetisurah, the sphinx that guards the valley. It’s a lot to do in a day.
In this scenario, there are Forgotten Pharaoh Cultists shuffled into the blessings deck—when they show up, we have to summon and encounter them. If we win, it makes the Warrior Dolls easier.
Right at the start, Tup drew Muminofrah’s Favor, which he put into play—it can be used to boost Diplomacy checks, which was great against the Cultists.
Ahmotep started off the game since once again she had her Symbol of Pain and Locate Object spells together, but she totally botched her combat against a Desert Trapper, which should have been an easy fight. She didn’t get much further on her first turn, but did manage to peek into the deck enough to know that there were Warrior Dolls at Chisisek’s Tomb.
Tup started off at the Pleasure Barge, where there are 5 allies—he’s got Charisma oozing out of his totally-not-a-goblin ears, and figured he’d be pretty good at acquiring a few allies and closing the location. Sadly, the first ally he encountered was a camel, which doesn’t care about Charisma, so then he had to take Poison damage (a consequence at the barge). Then he ran into the Warrior Dolls, which are particularly susceptible to Fire, so they were easily taken care of and the Pleasure Barge closed. A nice first turn, but it meant that we didn’t get any of the new allies.
It was slow going for a while after that—we had a couple rounds where nobody found any henchmen or the villain, just plowing through various locations. Ahmotep eventually got all the way through Chisisek’s Tomb, defeating a Warrior Doll and then Theletos to close it. Hmm. No sign of Chisisek yet.
Then, we had a string of Pharaoh Cultists in the blessings deck. DeeAnn swears she shuffled the thing seven times, but we hit four of them in a row. Tup, Yoon, and Mavaro each defeated theirs, but Estra wasn’t quite charming enough. Estra did, however, find our villain hiding in the Great Library of Tephu. She’s a Lamia rogue with a Combat 18 to defeat; before you can attack her, you must do a Strength/Melee 8 check or she’s automatically evaded. Well, we weren’t positioned to close locations yet, so Estra failed her Strength/Melee check (she only rolls a d4 if she doesn’t have help), and we let Jamirah run back into the library. (Estra: “Oh! You’re so strong. I guess I can’t keep you from running away.”)

Knowing where the villain was, we decided to focus on closing a few more locations before going after her. Yoon found the Lamia Sisters at the Shifting Sands, and Ahmotep pitched in for the second combat check. Then Yoon defeated the Giant Sand Eel to close out the location.
Estra got another chance to defeat a Forgotten Pharaoh Cultist in the blessings deck, and this time she turned on the charm. She used her Blessing of Nethys to check ahead in the Tarworks, and found the Warrior Dolls. With four defeated Cultists, she had a +8 against the Warrior Dolls and defeated them handily, and then closed out the location. Meanwhile, Tup tracked down the Warrior Dolls at the Thriae Hive, and then defeated the Thriae Soldier to close the hive.
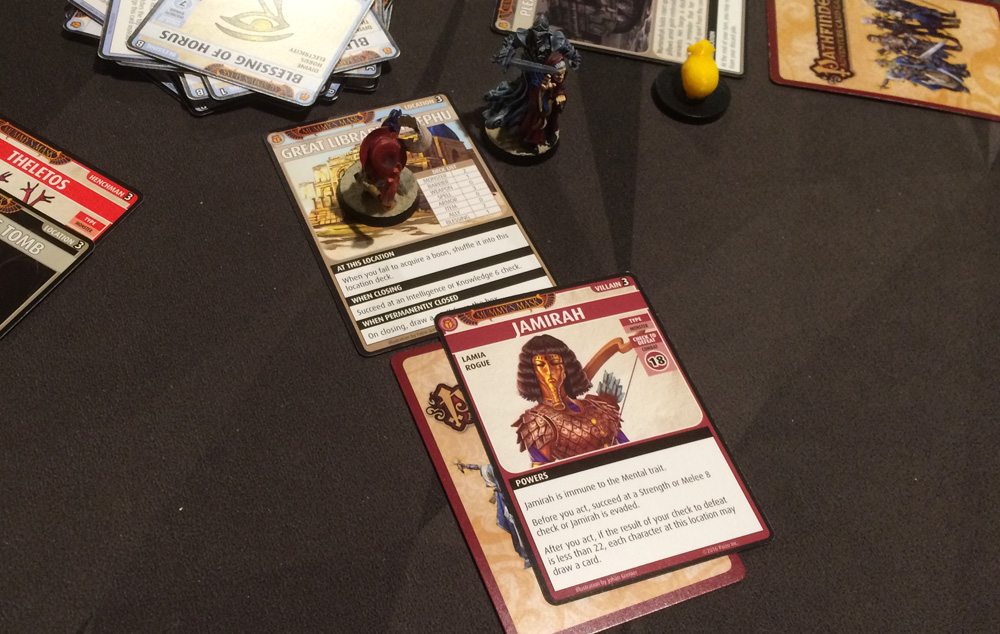
We had been planning just to close out a few locations and then get into position so that somebody could fight Jamirah, but Mavaro also found the Warrior Dolls at the Scorched Ruins, so he went ahead, defeated them, and closed the location. We had Jamirah pinned down at the library. With Tup’s help, Estra passed her Strength/Melee check so Jamirah couldn’t evade her, and then we all threw blessings at Estra to make the final fight a cinch. Success!
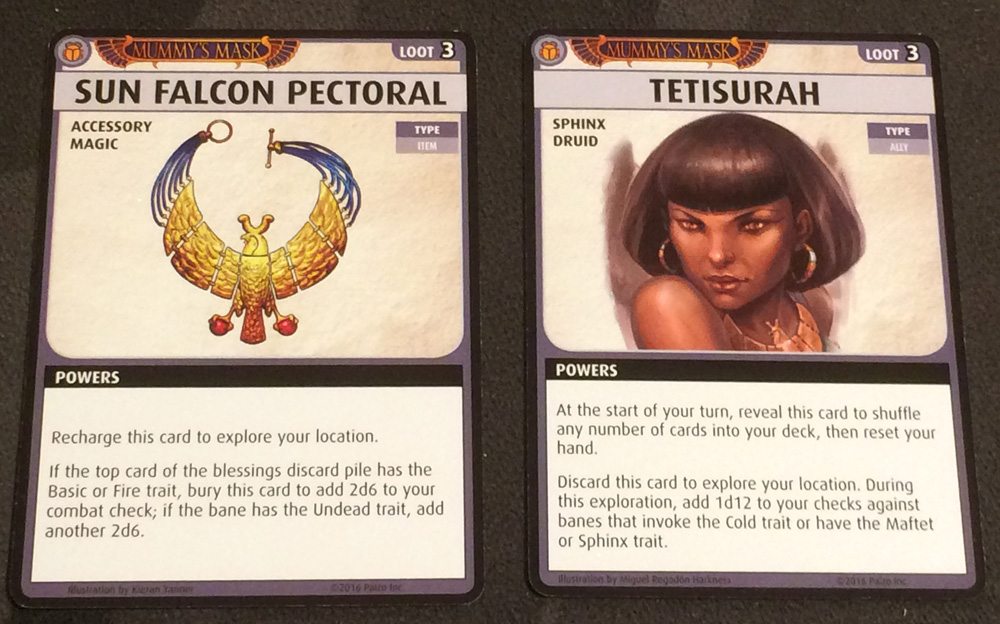
Our loot for this scenario was the Sun Falcon Pectoral and Tetisurah. The Sun Falcon Pectoral is a magic accessory that can be recharged to explore; under some circumstances, you can bury it to boost a combat check. Tetisurah is a sphinx druid ally—she lets you shuffle cards back into your deck and reset your hand at the start of your turn, basically letting you mulligan if you don’t like your hand. She can also let you explore, with a bonus against Cold, Maftet, or Sphinx banes. Mavaro claimed the pectoral, and Estra took Tetisurah.
In addition to the loot cards, we had now finished the Shifting Sands adventure, which meant that we got to pick our role cards and gain a new power feat. I’ll introduce you to our new roles next time, when we begin to investigate the “Secrets of the Sphinx!”
Disclosure: I received a copy of this Adventure Deck for review.


