The sixteenth, seventeenth, and eighteenth centuries are known to historians as “the age of sail,” when European powers used massive fleets of sailing ships to expand their influence and create global empires.
This time period has provided ripe fodder for games since pretty much the beginning of modern boardgames, but Burnt Island Games’ Endeavor: Age of Sail is one of the better entries in the genre.
Endeavor: Age of Sail is a game for 2-5 players, ages 12 and up, and takes about 90 minutes to play. It’s currently available from Amazon and other fine retailers.
Note: Endeavor: Age of Sail is somewhere between a reprint and a second edition of the game Endeavor previously published by Z-Man. Age of Sail does feature all-new artwork (albeit by the same artists as the original) and updated and at times expanded rules. We decided in this case that this version is different enough from the original to be treated as its own game.
Endeavor is a very fun game to play, but what also sets it apart in a fairly crowded genre is just how beautiful it is.
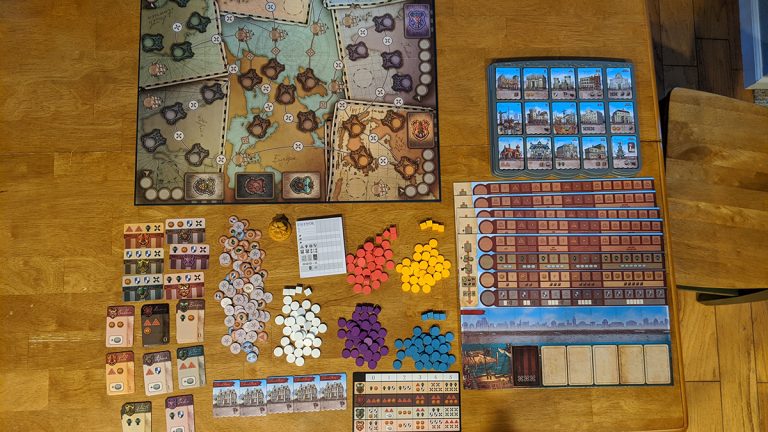
In the over-sized, 15-pound box (that is nonetheless still Kallax-compatible), you’ll find:
The game also includes a set of components for the Exploits expansion, which I have not had the opportunity to play yet.
The board shows a stylized representation of the world. The middle right portion shows Western Europe, with eight major population centers marked as cities.The designers of the game made an interesting decision in not having the players represent specific European powers. As a result, the player colors do not match any particular country, and the only geographic markings on the map at all are the big regions used in the game–Europe, North America, India, The Far East, Africa, South America, and The Caribbean.
Each of the other regions is shown as a callout that wraps around Europe on three sides. Each region has four cities of its own, along with a shipping track of either seven (for North America, India, and the Far East) or six spaces. Each region also has a designated place for that region’s deck of asset cards.
The map also includes fleet spaces, which are additional spots players can move to, and open sea spots for later in the game. Every city and fleet space is joined to at least one other city or fleet space by a link that provides a bonus to the player that controls both ends.
The trade tokens are all circular cardboard pieces. Their backs are all the same, while their fronts show one of eight symbols. Four of those symbols allow players to advance on one of the four attribute tracks, while the other four provide additional actions that players can take on some future turn.
The building tiles are all nice, thick cardboard. They all have very beautiful artwork, but have icons for gameplay. The top right shows the building level, which determines when players can purchase it. The bottom right of most buildings shows an icon for the type of action available to owners of the building. Almost all of the buildings require activation, so there’s a circle on which players will place a population disc. Finally, some of the tiles provide the player an attribute bonus, and this is shown in the bottom left.
I do wish the designers had made the names of the buildings easier to read, but in the end the names are really basically flavor text that don’t impact gameplay in any way, so I’m willing to forgive this point.
In addition to the 49 regular building tiles, there are also 5 starting buildings. Unlike the others, which are printed on both sides with the same information, these starting tiles have different buildings front and back, which allows players to choose their early game strategy.
The asset cards are split into eight decks. There’s one for each region, with cards numbered 1-5. Then, there’s a Europe deck and a slavery deck with cards labeled 0-5, and a governor’s deck with a single card for each of the six regions. (Note: see below for a discussion on how the game addresses the issue of slavery.)
Each card is pretty simple: the number, which tells players whether or not they can pick up the card, is a nice big number in the lower right corner. Most of the rest of the card shows the rewards one gains from having the card, using icons that match those on the attribute decks.
The card glossary is printed on heavy cardstock and simply shows the rewards given by each card in the game.
Honestly, I’m not sure if this was even on the table the first time we played, but I wish I had paid attention to it. Particularly in the late game, as knowing that the attributes I needed were on a card just below the top visible one would have been really helpful for my strategy. There’s no rule that says that you can’t look through the decks, but the glossary is meant to make that unnecessary.
The player mats are of the same thick cardboard as the main board. Each is identical, showing the attribute tracks along the top; the seaside, where buildings are placed below that; and then the harbor (where unused population discs go) and card slots below that. There’s also a handy guide showing the phases of each turn printed on the board.
The mats are nicely sized for the components that need to be placed on them, which seems like an obvious thing that is sadly overlooked in a lot of games. The layout is simple and makes it very easy for players to keep everything organized. I found that the mats helped new players get acclimated very quickly to the game.
The game also includes 4 track extenders, in case a player is able to increase an attribute beyond the 15 spots on their board.
The population discs and status cubes are basic wooden tokens, which isn’t a criticism at all. Making either of these fancier would have probably detracted from the gameplay, so I was totally happy having these easy-to-move, easy-to-stack, and easy-to-store components in the game.
A place where a lot of games get fancy these days is whatever they use to indicate the starting or current player, and Endeavor: Age of Sail is no exception. Here, it’s a large plastic crown. It’s one of those components that isn’t super needed unless you have to pause the game and want some kind of reminder as to where you are when you resume, but it’s a fun piece that fits the theme nicely.
Scoring in the game is fairly straightforward but there are eight different things you can get points for, so having the scorepad is a nice touch to make adding up the scores easier at the end of the game.
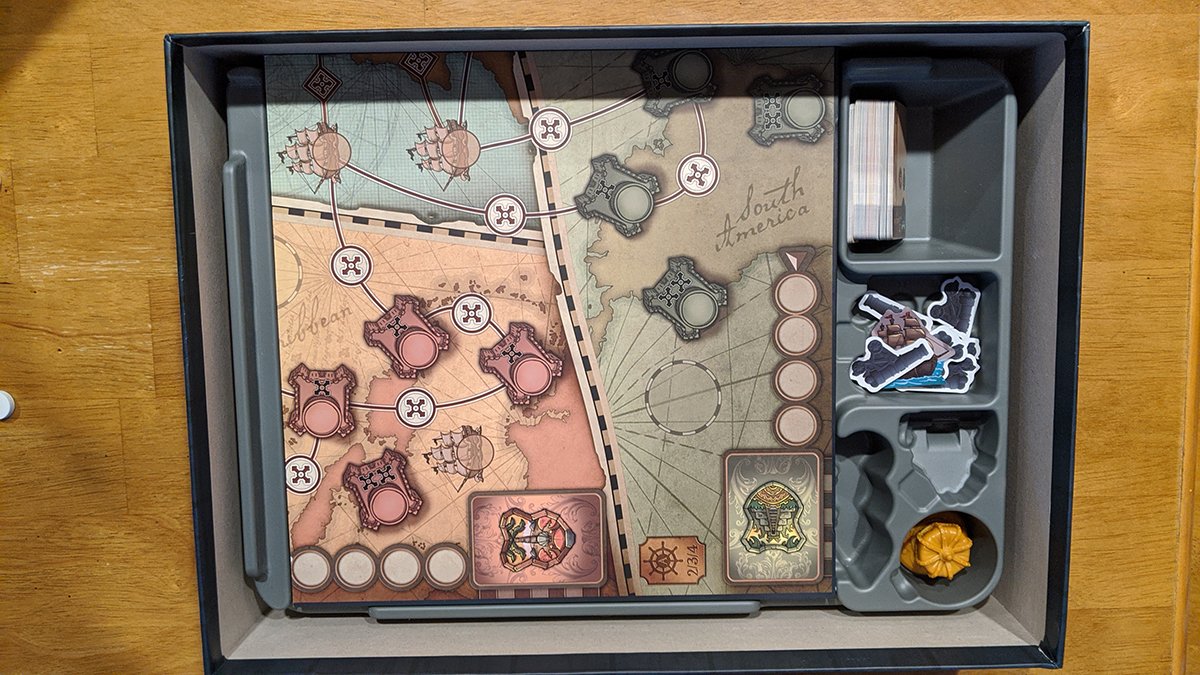
Any game that provides more than a cardboard trench for storage gets extra points in my book, but Endeavor goes way, way beyond even a simple insert and a bunch of plastic bags. In fact, this game has just about the best insert I’ve seen ship with a game, designed by GameTrayz.
The aforementioned bigger-than-normal box is basically mandated by the size of the player mats, but they took advantage of that space to provide a set of plastic trays to store the buildings and all of the pieces players need to get started.
The building tray has slots for each building that are molded to fit the tokens perfectly and, also, the slots have an indentation in them that lets the buildings sit at the top of the tray (it’s taller than it strictly needs to be).
This also gives an easy way to get a building out of the tray, since simply pressing down on a edge pushes it up for easy removal. It also includes a lid to keep everything in place when the game is stored on its side. But best of all is the fact that this isn’t a storage piece but something that can be used in game play.
I can’t describe how nice it was to be able to simply pass the tray around the table when each person wanted to buy a building, rather than having stacks somewhere that would probably get knocked over and mixed or that would require the player furthest away to ask someone to get their building for them.
As a serious gamer, I can’t begin to guess the amount of time I’ve spent just setting up games. Opening bags, separating out pieces by color, and digging through the rules to remember just which pieces each player starts with consumes way more time than it should. And so the Endeavor player trays are one of my favorite things ever.
Each player’s starting supplies–their 35 population discs, four tracking cubes, and starting building–all go in this great tray that not only can simply be handed to each player at the beginning of the game, but sits next to them throughout to store these pieces. The trays also provide a space for one of the components from the Exploits expansion, and like the building tray have lids that snap on to keep everything in place during storage.
When you pull the player and building trays out of the box, you have a layer with the player mats, held in place by a set of risers on the main insert below.
Below them is the board, which when folded sits nicely in its own slot.
Pulling out the board reveals the main insert. Made of grey molded plastic, it has slots for every component from both the main game and the Exploits expansion. It also has slots for additional components that were included in the Kickstarter edition of the game, so that is why there are some empty spots in the image above.
You can download a copy of the rulebook here.
The goal of the game is to be the empire with the most glory at the end of seven rounds. Glory is gained by increasing attributes, opening new regions, controlling cities, and fleets, and the routes between them, and owning buildings and cards.
Place the board on the table on the appropriate side. Two or three players use the 2/3/4 “A” side, and five players the 4/5 “B” side. For four players, the difference between the sides is the level of conflict desired, as the 2/3/4 side has many fewer cites in Europe and fewer links between cities and fleets, so with only four players, they will bump into each other a lot more on the A side of the map than they will on the B side.
Next, place the trade tokens randomly on the board everywhere there’s a circular space. I love this line from the rulebook: “This setup task goes quickly if a few players help out.”
Separate the asset cards into their eight decks. Do not shuffle them, but instead place each stack face-up on the appropriate spot on the board with the 0 (for Europe and slaves) and 1 cards (the other regions) on top and then counting up from there. The governor cards are slid under the board next to each region.
Place the building tray on the table somewhere, making sure that each stack of buildings is the same and that they are in the right places, with the level 1 buildings in the first column, level 2 in the second, and so forth. The order of buildings in each column does not matter. Also give each player their tray with their starting pieces. (Oh how I love that this is a thing.)
Randomly choose a starting player and give them the crown.
Each player now chooses their starting building in turn order. They can either select the Colonial House, which will allow them to immediately start occupying cities in Europe, or the Merchant Dock, which allows them to immediately start sending ships out to open up new regions. The chosen building is placed in the first spot on the seaside, and one of the population discs from the supply is placed on the activation circle on the building. They also place each of their status track cubes on the zero space on each attribute track.
The game lasts for seven rounds, with each round consisting of five phases. According to the rulebook, each phase is to be done in turn order, although it does say that more experienced players may choose to have the first player do the first three phases, then the next player do those phases, and so forth, before everyone returns to turn order for phase 4. The first time we played we ended up doing phases two and three simultaneously, because none of us really grasped the strategic advantage of making these early-phase decisions based on what other players were doing.
Each player in turn order (although, see above) takes the building tray and selects one building to construct. While there is no explicit cost for construction, you are limited in where you are on the Industry track–the top attribute track. If you are at zero (the starting point) or one on this track, you may only build level 1 buildings. Advancing Industry to 2 or 3 lets you build level 2 buildings, while 4-6 lets you build level 3 buildings. At 7-9 you can build level 4, and from 10 up you can build level 5. You can always choose to build from a lower level if you want, or if all of the buildings in your current level are gone. You are also allowed to build the same building more than once. If the building you choose includes an attribute symbol in the bottom left, you immediately move the appropriate attribute level up.
In turn order (although this is the phase where I can’t really seen turn order ever making a difference), take the number of population discs from your supply based on your spot on the Culture track. This follows the same basic pattern as Industry: spots 0-1 give you two discs per turn, 2-3 three discs, 4-6 four discs, 7-9 five discs, and 10 and up six discs.
These discs are all placed in your harbor.
In this phase, players decide which buildings they want to be available this turn. This doesn’t tend to be much of a choice in early rounds, as you will likely be able to pay off all of your buildings, but later it becomes an important part of the strategy. Thus, in early rounds, you can probably get away with having everyone do this simultaneously, but in later rounds it needs to be done in turn order.
How many workers you can pay depends on your spot on the Wealth track.
Paying off workers involves moving discs from buildings you activated in prior rounds so that they can be activated again this round in the next phase. This is why, in the setup, you place a disc on your first building: when you get to this step, you will have one worker that needs to be paid off and the ability to pay off one worker. (I actually like this bit as well, instead of the normal thing games do where the first round is an exception that skips steps.)
In later rounds, you may have more buildings than you can afford to pay off, in which case you need to choose which ones to do. (In the final round, for instance, you will have seven buildings, but the most workers you can ever pay off is six.) You cannot use a building in a round if its activation circle has a disc in it, so it’s an important decision in the later rounds. You also must use discs to activate buildings, so freeing up the disc is often just as important as freeing up the building.
Round 4: Action
The Action round is where the majority of stuff happens in the game, and needs to always be taken in turn order.
There are two ways players can take actions: activating a building or spending an action token. Each player performs a single action or passes, with the next player performing an action or passing, and so forth until everyone has passed.
Activating a building is by far the more common way of taking an action. To do this, you simply take a disc from your harbor and place it on the activation circle on the building you wish to activate, and then perform the action on that building. Some buildings allow you to choose between two actions, while others allow you to perform multiple actions. In this latter case, performing both actions counts as a single turn.
During the game, you will acquire trade tokens, some of which grant you an action. On any turn after acquiring the token, you can discard it from the game and perform the action indicated. You do not need to spend a disc in order to do this.
All trade tokens that do not grant actions allow players to advance on a specific attribute track. These tokens are placed on the circle to the left of the track, and the status track cube is moved up one space.
The possible actions are ship, occupy, attack, payment, and draw.
When performing a ship action, you will take another disc from your harbor (separate from the one you used to activate the building to get this action) and place it on either a shipping track, fleet space, or open sea zone.
The shipping tracks are sets of either six or seven circles that lead to the deck of cards in each region. When you play on a shipping track, you place your disc on the unoccupied circle furthest from the deck and then collect the trade token from that space. As all of the tokens are face-up on the board you always know exactly what reward you will get. If you play on the final space in the shipping track, the region becomes open, and the governor card for that region is awarded to the player who placed the most discs on that region’s shipping track. Playing on a shipping track establishes your presence in the region, which is a necessary prerequisite for playing a disc anywhere else in the region.
Fleet spaces are the spots in the open sea, and are played by placing another disc on the space. There are four fleet spaces on the “A” side of the board, and five on the “B” side, that are considered part of Europe and thus available to all players at the start of the game. The other fleet spaces are inside the regions and can only be played on if you have a presence in that region. When you play on a fleet space, you immediately claim the trade token there.
Open sea zones are a backup way to gain a presence in a region if you did not place at least one ship on the shipping track. The only requirement to play here is that the region be open (because you will always be better off playing on the shipping track in a closed region). You do not get an immediate award for playing in an open sea zone; it only grants you the ability to play elsewhere in that region.
The occupy action is similar strategically to the shipping action: you place a disc on an unoccupied city in Europe or in an open region in which you already have established a presence, and claim the trade token. Occupying cities allows you to gain cards in that region; more on that in a bit.
Cities and fleet spaces are connected by links. If you have discs on both sides of the link, you are said to control it. Many links have trade tokens, which you immediately gain, and all bestow glory points at the end of the game.
Attacking is the primary means by which players interact in the game. But war is costly: you need a minimum of three discs to do it most of the time. First, you place a disc on the building that gives you the attack option. Then, you have to discard a second disc back to your supply. Finally, you discard another player’s disc from the board, occupying it with a third disc from your harbor. (Discarded discs go back to your supply, not your harbor.)
It’s possible to attack with only two discs if you are using an action token, since you don’t need that first disc to activate the action, but you must always discard a disc and then have another to occupy the territory. You also can only attack opponents in regions where you have a presence. If the attack means that you are the first to control a link (because you already had the other side), you would collect the trade token from the link as an additional reward for the fight.
The payment action allows you to move a disc from a building back to the harbor, freeing both a disc and a building for use either later in this round or in a future round. It is identical to paying a worker in phase 3, but potentially allows you to use a building more than once in the same round.
Finally, the draw action allows you to draw a card. In order to do this, though, you must not only have a presence in the region, but you must control cities and/or ships in the region more than or equal to the value on the card. This is why the Europe and slave decks have a “zero” card, so they can be drawn even if you haven’t placed any discs in Europe. You can only draw the top card of the deck, even if your presence in the region would allow you to draw a higher-value card. You may, however, draw a card from a region that is not yet open–so long as you have a presence in the region you can draw cards there.
Most of the cards allow you to advance on one or more attribute tracks. Some give you an immediate additional disc.
In presenting an historical game about the Age of Sail and the creation of the European empires, it’s impossible to ignore the issue of slavery. Endeavor doesn’t shy away from this, but it does try to make it clear that slavery is not a positive thing to be taken lightly. Any player may draw from the slave deck–it has a zero card and is in Europe, so at least at first you don’t need to be present anywhere to draw a slave card. The slave cards all allow you to move up on the Industry and Wealth tracks.
But, there are two things to consider when drawing slave cards. First, the fifth and last card in the Europe deck is a special card that, once drawn, abolishes slavery. When this card comes into play, no further cards can be drawn from the slave deck, and anyone who has a slave card must immediately remove it from their player board and decrease their Industry and Wealth tracks accordingly. But they do not discard the card, and instead flip it over and keep it next to their player board.
At the end of the game, any slave cards drawn at any point by any player count as negative one glory point against that player. If you’re curious as to the designer’s thinking on leaving slavery in the game, the note above (from page 9 of the rulebook) explains why they left it in and how they feel the game handles the issue of slavery.
After every player has passed in the action phase, you move into the discard phase, and again it’s almost always possible to do this simultaneously. Each player needs to look at the number of cards they have and compare it to their hand limit, which is set by the Influence track. Players may always choose which cards they wish to discard, but they must reduce the appropriate attribute tracks for any cards they discard. Discarded cards are placed face-up next to the board near Europe (regardless of which region they originally came from) and may be drawn by players (including the one who originally discarded them) in future rounds, so long as their presence in Europe equals or exceeds the card’s draw value.
There are two exceptions to the hand limit. To the left of the card slots on the player board is a free governor card spot. You will place the first governor card you get (for having had the most presence when a region was opened) there and not have it count against your hand limit. If you later acquire additional governor cards, you can choose which one to keep in the free spot and which ones to put in your regular hand, but only one doesn’t count against your limit. Governor cards, if discarded, are discarded from the game. You might also chose to not use the free spot for the governor card, since if you have fewer than five cards the empty governor spot gives you three glory points at the end of the game.
Also, you may hold one slavery card beyond your hand limit. Any additional slave cards count against your hand size.
Once everyone has discarded down to their hand limit, everyone should do a quick check to make sure their attribute tracks are correct. This is easy: simply sum up the symbols on buildings and cards, add that to the number of tokens stacked next to a track, and make sure the marker is at the right spot. Repeat for the other tracks.
The crown is passed to the left and a new round begins.
Game End
The game ends at the end of the seventh round. The number of buildings on each player’s board is the round number, so when you are out of space to build you know the game is over.
First, points from the attribute tracks are counted. All tracks have certain scoring spots–the places with the attribute icon behind the number. Any player who is not on a scoring spot slide their marker down to the nearest lower scoring spot, and then tally the number of points from all of the tracks combined.
Next, you count points from cities and links. Every city has at least one glory icon on it, while some have two. Every link scores one point to the player who controls both sides; links with split control score nothing.
Tally up the points from your cards. Remember that an empty governor space is worth three points.
Add up the total population you still have in your harbor. Divide by three, rounding down, and add that many points to your score.
Finally, if you have any slavery cards, deduct one point per card.
The winner is the player with the highest score. In the case of a tie, victory is shared.
I’m a history nerd and the Age of Sail is of particular interest to me (along with the Hundred Years War). I also like heavy strategy games, so Endeavor was definitely in my wheelhouse. Yet, despite my pretty high expectations going into the game, I was still a bit surprised by just how much I liked the game.
Like most meatier games, it took some time getting into our first play. The group I was playing with is comfortable with these types of games (which is why it took so long to make it to the table–I wanted to make sure I had players who wouldn’t mind spending two hours on a new game) and even still when I was first reading through the rules and explaining things there was a lot of “ha ha you got that, right?” and “is this going to be on the test?”
But like all well-designed games, it turns out Endeavor is easier to play and understand than it seems on the surface. For a new player, staring at this player mat with all of these tracks and empty spaces, and then looking at a board that starts out crowded with close to 100 tokens and eight decks of cards, it can seem intimidating.
What makes Endeavor work is a combination of well thought-out rules that make sense and just good old design. There’s nothing that you do in the game that seems random or arbitrary. You have a set number of actions, and they are basically actions you have chosen based on the buildings you select. So picking buildings is a key point in the strategy, and right from setup: do you chose the Colonial House and focus your early turns on establishing a presence in Europe, or do you select the Merchant Dock and get to sailing, worrying about Europe later (if at all?) As you build your city, you keep having to make those choices–which actions do you want to be able to perform?
But then you have to figure out how to balance the different attributes. Because of some early decisions, I was focused on cards in our first game, so I kept needing to worry about the Influence track to make sure I could keep all of the cards I was getting. (And, for what it’s worth, I chose early on to go ahead and draw that zero-value slave card, because I needed a quick boost in construction. At game’s end, I came in third, losing to the second place player by one point–the point I lost from having that slave card.)
Another player, Nick, did a better job of balancing all of his tracks, and at game’s end he had all four at 10+. He also managed to have stacks of population discs on his harbor throughout the game. I was focused too much on my own game to really figure out what he did, but whatever it was, it was the right move, since he ended up walking away with the victory.
One of the things that can be frustrating in deeper games like this is the constant need to refer back to the rules after every move, because there simply isn’t enough information printed on the boards and reference cards, or because the game relies too much on inconsistent or frankly weird iconography. This game suffers from neither of those issues. Designing the player boards to show the phases meant I had to explain them once and then we were good to go. And the icons used for the actions and attributes are absolutely consistent and make sense for what they represent, so again, referring back to the rules wasn’t needed, and the few times I did need to check, it was more about confirming that our guesses as what we thought something meant were right (and they were.)
Given the depth of strategy and incredible design (not to mention those awesome box inserts) makes Endeavor an easy call for the GeekDad Approved label, but more than that, it’s easily one of my favorite games of the year. It’s both heavy and a bit on the pricier side, but in both cases it’s well worth it.
I only wish I had had time to play the Exploits expansion before needing to write this review, but I guess that will need to be a separate review when I get a chance to play it, which I very much hope is soon.
Click here to see all our tabletop game reviews.
Disclosure: GeekDad received a copy of this game for review purposes.
This post was last modified on September 3, 2020 10:02 pm
The Station will keep all your Solo Stove fuel and accessories organized.
Being a mom is hard. Being a mom trying to raise a son who can…
The fan-favorite satirical board game 'Munchkin' has a new product on the line, and it's…
The fantasy beverage springs to life in a super-premium bourbon.
'Deep Sky' is a new IMAX documentary on the James Webb Space Telescope. It is…
What do you know, it's time for another roundup of tabletop projects!
This website uses cookies.