Some mountains are boring, ice-covered affairs that offer little more than bitter-winds and immeasurable tons of rock (I’m looking at you, Kilimanjaro). Other mountains, though, are a little more interesting, containing gems or gold. Still others may offer a maze of passages guarded by murderous dragons. Some may be ruled over by an imperious and mercurial dwarf king. And then there’s one mountain, just one special mountain, that has all of that and more…
What Is Treasure Mountain?
Treasure Mountain, which is currently on Kickstarter from designer Daniel George and publisher August Games, is a worker-placement game, for 2-4 players (ages 8+) set inside the titular mountain. The listed playtime is 60-120 minutes, but I would say it definitely averages closer to the 120 minutes side, even with a low player count. In the game, players will be taking on the role of enterprising dwarves seeking to find fame and fortune inside this extraordinary mountain, though the paths they take toward that goal will often be completely different.
What Do You Get for $55
Note that all descriptions of the physical components of this game are based on a prototype copy and are subject to change. That said, even the test copy of this game is robust, coming in a deceptively svelte package that has a surprising amount of heft when you pick it up. The game contains:
- 1 Large gameboard
- 20 Dwarf meeples (5 in each 4 colors)
- 12 Player tokens (3 in each color)
- Cloth bag
- Ax tokens
- Dragon tiles
- Dragon meeple
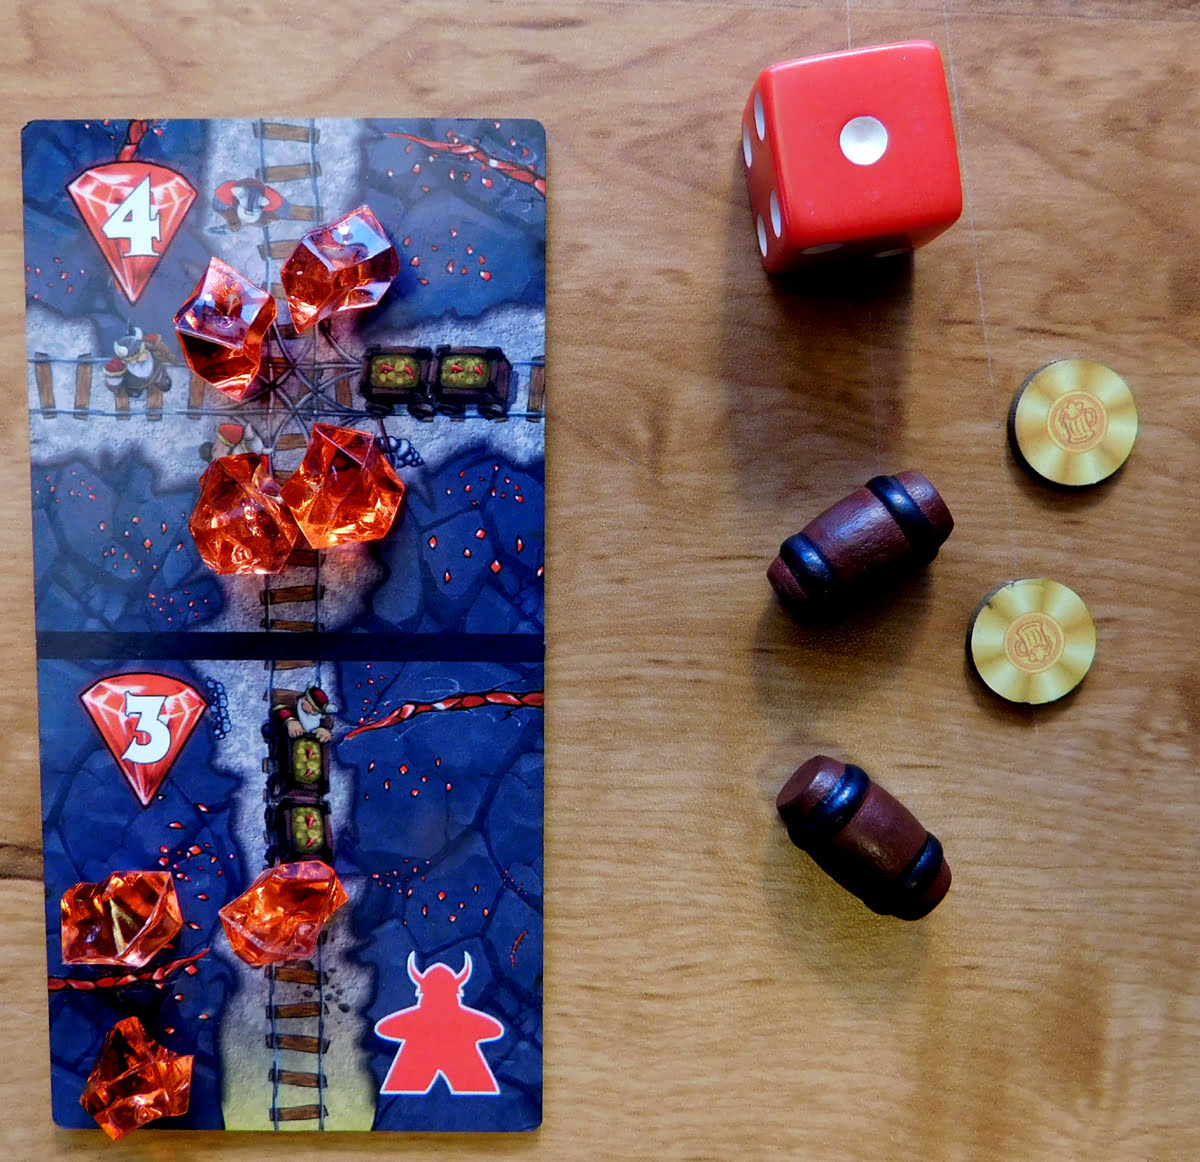
- Emerald gems
- Sapphire gems
- Ruby gems
- Diamond gems
- Gold coin tokens
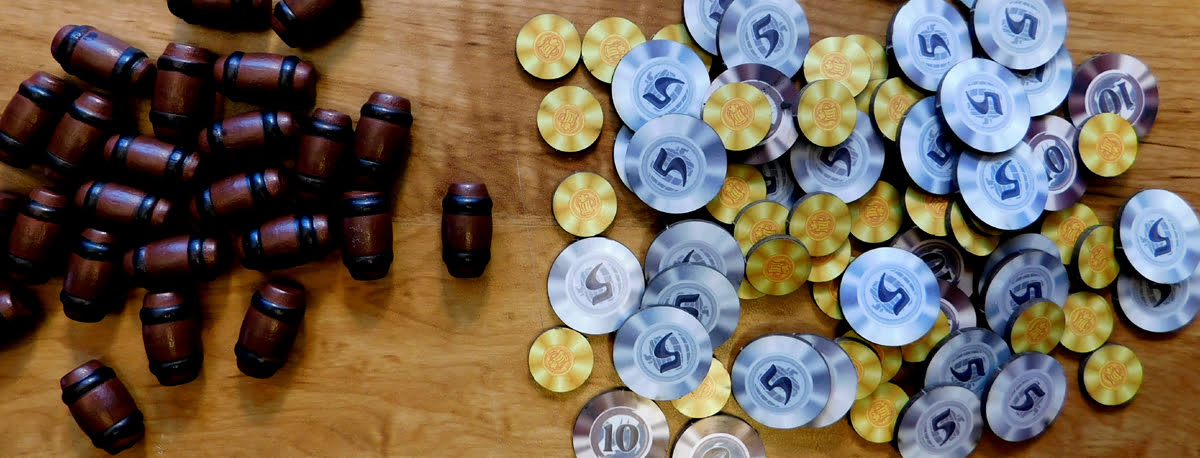
- Wooden beer barrels
- Dirt pile cubes
- Round counter tokens
- 4 Starting mine tiles
- 4 Dice (1 in each color)
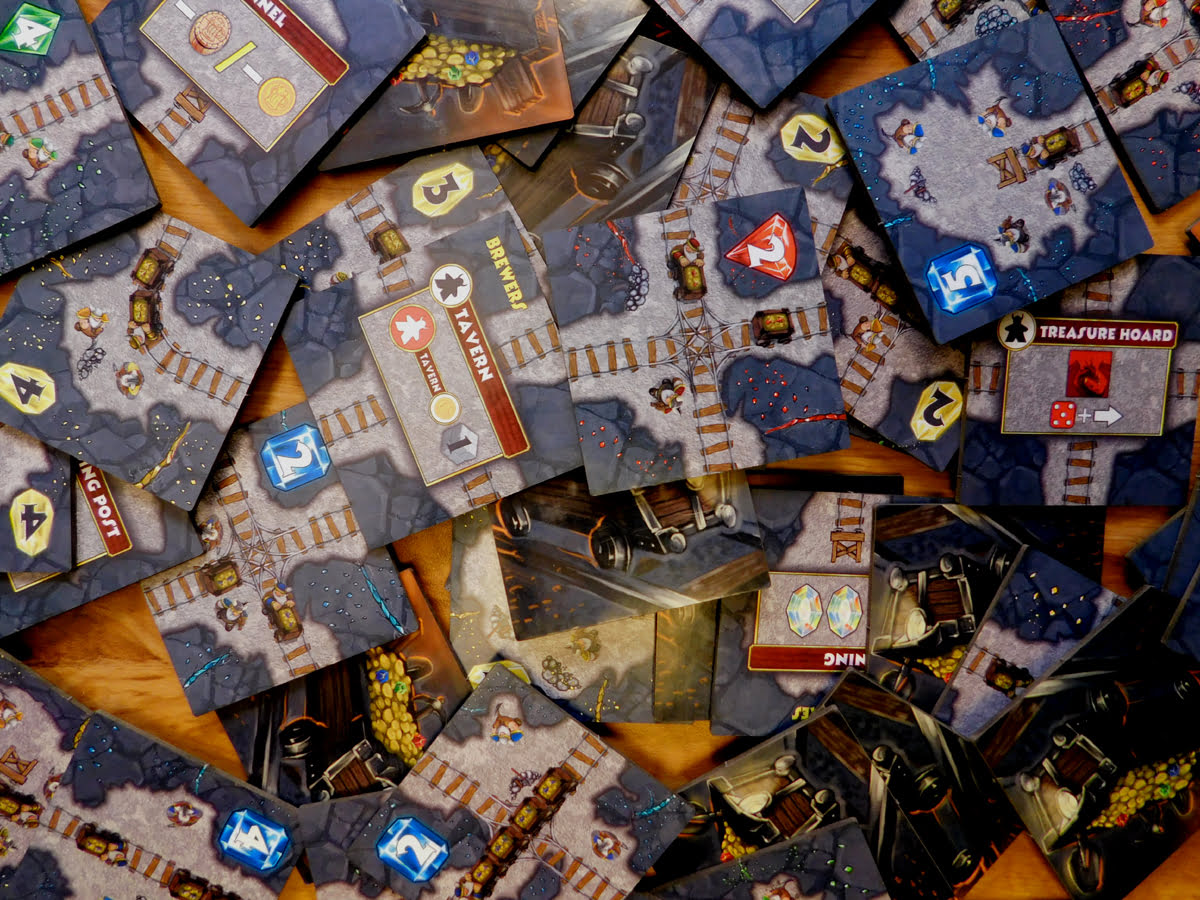
- Mine tiles
- Achievement deck
- Market deck
- Player reference cards
- Rulebook
It’s a box full of colorful, playful “stuff,” and I can only imagine that the already nice components will get even nicer between now and the final product. The beer barrels, more than just wooden cylinders, are actually shaped like beer barrels, and the gems are little plastic gems instead of plain old wooden cubes.
It’s these little, seemingly inconsequential touches that help draw you in to the world of ‘Treasure Mountain’ which, for worker placement game trying to get noticed in a market stuffed with good worker placement titles, is a valuable place the start. Also, while the game isn’t illustration heavy, the cover and other scattered illustrations by Mac Hillier do a good job of setting a tone that’s both evocative of high fantasy while also maintaining a certain amount of whimsy.
My only component complaint, and something I would love to see upgraded through the Kickstarter campaign, is the dwarf meeples. Currently, the images are sticker-based, requiring application of 20 tiny stickers before the first play of the game. While this might not bother everyone, speaking as a person with big, clumsy fingers, anytime I have to apply stickers to game pieces they end up askew and looking worse than a simpler, non-sticker graphic would.
Otherwise, this is a box full of good-looking goodies. The dragon meeple is especially delightful, cutting an amusingly-menacing silhouette.
How to Play Treasure Mountain
Each game of Treasure Mountain will play out over a series of rounds in which players will send their 5 dwarves to work in the mountain and attempt to amass the most victory points. The number of rounds played scales based on player count: 7 rounds with 2 players, 6 rounds with 3, and 5 rounds with 4 (this serves to keep play time from growing out of control with higher player counts).
Each round, players will alternate sending their 5 dwarves to work in the mountain. Each dwarf is numbered 1-5 (representing the length of their beard) and they will be sent out to work numerically, starting with the lowest. These dwarves start the round in the Bed section of the board (even dwarves need a good nights’ sleep) and are taken from there to be assigned to their tasks.

Each different area on the board represents a different task, and can have a single dwarf assigned to it. However, if a player really wants to go somewhere that’s already full, they can bump an opposing dwarf from that spot provided they send a dwarf with a longer beard to do so (just like in real life). While this will net them the desired spot on the board, it also will send the displaced dwarf back to bed and allow their opponent an extra action that turn as they will send that dwarf back out on another job.
Setup
Each player will start the game with a special, double-sized mine tile that will specialize in a specific type of gem and begins with a few gems on each tile (the starting tile represents two tiles, although it’s a single piece). All players will then receive some gold and beer, the quantity of which will vary depending on the randomly-determined player order, with the players who go later receiving more starting resources.
Each players’ dwarves will then be place in their beds, with the starting player in the top row, second player below, and so forth. The number of dwarves used also scales depending on player count, with fewer dwarves being used when more players are in the game.
Gameplay
The rounds are simple, but don’t make the mistake of thinking that means they’re easy. On your turn, you will take the dwarf with the shortest beard out of bed (so you start with the lowest numbers you have) and place it on one of the 12 spots available on the board (technically, there are 16, but more on that soon.)
An interesting wrinkle that Treasure Mountain brings to the worker placement format is the “All-play” option. Many of the spots on the board where you can send a dwarf are marked as all-play (AP) which means that, while you get to take the action first, all the other players will also get to take that action if they wish. Now, the first player to visit this spot always get an extra bonus (a few gold, a few gems, etc) but that isn’t always enough to make you want to gift that action to all your opponents, as well.
Each of these spots will do something different, so let’s take a brief look at your options. I’ll note in parenthesis which allow all players to take the action when visited.
Forge
This location allows you to exchange either 1 beer or 1 gem of any kind for 1 ax token, randomly drawn from the ax bag.

Excavate
This lets players, for the cost of 1 gold or 1 beer, dig deeper on existing mine tiles, adding gems to those tiles but also adding a rubble cube. The more rubble on a tile, the fewer gems you add for this action. If your tile has no rubble, then this action will add 3 gems. You can do this action for up to 3 of your mine tiles.
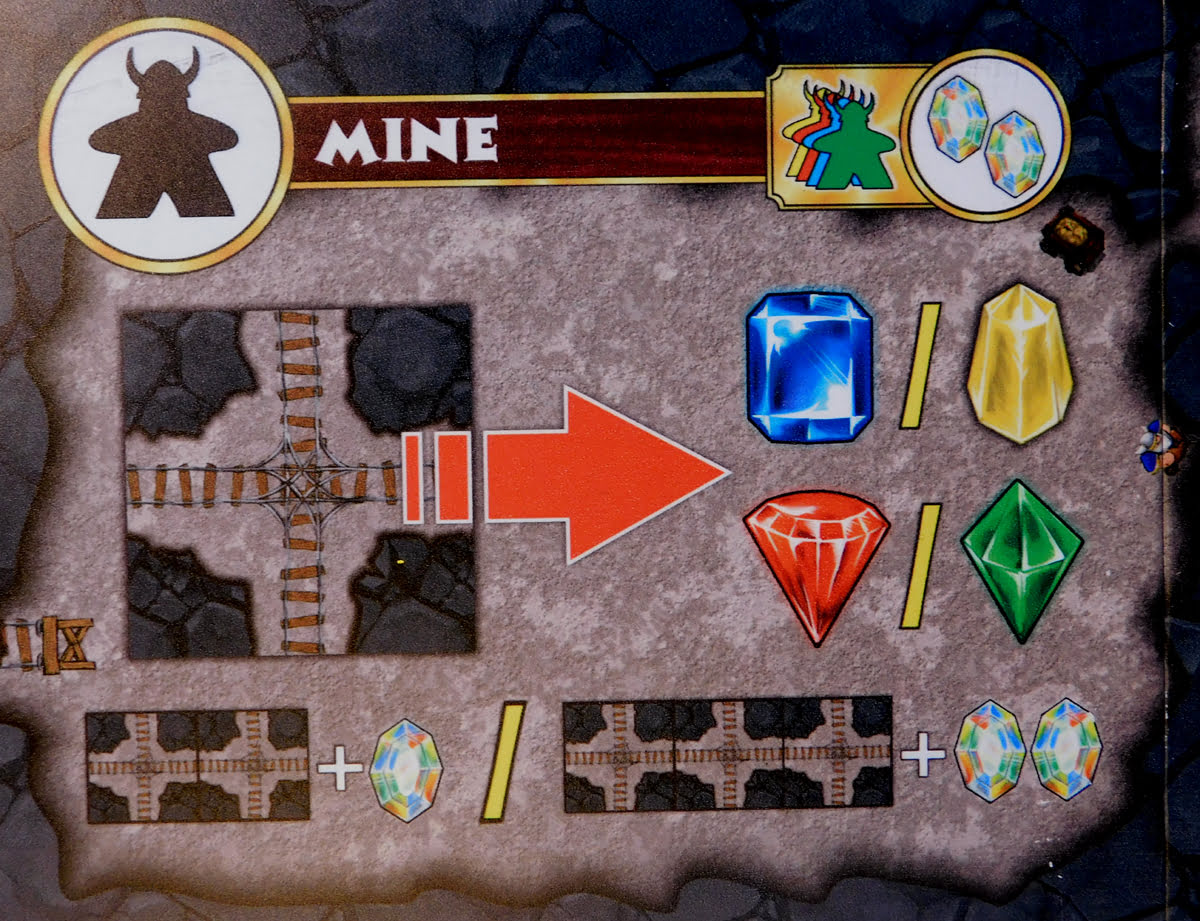
Mine (all-play)
For this action, you declare a gem type and then take 1 gem of that type off each mine tile in your mine. There are also bonuses for having multiple, adjacent mine tiles that produce the same gems, allowing you to mine up to 2 bonus gems during this action.
Trading Post
Here, you get to spend a single gold for either a beer, an ax, or 2 gems of any kind, or you can swap 2 of your own gems for a gold. You can do any combination of 2 of those actions when you place a dwarf here.
Temple
This one allows you to spend gold for VP (Victory Points), exchanging 2 gold for 5VP. It’s worth noting that each gold you have is already worth 2 VP at the end of the game, so this maneuver effectively only nets you 1 extra VP. As an additional incentive, if you have a dwarf on this spot when combat with a dragon occurs, you get to re-roll your combat die once, which can be helpful.

Gem Market (all-play)
Here, you can sell the gems you’ve worked so hard to mine in exchange for gold. As the game begins, you will be able to sell 3 gems of a given type for 2 gold (gems are worth 1 VP and gold is worth 2, so this is a small net gain). However, at sales are made those cards are removed and new sale cards are placed, which will allow you to make sales of more gems and, often, get a better return than 1 VP. Additionally, at the end of each round that the second sale card of a certain gem type (there will be 2 sale cards for each gem) isn’t claimed, an extra gold will be placed on it as incentive to make that sale next round, and at 2 VP per coin, this can become very appealing very fast.
Tunnel (all-play)
Much like the gem market, this section is filled by a stack of tiles that, throughout the game, will change and cycle. Each of the 4 spots will hold an available mine tile, priced based on position in the queue with the cheapest costing 1 beer or 1 coin, and the most expensive costing 2 of each. Going here will allow you to purchase your choice of tile and add it to your mine. If it is a gem-producing tile you will immediately add the gems indicated on the tile onto it. Other mine tiles will give special bonuses, abilities, and modifiers to you or, at times, all players. When a tile is purchased, all tiles to the left of it slide down and a new tile is added to the end.

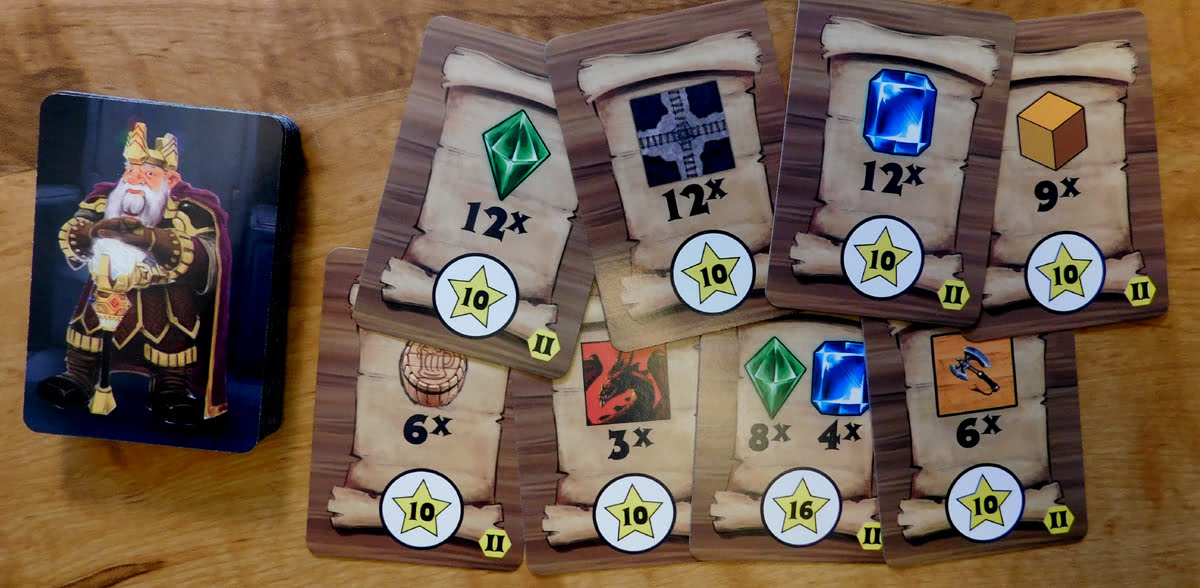
Dwarf King (all-play)
These spaces are also populated by a deck of cards, each one representing a goal or deed that will impress the dwarf king and lead him to reward you with VP. They start off simply (with the ‘basic’ rewards being shuffled and placed on top of the more advanced rewards) with VPs being doled out for having a few gems or a few axes. As they deeds become more difficult, the rewards get much higher, too, and can cause you to shoot ahead of your opponents if you can claim them. Placing a dwarf here allows you to claim a reward if you meet its requirements. At the end of every round, the final card in the queue is removed, they slide down, and a new one is added. So you don’t want to wait too long to claim a reward that you may have your eye on.

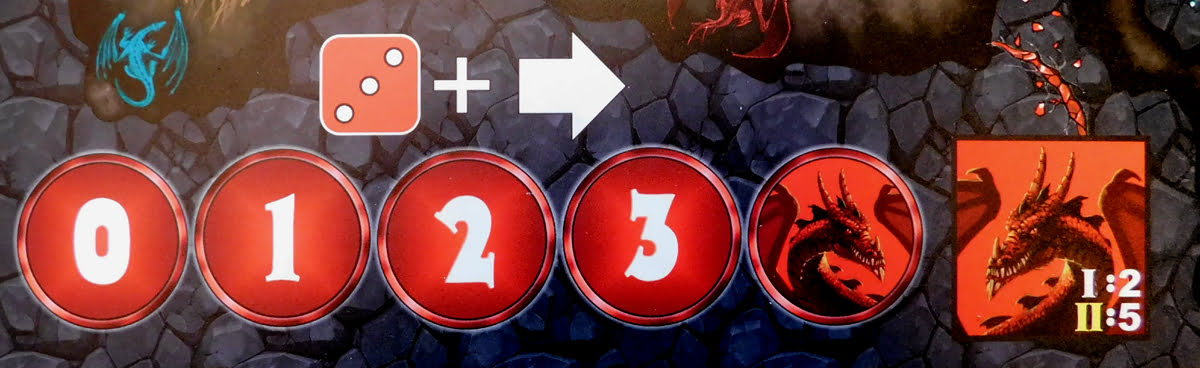
The next four locations are unique because, each time you visit one of them, you risk angering the dragon you’ve ventured close to. This means that, when you place your dwarf, you also roll a die and, on a 3, 4, 5, or 6 you anger the dragon and advance the dragon token on the aggression track. When the token reaches the final spot (it only takes 4 clumsy, noisy dwarves to do so) the dragon wakes up and attacks all the players. This means that you reveal the top dragon tile (the first couple can have a strength between 3 and 6, and the rest can be slightly stronger) and players must “beat” that dragon’s strength by rolling a single die and then (if necessary and if possible) adding axes they’ve collected to generate a higher strength.
Dwarves who lose to the dragon suffer penalties including losing half their resources and losing one of their dwarf workers until the next round. The victors live to fight another day and the winning dwarf with the highest combat number will take the defeated dragon as a trophy that will earn victory points (also, defeating dragons can impress the dwarf king, so keep an eye open).
Supply Wagon
Going here will give you 2 beer. Beer isn’t worth an VP at the end of the game, but is often a cheap substitute for gold when making in-game purchases.
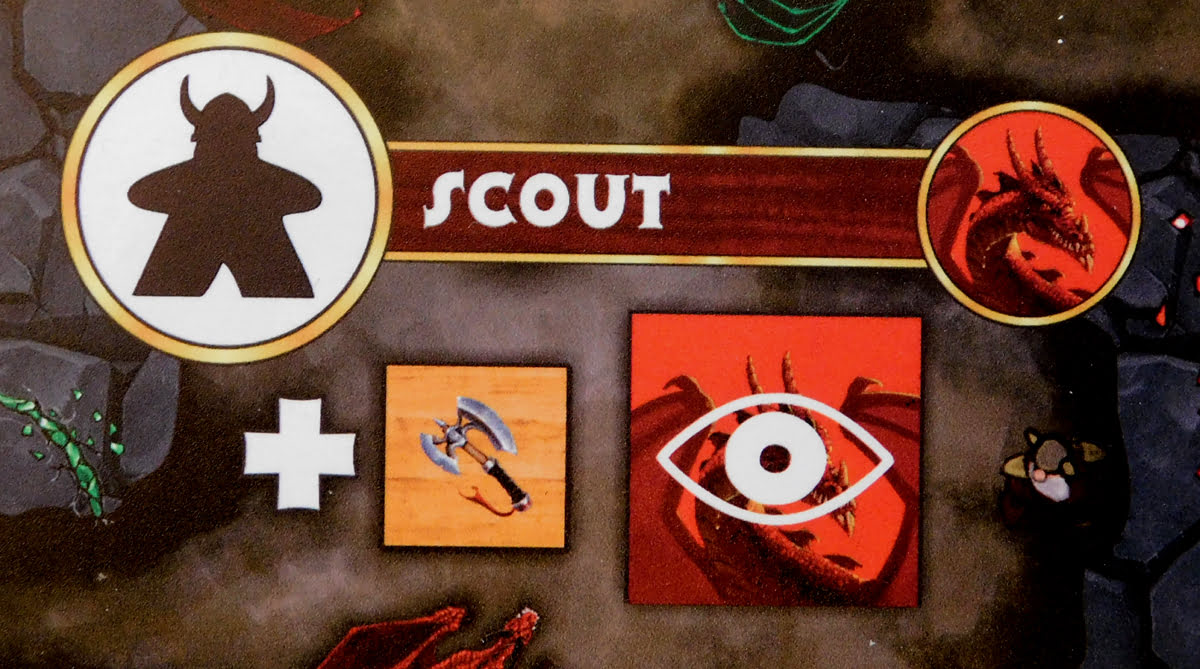
Scout
This is an interesting one, because it has little to do with the very inter-connected nature of the rest of the game. Going here allows you to draw an ax from the ax bag as well as peek at the top dragon tile (letting you know what its strength will be when it finally wakes and allowing you to plan for that eventuality).
Treasure Hoard
Going here will give you 2 gold which, in a game where VP can be hard to generate in large batches, is actually quite good.
Tribute
This is perhaps the most interesting, and definitely the most mean-spirited, spot on the board. Going here allows you to remove from the game up to 3 available cards/tiles from the Gem Market, Tunnel, or Dwarf King spaces. Basically, this is how you keep other players from getting what they want, making killer gem sales, and snagging valuable rewards from the king. It’s nearly impossible to push back on other players in Treasure Mountain, and this space becomes the most important in truly cutthroat plays of the game.

The last few options for dwarf-placement involved the beds. While the initial turn-order is randomly-chosen, you can re-seed that order through the game if it’s important to you (which, in games with 3-4 players, it often will be). On your turn, you can place your dwarf on any of the 4 player tracks, which will lock you into that position next round. If you decide you want to go first, that will cost you a dwarf and give you nothing else. Placing in the 2 spot will also give you a beer, the 3 will give you a coin, and if you’re willing to go last then you can send a dwarf to the 4 spot to net 2 gems. These turn orders take effect the following round, and remain static unless altered again via these spaces.
The gameplay is extremely straightforward, and I won’t waste your time here covering the little bits of upkeep that happen at the beginning and end of each round, as it’s pretty self-explanatory. Overall, despite all the options and bits in front of you, Treasure Mountain is pretty easy to get your head around.
End of Game
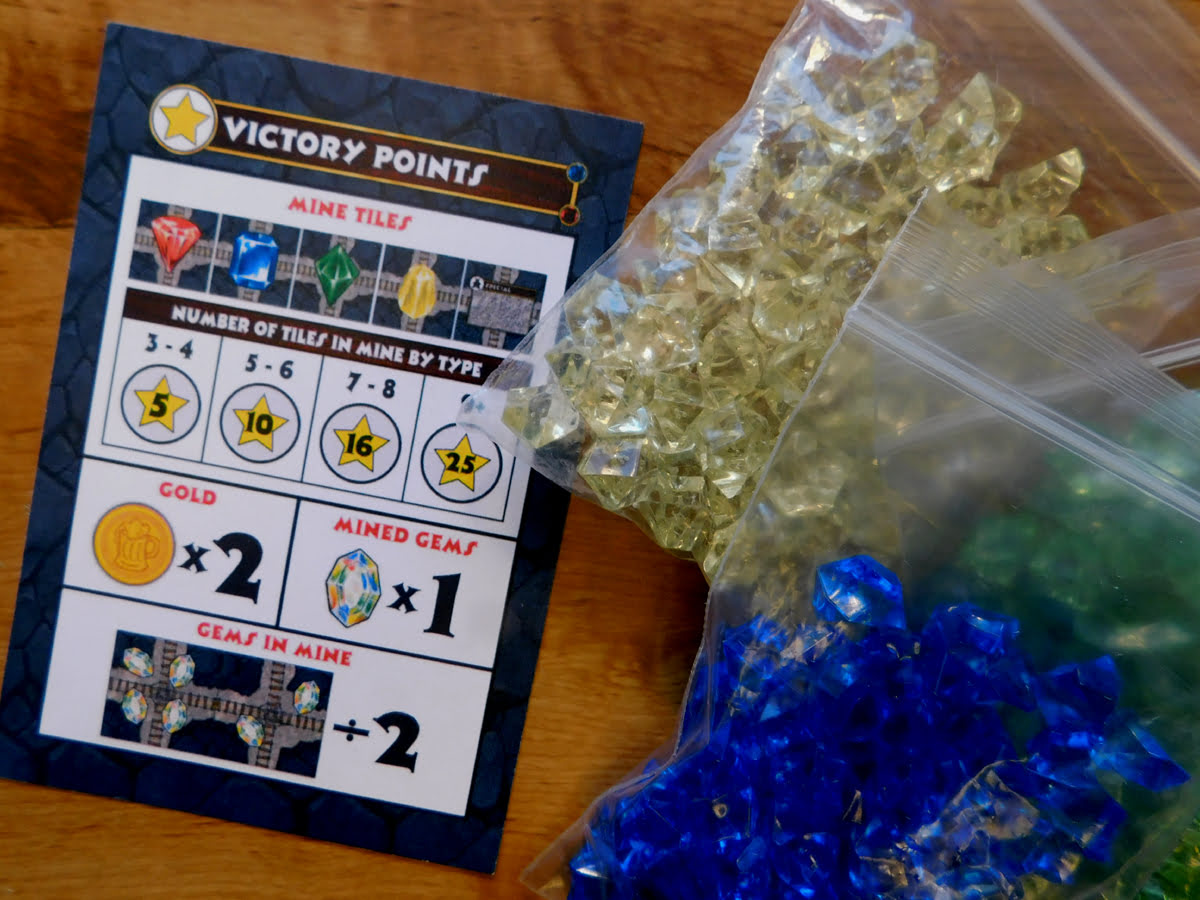
The game ends after a certain number of rounds, depending on player count. At the end of the last round, points are totaled, with the highest number winning. Apart from the VP that each player will have earned throughout the game from the dwarf king, killing dragons, and other exploits, most of their accumulated resources will give them VP at the end of the game. Gold is worth 2, gems you’ve collected are worth 1, and gems that are still in your mines are worth 1/2 point each. Additionally, you score points based on how many mine tiles of each type you have in your mine. 3-4 ruby tiles, for example, will score 5 VP, 5-6 tiles score 10, 7-8 score 16, and if you somehow managed to get 9 or more tiles of a specific type then it will net you 25 VP, likely win you the game, and almost certainly cause your friends to never speak to you again.

Should You Back Treasure Mountain?
Worker placement games are like pasta: simple, filling, and versatile. You can do just about anything with worker placement and have it feel satisfying. You can add complexity and layers and abstraction (Trickerion) or you can boil it down and make it simple, streamlined, and whimsical (Asking For Trobils). A good worker placement game will be immediately familiar, but bring enough new material to the table to make it worth your time, and Treasure Mountain is a good worker placement game.
At first, Treasure Mountain will feel like running in mud. You will put all your effort and cunning into a plan only to find that your opponents benefit from your actions, receive similar rewards, and despite your best efforts are only a few points behind you. Which can be frustrating. Maddening. Irritating. Until you realize that you can’t beat them, but you can make them beat themselves.
Treasure Mountain isn’t a game of take-that aggression, of attacking your opponent and gutting his resources. Rather, it’s a game of timing, of paying close attention to what they’re doing and steer into the skid, forcing their momentum to carry them too far. To truly put distance between yourself and the other players, you must pay as close of attention to their resources as your own.
The best move is often to go to the Gem Market before they can, or buy the cave tile they need to get a bonus, or–most aggressively–to visit the Tribute space and remove anything and everything you think they need from the board. This won’t make you any friends, but it’s a cutthroat mountain! And as aggressive as that sounds, it’s hard to keep your opponents from scoring. You may remove the cave tile they want only to see it immediately replaced by something better.
So yes, there’s a little luck involved, but not much, and not enough to be a problem. Really, it’s just enough to smooth over the edges and keep the game tight. Treasure Mountain doesn’t tend towards runaway leaders, which works well to keep everyone engaged throughout. The smallest victories (gaining 7 VPs when your opponent only gained 5) feel enormous, and can often be the difference in the game. And because there’s such intense pressure on the little decisions, those little moment become big. On occasion, too big.
As each round progresses, decisions become a little easier. You don’t want to bump someone else’s dwarf without a great reason, so as the board fills your options shrink. At the start of the round, however, you have a world of options and, as appealing as that sounds, it isn’t always a good thing. Because you have so much to track (gems, gold, rewards, dragons, etc, etc, etc) your first move of the round (and even your second) is agonizing because of how many good options you have. You can do just about anything without penalty, without giving you opponent another move, and because you have so many good options it can be agonizing trying to pick the right one.
At a certain point, as the other players grow restless and you realize that figuring out which move is objectively best is going to be impossible, you just go for it. You leap into your turn, place your dwarf, and live with the results. But you don’t feel good about it. I suspect that after you’ve played 10 or more games of Treasure Mountain that feeling begins to lessen as you see patterns, develop habits, and figure out how you like to play, but at first you should prepare yourself for a little uncertainty and, more importantly, games that can veer towards 2-3 hours long.
That’s no deal-breaker, though. Treasure Mountain struggles slightly under the weight of its options, but those varied and numerous options are also what I love most about it. Because you can earn points in countless different ways, no two games of Treasure Mountain will feel the same. One game you may have a thriving mine that pumps out gems like a vending machine. The next game you might go full on Saint George and become the greatest dragon-slayer in the mountain, racking up kills and VPs while depressing the other players’ economies with the constant dragon attacks.

Each game of Treasure Mountain is a story, and so far I’ve enjoyed each one in very different ways. And that’s not even including the expansion (also available via the Kickstarter campaign) which, although I haven’t played it, looks to add even more options and flavor and fun.
When all is said and done, Treasure Mountain isn’t going to rewrite the history books when it comes to this sort of game, but it’s done a great job to be broadly appealing, and will make a great addition to the collection of both experienced gamers familiar with this style of game, as well as being a marvelous entry point for players who have never touched a worker placement game.
As always, I recommend watching an in-depth playthrough video to see the game in action (you can find these on the Kickstarter page), but I wholeheartedly encourage everyone to do so immediately. I had a lot of of fun with Treasure Mountain, so you should definitely go see if you might, too.
Click here to see all our tabletop game reviews.
If you’d like to stay up-to-date with all of our tabletop gaming coverage, please copy this link and add it to your RSS reader.
Disclosure: GeekDad received a copy of this game for review purposes.