

In Darwin’s Choice, you create new animals, adapt to changing environments, out-evolve your opponents, and survive!
What Is Darwin’s Choice?
Darwin’s Choice is a brand new game from Treeceratops, a creation of Marc Dür, Samuel Luterbacher, and Elio Reinschmidt. From 2 to 6 can play, though it is probably best with 3 to 4 players; a rules variant for 2 players is included. It takes 90-120 minutes to complete a game, and ages 10 and older are recommended. The game’s gorgeously illustrated cards are based on hand-painted artwork by Rozenn Grosjean, making for visually appealing and engaging gameplay.
In Darwin’s Choice, you build animals by combining cards and lay them down in different vegetation zones to which the animals must adapt. I had the opportunity to test out this game pre-release. I played with my 2 kids, ages 11 and 14, who both found it engaging.
The game is currently on Kickstarter, and doing very well, having surpassed its funding goal in one day.
New to Kickstarter? Check out our crowdfunding primer, and visit our Kickstarter curated page for more projects we love.
Darwin’s Choice Components
- 129 large Animal cards that show either an animal body or a double pair of legs
- 98 small Animal cards that show heads, wings, tails, or a single pair of legs
- 22 Vegetation Zone cards
- 13 Event cards
- 6 Overview cards as references for players
- 5 Number cards (numbered 1 to 5)
- 5 Number chips (numbered 1 to 5)
- 27 Plant chips (15 1-leaf, 7 2-leaf, 5 3-leaf)
- 27 Meat chips (15 1-meat, 7 2-meat, 5 3-meat)
- 6 Competition chips (2 gold, 2 silver, and 2 bronze)
- 73 Darwin chips (3 10-points, 10 5-points, 60 1-point)
- 48 Player markers (8 in 6 different colors for each player)
- 1 Start Player marker
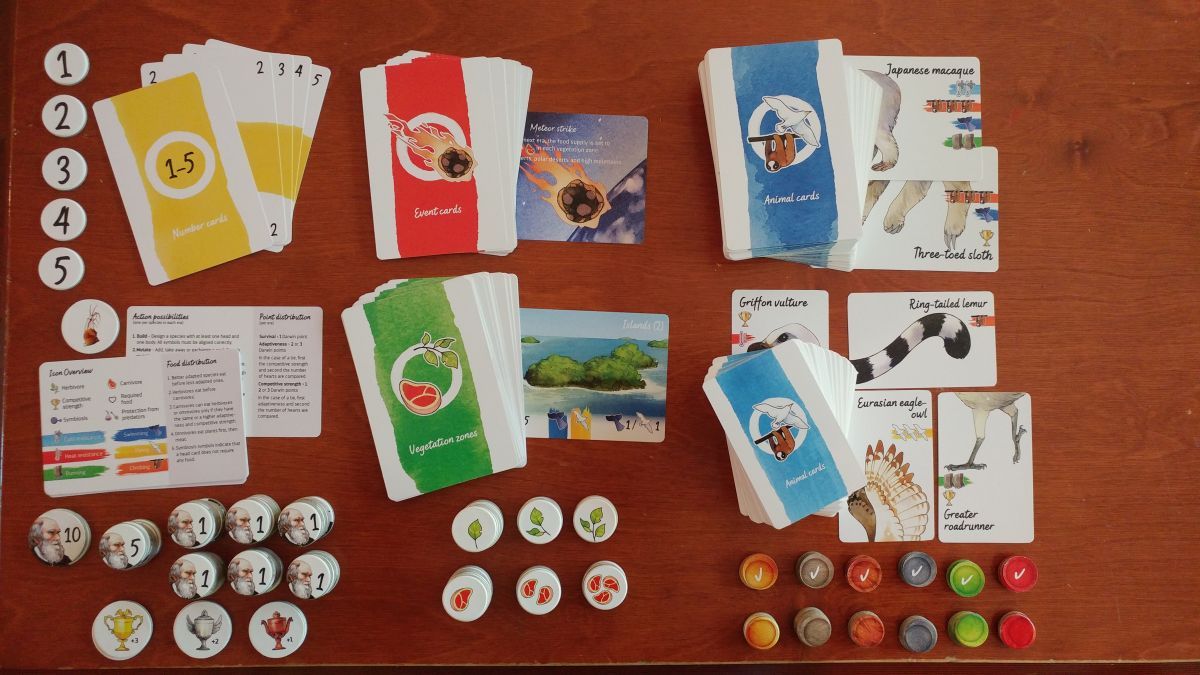
The quality of the components is very good, and all parts are made from nice card stock with beautiful printing. The bright colors and beautiful artwork really make this game appealing to play.
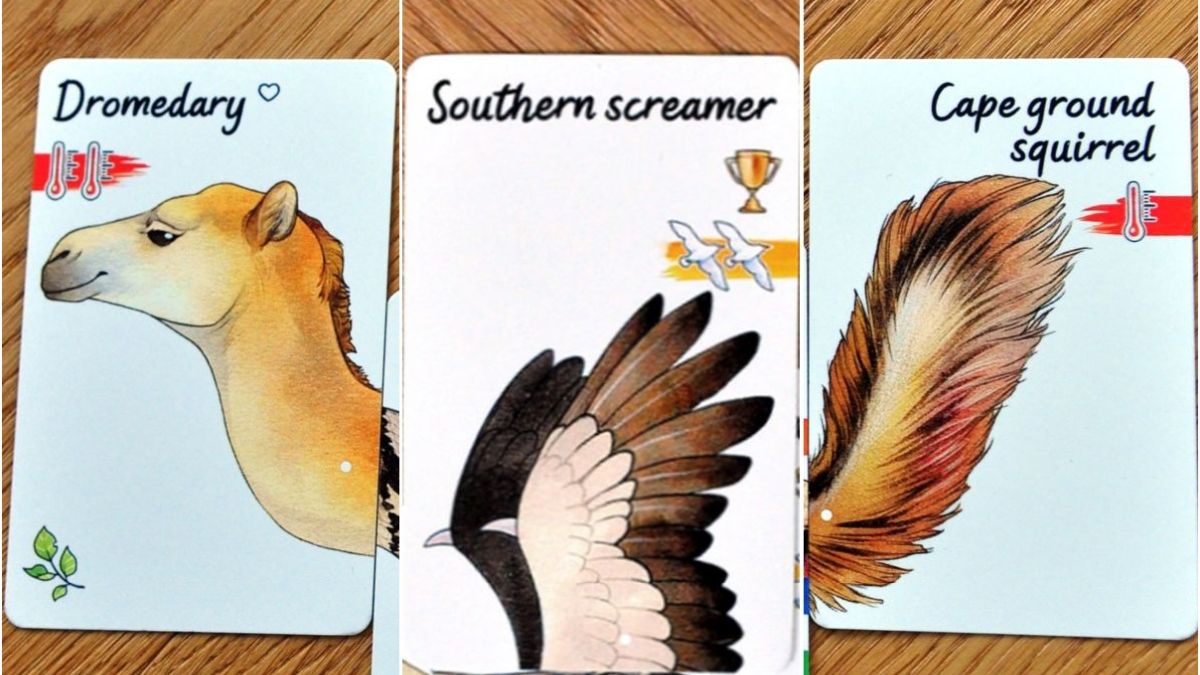
Animal Cards
The large Animal cards include animal bodies and double pairs of legs. They are marked with various icons below the name of the animal. In the case of the reticulated python card pictured below, the gold trophy is an indication of the animal’s competitive strength relative to other animals. The tree sloth icons indicate that the reticulated python is good at climbing, the whale tail icons show that it can swim, and the elephant feet icon shows it can “walk” too. The more icons shown, the better the animal is at that attribute. So the reticulated python can climb and swim equally well, and it can walk, but not as well at it climbs or swims.

Note the white dots on the card. These are anchor points where other animal cards can be added to the main body of the large animal card. When building an animal, you need at least a body and a head. The heads are on the small animal cards. Some animal bodies have two anchor points along the bottom, indicating that up to 2 pairs of legs can be attached.
The white heart symbol on the card indicates how much the animal needs to eat. As you build your animal, the sum of these white hearts is the total amount of food the animal requires. It is also the amount of food the animal supplies if another animal eats it (more on this later).
The small animal cards include heads, wings, tails and single pairs of legs. Like the large animal cards, these cards may be marked with icons indicating the competitive strength of the animal, and attributes such as climbing, swimming, running, or flying, as shown in the example small animal cards pictured below. The small animal cards with the heads will indicate what type of food the animal eats. The leaf icon indicates an herbivore, and the meat icon is a carnivore. If both are pictured, the animal is an omnivore. A few animals may have an icon with a small dark circle attached to a larger one; this indicates the animal can feed symbiotically. Both large and small animal cards may also indicate heat or cold resistance (red or blue thermometers). Some small animal cards will have the white heart symbols, which will add to the amount of food the animal requires as you build it.
Vegetation Zone Cards

The Vegetation zone cards are the environments your animals will need to adapt to. Just to the right of the zone name is a number in parenthesis indicating how may Darwin points will be awarded to the animal that is best adapted to that zone. At the bottom-left of the card, the food that the zone provides is shown; animals will be competing for this food. At the bottom-right of the card are icons indicating the requirements for the animals in this zone. The example Tundra card shown above indicates that the animals in this zone must be cold adapted (blue thermometer) and must not be heat adapted (crossed out red thermometer). At the bottom-center of the card are icons that show what attributes animals need to adapt to for this zone. In the case of the tundra card, the cold adapted attribute is the one that is most important for this zone.
Event Cards

Event cards are applied once each round (or era) of the game, to indicate an environmental shift that the animals need to adapt to. This can include events that affect all Vegetative zones or are applied only to one of them. Some of the Event cards have ongoing effects.
Other Cards
The other cards in the game are the 2-sided Overview cards, which provide a useful reference for the players. There are also numbered cards (1 through 5), which are used to determine which Vegetation zone is affected by the Event cards during play.
Chips and Markers
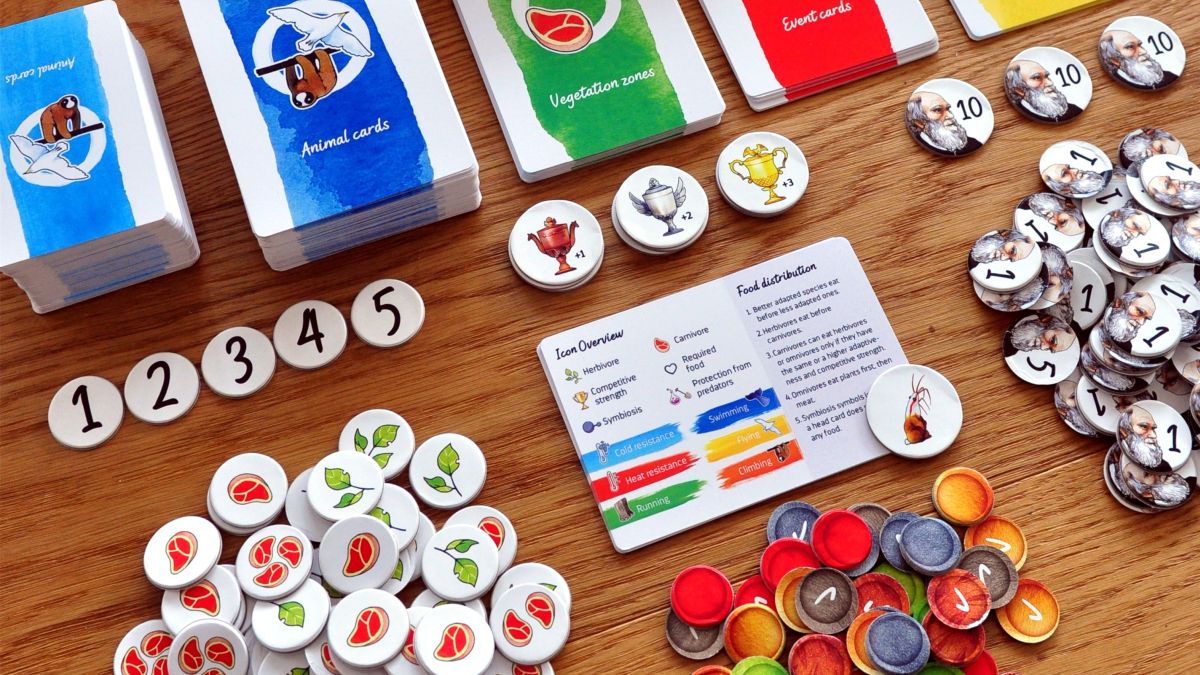
The game comes with various chips and markers. The numbered chips are laid on top of the Vegetation zone cards in play. Food and plant chips are used to distribute food. The colored player tokens are used to keep track of which animal belongs to each player, and are flipped with the check mark up when an action has been taken. The trophies are competition chips to indicate which animals gain points for competitive strength during the game. Darwin points are awarded throughout the game and ultimately determine the winner. The chip with the bizarre shrimp-rabbit animal is used to track which player starts first during each round of the game. In the image above, you can also see one side of the Overview reference card.
How to Play Darwin’s Choice
Gameplay is divided into 4 rounds or eras. After setup, each era consists of three phases: the Action phase, the Evaluation phase, and the Transition phase.
Setup

You will need a fairly large surface to play this game. As you can see in the picture above, even with just 3 players, our 3-foot by 3-foot card table got a bit crowded. So keep that in mind when you prepare to play.
All the cards are placed in the center of the table, face down. A number of Vegetation zone cards are played face up, depending on the number of players. For our 3 player game, we had 4 zones. A 5-6 player game would have 5 zones. The zones are numbered with the number chips starting from the bottom left and moving clockwise.
Each player then draws 10 animal cards and can draw any combination of large or small cards, keeping in mind that to build an animal they need at least one large card with a body and one small card with a head. Players can draw cards one at a time, to try to get cards in their hand that will be useful for building an animal in the zones on the table.
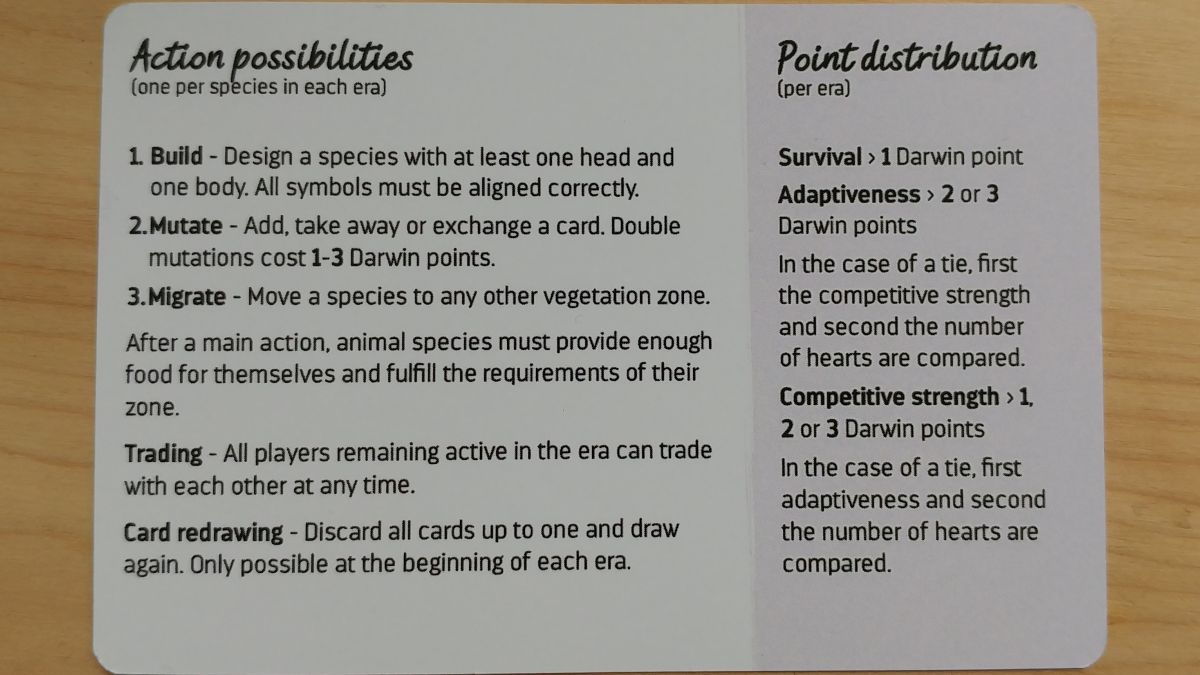
Action Phase
During the Action phase, players can build their animals and place them in the zones they want. The animals they build must meet the requirements shown in the bottom-right corner of the Vegetation zone card. The animals that are best adapted to the zone should be placed closest to it, with the rest below in decreasing rank. This helps make gameplay easier. We found it challenging on our small game table to adhere strictly to this, but it didn’t stop the game from being fun.
After the first era, players can choose as to migrate their an animal to another zone or to mutate an animal to adapt to a changing vegetation zone, rather than to build a new animal as their main action.
There are also minor actions available during this phase, such as discarding all but one of your animal cards and redrawing, or making trades with other players for animal cards you need.
Each zone will have a certain amount of food, represented by plant and meat chips. Animals in the same zone compete for food, and the best adapted and most competitive animals have an edge. If there is not enough food to go around, some of the herbivores may find themselves on the menu!
Evaluation Phase
During the evaluation phase, the players confirm that all the animals meet the requirements of the zone they are in, and then distribute food (if not done during the action phase). Any animal that survives the food distribution step gets 1 Darwin point, but the evaluation isn’t over yet.
Now each animal in the same zone is ranked by how well it is adapted to the zone. This is done by checking the attributes at the bottom-center of the zone card, and seeing which animal has the most of those attributes. Ties are given to the animal that is most competitive (indicated by the number of trophies shown on their animal cards). The best-adapted animal gets the number of Darwin points indicated in parenthesis on the zone card.
The last step of the evaluation phase is to award the animals that are most competitive across all zones. The animal with the most trophies on their collection of animal cards gets 3 Darwin points, the next best gets 2 points, and the third best gets one 1 point.
Any animals that are eaten or eliminated during the evaluation phase are removed from the game, but their player gets to retain 1 Darwin point.
Transition Phase
At the end of the first 3 eras, there is a transition phase into the next. There is no transition phase for the fourth era, as the game will end.
An Event card is drawn and the effects are resolved. Events can be catastrophic, and may force animals to mutate, migrate to a different zone, or go extinct.
New Vegetation zone cards are drawn and replace some of the existing ones, so even if the Event card did not shake things up for your animals, the change in environment may. You must be prepared to adapt by mutating or migrating during the Action phase of the next era, or your animal will go extinct, and you will lose all but 1 of any Darwin points you earned for it.
Ending the Game
After the fourth era, players count up their Darwin points to determine the winner. If there is a tie, all those players win. Congratulations, you are Darwin’s choice!
Why You Should Choose Darwin’s Choice
Most certainly the best part about this game is the fun you have creating bizarre animals. The competition aspect is fun as well, and every player will be challenged by the changes wrought by Event cards and Vegetation zone changes.
Darwin’s Choice provides a good lesson in how different species must compete for the same resources. This could be a fun way to provide some context to a conversation with your kids about evolution and climate change, and how animals (including humans) have adapted over time.
However, it doesn’t have to be all about education. This game is just plain fun!
Click here to see all our tabletop game reviews.
If you’d like to stay up-to-date with all of our tabletop gaming coverage, please copy this link and add it to your RSS reader.
Disclosure: GeekDad received a copy of this game for review purposes.


This game looks so oddly imaginative. I can’t wait to see what abominations my friends and I create. As a father, I look forward to games that will serve to be educational and nerdy all at the same time.
Yup! The weird animals you create is definitely a great feature of the game!