Zombies have taken over the city! Fortunately, the doggos of the city are good and brave, and are rescuing the poor hoomans and bringing them back to Central Bark. Will you save the hoomans and build a new home, or will you go feral and forget the love of hoomans? Find out in Good Dog, Bad Zombie.
What Is Good Dog, Bad Zombie?
Good Dog, Bad Zombie is a cooperative game from Make Big Things for 2 to 4 players, ages 12 and up, and takes about 60 to 90 minutes to play. It’s currently seeking funding on Kickstarter, with a pledge level of $35 for a copy of the game (and higher pledge levels for other rewards, like an expansion or getting your own dog as a playable character). The gameplay isn’t too complex and is fine for younger players; the zombie theme is less gruesome than most, though it is still a zombie game, so it depends on whether your kids are freaked out by zombies or not.
New to Kickstarter? Check out our crowdfunding primer, and visit our Kickstarter curated page for more projects we love.

Good Dog, Bad Zombie Components
Note: My review is based on a prototype copy, so it is subject to change and may not reflect final component quality.
The game includes:
- Game board
- 4 Dog sheets
- 4 Dog standees
- 3 Hooman standees
- 18 Zombie standees
- 3 Scent tokens
- 64 Energy cards
- 12 Hooman cards
- 54 Scent cards
- Feral track
- Feral token
- Hooman Town board
- 20-sided die

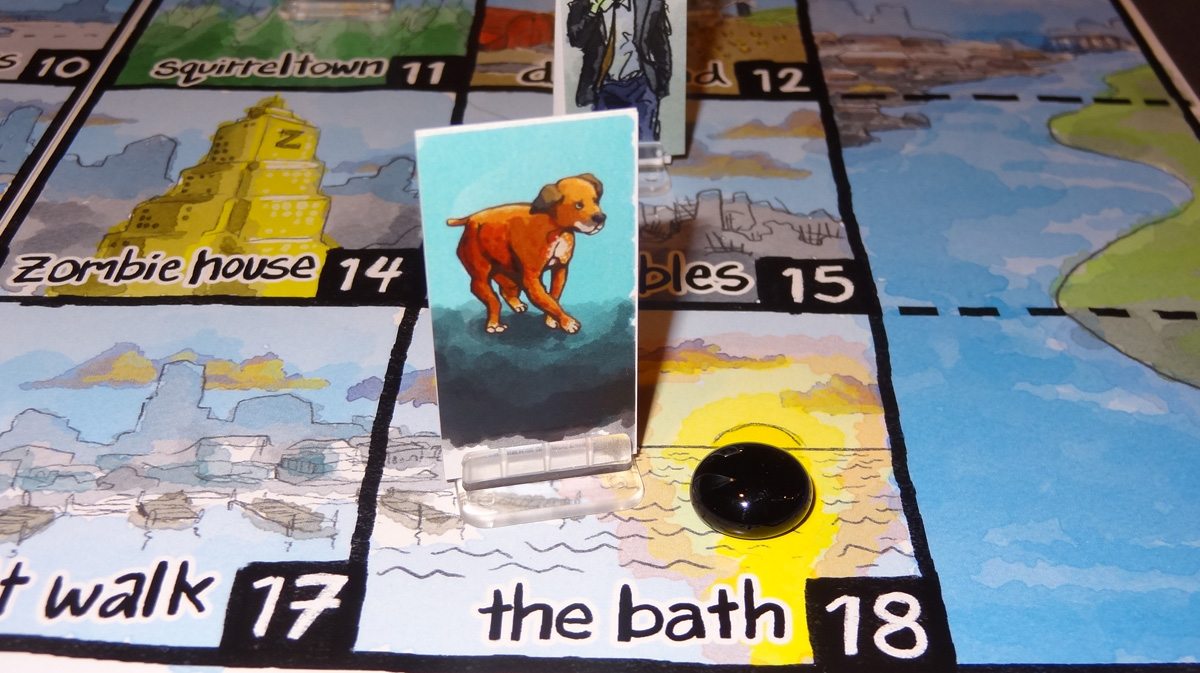
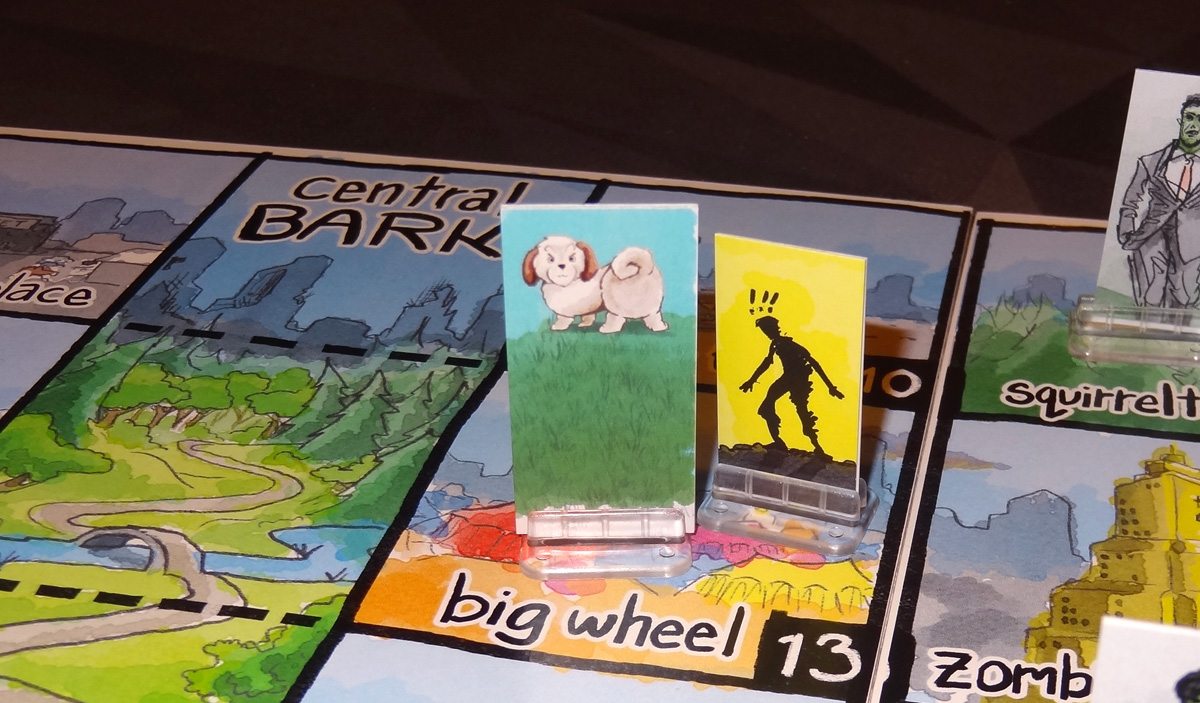
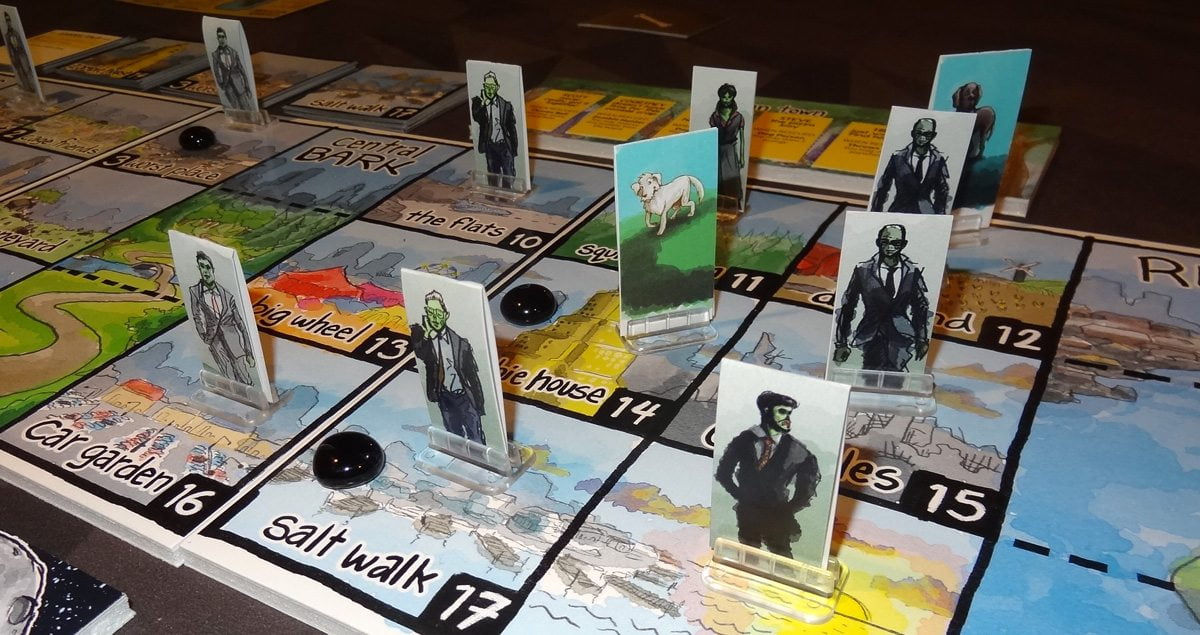
The board shows a town, with cliffs on one side, a river on the other, and Central Bark down the center. The location names are from a dog’s perspective, and are pretty funny. The vet is “worst place,” the fireworks factory is “terror mill,” the cemetery is “boneyard,” and so on. The illustrations in the prototype are watercolor illustrations and have sort of sketchy look, which I thought kind of fits the theme of the game, though it’s not as polished as some game illustrations. The hooman and zombie standee art will get another revision, but the location artwork is pretty much what you will see in the final version. (It is a little funny to me that the zombies look kind of like hipsters, standing around wearing suits and dresses with their hands in their pockets.)

The dog sheets have a turn order reminder, along with some information about the specific dog including its special “Good Doggo” ability. Hooman cards don’t currently have artwork, but each one has some funny text about the hooman in question, along with a special effect. The scent cards have the location illustration on the back, and on the front there is text (narrated from the dog’s perspective) describing what you find at that location. These are always a lot of fun to read, and I imagine the designers had a lot of fun thinking about how dogs would think about things.

The cards in the prototype are all non-standard sizes. The scent cards are square cards, sized the same as the locations on the board. The energy cards are smaller than those half-sized cards you often see in Euro-style games, and the hooman cards are tiny. The scent cards are fine, but the energy cards might be nice to be slightly larger for shuffling purposes. They don’t have a lot of information on them so they don’t necessarily need to be very big, but a little bigger would make them easier to handle. Part of the funds from the Kickstarter campaign will go toward custom, color artwork for the energy cards rather than the silhouettes currently used. (Increasing the size of the cards is less likely.)
How to Play Good Dog, Bad Zombie
You can download a draft of the rulebook here.
The Goal
The goal of the game is to rescue six hoomans and get back to Central Bark safely before the whole pack goes feral and forgets the love of hoomans.

Setup
Set up the game board in the center of the table, and place starting zombies on the board–the number and locations of zombies will depend on the number of players and the difficulty level, ranging from “plucky pups” to “hounds of the barkalypse.” Shuffle the scent cards and make three roughly equal stacks. Place scent tokens onto the board matching the locations shown on the cards. (There may be more than one scent token at the same location.)

Set the hooman town and feral tracker boards nearby. The feral token will start on a space according to the number of players. Shuffle the hooman cards and shuffle the energy cards and set them nearby.
Give each player a dog sheet, the matching dog standee, and two random energy cards. The dog standees are placed in Central Bark on the board.
Gameplay
Players take turns in clockwise order. On each turn, you get two actions, and can choose from the following (including the same action twice):
- Run 1: Move 1 space in any direction (including diagonally).
- Lick: Choose a dog in your space (including yourself) to draw 2 energy cards. (You have a hand limit of 5 energy cards, and cannot draw more if you have 5.)
- Act: Play an energy card from your hand.
- Sniff: If you’re on a space with a scent token, draw the corresponding scent card and resolve it. (Some have a single effect, and some require a die roll to determine the effect.) The scent token is moved to the next location revealed on the card deck.

Energy cards have various functions:
- Run X: Move up to X spaces.
- Bark X: Move another piece in your space up to X spaces.
- Herd X: Move yourself with another piece (dog, hooman, or zombie) up to X spaces.
- Chew: Remove a zombie in your space.
- Good Doggo: Use your dog’s special ability.
Some energy cards have paw icons on them–that means you get another action this turn, so you can chain together cards with paws on them to take more than two actions in a turn. Some energy cards have a howl symbol, which allow you to choose another dog (not yourself) to draw 2 energy cards.
At the end of your turn, you roll the die, and add a zombie to that space. (19 and 20 mean that no new zombie appears.) If there is already a zombie in the space you roll, you place it in the next space closer to Central Bark. If that would place a zombie into Central Bark, instead increase the feral tracker one step. (The dogs who live in Central Bark defeat the zombie, but not without a cost.)

If a zombie appears in your space, you are surprised, and lose 2 energy cards. Not enough cards? Increase the feral tracker one space for each card you can’t discard. (Note: if a zombie appears in Central Bark, any dogs there are surprised and have to discard cards even though the zombie is killed.)
There are a few other important notes about zombies and hoomans. There can only be one zombie per space, and you can’t move a zombie into a space with another zombie. If any hooman is ever in the same space as a zombie, it immediately dies. Hoomans and zombies get washed away in the river and fall off cliffs, so as soon as a hooman or zombie enters any of those spaces, it dies and is removed. Any time a hooman perishes, the feral track increases.
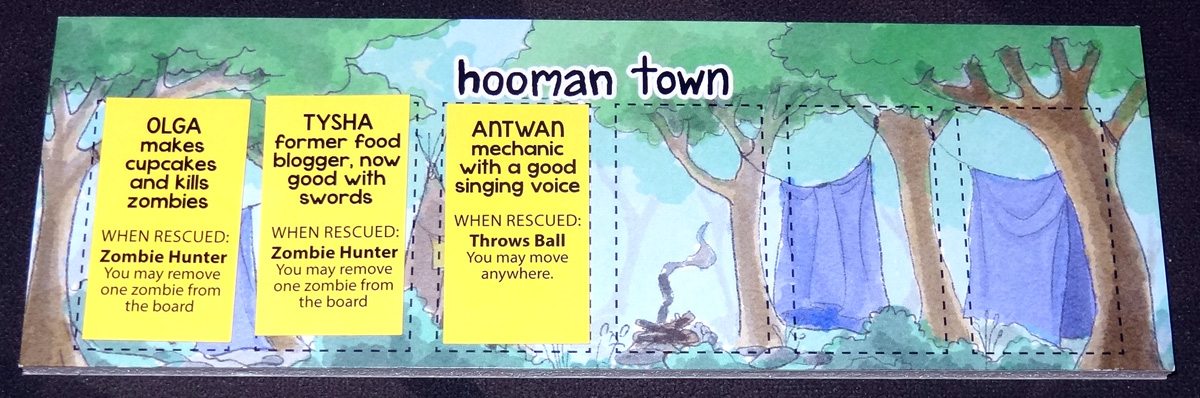
Whenever you rescue a hooman by bringing it into Central Bark, remove the hooman standee from the board and draw a hooman card. Each card has an effect that triggers immediately. Then place the hooman card into hooman town.
Game End
If the feral tracker reaches 10, your pack has gone feral and forgotten the love of hoomans, and you immediately lose. (Or win, I suppose, if you think it’s better for doggos to return to their wild ways.)
If you rescue six hoomans and all dogs return to Central Bark, you win and can “enjoy the love of your hoomans forever.”
Why You Should Play Good Dog, Bad Zombie
I’ll start with this: my daughters, who have not played a zombie game with me since Zombie Dice (when they were much younger), actually liked Good Dog, Bad Zombie and have been eager to play more than once. I happen to love zombie games. I know, there are tons of reasons I shouldn’t: they’re overdone, they’ve jumped the shark, that one game is the best zombie game and nothing can compare to it… and yet, I still like them. I like the way that you can see your impending doom shambling toward you, slowly but inevitably. I like the irony in how difficult it is to outrun a slow creeper, to outsmart an unthinking monster, to kill something that’s already dead.
My two older daughters (aside from the one exception of Zombie Dice) have never liked zombie games. They’ve complained about going down to the basement game room alone because it’s “full of zombie games” (it isn’t!) as if the plastic miniatures will come to life and nip at their toes. So I’ve pretty much given up on getting them to play anything that’s zombie-related.
But Good Dog, Bad Zombie has something that most zombie games don’t: you get to be doggos! (Yes, I know, there are dogs in some zombie games, but usually only one.) The fact that this whole game is from the dog’s perspective somehow makes it more acceptable to them, and if that’s what it takes, well, I’ll bite! The funny thing is, I’m not even a dog person, but but I’ve really had fun pretending to be a dog. (One note: my middle daughter was a little disappointed that the cover shows an Old English Sheepdog, but it’s not actually one of the options in the game… maybe as a stretch goal? She really just wants to be a huge fluffy dog.)

The theme of the game is a lot of fun: I love the way that the scent cards describe the dogs’ reactions to things, the names of the various locations, and the silly flavor text on some of the energy cards. For the most part, that dog’s-eye view makes the game a little less scary than your average zombie game, though I will note that there are a few “ewww” moments as well. For instance, at the beach (or “the bath”), you might find a hand sticking up out of the sand. You roll the die to find out whether it was a hooman hiding in the sand or… the hand wasn’t attached to anything. Likewise, in the “boneyard” you might find a hooman in a hole in the dirt—either you revive them enough that you can try to rescue them, or you were too late and it’s just a dead body. That gives you a feel for the type of thematic content, so you can judge whether the game would be a good fit for your group or not.
So, on to the gameplay! Good Dog, Bad Zombie is about spending your actions wisely, and assessing risk. With only two actions per turn, it feels like you won’t be able to do a whole lot, but the energy cards open up a lot more options, including getting additional actions. Plus, without energy cards, you’re basically limited to running around and sniffing things and getting more cards—you can’t chase off zombies or rescue hoomans if you don’t have any cards, because that’s where the herd, bark, and chew actions are. And while it can be exciting to play a whole string of cards with paw icons so you can have an epic turn running all over town, it’s dangerous to end your turn with no cards in your hand, because if a zombie appears in your space, the feral track goes up.
The Good Doggo cards are particularly powerful, because they trigger your special ability. Captain Woofster, the Great Dane, can hunt, killing an adjacent zombie and then howling so another player can draw a card. Ms. Fuzzy Ears, the Shih Tzu, can protect: she can herd, then run, then herd—this can be fantastic for pushing some zombies off the edge of the board, or leading a hooman to safety.
The appearance of new zombies is random (based on the die roll) but you do have at least some information about what spaces may be more or less risky. For instance, you know that zombies will never appear in the Cliffs or River spaces, so if you end your turn there, it’s totally safe. The downside is that you’re off on the edge, which may make it harder to get to where you’re needed on your next turn. Because of the way zombies overrun, skipping over spaces with zombies and appearing in the next space closer to the center, you also know that some spaces have a higher risk. For instance, if the terror mill (7) and the backyard (8) both have zombies, then you know that a zombie will appear at the smell tower (9) if you roll a 7, 8, or 9—that’s a much higher risk than standing somewhere that doesn’t have any zombies that will overrun into your space. Also, it’s always safe to end your turn on a space with a zombie, ironically, because you know that no new zombies will appear there.
Overrunning zombies are also a consideration when you decide what zombies to get rid of, whether you’re herding, barking, or chewing. Certainly the zombies closest to Central Bark are the biggest threat, but if you have a hooman who is about to be overrun, you may want to risk Central Bark so you can save the hooman instead.

There’s always the balance between keeping the zombie threat at bay and searching for hoomans to bring back to Central Bark. If you spend all your time chasing after zombies, you can’t win the game, because you’ll never get any hoomans. But if you run around just sniffing tokens, you may find some hoomans who will immediately get killed off by those zombies you were ignoring. I haven’t yet figured out the best balance, other than that you can’t neglect either task.
No matter how you slice it, Good Dog, Bad Zombie does have a lot of random chance involved, in the cards you get and the die roll for the zombies. It’s the sort of game where success might be thwarted because all of your energy cards were “run” cards and you never got to herd or bark. Or because the die kept rolling the same two numbers, making zombies overrun Central Bark too quickly. Or you might roll several 19s and 20s, spawning no zombies, making it much easier to manage the threat. If you’re looking for a game where good strategy always triumphs, well, I’m not sure I’ve played any zombie games that don’t have a good dash of luck involved. But if you don’t mind the sometimes wild swings of fortune, it’s certainly a lot of fun to be a brave doggo battling the undead.
So far we’ve only had one successful hooman town—and I think maybe we had some beginner’s luck. Since then, the pack has gone feral a few times. But I like that there are several difficulty levels, so you can adjust the game to your preference if you find you’re losing too much or winning too easily.
Finally, there’s one other reason to back Good Dog, Bad Zombie: it will help real doggos, too! Make Big Things is partnering with One Tail at a Time, a nonprofit organization in the Chicago area that helps rescue dogs and get them adopted. Kickstarter doesn’t allow for direct monetary donations from campaigns, but they do allow for purchasing materials for rewards. So at the $100 and up pledge levels, Make Big Things will spend a portion of that money to purchase items from the One Tail at a Time resource wishlist.
In short: Good Dog, Bad Zombie has dogs, zombies, and lots of interesting smells. It’s a fun theme with challenging gameplay and a mix of luck and strategy.
For more information or to make a pledge, visit the Good Dog, Bad Zombie Kickstarter page!
Click here to see all our tabletop game reviews.
If you’d like to stay up-to-date with all of our tabletop gaming coverage, please copy this link and add it to your RSS reader.
Disclosure: GeekDad received a copy of this game for review purposes.