Sometimes, the most daunting part of painting a miniature is getting started. Here’s a trick I’ve started to use to add visual interest to my primed figures and get me painting faster.
Zeni-what?
When I started painting miniatures a couple of years ago, I had a very straightforward way of priming my figures. If they were going to eventually be a color, they were primed that color. Dragons were primed red, aliens green, Stormtroopers black (because I was being clever and was “just going to paint the white” to avoid having to shade… yeah). It worked out for my minis eventually because I ended up using a shade step to draw details back out. While they were fine for tabletop, they lacked something.
A little while back, Sorastro added a new technique to his ever-growing bag of tricks, Zenithal Shading. All this meant was that, after priming black, he went back with grey and white paint at different angles to give the impression of a light source. The effect was pronounced and, for me, revelatory. Even without any color, minis prepped this way had more visual interest than anything I’d produced. And using the technique, it was easy to see where colors should naturally be darker and where lighter tones were needed. It was almost like a cheat sheet.
Airbrush? We Don’t Need No Stinkin’ Airbrush.
Sorastro’s preferred method is with an airbrush, and he gets incredibly smooth, targeted results. If you have an airbrush, I highly recommend using it instead of spray cans (but then, if you have an airbrush, you’re a lot more dedicated than me already, so this article is likely old news for you).
Me, though? I have cans of spray primer. It’s messier, and the results aren’t quite as smooth, but it gets the job done.
To get started, grab your mini, a can of black, grey, and white spray primer, and find a very well ventilated space.
Paint It Black

Grab a rigid scrap of cardboard or foam core and affix your minis to it with a bit of sticky tack or poster putty. If you’re priming multiple miniatures, make sure you leave enough space between them so that you can paint all sides evenly. I like anywhere from three to six inches, depending on the size of the mini.
Once your minis are ready, spray them black in sweeping strokes, rotating the board or walking around them so that you hit all sides. Don’t worry if you don’t completely cover the mini on the first pass. The goal here is to get total coverage with a few light layers of primer. Too much in one pass, and you’ll obscure the finer details.

Once your initial coat is complete, pick up the board and double check to make sure you got everything covered. Chances are, there is an underside of a cloak or an otherwise obscured portion of the mini that you missed. Adjust your angle accordingly and respray.
After your satisfied with your coverage, tip the spray can upside down and spray till it’s clear to keep residual paint from clogging the can. Give the black primer coat ten minutes or so to dry. If you’re painting outside, you should bring it inside so that it dries faster and more evenly.
One Shade of Grey

Once dry, grab a can of medium grey primer. For this coat, instead of moving it all around for total coverage, you’re going to keep the can at a 45-degree angle to the figure. Move around again so that you get all sides. Don’t worry if the coat is a little lighter, you’re looking for just enough contrast to start pulling the details of the mini back out. Let the mini dry and clear the spray can as you did previously.
An Unbearable Whiteness of Being
This is the step that will make everything really pop. It’s also the one I have the most trouble with. Shake your white spray primer really, really well, then spray your minis from directly above at a distance of 6-8 inches. You won’t have to spray long, the white will stand out starkly against the rest of the figure almost immediately but you’re going to want to make sure you have an even coat. You’re also going to want to make sure you’re shaking the spray can often and that you keep moving to avoid pilling.
Maybe it’s Florida’s humidity. Maybe it’s the formulation of white paint, but I have never been able to lay down a white coat that wasn’t a little fuzzy. When you get up close, you can see a fine grit, almost like a 3D-printed figure. Once I start painting, it doesn’t make a huge difference, but it still bugs me. If anything prompts me to grab an airbrush, it’ll be this.

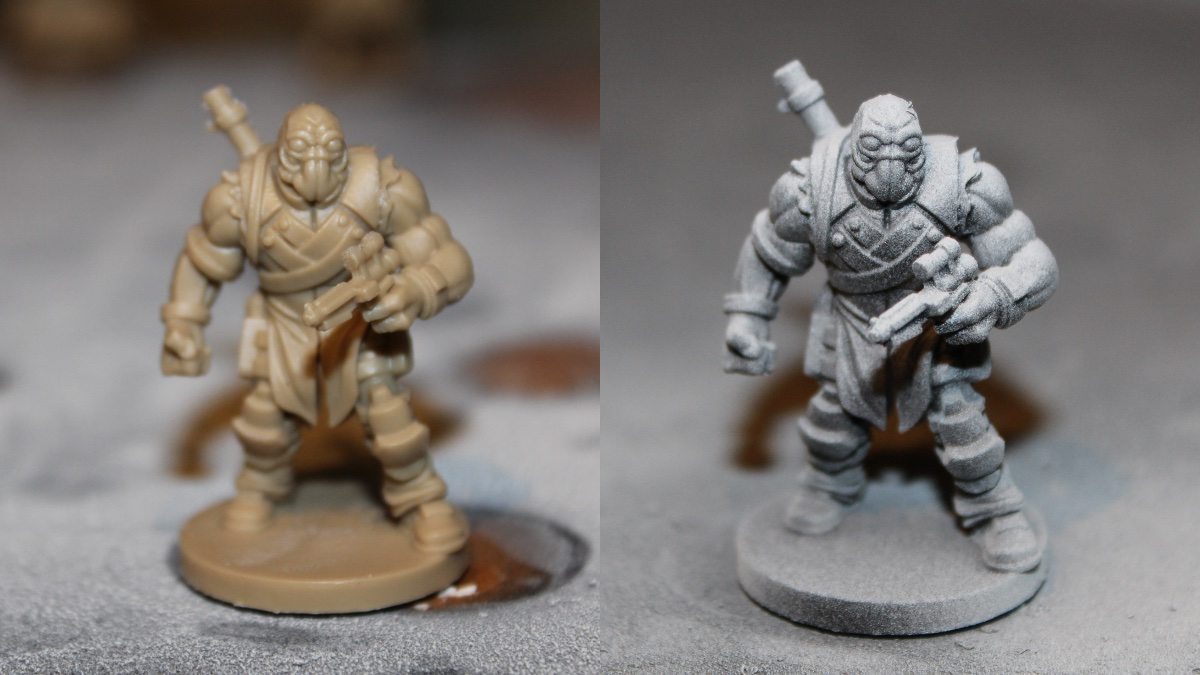
The resultant figure should have a pleasing gradient as if it was lit from above. It provides a visual shorthand of where the high points are on your figure and will help when you’re planning out your color scheme. It’s especially effective when combined with wet-blending (which I’ll get into more in my next GeekDad Paints! article). You can even shift the angle on the white spray if you want to simulate different object source lighting (OSL).
You’ll see in upcoming months that I’m priming all my minis this way now (and adding Zenithal shading to those I originally primed flat). Much like having a bit of something down on a white sheet of paper makes it easier to get writing, I find it much easier to dive into a mini when I’ve used this shading method.
Thanks to Sorastro for showing me the OSL and look out for more GeekDad Paints! coming soon.


I don’t have an air brush, and I feel that spray cans are hard to control. So I use a super soft brush (make up brush) with very very little paint on, and just dry brush in a top-to-down direction.
Here is a tutorial: https://www.youtube.com/watch?v=vHRMnJce4b8&feature=youtu.be&t=862
I know what you mean about the gritty effect of spray cans. It’s caused by the paint partially drying before it hits the mini. There’s three things you can do to help reduce that effect.
1) Spray closer: Get in closer than you’d usually spray. Like in about about 4-6 inches.
2) Spray when it’s cooler. If you live in a hot climate, spray at night/ first thing in the morning.
3) Put the can in warm water for 5 minutes (in the sink full of hot water from the faucet is perfect), then shake it like crazy.
Hope that helps
Cheers,
Tony