
Mabot is a modular robot kit from Bell Robot that lets your kids (and you) assemble all sorts of cool robots, vehicles, and more. It will be launching on Kickstarter later this month, and I was provided with a sample set to try out.
New to Kickstarter? Read our crowdfunding primer, and check out our curated page of projects we love.
Note: The media review kit I received looks fairly finished in quality, though all the manuals were in Chinese and I had to refer to a PDF the company provided for English instructions. The two companion apps are in English, though some of the translation seems a little off. The Bell Robot website itself has a lot of odd English on it as well, so while the robot itself is pretty awesome, the documentation still needs some work—hopefully by the time the product is actually delivered.
There are a few reward tiers to choose from, ranging from $119 to $599; the pricier sets have more types of components and allow you to build more models.
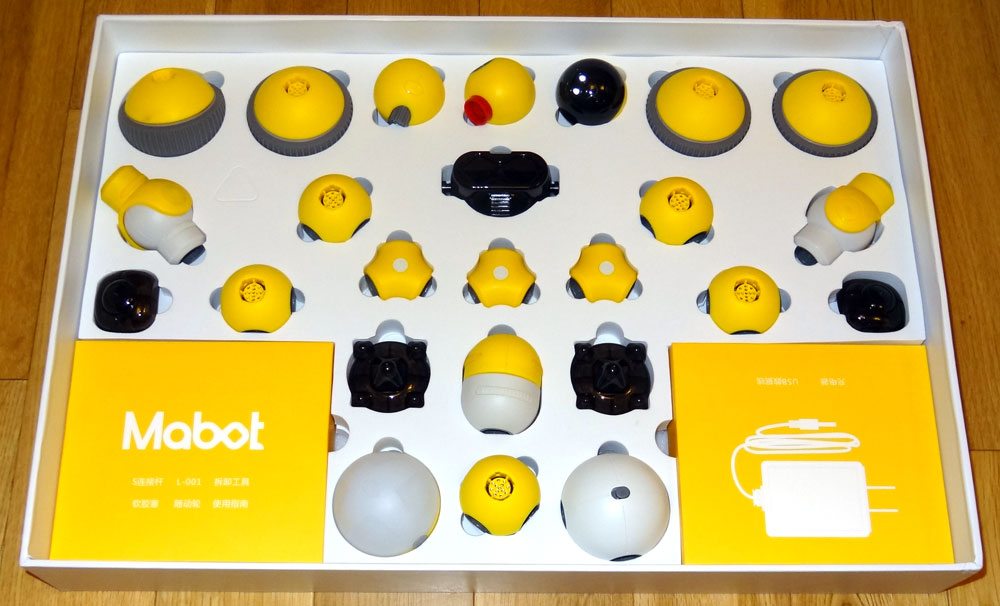
Mabot Components
The exact components that will come in your set will vary somewhat from what I have, which is a special media review kit. The Kickstarter campaign has four sets (labeled A through D), depending on how many components you want to get. Mine includes many of the components from the C set, though without the grabber arm and some of the other connector types.
Here’s what came in the box:
- 1 Control ball
- 1 Battery ball
- 4 Drive balls
- 5 Connection balls (6 Port)
- 3 Connection balls (3 Port)
- 1 Horizontal Joint
- 2 Swinging Joint
- 1 Touch Sensor ball
- 1 Infrared Sensor ball
- 1 Color Sensor ball
- 1 Control Ball Accessories (goggles)
- 2 Connection Ball Accessories (rounded square plates)
- 2 Drive Ball Accessories (hubcaps)
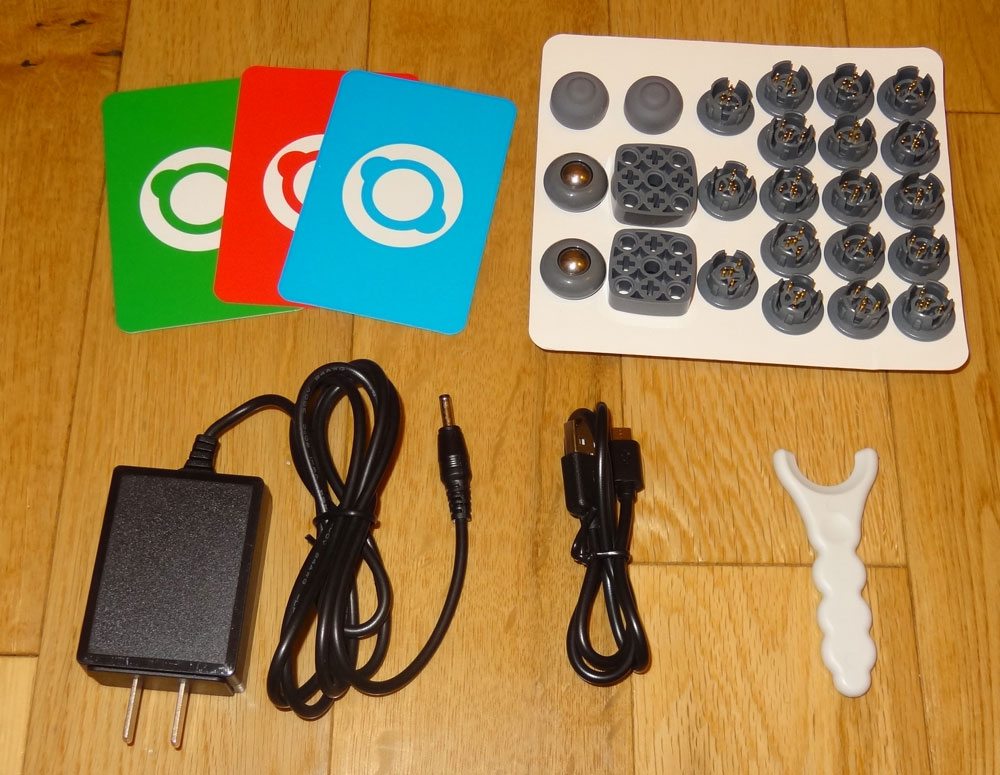
- 18 S Rods (connectors)
- 2 Wheel Plugs
- 2 Rubber Plugs
- 2 LEGO Adapters
- 3 Color Cards (red, green, blue)
- Power adapter
- Micro USB cord
- Disassembly Tool
Most of the pieces are balls, or mostly ball-shaped, with various round ports—they’re easily snapped together by using the S rods, small grey plastic pieces that have metal plugs inside. The battery ball has a DC charging port and an on/off switch, and the control ball (usually the “head” of the robot) has a micro USB port along with two small buttons on the sides. The control ball also has a translucent top half, through which various colored lights can be displayed. There are two types of small connector balls—some are spherical and have 6 ports on them, and some are triangular, with only 3 ports in a Y configuration.
The two elbow-like joints can bend up to 90° in either direction, and the pill-shaped horizontal joint rotates (like a waist) from side to side, about 90° each direction. The drive balls are spherical wheels with rubber treads—the outside portion of the wheel is also translucent plastic and has lights inside.
Finally, there are three sensor balls: the infrared ball can detect objects from about 5–15cm away; the touch ball has a red button that can be depressed (and it also has a green stripe light on one side); and the color ball can detect color—it has a small light with a sensor window right below it to detect the reflected color. The manual says it can also be set to detect light intensity, though I haven’t found out how to use that feature.
The wheel plugs and rubber plugs can be attached to the ports—wheel plugs have a large bearing in them so that they can serve as extra free-rolling wheels. The rubber plugs are just used for bumpers or to prevent something from sliding. The LEGO adapters have round and “+”-shaped holes so that you can attach various LEGO bits to the robots.
There are a couple of accessories that can be attached to the robot, mostly for decorative purposes, like a pair of goggles that fits on the control ball to make it look like a robot face.

The disassembly tool is a small wrench-shaped object that helps pull out the S rods if they’re a little stuck. You can easily pull two modules apart, but the S rod will still be attached to one of them, so the tool works really well to pop it out.
In the manual, there are other parts shown that were not included in my set: connecting links that are like the S rods but without the metal plugs, so that they’re physical connections only but not electrical connections; longer connection rods, cords that can make electrical/data connections between modules, and a three-pronged claw that can attach to the horizontal joint to grab things.
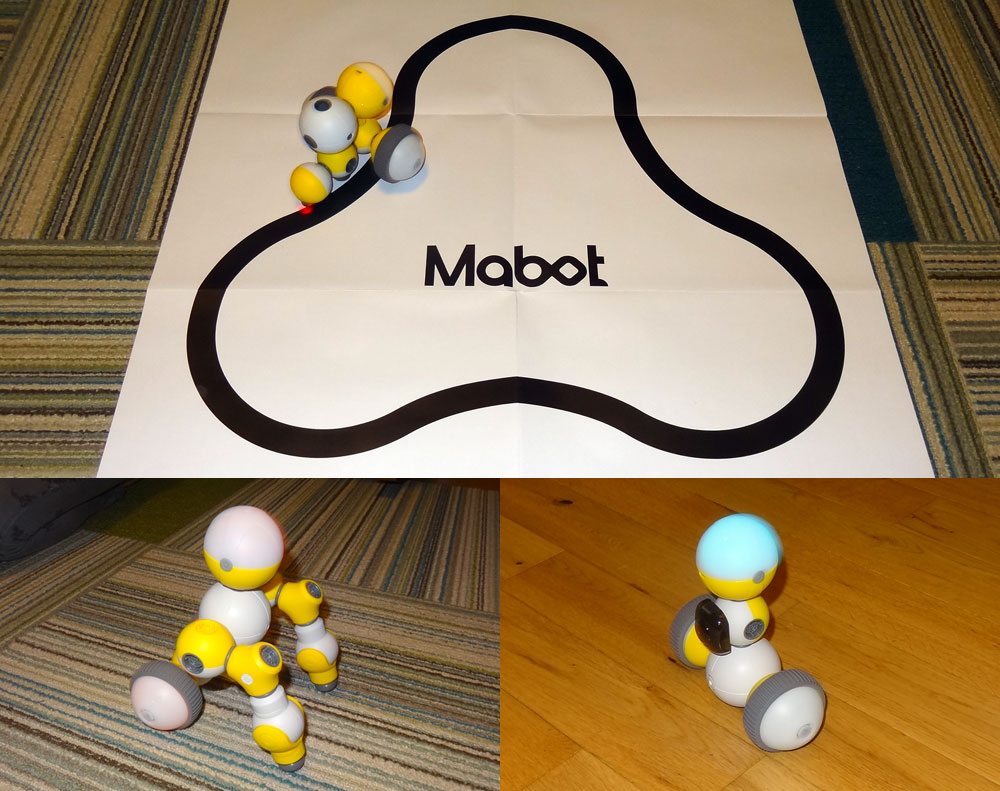
One thing that is not pictured above is the tracking map, a large poster-sized paper with a thick black shape on it, used for the line-tracking robot.
Overall, the components are pretty good. Assembly is easy and the parts feel fairly sturdy. I did see that the outer casing of one of my 3-port connection balls is slightly separated along one seam, but all of my kids tell me they didn’t drop it or anything, so I’m not sure what caused it or if I just didn’t notice it before. Like building with LEGO, though, some structures hold together better than others, and if you create a very large structure that is unbalanced or has unsupported parts, those connections may jostle loose during play.
How Mabot Works
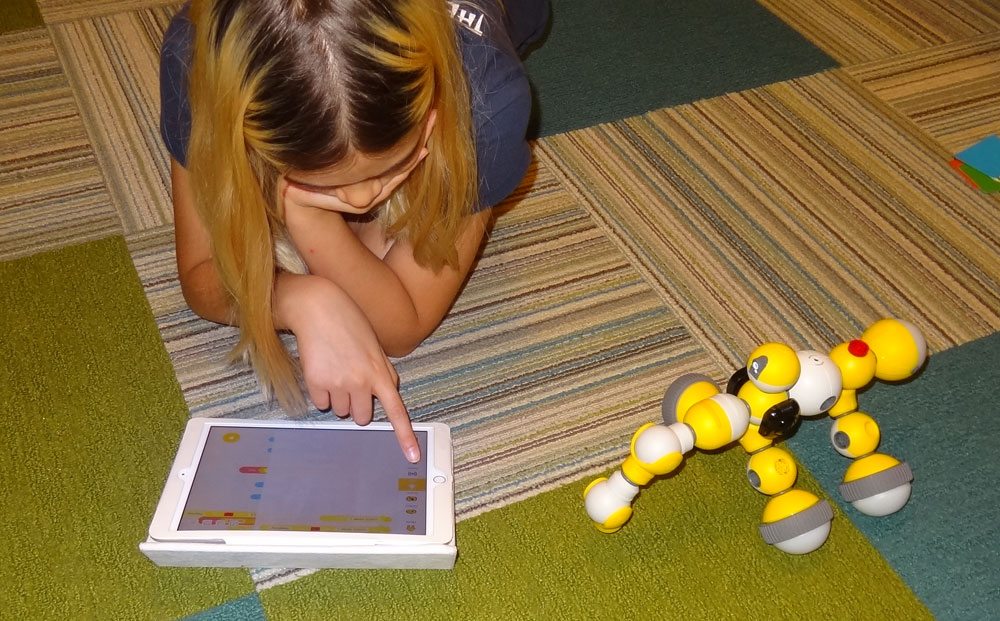
There are two apps available for the Mabot set, Mabot Go (iOS and Android) and Mabot IDE (iOS and Android). Mabot Go can run on a smartphone, but Mabot IDE is tablet-only because it needs more space to see the programming.
Mabot Go app
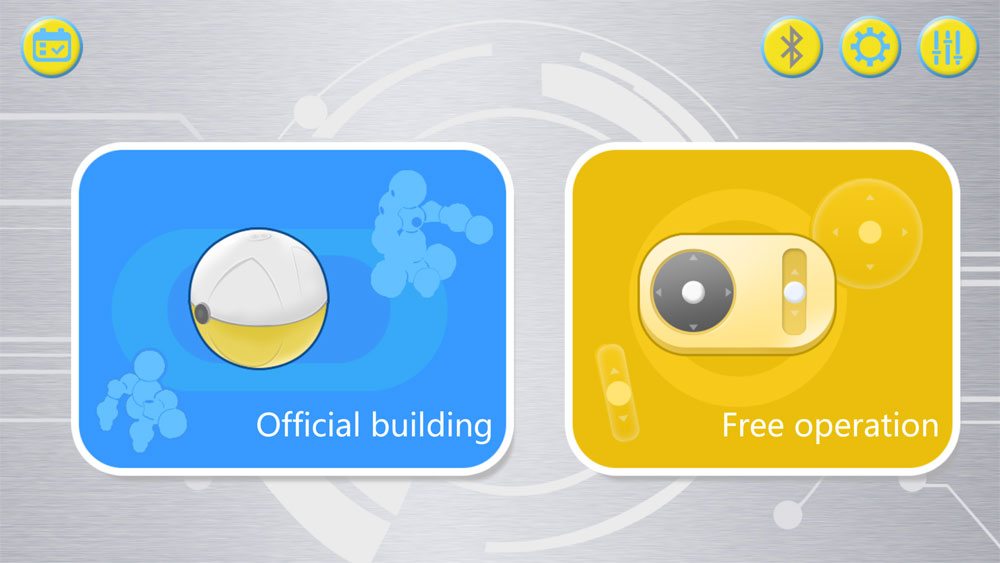
Mabot Go is the more basic app, and has two primary options: follow instructions to build a pre-designed robot and then play with it, or build your own robot and then control it.

If you choose the “Official Building” option, you’ll be presented with several models, each marked with the set letters that include the parts for it.
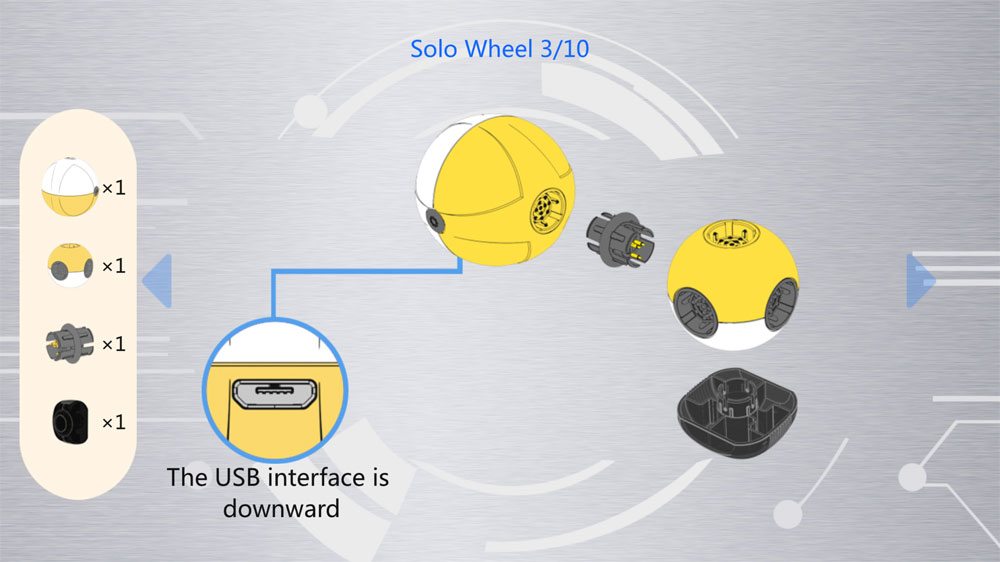
After choosing one of the options, you’ll be presented with the list of components needed, and then a step-by-step visual guide to building it.

After completion of the model, you’ll need to connect the device to the Mabot via Bluetooth, and then send the program over to the control ball. The pre-designed models have more complex behavior, so the programming is already built into the app, but still needs to be downloaded to the robot since each model behaves differently. Before controlling it, you’ll need to calibrate the wheels—each wheel on the model will light up a different color, and the app displays the model along with the different colored wheels. Drag and drop the colors so that the image matches your model so that the robot’s brain knows which way the wheels should turn.
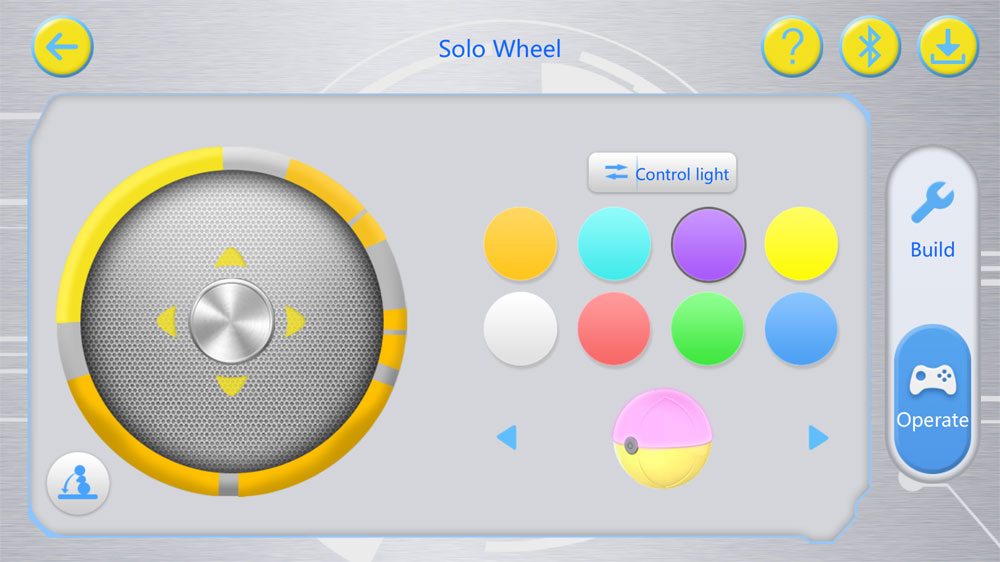
Some of the robots have an “Operate” option because you can control them through the app, moving them around or changing the lights on the control ball and the wheels (changing colors, and choosing between solid, pulsing, and flashing). There may be additional buttons on the control panel depending on the model. Other models are controlled using the various sensors rather than the app, so in those cases, there will not be an “Operate” section.
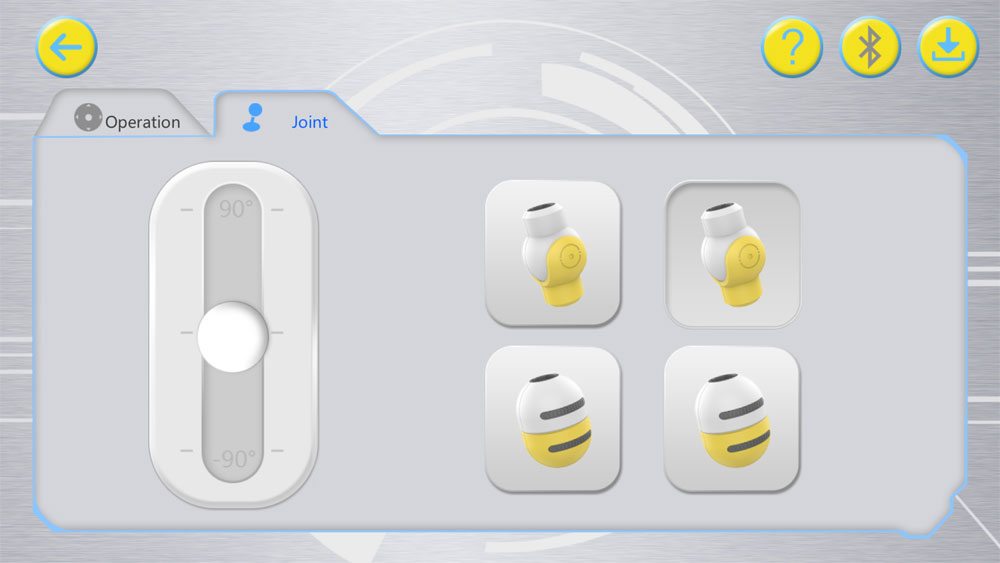
If you choose the “free operation” option, you can assembly the Mabot however you like. After calibrating the wheels, you can switch between the “Operation” tab and the “Joint” tab. “Operation” is similar to the image I showed for the Solo Wheel, with a joystick for controlling movement and buttons to change the lights. The “Joints” tab lets you choose an individual joint and control it.
In the Mabot Go app, you can’t use the various sensors or program more complex behaviors—you can only drive the wheels around, change colors manually, and control joints one at a time.

Mabot IDE app
For more complex behaviors and to take advantage of the various sensors, you’ll want to use the Mabot IDE app. This one uses a Scratch-like programming language to drag and drop various code blocks. You’ll be able to program different behaviors when the color ball sees specific colors, or when the button is pushed, and so on.
The app itself does have some limitations—for instance, programming the wheel movement required a lot of taps because each wheel had to be programmed individually rather than being able to quickly copy and paste between wheels. The interface will be fairly familiar to those who have used Scratch, though, and my 10-year-old was soon creating her own programs after I gave her a few tips.
With Mabot IDE, you can set if/then blocks of code that rely on the sensors, repeat blocks of code, and create functions and variables.
The one thing I wish is that you could also create your own control panel, so that you could use a joystick to control your model and have the robot react to sensory input.
What Can You Build With Mabot?
Pre-designed Models
First, we built all of the designs possible with the components we had:
- Solo Wheel: a self-balancing robot with two wheels
- Laser Pistol: a gun that lights up when you pull the trigger; use color cards to change the light colors
- Tracker Boy: a robot that follows a line
- Drag Racer: a car that runs when you tap the button on top, and zooms if you tap twice
- Explorer: a robot that moves until it detects an object in front of it, and then rotates before continuing
- Shaker: a car that wiggles like a snake while it rolls
- Knock Knock Car: a car that uses its “arms” to push its own button to move
- Big M: a robot that will wave its arms and move around based on what color it sees or objects nearby
- Gorilla: a robot that scoots around on its knuckles
Building these models helped us understand how the various parts work and interact with each other, and we had a lot of fun with them. It also helped prepare us for using the Mabot IDE app to create our own programs. One of my favorite models was the Solo Wheel, which had an interesting way of righting itself: while lying down, you drive it forward quickly and then stop suddenly, which flips the body up, and then the self-balancing kicks in.
There are some other models shown in the app, but they require parts we don’t have—in particular, the grabber attachment.

Our Own Models
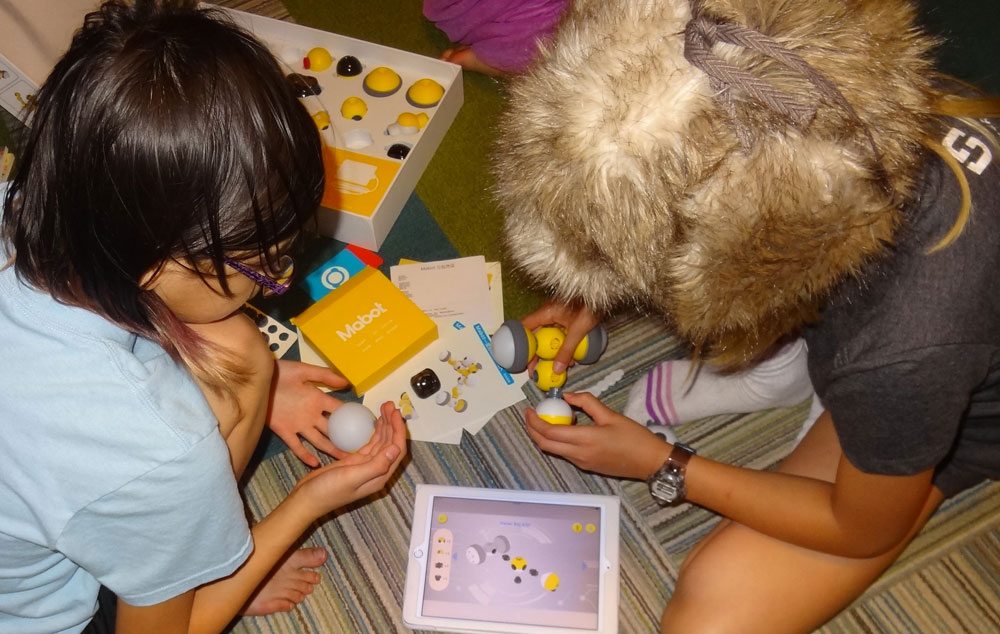
After completing the pre-designed models, we tried some of our own contraptions—and some worked better than others. First, with the free operation mode, we tried a few robots that we could drive around and manipulate with the joystick and joint controllers. The humanoid robot (above right) was one that my daughter designed on her own. It can turn left and right at the waist, and can raise and lower its arms. She drove this around and chased our 4-year-old around the room with it.
Then she had the idea to build an elephant, using all three of the joints for its trunk. I had to help her a bit to make the elephant tall and heavy enough so that its trunk didn’t drag on the ground, but we came up with the model you see above to the left. First, she tried driving it around with the free operation mode, but then we had the idea to try some programs.
Using Mabot IDE, we made the elephant react to various colors held in front of the color sensor or pushing the button—moving forward and backward, waving its trunk, and “panicking.” I’ve caught some of it on video, which you can see below, along with some of the other models. Since then, my daughter has continued to tweak the program to add other movements and reactions.
The one thing that I did not see in the app was any sort of accelerometer, which surprised me. I’m sure that the Solo Wheel uses an accelerometer to stay upright, but in the Mabot IDE app, there isn’t a way to access it that I could see. I was hoping to try out a program that used it, but perhaps that’s a feature that will be added later on. One other issue we ran into was that the color ball is supposed to be able to identify 8 different colors, but, in practice, ours gave the same response to blue, black, and white. I also haven’t found where to change the sensor to respond to light intensity rather than color, despite what the manual says.
Should You Back the Mabot Kickstarter?
Comparisons to Other Robots
I found the Mabot had some similarities to Dash & Dot, another set of app-controlled robots that we’ve covered here at GeekDad in the past. (See Dave Banks’ introduction, my review of the Wonder app, and Robin Brooks’ impressions of them.) Dash & Dot also feature various sensors, customizable lights, and multiple apps that allow for simple controls or programmed behavior. Dash & Dot’s strengths are that they are designed to look cute, with large “eyes” and voices. They have sound sensors and speakers, so they’re capable of using auditory signals. They are quite capable of many things, but because they aren’t modular, you can’t build your own robots. There are accessories that can be added to them (and they’re also LEGO-compatible), but you can’t pick your own configuration of wheels, sensors, and so on.
Another comparison could be made to LEGO Mindstorms, since that is another well-known existing robot set. Mindstorms allow you to create your own models and program them, and arguably you get even more flexibility in building. I would say they’re also more complex—creating your own contraption will take more building than the Mabot does. Which one you prefer probably depends on the age and skill of your kids. Mabot seems a bit more like plug-and-play, with simpler building.
Pricing
The price will probably be one of the biggest factors, because the Mabot sets aren’t cheap. The cheapest set is $119 on Kickstarter, but it only comes with enough parts to build the Solo Wheel. While that’s a very cool model and fun to play with, I don’t feel that there would be enough parts to build much of your own, and you might get more play out of Dash. Once you get to the larger sets, though, the options and possibilities multiply and your kids will be able to try a lot more—but that’s a big investment.
Summary
One thing is certain: the Mabot is a hit with my kids (and me), particularly my coding-minded 10-year-old. She’s already asking if we can get an additional set so she can have more parts to build bigger models. I really like the way that the various modules snap together easily, and the programming app gives it a lot of possibilities. I’m excited to see what else my kids will come up with, and I’m really curious about the additional components that come in the larger sets. If the price isn’t a barrier, the Mabot sets can provide a lot of fun and education. I also do hope that the company will invest in better English translation for its website and documentation.
The Mabot Kickstarter will be launching soon! I’ll post a brief reminder when the campaign is live. For now, there is a Mabot landing page here, where you can sign up to get a discount.
Disclosure: I received a Mabot set for review purposes.


Have you had any problems with the Bluetooth connection or the Mabot ceasing having response despite being connected? I am using Android and it stopped responding after our first build.
I didn’t have that problem myself on the iOS—it seemed to connect pretty easily whenever needed. I wonder if the control module came loose, or the batteries need charging? Sorry I can’t help more!