 The gaming table news coming out in the past couple of weeks inspired me to finally post about my do-it-yourself gaming table, complete with claw feet! While not quick, easy, or cheap, this table was custom to my specific requirements, and is a piece of furniture that may last generations. TL;DR, if you just want to see the build pictures, check out my Flickr album.
What of this gaming table news?
If you’re reading this, you’re likely the type of person to have already heard that Geek Chic has announced the sad news that they are ceasing operations. Geek Chic set the standard for treasured geek gaming tables. While many competitors have cropped up, Geek Chic was still the pinnacle of the gaming table market.
Nothing compared to the Sultan as the centerpiece of a gaming room. While amazing heirloom-quality pieces of furniture, each gaming table cost thousands, with a Sultan averaging twenty to thirty thousand dollars! There are many quality alternatives such as Board Game Tables, Carolina Game Tables, Game On Tables, Rathskellers, to name a few from just a very cursory web search, and Wyrmwood, the maker of high end gaming accessories, is also jumping into the gaming table market.
Gencon50 is where we will be revealing the very first Wyrmwood Table. We will be doing demos and pre orders! Be sure to stop by.
— Wyrmwood (@WyrmwoodGaming) June 22, 2017
While, sure, you can buy a quality gaming table from one of these many great options available, another option is to just build your own! There are many options for handmade as well, ranging from just felting and adding a gaming-vault top to an existing table or building a gaming table using cheap lumber. One forum poster even suggested buying an old pool table… comes with ready made drink holders!
When I decided to go with the DIY method for my gaming table, I looked into all of these options, but what I wanted was was, like a Geek Chic, an heirloom piece of furniture; something I could hand down to my geek kids; something that will see the spilled blood of many characters, played through real generations of gaming geeks!
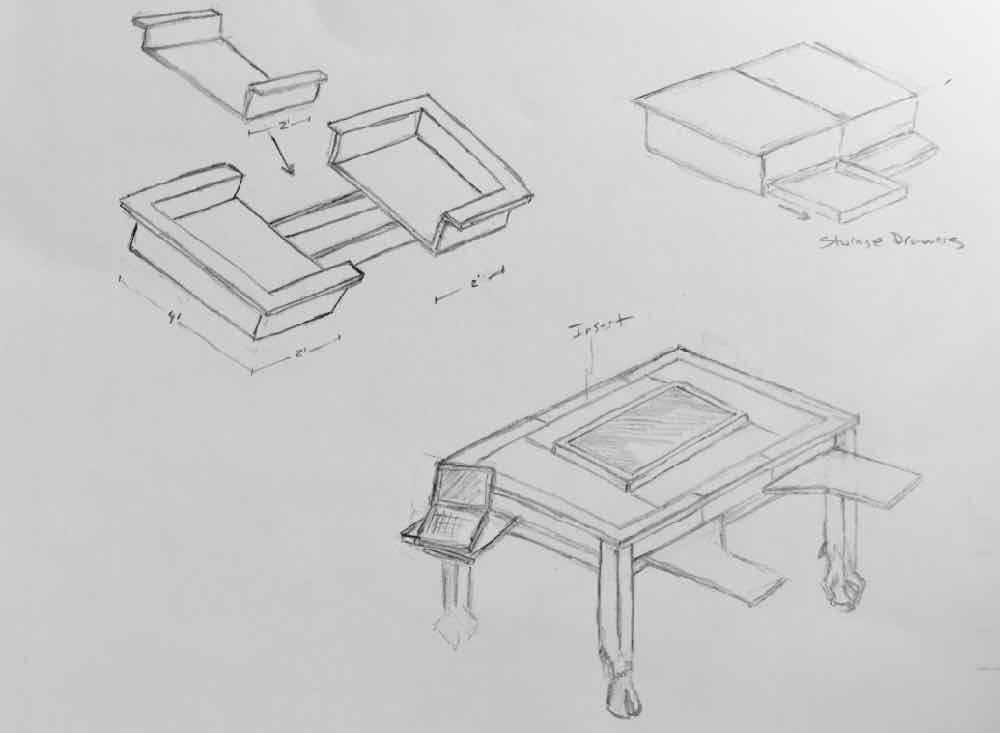
Gaming Table Design Concepts
I’m more of an idea guy (a nice way of saying I lack any useful skills), so, I called on my much more talented brother for help. I showed him my table drawings, and similar tables that could be purchased and after some back-and-forth we came up with a some designs, and a plan. I would love to do a dining room game table, and that’ll be next, but to figure it all out and as a trial, we started with a coffee table.
I believe I purchased the lumber in August of 2016, and set the goal to surprise my family for Christmas. The table was finished under the wire, and set up for Christmas morning.
The requirements of my build were:
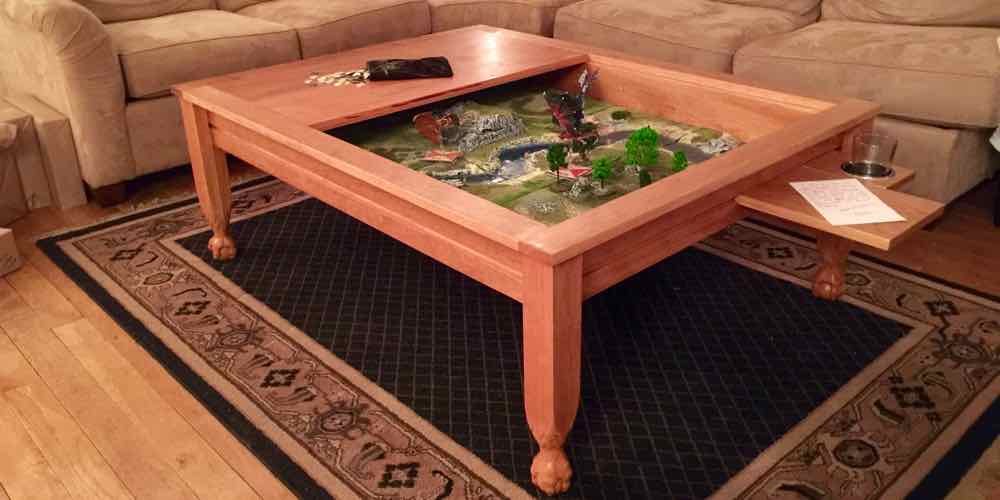
- Comfortable height for gaming as a coffee table – Settled on 19-20″ for the surface
- Internal gaming vault 4-6″ deep. I wanted most miniatures-type games, and terrain to be able to be covered. This depth seems to be way more than most gaming tables commercially available
- 3′ x 4′ playing surface (the vault) to accomodate 12 1′ x 1′ terrain tiles I have from Pedion Modular Battlefields
- Geek Chic style slot on the side for cup holders, dice trays, paper holders, etc
- High-quality wood and build to last generations
Check out my Flickr album for higher res images of the designs.
Talking about our designs, I was a little concerned that 3′ x 4′ was pretty huge for a coffee table. Luckily I have a room that does not get dwarfed by it. The reason I had to go so large was that I didn’t want gaps when the 1’x 1′ modular terrain prices were in, and 2′ x 3′ seemed too small. It worked out though, nicely filling the spot where it landed, as you can see in the title picture of this post.
The other concern was that 4-6 inches for vault depth is way deeper than most of the commercial tables, and I figured they likely had good reason for their chosen vault depth. The functional reason for my 4-6 inch depth though was that if I was going to use it to cover games I had still in progress, I wanted to be able to cover games without having to remove most of the taller miniatures or terrain. I also figured that if I found I wanted to usually be using a much shallower surface in the vault, I could make a felted insert to raise the floor of the vault to whatever level I wanted.
Other design considerations
- How to get the boards covering the table out. Many Ideas were discussed; a stick to push through a hole to lift the first board; a hole to stick a finger through to lift the board; have it so that you can push down on one board and the other side would lift up. One of my favorite ideas and one I may utilize on my future dining table is a skeleton key and lock. For the coffee table, however, my brother came up with a lever that works well. You can see this later in the post.
- At one point I sketched out a claw foot on one of the design pages and said, “wouldn’t it be cool …” and that then became a must-have addition to the table. I think this is what sets this custom table apart from most anything else I’ve seen, and was certainly the most fun part of the build.
What Materials and Equipment do You Need to Build a Gaming Table?
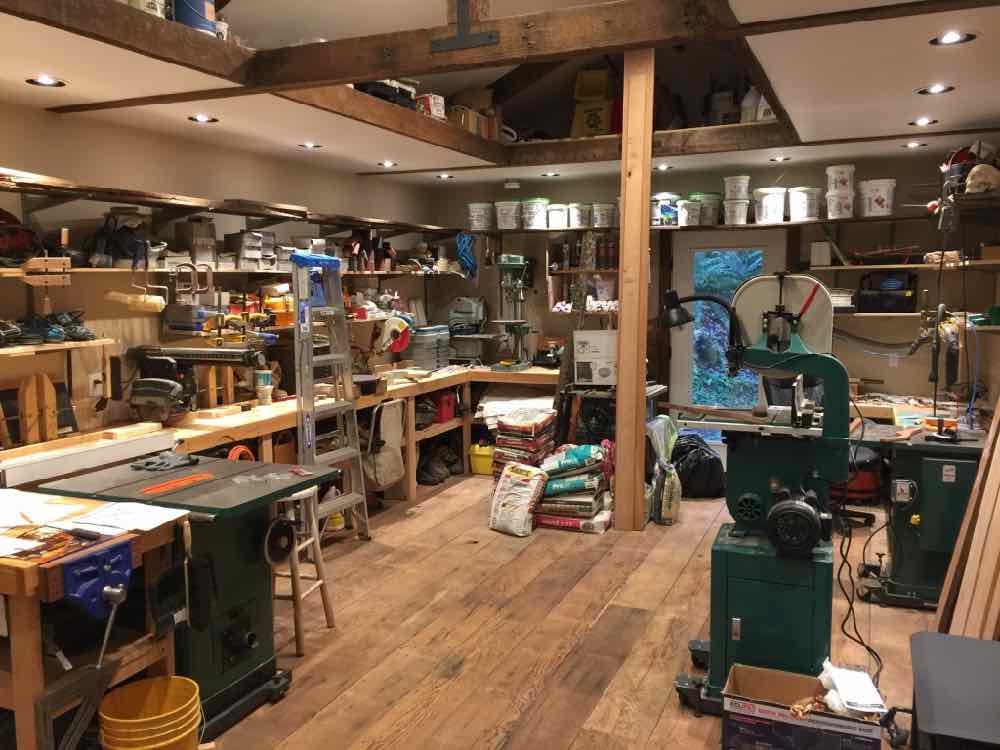
While you could easily do this at much less cost with cheaper wood from any home improvement store, I wanted quality and appealing wood. Again, I was seeking to make an heirloom piece of furniture. So I took my brother, the expert, to a quality exotic woods and hardwoods store, and spent a good deal of time settling on a type of wood. There were so many factors to consider, color, density, consistency in how it looked. I settled on cherry and after some calculations we purchased most of the material we’d need. This isn’t like Home Depot where you go in and buy a bunch of 2×6’s that are all the same size. Each piece is a different length, width, depth. Later, this took my brother’s skill to shape and size the boards we needed. I think I’ve learned enough to do this work on my own for the next table.
Again, this is not a cheap-option. The wood alone was around $800, and while much cheaper than a few thousand dollar Geek Chic coffee table, there is also the need for the tools, a shop to build in, time, and of course skills. If you have all of that, then by all means, building your own table is the way to go. If you don’t, then the prices these companies charge are really quite reasonable.
Tools and Materials
Note, these are not the specific tools we used, but I linked to similar items for clarity (mainly affiliate links). Many of these items can be found used for less, and be sure to talk with your supplier, discussing your needs before buying any of this.
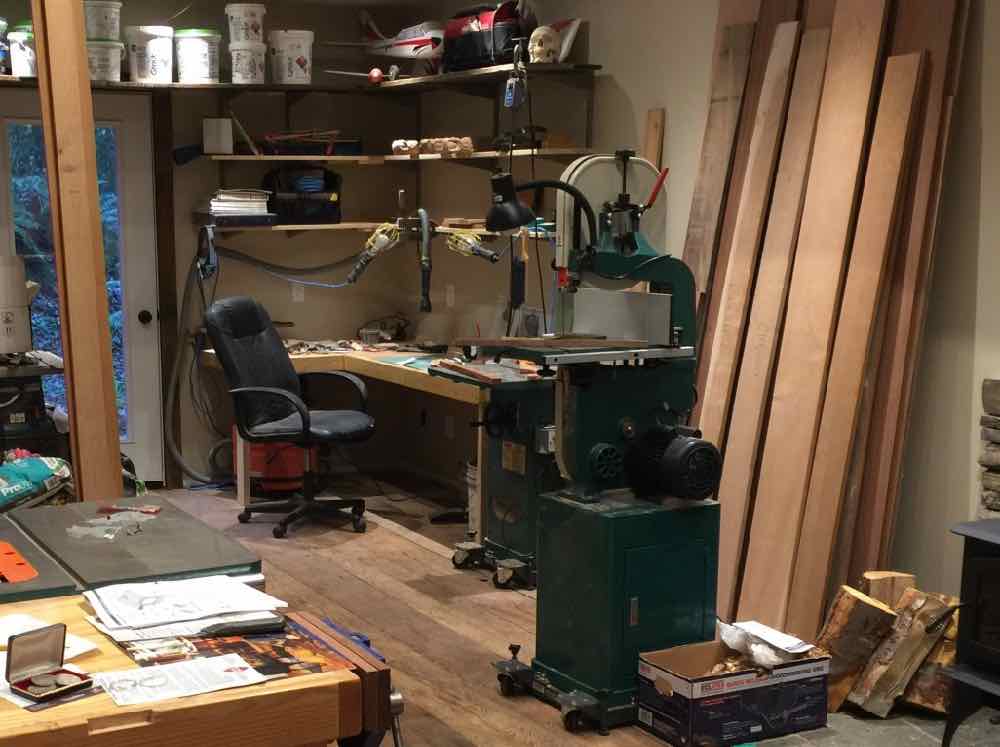
- Table saw : $800 – $2500 – We had a 3 hp Grizzly
- Table saw blades : $100
- Dado Blades for table saw : $100
- Planer set : My brother had a great used set he purchased for $250
- Clamps : $75 – We had a few of these going at a time
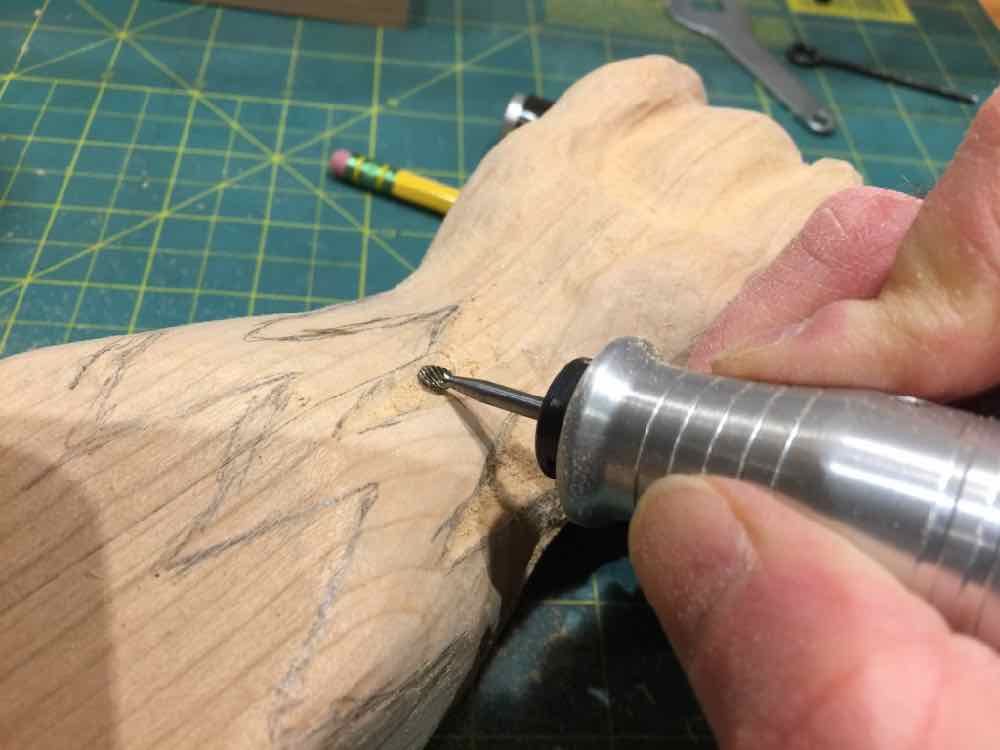
- Carving tool : $500 with accessories – We had a Foredom with connected shop vac
- Carving Bits : $200 (We burned up a couple)
- Shop Vac : $50
- Kreg Jig for concealed/angled screws : $140
- Shaping Table : $800 – $1200 – We had a 1.5 HP Grizzly
- Shaping Bit : $50 we used just one, for the accessory groove
- Chop/Miter Saw : $250
- Circular Saw : $100
- Jig Saw : $50
- Drill + Bits : $50
- Finish nail gun and compressor : $200 – You easily use a hammer and nail punch for the limited nailing
- Plug cutter and Drill Press : to plug screw holes (we just had four)
- Finish – Teak Oil
- Cherry wood – I wish I had documented this better, but the wood alone was around $900. I can’t really say how many board feet, or the dimensions purchased
- Plywood – for base of gaming vault, we used birch
- Shop/garage to work in
Total cost works out to around $1,000 in materials and $4,000 in tools. For comparison, a Geek Chic Hoplite coffee table was from $2,000-$4,000, and a Carolina Game Table coffee table with much less in terms of features, not even a cover, is available for $900. Even when you just consider the cost of the wood, DIY is not necessarily going to save you a ton of money on a coffee table, but my ultimate intention is to build a dining room table where the savings gap will be much greater.
It is important for me to stress though, the cost of the gaming tables on the market is really quite reasonable when you consider the craftsmanship that goes into each, and the custom nature of the more expensive tables.
My custom DIY build though wasn’t so much about the savings. It’s about the satisfaction of making a piece of furniture with my own hands (or my brother’s hands)… a piece my kids will be able to take and use and hand-down to the next set of geeks. It’s also about making a table that meets my specific requirements. The dimensions, including the depth of the game vault are all determined by me. Accessories can be made for whatever I can conceive of. And last, if I decide to carve claw feet, I can!
How to Build the Gaming Table
We started with the drawings and ideas from earlier in the post, and mostly worked it out as we went. It was interesting seeing where a table manufacturer would be saving time doing pieces in bulk, and learning why various design elements are the way they are. One benefit most commercial shops will have is that they likely have a tool set up for a specific purpose, and can leave it set one way, whereas we’d have to set up a tool, then change it, and have to change it back at a later time. This results in some inconsistencies and inefficiencies in our table build. There are definitely economies of scale with this work.
Bear in mind, this is not intended to be a step-by-step guide. I’ll just discuss and show images of each step of the table build.
Claw Feet
The first thing we did was build the legs from smaller pieces of material and start carving them. Easily the most time consuming part, this was also the most rewarding, and resulted in making this table really stand out from the commercial options. One leg is made up of two pieces of 2 x 2-ish material glued together. We then roughed in a basic claw shape with the carving tool, and worked it with finer detail from there. A band saw would have been excellent for the initial shaping on each leg. We probably spent 60+ hours on the legs.


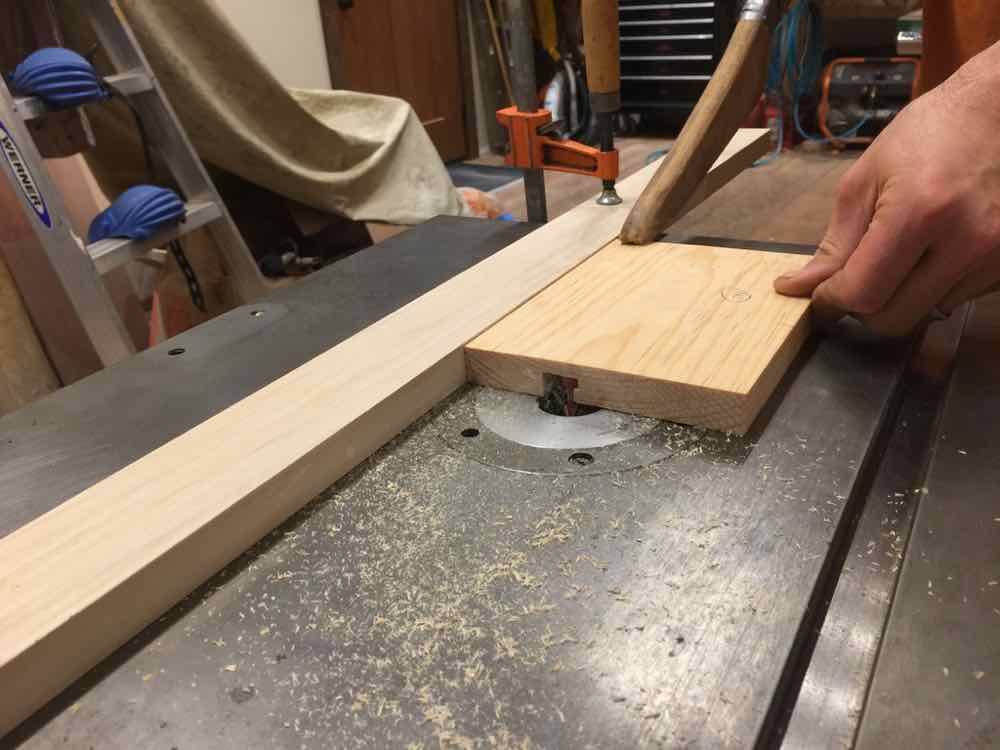
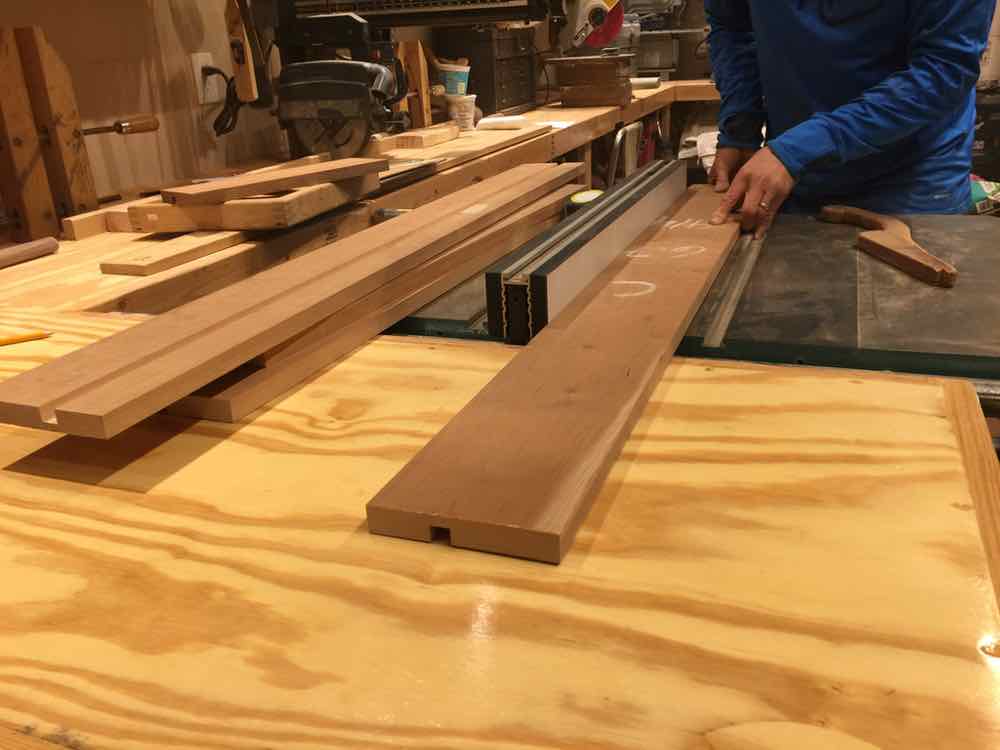
Accessory Groove
The notch or groove on the outer edge of the table is designed to take accessories such as cup holders, dice trays, paper holders, and the like. The idea is straight from Geek Chic and took us awhile to figure out. After a couple of trial runs we got a working sample, and then had something to replicate.


Accessories
There are many great accessories that can be built; mug holders, wine glass holders, dice rolling trays, card holders, book/computer/paper trays, and more. We used our scrap wood to make a few sample accessories. It’s on my list to make more. The main problem we have now is we don’t have a sample groove board that matches what’s on the table (It came out slightly different than our initial prototype). Making new attachments will be difficult unless I take the table back to the shop!
The ends of the shelf that go in the groove involved quite a bit of sanding and reworking until each accessory would insert and remove easily. We didn’t put a great deal of time perfecting this process as most of the accessories were done under the wire at the end of the build. We probably won’t get to making more until I am making them for the dining table build.
For the mug holder I purchased cup holder inserts from a a boating supply store.
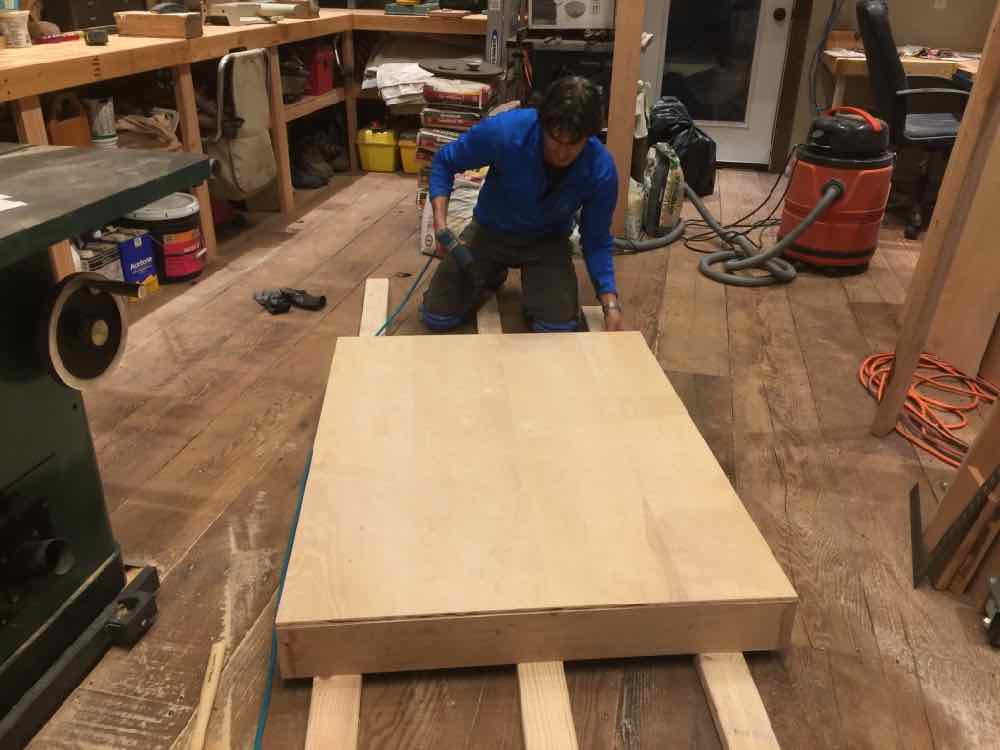
Gaming Vault
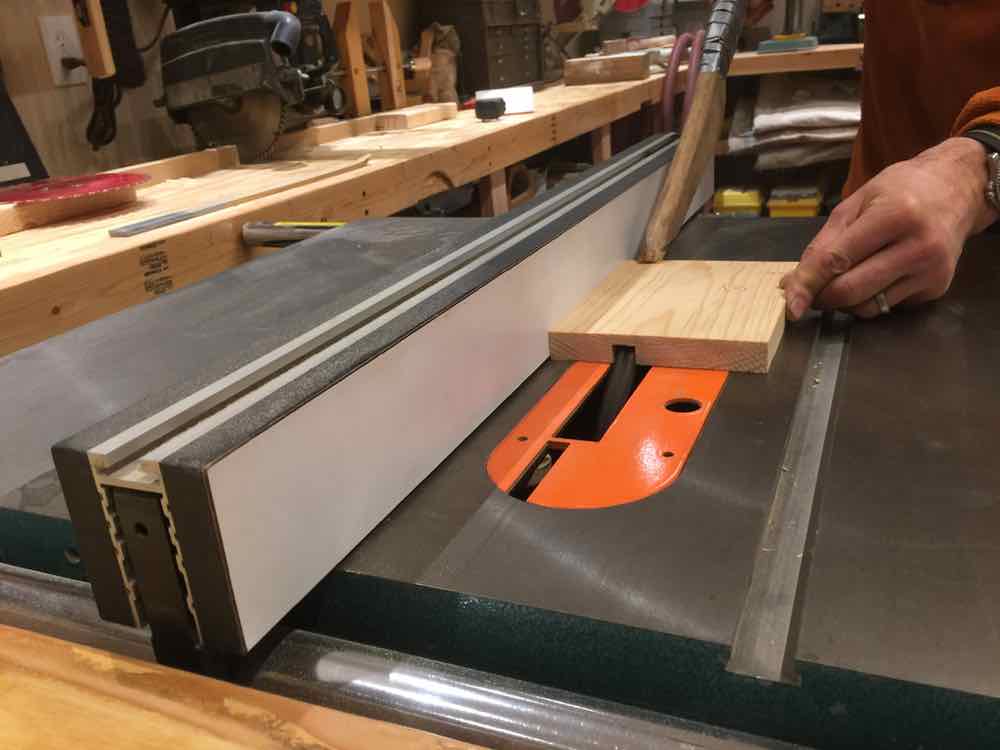
This is probably most distinguishing element of a gaming table; the vault where games in-process can be covered and out of site until you can continue them. The vault was the first part of the structure to be built. It’s pretty simple, four sides and a bottom held together with some finishing nails and wood glue. None of these nails are visible in the end product. The inside of this box is the visible playing area, but the outside is totally enclosed in another “box” that is built from the material with the accessory groove prepared above.
The depth of this vault box needs to match the notch depth on the legs and determines the final depth of the gaming vault. I went deep, so I could enclose games with large figures or terrain. I envision later creating a raised felt covered insert for playing games on a shallower surface.
The base of the vault is a piece of birch plywood. It’s a little cheaper than cherry, and the lighter colored playing surface is kind of cool.
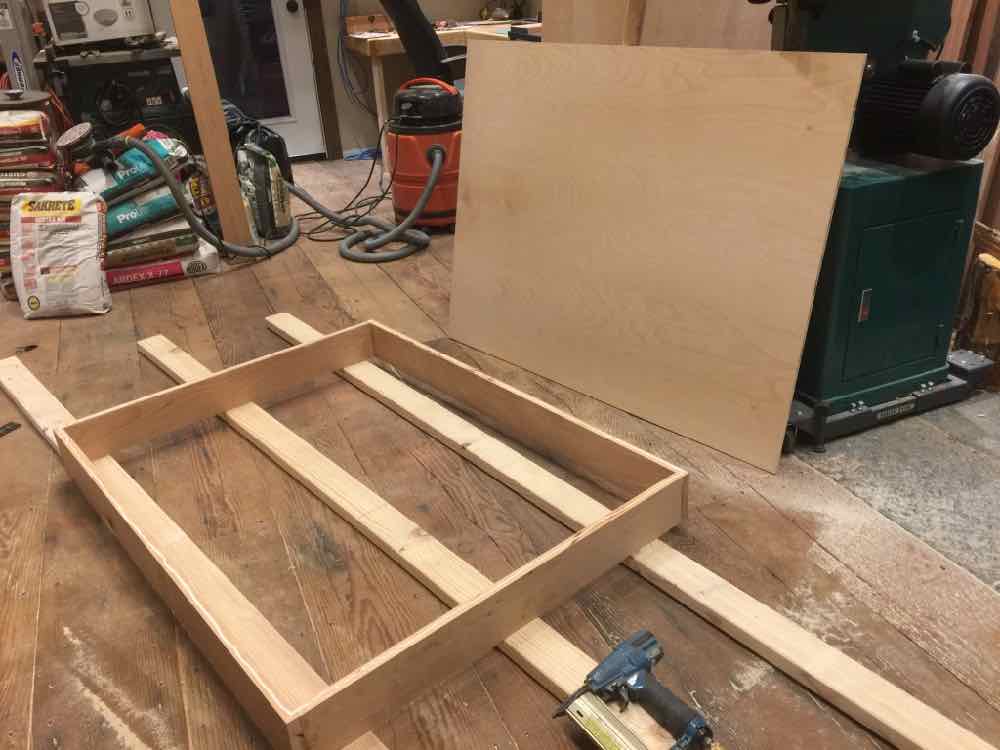

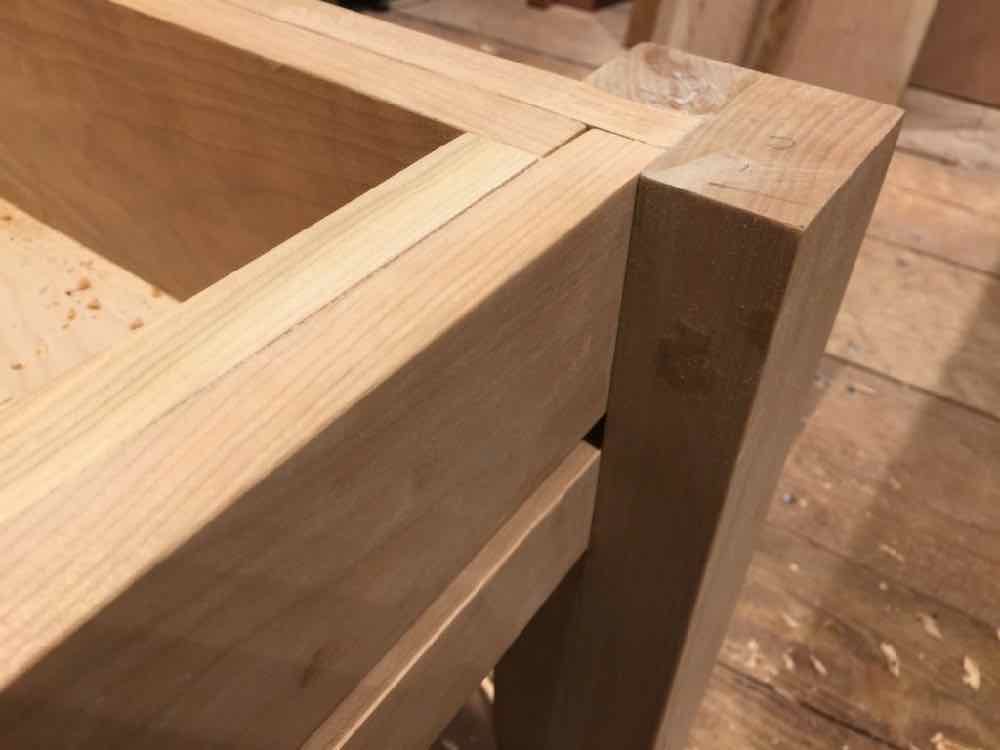
Main Table Frame
We then built the outer frame. This included the legs and the visible outer table sides where the accessory grooves are. The outer boards rest right into a notch built into the legs. It’s important to have made the leg-notches the right depth for the desired vault depth. We fully assembled this outer frame and then dropped the vault into it. We may do this differently next time as we could have very easily run into a situation where it didn’t all come together!


Once the wood glue did its thing, we were ready to drop in the vault. If we did this again, we’d likely build it around the vault to more likely get a fit.
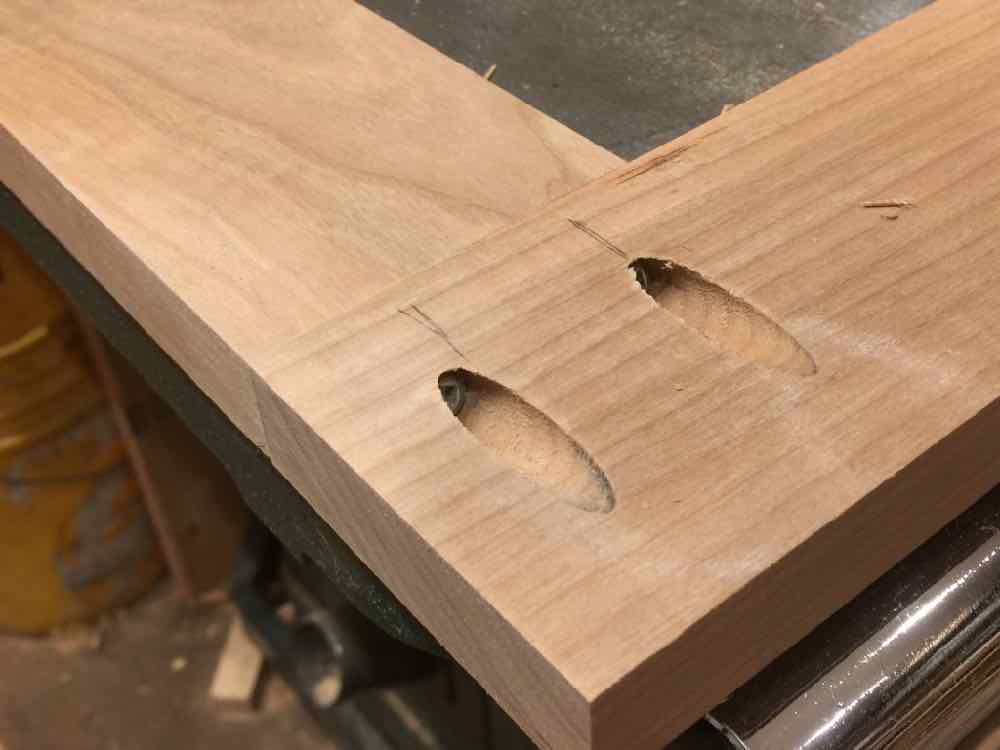
This is also the first place we ended up with some exposed screws. In the center of each inner board we put in one screw to help hold it all together, We then filled the hole with a plug we created from some of our cherry scrap.

Upper Table Edge
We built a frame that served the dual purposes of coving all those ugly seams in the above picture, as well as leaving a lip for the vault cover boards to rest on.
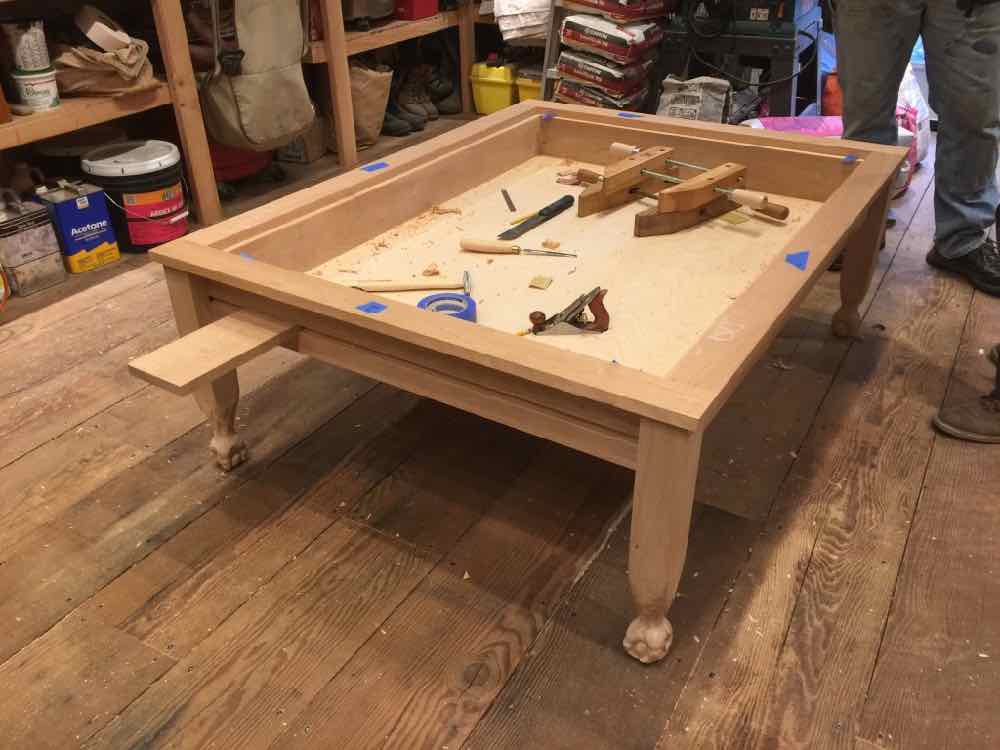
Cover
The vault cover consists of five boards about 10 inches wide. They just need to be cut long enough to rest on the lip created in the prior step, and be wide enough when all are in to fill the vault hole. Each board needs a little overlap. We went with a flush surface where the vault cover boards are flush with the upper frame put in during the last step. As humidity changes in my house some of these boards change shape, and raise up above the upper frame. Looking at pictures of Geek Chic tables online, the cover boards appear slightly recessed, so you never end up with them higher than the outer frame.

Opening Mechanism
We needed a way to lift up a board to be able to get them all out. I spent quite a bit of time trying to find a skeleton key mechanism to use. The idea being there’d be a keyhole on the outer edge of the table with a skeleton key sticking out. When you turn the key, the lock mechanism would push up and lift a board. Under a time constraint though my carpenter brother came up with a lever mechanism that worked well.
Finish
We covered the table in teak oil. I liked the look, and it was a material that we could easily add more later.
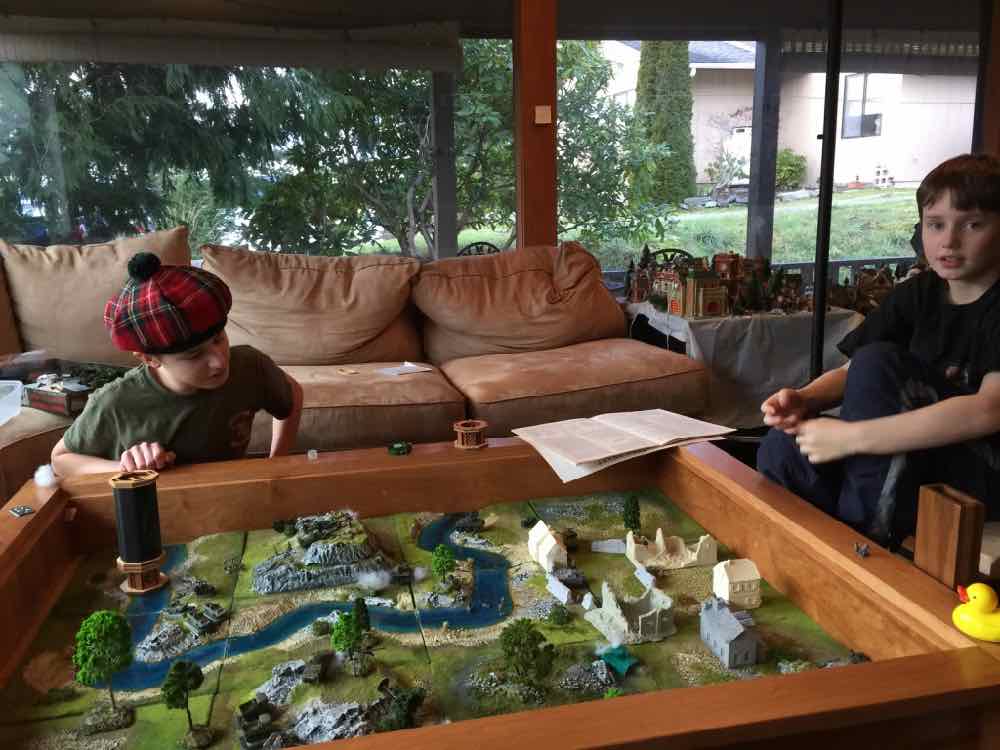
The Finished Gaming Table
The last coats of teak oil and some finishing touches on the various accessories happened on Christmas Eve for set-up in the wee hours of Christmas morning. One of the things I sometimes regret with these surprise projects is that while my kids get to be surprised and enjoy the final product, they are not involved in or learning from the build process. I’ll definitely involve them in the dining room table build if that ever happens.
Check out all of the design, process, and finished gaming table pictures in my Flickr album.


Using the Custom Gaming Table
The table is seeing quite a bit of use. My oldest is running a Pathfinder campaign on it as I type this. The following pictures show some of the configurations you can use the table in. I need to start cranking through many of my unplayed games and my plan is to set up one game in the vault, replace the cover and set up a second game on top. On game night, we’ll play the first game until we’re ready to move on, put it away, and uncover the table to access the second game. It’ll be a way to allow us to focus more on playing and less on setting up when the gamers are over.

Should You Build Your Own Gaming Table?
That’s a tough question. If you don’t have the tools, access to the tools, or have an ongoing need to have the tools, then it is certainly not a cost effective solution. If you have the tools, then by all means, just make your own gaming table. It’s not really that difficult. You can make it a much more simple process by not having the groove, or not carving, but really, the claws were not that difficult. Again, I carved three of them, and they aren’t bad, especially considering they are the first things I’ve ever carved!
On the other hand, the costs I’ve seen online for gaming tables, after seeing what goes into building one, are completely reasonable. Especially when you compare them to other quality (but boring) pieces of regular furniture. Given the time you’ll use these tables, it’s very easy to justify!
What’s Next? Designing a Custom Gaming Dining Table
With the trial run on a coffee table successfully completed, it’s time to consider the original goal, a full size dining room gaming table. First though, I want to really investigate my gaming table needs.
Do I really need the vault? I do like being able to cover a game in process and come back to it later. The central focus of my gaming table though is for roleplaying Pathfinder/D&D type games, so I want to ensure it meets that need. Currently I use a projector to display my RPG maps onto my dining table from above, but I’d like an LCD laying flat for the maps. I need to consider the placement of computers, spots for character sheets, RPG books, miniatures, dice trays, and more.
To really flesh out the requirements of my dining room gaming table, during my next few Pathfinder sessions I’m going to have the players come up with requests and suggestions for what might make the gaming easier and more comfortable. But here’s what I think so far.
Gaming Dining Table Requirements
- 4′ x 4′ standard size : Good size for family of four dining
- Expandable : Two 2′ sections for expanding table to 4′ x 6′ or 4′ x 8′. Close to our current dining table capabilities. One of the key requirements of the dining table is for it to be expandable. My brother currently refuses to consider this! A fixed 4′ x 6′ table is too big for a family of four to have a meal at, while too small for the 14+ people meals we sometimes have at my house. Our current dining table expands from a 4′ circle to about 4′ x 9′. Table slides exist for this, and I could even use the one made by Watertown Table Slide Co already on my current dining table
- The expansion pieces need to work as a gaming fault, or covered as a regular table
- Gaming vault with removable lid to cover games – 5-6 inches deep
- Groove on edge of table for accessories like cup holders, computer holders, etc
- Flat panel television capabilities. Television should not be a permanent part of the table, so the tech does not make the table obsolete. I would like the television to be able to be left in the vault and covered. If the screen is in an enclosed area in the table, it will need to be vented for cooling.
- Power accessible on the table and through the vault
- Dungeon Master station : I think the best set up is some kind of wrap around as pictured below
- Computer stations : While playing Pathfinder most of us are using Hero lab on computers. We also use Syrinscape, and Roll20 which require computers.
- I want to be able to easily store the in-process Pathfinder/D&D game for between sessions. Miniatures, dice, books, etc need to be quickly stored, and pulled out as-they-were
- Mechanism to lift vault-cover
- Cool claw feet! I envision four different claw feet on this table. Maybe the hoof of Orcus or some demon, a dragon claw, the claw of a griffon, and something else. I’m still trying to come up with four good ones, but one thing I have to consider is that I want to hand this table down to one of my kids and some spouse may frown upon a demon hoofed table! I am going to build up the size of the bottom of the table leg prior to carving this time so that the carved foot can be as big as the table leg or bigger once carved
Outlandish ideas
- Billards ball style chutes for players to roll dice that come out on a tray near the dungeon master for rolls that the players should not see the result of.
- Power capability concealed and run up through the leg of a table, and into the gaming vault
- Runes/carvings over portions of the table
- TV on mechanism that will lift it up for viewing, and then lower it back into the table for concealment.
- Skeleton key lock mechanism or some tricky secret lever/puzzle mechanism for lifting the cover
This was a fun process that I could not have done without the help of my brother. I think I know enough now though to do most of the next table on my own. I think if I had a table saw, some planers, and a miter saw here I could do the majority of the work, just running to his shop for the accessory groove, Kreg Jig, and other one-off needs. I’m going to start by finalizing my requirements and determining the design for the table legs. I’ll then build the legs, and start carving.
Please provide any ideas for improvement, or requirements you’d want for your gaming table in the comments below.
Many more pictures are available in this Flickr photo album.


Building your own table is most doable. i built my own earlier this year and it has been fantastic. The table doesn’t have to be fancy like a GeekChic. I’m not a craftsman so it can be done with limited skills.
So true! Google some do-it-yourself gaming tables, there’s an amazing one that the creator says was under $100, has cup holders, built in power, etc! There are many options including cheap and easy. Do you have images you can link so others can see other options?
Where do you store the accessories?
They are stored in a closet. The lid pieces usually just lean up against a wall when off.
Amazing piece. I may steal this entire setup for a kitchen table.
Question on the attachment of the upper frame. You glued it on then used finishing screws.
Did you screw the upper frame into the legs on each side?
Thanks!
So, the legs and the outer, slotted piece are one section and the vault box with the inner walls, and floor are a separate piece.
First, the legs and slotted boards were assembled. They sat on the square notch on the legs, got glue AND nails to hold it all together. These nails are later covered with the vault slides in.
At this point it was the whole edge and legs of a table, but was open, had no base/floor. You can see a picture of this with it sitting on the table saw, with legs/notched side boards but no floor.
The Vault box, with inner walls and floor were separate. That was assembled and then lowered into the Leg/Notch section. it sat on what was left of the leg notch, glued, and with finish nails at the center of each side, on the inside. (one of the only exposed nails).
Make sense?
It has to be pretty precise for that center section to slide in the leg section.
And, are you going to carve the feet?
Also, be sure to link pictures here when you’re done, or as you work!
For the full size dining table have you thought about placing the slider higher rather then under the gaming vault? Currently drawing up plans for a kitchen table was was considering an off set cut so the vault isnt cut in half but at the end of one side so to leave the vault mainly whole for a dinner party so a set up game does not get disturbed.
Questions so I understand… so, half the table is “normal” and half the table is a vault? what is your total table dimension and your vault table dimension? How do people access the vault from the “normal table” side?
This is great, thanks for posting, Ryan. I drew up plans for a coffee table version of the Geek Chic Hoplite table but never got around to making it. Its time to dust off the plans and make it happen. One question, can you post the lumber sizes that you used? I think that your Cherry stock is true 1″ thick. Is that right?
Sorry, just got back to checking on this. I just measured some of the boards I can still get to on the table. It’s mostly 3/4-7/8’s actual thickness. So, I think using hardwood lingo, these are 4/4 boards (roughly one inch thick). All boards were planed some.
Thanks again, Ryan. Appreciate the info!
Post a link to pictures when you’re done… I’d love to see other people’s work! I’m also still looking for ideas for my dining table…
Hey Ryan,
I stumbled upon this page while looking for plans to try and build my own GM’s Valet. I’m not very knowledgeable about woodworking, but I have a few friends with tools and we (friends and I) are looking to try and make one.
Was just wondering if you had any advice or help to pass along.
This is the Valet: http://bit.ly/2BGVwGP
What’s the use case… is this always in front of the DM, or off to the side.
In looking at that, I’d want it to possibly be
1. Adjustable height (in writing up a review of the Fully Jarvis adjustable height desk, I got the idea for a gaming table where the main gaming area can change from sitting to standing height, and each gaming space can switch between sitting and standing!) I think it would be cool for the GM to be sitting with this in front, or right to the side of him, and then choose to stand and raise at least the top surface to standing.
2. I’d want it on rolling casters so I could easily move it to the side, or in front, etc.
3. I’d want more desk surface area. Whenever I think of a DM station I think of a wrap around type situation (check out my rough designs above for the dining table. Room for a laptop, and an open book, and some notes. I’d try to think of a way to get a couple of “Wings” to slide out from the top that folds down. The Valet just looks a little to restrictive.
Dice tower on the side is nice, might be nice for those roll you do in front of everyone, to have them shoot out a chute on the front to the table.
To really see what you need as a DM, set up your optimal work space. Maybe Even prototype a surface with cardboard and tape. See exactly what you’d want. I would want room for a computer, notes, an open book, a staging area for miniatures (and something with a few shallow drawers and foam to hold miniatures) would be cool. a dice staging area and a dice rolling area (tray or tower) with maybe a low screen near the dice (I don’t like tall screens), consider the route for the laptop power (and maybe cord running to a projector for me), and your ability to access the table for moving miniatures and drawing. I’d say mock up your workspace.
Other than that I’d just say to definitely do a good deal of design on paper, and to go ahead and spend more for nice wood. Make it an heirloom! The most difficult part is the grooves on the side for the attachments. Maybe forgo that concept unless you have the shaping table available.
It’s well worth doing. I enjoy playing games with mine and I feel proud every time I see it!
OUTSTANDING article. On my table I use a suction cup to remove a leave. My vault is watertight so a rod or lever wouldn’t have worked.
Thanks! I am considering making it watertight when I do a dining table (which has moved up on my to-do list, so I may start carve feet soon!) I think that’s a must on a table you’re going to eat and drink on on a regular basis.
What did you do to make it watertight? Would love to see pics.
Did you ever start your dining table? For me, I’m looking for something more like the sultan with the fold out stations, or perhaps fold out stations that sit to the side of each gamer, so you don’t have to reach across it to get to the game surface. My wife and kids are all pretty short, so reaching over an entire station or a large lip would be challenging on a table that is dining room height.
I have not yet begun the dining table. I have kind of chosen against the fold out stations because I think that makes it less like an elegant dining table and more like a gaming table… since it’ll be in the dining room, I want “nice dining table.” If it was game room specific I would probably have drawers for miniatures and such.
I am pretty close to purchasing the wood for legs so I can do the carving of claws or something… that’s the most time consuming part. When we play most everyone has a computer, there’s a TV screen (48 inch) in the middle of the table, etc. The table ends up full of stuff. I want to mock up some designs for computer holders, embedding the table, and such to prototype potential designs. I might cut a piece of plywood to size, put the TV under it, use saw horses for legs, then come up with ways to mount the computers somehow… this will allow me to get table height and size down. I still really want it to expand from 4×4 for small family eating and gaming, to at least 8×4 for our RPGing (sometimes with 7 people).
The list of equipment is pretty misleading if someone was interested in getting necessary items to make a table. “Total cost works out to around $1,000 in materials and $4,000 in tools.” $4000 IN TOOLS?! Jesus, one could outfit two workshops to make a table for that much. I mean, a nail gun? A power carving tool? A shaper table instead of a router? A Dado blade? It would be good to give people an idea of what they NEED, rather than what you have. Sure, some tools make jobs quicker and easier, but really aren’t needed. Given time to research and acquire equipment used and to practice hand on cheap wood, the most costly part of this build would be the estimated $1000 in materials you’ve quoted.
Woodnub is correct, you can certainly do it for much less… and you can certainly get lower quality lumber to make it even cheaper. Heck, some quick web searches will show gaming tables built for very little, some with detailed plans provided and all!
Toolwise, you could go as cheap as a hammer and nails, a hand-saw, and some chisels … for what, like $25! I wouldn’t recommend it, but you could do much of this design with those. Then there’s everything in between, a circular saw would certainly help in-lieu of a hand-saw… and in lieu of that a table saw would be great… and you could certainly go well beyond the cost of the tools we used that are listed above. We spent quite a bit of time talking about the tools Geek Chic was probably using, and the multiples of each the likely had so you weren’t always resetting the table saw for instance.
I certainly don’t recommend running out and buying all those tools for a one-off table. As I said in the article, talk to your supplier about what you’re trying to accomplish, and I’m sure they would direct you to, like Woodnub said, the router over the shaper table for instance.
In any case, I listed those items because that’s what I did the project with. I can’t write about how it’d go with a hammer and hand saw, because I didn’t use those. I listed the price of the wood I actually used… not much cheaper pine, or much more expensive woods… there is certainly a wide range of options here as well.
And again, there are now even more professionally built gaming tables on the market… given the craftsmanship of these tables, and as compared to even just a quality regular non-gaming table… they’re not “overpriced.” Whether or not they are “worth it” is up to you.
Have you ever thought about making/selling the notch rail accessories (cup holders/shelves/etc.) for people who already own a geek chic table, but now have no way to get more accessories?
Heh, interesting thought. I don’t think there’d be a huge market… at the very least it’d be a finite and constantly shrinking set of customers! I suppose some might be willing to pay top dollar for the accessories they need.
Of course, I’d need an original Geek Chic to get the dimensions right… anyone wanna give me one?!