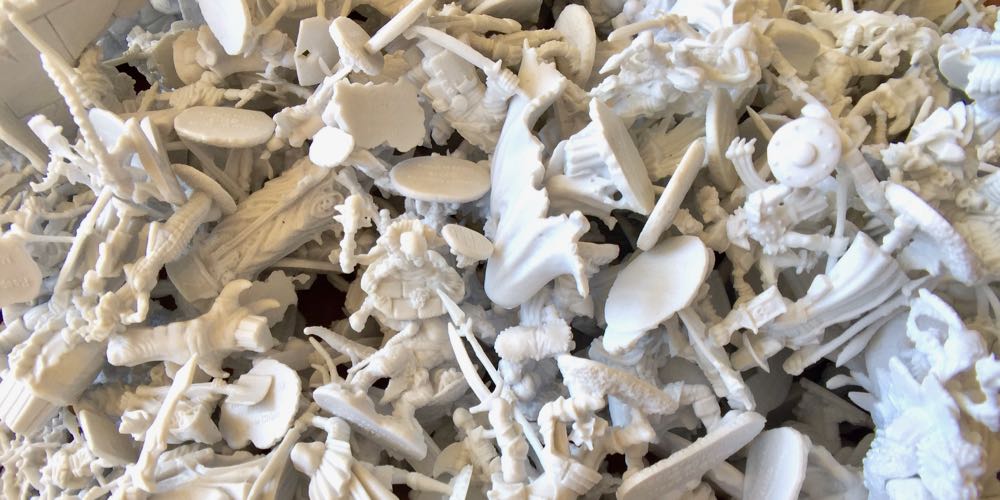
With my third Reaper Bones Kickstarter rewards arrival fast approaching, the need to paint the piles and piles of Bones miniatures from the first two Kickstarters is starting to loom over me. Besides, I’ll need to be able to justify my investment in the more-than-likely forth Reaper Bones Kickstarter! If you are at all interested in painting miniatures, Reaper Bones Kickstarters are hands-down the best source of unpainted miniatures anywhere.
Bones are Reaper’s line of unpainted white polymer 28mm miniatures. They are durable and ready to paint right out of the package with no priming. Reaper has successfully run three Bones Kickstarters each offering an amazing selection of miniatures at phenomenal prices.
With the goal of painting literally hundreds of miniatures, I’m going to start a periodic series of posts documenting their completion. I’ll also cover tips and techniques I learn along the way. In no way am I claiming to be an expert at this. To some, my skills will be slightly impressive, and to many others, I’ll appear a rank, arrogant amateur. If you have different recommendations, tips, or disagree with anything I say here, be sure to kindly contribute in the comments. The point is for everyone to learn something about the hobby here, including me! Well, really, the point is to get all these damn Bones painted!
I will mostly select which miniature to paint through random selection, as otherwise, I would likely paint all the bad-ass ones (most of them), and then be left with the dregs to slog through. I’ll also take recommendations from readers. If you’re interested in seeing something specific from the Reaper Bones Kickstarters get painted, post your request in the comments!
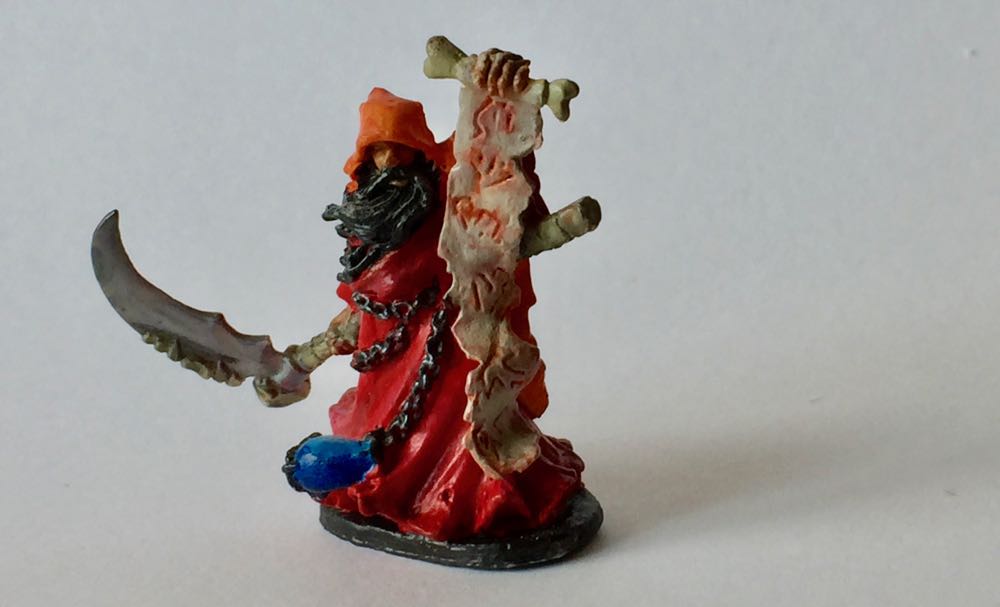
For this first posting, I have a wizard that was randomly selected by reaching into my Reaper Box of Bones™ and grabbing one. I asked my kids for a random color as well for his color scheme. Their selection of “orange” created this cool fire-focused wizard.
While I didn’t use any new techniques with this wizard, my intent is to up my game, so I’m going to be looking into new techniques and delving into the practice.
I painted miniatures quite a bit in my pre-teen and teen years. It was pre-internet, and I was not part of a wider gaming group than just my family, so I didn’t have any source of painting information. It was all trial and error, discovering techniques such as priming with a spray paint on my own. I used primarily black spray paint as that pre-shadowed my miniatures, all the recesses would be dark already. I didn’t know about dipping or the wash technique. When I started painting again a few years ago, inspired by my kids who developed an interest in Dungeons & Dragons, I discovered that the resources available for the aspiring painter are astounding.
As a baseline, here is where I currently am with the hobby.
Kit
- Cheap-to-mid paintbrushes, size 0ish: I have not historically been buying great brushes. They never last long, so I have trouble bringing myself to buy a brush for more than a few dollars. However, I’ve done some research, and purchased some new brushes and brush care products. With proper care, I should get my money’s worth out of these. Once I’ve used them, I’ll detail this in my next post.
- Reaper Paints: I have the pretty awesome Reaper Core Colors Basics set with random additions such as the wash triad. Reaper paints come in dropper containers, allowing you to take a single drop of paint. This lets you keep your paints closed, and conserve paint by not taking too much at once.
- Wine cork and tacky putty: These allow me to hold my miniature without touching it. There was a Kickstarter a while back for what looked to be a great miniature holder. These are probably worth checking out. At least I got a bottle of wine out of my solution, though.
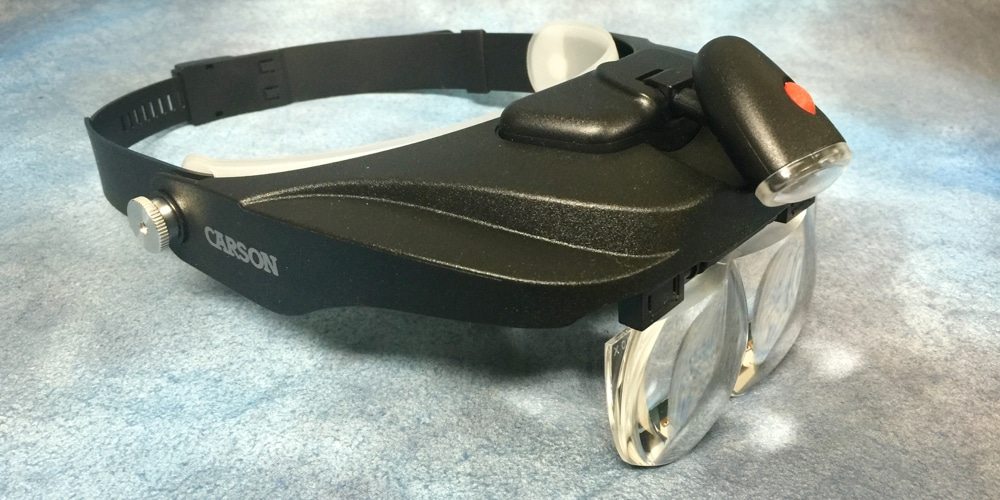
- Carson Optical Jeweler’s Glasses: I can’t see the side of a barn, let alone any detail on a miniature. These glasses give me 1.5, 2, 2.5, and 3 times magnification along with an LED light the can shine right on the miniature. If I can make it look ok under 3 times magnification, it looks great (to me) when sitting on a battle map a couple feet away.
- Kitchen garbage bag: I don’t currently have a dedicated painting location, so to protect the various areas I paint, I throw down a plastic kitchen garbage bag. I can then also put my paint drops, and mix right on my painting surface.


Techniques
- Base coating: The original intent of Reaper Bones miniatures was to create a miniature that did not need priming. Because of this, I typically don’t prime; instead, I base coat the primary color for each portion of the miniature, with the goal of covering the white of the figure. For the Fire Wizard, a solid orange cloak, red robe, light-flesh face, black beard, etc.
- Shading/Highlighting: Using lighter and darker versions of the base-coat, I’ll darken deep areas like in the folds of his robe, and lighten areas that would be more exposed to light.
- Wash: A wash can be used to darken the detailed recesses of the miniature. It’s great for making the details really pop. I’ll sometimes use a watered down black, brown, or a Reaper Wash specifically for this technique.
- Dry Brushing: Opposite the wash method, this technique can make all the raised parts of the miniature stand out. It’s great for highlights or making highly detailed miniatures, such as with fur, really stand out.
- Eyes: Ugh. I’ll detail this in a later post, but I’ll often just skip them if they are not obvious. Like with the Fire Wizard, you have to actually look under the hood. My miniatures are for tabletop gaming, seen from a distance, so, meh. The technique I use though when I try to do eyes is to paint the area black, then I work in towards the pupil with an off white, slightly yellowed (straight white makes your miniatures look crazy!), then work in from the edges with whatever flesh-tone is appropriate. I’ll detail this in a later post. This method was something I learned on YouTube, from a video I have not been able to find again.
- Varnish: I mostly protect my miniatures with a matte varnish, using a glossy varnish on metals or glass. It looks like the Fire Wizard has gloss, though, he might not even be varnished. I’d highly recommend the varnish to help keep the miniatures from chipping.
I’m painting for use in tabletop, which means the pieces will be viewed from afar, and I’m painting with the intention of getting through all these Bones! I’ll encourage my kids to participate as well; it’ll get the Bones done more quickly, and is some great social time with the kids.
Inspired by GeekDad’s Anthony Karcz’s series on painting Imperial Assault figures, I’d like to try the dipping technique. He has been using Army Painter QuickShade with great results, but I’ve read that Minwax Ployshades stain may be the way to go with flexible miniatures like Reaper Bones. Since the goal is to be cranking these guys out for tabletop play, the dip method may be an excellent option.
I also plan to look into some eye painting methods. I have a method I’ve used in the past, discussed above, but that I will detail in a later post, and Anthony describes a method in his Imperial Assault posts. Maybe with a little practice and research, I’ll find something that can be done quickly and acceptably, even with my lack of vision and motor control.
As I go, I’ll add to these goals, like I know I want to do some basing, and, again, maybe you can direct my learning. Please kindly offer your opinions on kit, Bones you’ve enjoyed painting, Bones you’d like me to paint, or techniques you’d like me to try.
Check out my next post for my next finished Reaper Bones miniature and what I’ve discovered so far about quality brushes and brush care.


Have you tried the Dipping method with Polyshades to do the wash? I am shocked at how good it works and it is a good way to do a lot of minis really fast.
I have not done it yet, but that’s on the list of new techniques to try. I’m going to compare the MinWax Polyshades to Army Painter Quickshades.
Anything to speed it up!
Best of luck, I also am anticipating the Bones 3 kickstarter, and will most likely host a painting party when it arrives. I’ve got a number of Giants that I am working on (as I’m running SKT for my friends. I did not get in on Bones 1 or 2, but they all appear to have some very awesome figures.
Lots of great things in that Bones 3 Kickstarter… I know at least one of the GeekDads funded not-Tiamat. I’m excited to see how that goes!
Couple thoughts from someone who has also picked up painting a bit ago (btw, I recently painted that same wizard, I love that sculpt!):
Reaper paints are pretty thin, but worth making them thinner for layering
Wet palette is a game changer
If you store your dropper bottles in a container like that, take a drop of paint and drop it into the recess on the top of the cap, it makes finding the right color much easier.
Excellent comments… I was thinking of a shelving setup so I could see my paint colors, but a drop on the top would satisfy the need to see the paint color while allowing me to keep my paints mobile.
And, yes, the wet palette is another great idea! I just looked up some methods to keep your mixed paints stored and kept from drying. Some great options there. That may just be a game changer!
Thanks, I’ll certainly be discussing both of those in a later post!