The base set of Pathfinder Adventure Card Game: Mummy’s Mask comes with two adventure paths: Deck B “Cross the Pharaoh’s Land” and Deck 1 “The Half-Dead City.” Last month, I shared our adventures through the desert. This month, we’ve it to Wati and are ready to explore.
Wati is a necropolis: the living are outside the walls, which were sealed long ago because of a plague. But now treasure hunters have been allowed to enter, as long as we obey the rules of the Pharasmin clerics. Let’s check it out!
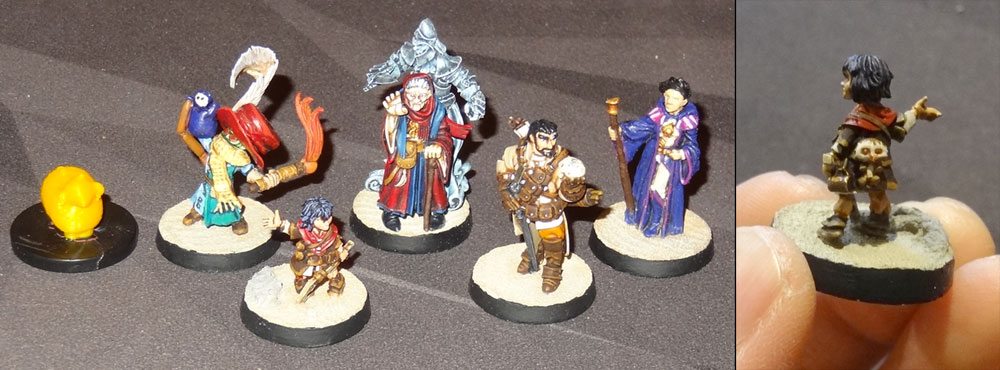
First, though, let’s take a look at our team, because Tim Post (husband of Cathe, who is playing as Tup) finished painting our miniatures! Over at the far left you see (unpainted) Deliverance, Tup’s sheep cohort, which I printed on a 3D printer just for fun. Then comes Tup, with his crazy hat, hand puppet holding a string of sausages, and torch. There wasn’t a Tup mini available, so Tim made one starting with a gnome and made everything else himself, including the scarf and hat. Yoon is next, and I’ve included a shot of Yoon’s back so you can see her stuffed owlbear, Gom-Gom. Estra is next, with her dead ex, Honaire the friendly ghost knight. Then comes Mavaro—in miniature form he maybe looks a little less pregnant (with evil) but he’s still obviously interested in a lot of stuff. Finally, at the end is Ahmotep—another character who didn’t have a figurine, so we substituted another D&D figurine that DeeAnn found that at least had some robes and a staff.
Note: From this point on I’ll be sharing photos and explanations of the scenarios, villains, henchmen, and loot, so if you want to avoid spoilers, stop here!
 “The Half-Dead City” includes five scenarios. The first four may be played in any order of your choosing, and then you end with “Sanctum of the Erudite Eye.” That provides a little more flexibility, and you can make a choice based on the story, the scenario-specific rules, or the potential rewards. We decided to start with the two scenarios that gave us a skill feat and a power feat, because then we’d get the most benefit from those boosts.

For this scenario, the scourge die is 1d4+1, and the new scourge is the Curse of the Ravenous. It’s pretty terrifying—we’ll see more of that soon. As with “Cross the Pharaoh’s Land,” if you are ever dealt poison damage and don’t reduce it by at least 1, you suffer the Scourge of Poisoning, which forces you to recharge a random card after you reset your hand, effectively reducing your hand size.
Scenario 1: Akhentepi’s Legacy
Our first stop is the Tomb of Akhentepi, an ancient military commander who, we hope, is all-dead. His tomb is filled with valuable treasures, but what fun would it be if it weren’t also full of traps? In this scenario, you add a Trap-based barrier to every location deck.
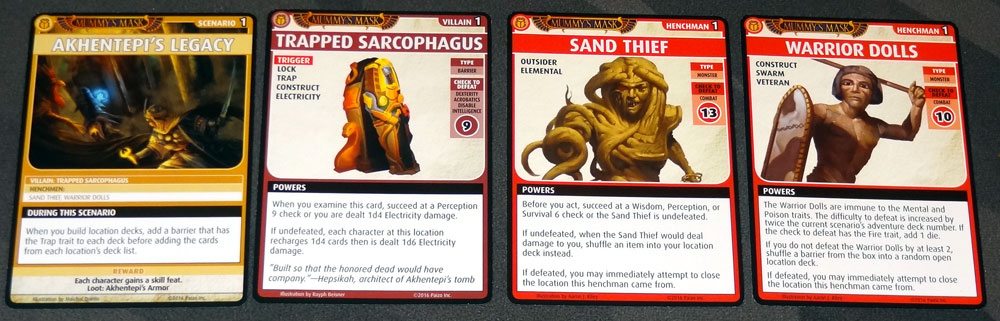
Other than the extra traps, it’s mostly a straightforward find-the-villain scenario, though the villain in this case is Akhentepi’s sarcophagus, which is itself a trap barrier. There’s one unique henchman, the Sand Thief, and then the rest of the henchmen are Warrior Dolls. (I found it interesting at first that the name is plural on the Warrior Dolls card, but each henchman card apparently represents a whole swarm of them.)
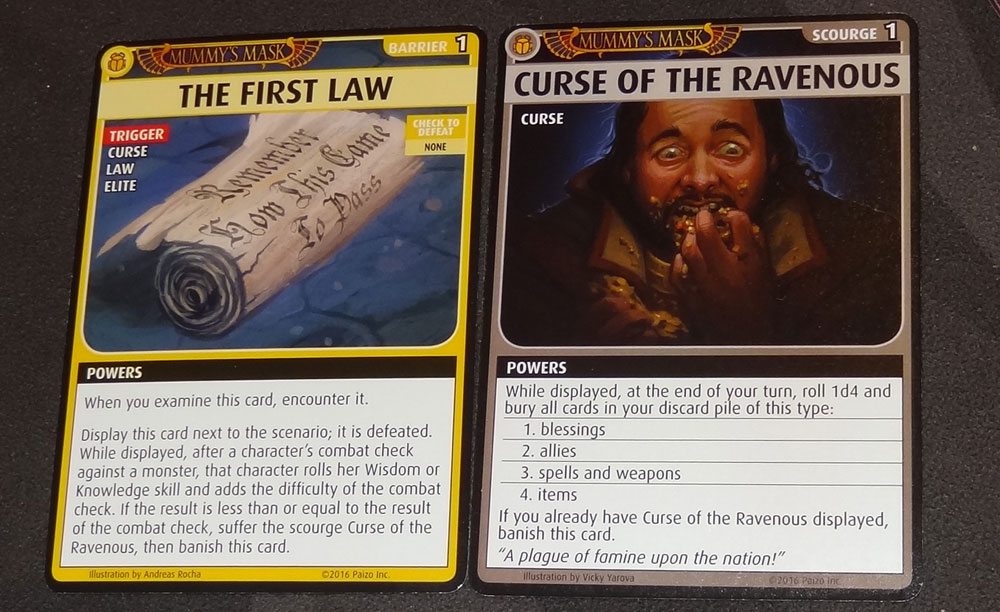
Right near the start, Tup encountered a new barrier: The First Law. It gets displayed next to the scenario, and stays in effect until triggered. If you defeat a monster, you’ll have to do a Wisdom or Knowledge check and compare that to the amount of overkill damage you dealt to the monster. If your Wisdom/Knowledge isn’t high enough, then you suffer the Curse of the Ravenous, and then the First Law goes away. The First Law stays in place until somebody triggers it and gets the scourge.
So, about that curse: the Curse of the Ravenous makes you roll a d4 at the end of each turn, which indicates a type of card: blessings, allies, spells/weapons, or items. You then bury all of the cards of that type from your discard pile. This is pretty terrifying because those cards can’t be healed, and if you have cards of several types, there’s a high chance you’re going to lose some of them until the end of the scenario. Fortunately, both Estra and Ahmotep have Remove Curse spells in their decks, so we were able to remove this scourge as soon as the First Law was triggered.
Anyway, Tup kept digging and encountered our first henchman, the Warrior Dolls, at the Tarworks. The Warrior Dolls aren’t too bad—a combat 12 during this adventure path. They’re particularly susceptible to fire, which is good for Tup, but that First Law meant he didn’t want to overkill them by too much. However, you do want to overkill them at least 2, or else you’ll end up shuffling a new barrier into a random open location. I guess if you don’t smash the whole swarm of them, some of them run away and set up a trap. Tup defeated the Warrior Dolls, and had to close the Tarworks with a Strength, Charisma, or Diplomacy check. Well, Tup is nothing if not Charismatic and Diplomatic—why else would we allow a pyromaniac goblin to travel with us? But this time he failed, rolling a 1. Ouch!

Mavaro went shopping at the Dye Market—you know how much Mavaro loves those dyes—and also encountered Warrior Dolls, but unfortunately he didn’t have three different types of cards to recharge for closing the location, so he didn’t want to defeat them and then miss out on the opportunity to close the location. But at the Dye Market, if you discard cards for damage, you also gain the Curse of the Ravenous So, instead, he used his power to display his remaining cards to gain skills, which meant he did not take any damage, thus avoiding the scourge. (Note: there’s been a lot of debate on whether Mavaro can use his power like this, and I think there hasn’t been an official ruling from Paizo on it, but we didn’t know about it at the time we played the scenario. We’ve since revised the way he can display cards.)

We also encountered the Second Law, another barrier, and this law applies to how well you do with barriers. When you defeat a barrier, you compare your overkill amount to a d6; if your overkill was too great, everyone at your location has to banish a card or face the Voices of the Spire, the human inquisitors who maintain order in Wati. The Voices of the Spire can be fought, or you can try talking your way out of it. However, if you fight them rather than using Charisma/Diplomacy, you take a Curse of Vulnerability. Estra was the one who had to deal with this law—she defeated a barrier and decided to face the Voices, but fortunately she’s pretty good at Charisma/Diplomacy. Nobody looks too hard at the old lady who walks around talking to somebody only she can see.
Yoon discovered the Trapped Sarcophagus villain at the Earthworks, so we all tried to temporarily close our locations. Mavaroo was able to temp-close the Dye Market by recharging cards, Tup succeeded at temp-closing the Tarworks this time with Diplomacy, and Estra temp-closed the Catacombs. The sarcophagus’ traps were no match for Yoon’s acrobatics, but then it was reshuffled into another location. Thematically, I’m not entirely sure how that works—did the sarcophagus run away? Maybe a swarm of Warrior Dolls came and carried it off.
Mavarro finally got through the rest of the Tarworks and closed it (barely), and then Estra found Warrior Dolls at the Sulfur Pits with her power, leaving them on top for Ahmotep to defeat, and then the Sulfur Pits were closed. Ahmotep then went to the Towering Obelisk and found yet another swarm of Warrior Dolls, defeating them and closing the location. So then we knew for sure that the sarcophagus was in the Hall of Blessed Rebirth, which totally makes sense. I guess you always find something in the last place you think to check.
Tup went to the Hall of Blessed Rebirth, and the sarcophagus happened to be the first card in the location—I guess those Warrior Dolls didn’t want to carry it any farther inside than they absolutely had to. We were able to temp-close the remaining locations, and Tup defeated the sarcophagus for the win. We never did encounter the Sand Thief henchman, since it was in the Hall of Blessed Rebirth.

Our rewards for this scenario were a skill feat and the loot card Akhentepi’s Armor, which Yoon acquired. Akhentepi’s Armor is a magic light armor: it can be recharged to ignore a non-villain bane’s power that happens before you act, or buried (or discarded with proficiency) to reduce Cold, Combat, Electricity, or Poison damage to 0. And since it’s magic armor, you can recharge it when you reset your hand if you want.
Scenario 2: The Pharasmin Lottery
Everyone knows the Pharasmin Lottery is simply a tax on the mathematically challenged, but we couldn’t resist buying a few tickets anyway.
Actually, it’s really about our opportunity to go do some more treasure hunting in the necropolis because the Church of Pharasma has opened up the gates. It’s a lottery because down that hallway you might find a shiny new staff or magic armor … or you might find an angry zombie. So, pretty much just like the Powerball.
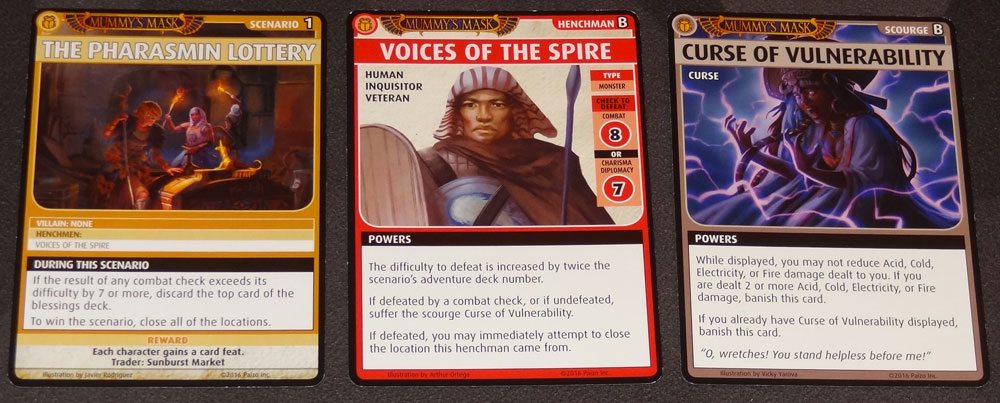
This scenario does not have any villain at all. Instead, there’s a Voices of the Spire henchman in each location, and you have to close all of the locations. There is one fewer location than usual, but it means you really need to find the henchmen and you can’t afford to miss a location-closing check, because you’ll run out of time if you have to explore each location fully before closing.
On top of that, the Voices apparently don’t like it when we smash things too hard. If any combat check exceeds the difficulty by 7 or more, we lose the top card of the blessings deck.
Right near the beginning of the scenario, Tup was exploring at the Warehouse and fell into some dry quicksand. (It was a really disorganized warehouse—who puts Dry Quicksand in the bulk foods aisle?) This is one of those situations where we displayed the barrier card, and then shuffle Tup’s token card into the location deck. While the card is there, Tup can’t leave—he can still explore and encounter things, but automatically evades any banes that he encounters. Well, a couple of us went over to help dig him out. Three times Tup encountered the Voices of the Spire, which meant that he had to evade, reshuffling the deck. One of those times, his token was the very next card in the deck … but then he sank again. I mentioned in my Mummy’s Mask overview that it would be interesting to see how this mechanic plays out—well, it was certainly interesting for the rest of us, if quite frustrating for poor Tup.
Meanwhile, Yoon started off at the Quarry, a location she figured she’d be good at closing. She explored several times using allies, and then managed to acquire a Twitch Tonic, which—despite the name—doesn’t let you livestream your tomb raiding to the internet. It lets you draw d4+1 of your allies back out of your discard pile, and then shuffle any number of allies back into your deck. Yoon managed to get all of her allies back, and just kept them in hand to keep exploring. She soon found the Voices of the Spire and defeated it with combat, which gave her a Curse of Vulnerability. This scourge prevents you from reducing certain types of damage until you take at least 2 damage. Yoon closed out the Quarry with a Fortitude check, and we later managed to remove her curse with a spell.

Amhotep finally managed to dig Tup out of the quicksand, and then then actually got to encounter the Voices of the Spire that had kept shoving Tup back in. She had a nice chat with him using Diplomacy, and then closed the Warehouse with a Dexterity check. (That key is a little sticky—you have to jiggle it just right.)
Yoon found another henchman at the Golden Lake, defeated it with a combat check as well (Yoon lets her fire do most of her talking) and took another curse. To close out the Golden Lake she had to face the Graven Guardian of Nethys henchman—but fortunately she had a Blessing of Nethys, which let her automatically defeat it.

At the Precinct of Left Eyes (where you hang out after you’ve paid your “eye for an eye”), Mavaro encountered a henchman and fought it—but he rolled too high, trigger the scenario’s overkill penalty, in addition to taking a Curse of Vulnerability. And then he tried to do an Intelligence check (Mavaro’s specialty) to close the Precinct … and failed.
Meanwhile, Ahmotep had gotten a tip from Estra that the Voices of the Spire was right at the entrance of the Tooth & Hookah. (Estra swore she was only looking for the restroom.) Ahmotep used her charm again and defeated the henchman, and then picked up a new friend—to close the location, you have to summon and acquire a random ally.
Estra then went over to the Dye Market and used a spell to examine the top two cards. One was the Voices of the Spire, and the other was a Geniekin monster, which has a trigger effect. When you peek at the Geniekin, you have to summon a monster with a particular elemental trait. Fortunately it was just an Emperor Cobra, which was not too bad. She left the Dye Market (“I’m not shopping there again!”) and went to the Precinct of Left Eyes, where she managed to finish off the rest of the cards in the location deck. But she, too, was unable to close the location.
Ahmotep went to take care of the Voices of the Spire at the Dye Market. This time she fought it instead of talking, because she needed to make sure she had three different types of boons to close the location. She took a Curse of Vulnerability, and then recharged her 3 boons.
Finally, Tup (who had finally gotten all the sand out of his trousers) made his way to the Precinct of Left Eyes and managed to close it with a Charisma check.
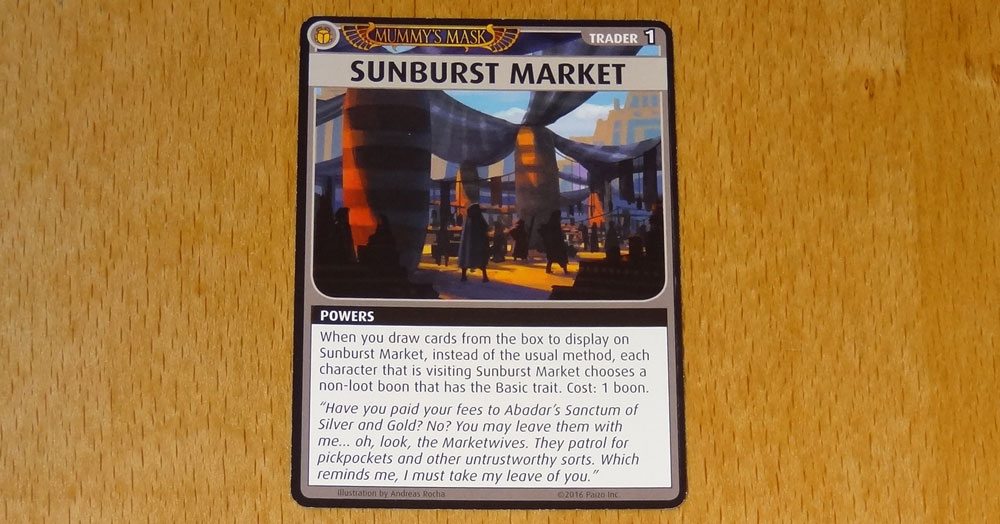
Our rewards for this scenario were a card feat and access to the Sunburst Market trader. It only takes one card to buy something from the Sunburst Market, and you get to take any Basic non-loot boon you want from the box. So while you may be able to get a really powerful card there, if you’re looking for something like a Cure spell and just want to make sure you get it, the Sunburst Market is a good place for that.
Scenario 3: Ahead of the Competition
What do you call a flaming skull that’s beating its opponents?
Ahead of the competition.
Yep, the title of this scenario is apparently a dad joke, because this scenario features not one, but three floating heads (though we only ended up encountering two of them). We’ve decided to venture into the House of Pentheru—sealed up since the Plague of Madness—because … well, okay, Tup double-dared us. Turns out that although nobody lives there, there are someheads. Get it? No-body? Sorry.
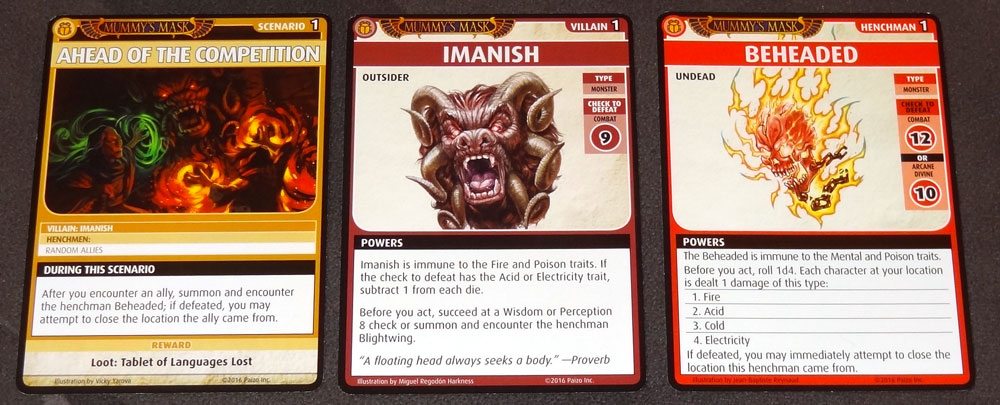
In the scenario setup, you actually don’t put in any henchmen. Instead, you shuffle the villain Imanish together with random allies, and shuffle those into the location decks, so all the locations except Imanish’s have an extra ally in them. Then, after you encounter an ally (whether you acquire it or not), you summon and encounter the Beheaded henchman, and then you may attempt to close the location if you defeat Beheaded. That means that, at least for a few locations, it was easier to close because there were already allies in those locations, and you just had to find one of them for a chance to face the henchman. Several of the locations in this scenario, however, started with no allies regularly.
On Ahmotep’s first turn, she got lucky and found a Porcupine ally at the Scorched Ruins, but failed to acquire it. No problem—she’s really after Beheaded anyway. Beheaded—that flaming skull—is immune to Mental and Poison, and before you act it deals a random type of damage to everyone at the location. It’s not terribly hard—a Combat 12 or Arcane/Divine 10—and Ahmotep is good at both of those. She sent Beheaded rolling, and then acquired a weapon to close the Scorched Ruins.
Tup took a trip to the Hot Springs with Estra and encountered an Embalmer, who was easily acquired by Tup’s charm. Beheaded did some Cold damage, but fortunately Tup had an Elemental Treaty that protected him and Estra from that. He defeated Beheaded, and then defeated the Acid Pool henchman to close the location … and found Imanish hiding in that location. I’m not really sure what a disembodied head would do at the Hot Springs, really. Lucky for us, the Hot Springs is a location that had allies already, so we were able to close the location and track down the villain.

Yoon went out to the Warehouse and encountered a Stone Weasel ally, but failed to acquire it. And then she faced Beheaded, but failed to defeat it, so we had to keep looking for another ally.
At the Tarworks, Estra used her Augury spell to look for allies, and found Marianix Karn, a human sage. She put Marianix on top but didn’t acquire her (Estra is usually quite charming, but the smell of the tar makes her cranky). Before she summoned Beheaded, Tup rode over to the Tarworks on Deliverance. With Tup’s “help,” Estra defeated Beheaded and then took a bit of fire damage, but she managed to close out the Tarworks.
Then Tup got a lot done while the rest of us were poking around and exploring. He acquired an ally, Terhk Fourwinds, at the Thornscrub, and just barely succeeded at defeating Beheaded. His Elemental Treaty spell let him take the poison damage to close the Thornscrub. Later, he went to the Warehouse, failed to acquire a camel, but did manage to defeat Beheaded again. Seriously, that Beheaded gets around. The Warehouse was now closed.
Yoon took a trip to the Crypt and failed to acquire an Embalmer ally (“Sorry, got lots of work to do”) but did defeat Beheaded and closed the location.
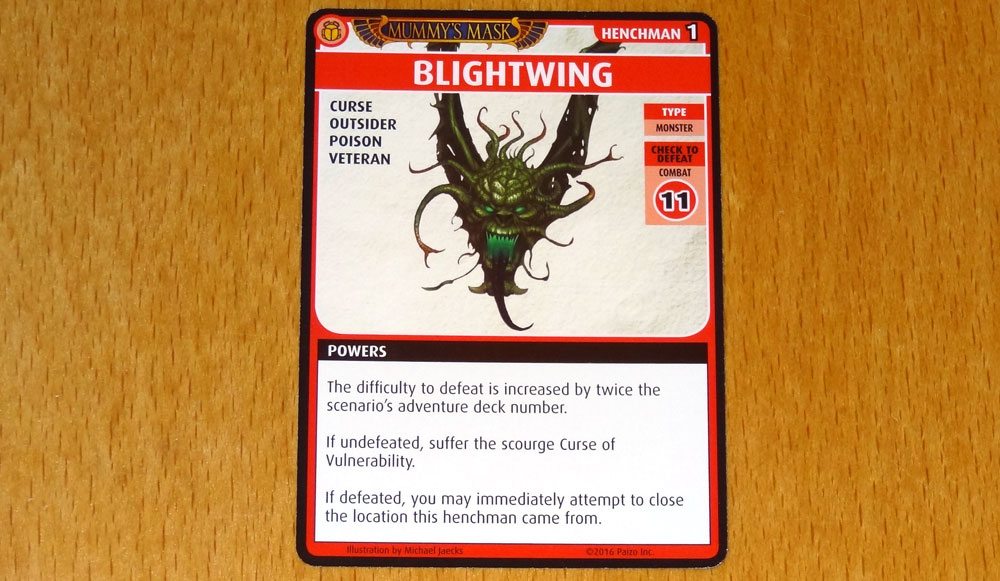
So, finally, we were all set—the only other open location was the Glass Pavilion, where we hadn’t managed to find an ally yet, but we parked Estra there to do the Wisdom/Divine check for temporarily closing it, and then Mavaro went to the Hot Springs to face Imanish. Imanish makes you do a Wisdom/Perception 8 check before acting, or else you face the henchman Blightwing—another floating head. Fortunately, Mavaro passed the check, and was able to attack Imanish, who isn’t really all that strong—just a Combat 9. Turns out Mavaro isn’t scared of no-body. (Okay, really, that’s the last time.)
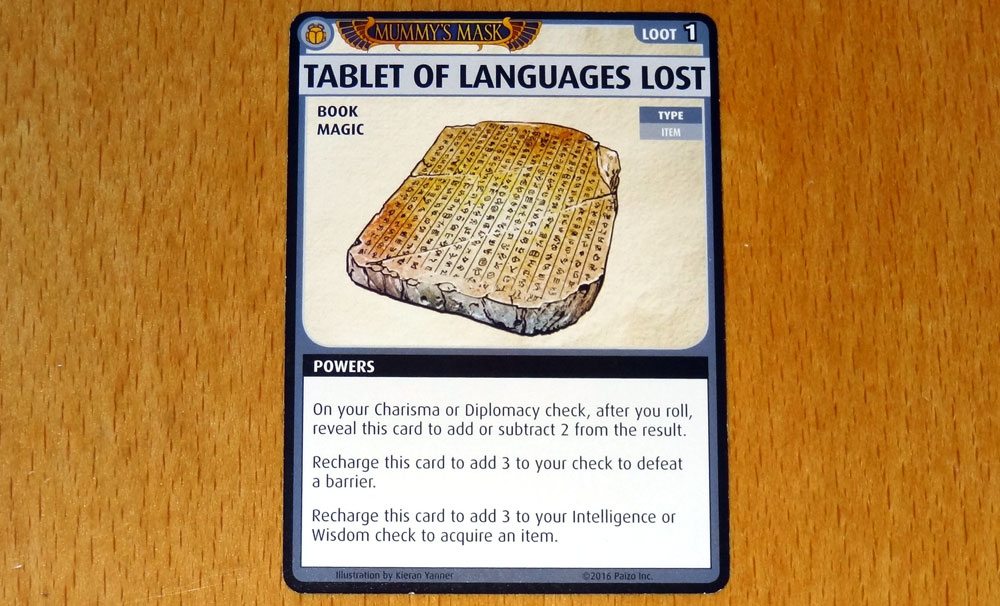
Our reward for defeating Imanish was the Tablet of Languages Lost, a magic item that Estra claimed. It gives her a +/-2 on a Charisma or Diplomacy check after rolling, or can be recharged to add 3 to a check against a barrier, or to an Intelligence/Wisdom check to acquire an item.
Scenario 4: Tomb Raiders Gone Rogue
Even though we’re all tomb raiders, most of us obey the laws set down by the Voices of the Spire. (At least while they’re watching.) There are nice bounties for bringing in the gangs of tomb raiders who aren’t abiding by the rules, and Velriana Hypaxes is one of the worst. Our task in this scenario is to round up her gang, dead or alive.
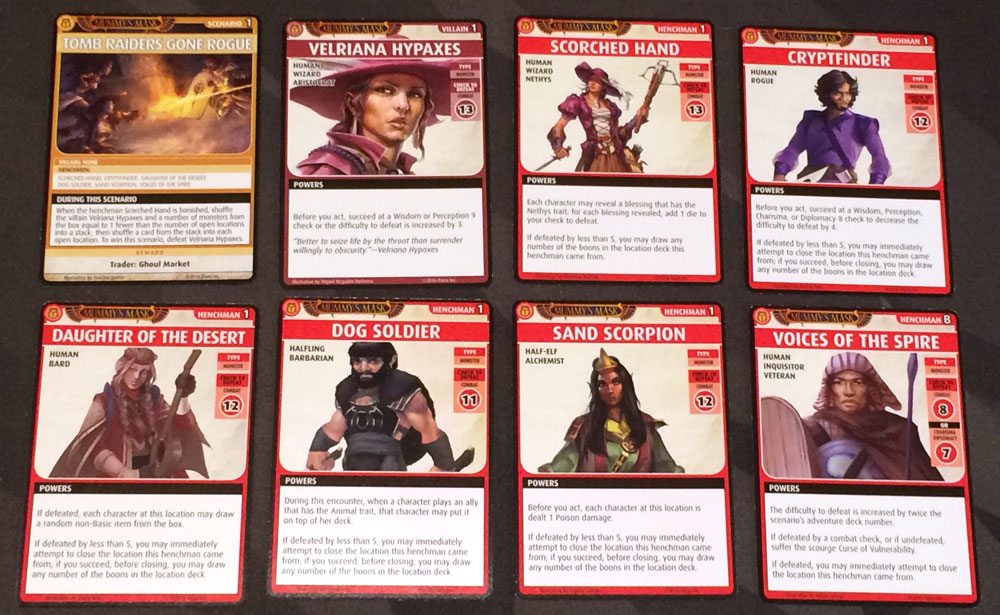
For this scenario, you start with a number of henchmen but the villain Velriana Hypaxes is set aside. Once you find and defeat the Scorched Hand henchman, Velriana and random monsters get shuffled into the open locations, and you have to track her down and defeat her to beat the scenario. So this scenario seemed like one in which we might run out of time, depending on how long it took us to find the Scorched Hand and how many locations were still open when that happened.
Tup went to the Smoking Den (where there’s smoke, there’s fire … probably started by Tup) and found the Voices of the Spire, which he barely defeated with Charisma, and then acquired an ally to close the location. So far, so good.
At the Caravanserai, Yoon encountered the Sand Scorpion, a half-elf Alchemist who does poison damage before the fight. Like most of Velriana’s tomb raiders, the Sand Scorpion only allows you to attempt to close the location if you defeat her by less than 5, so it’s a tricky check. If you do, you’ll also get all of the boons remaining in the location deck. I guess it’s kind of like capturing them (and relieving them of their loot) vs. killing them. Yoon managed to get exactly the Combat 12 she needed, banished an item to close the location, and then drew all the rest of the boons.

We encountered another Voices of the Spire at the Precinct of Left Eyes—Estra charmed her way out of that one, and then closed the location with her Wisdom. Then Tup found Daughter of the Desert at the Mausoleum, another henchman that he couldn’t overkill. He succeeded, got all the boons, and then defeated a Voices of the Spire to close the Mausoleum.
Yoon tracked down the Scorched Hand at the Tooth & Hookah, but failed to defeat it, so it was shuffled back in. Mavaro joined Yoon and eventually found the Scorched Hand, finally defeating it. The Scorched Hand lets you draw the rest of the boons if defeated by less than 5, but does not allow you to close the location. So we had three locations left open by then: Tooth & Hookah, Oasis, and Surgery. Velriana was hiding in one of them, and the other two had extra monsters.
Estra went to the Surgery (“gotta pick up my prescription”) and found the Dog Soldier, but she defeated it by too much, so she wasn’t able to try closing it. We would have to get through all of the rest of the cards in order to close it. Mavaro went along to help explore, and encountered Velriana—but we weren’t covering all the locations yet. With Tup’s fiery help, Mavaro defeated Velriana, sending her to the Tooth & Hookah (since we did temp-close the Oasis).
Ahmotep took a trip to the Tooth & Hookah, explored until she found Velriana, and finally defeated her for good.

The reward for this scenario was a new trader: the Ghoul Market, which sells armors. We left this one for last of the four because most of us aren’t proficient with armors or can’t carry many of them in our decks anyway, so we didn’t feel like investing much in armor yet.
Scenario 5: Sanctum of the Erudite Eye
Well, we thought we had defeated Velriana for good. But apparently she’s gotten herself into the Sanctum of the Erudite Eye, an altar to Nethys. She’s gotten past the guardians, so we’ll need to as well—and steal the loot for ourselves. I guess we’re tomb raiders, too.
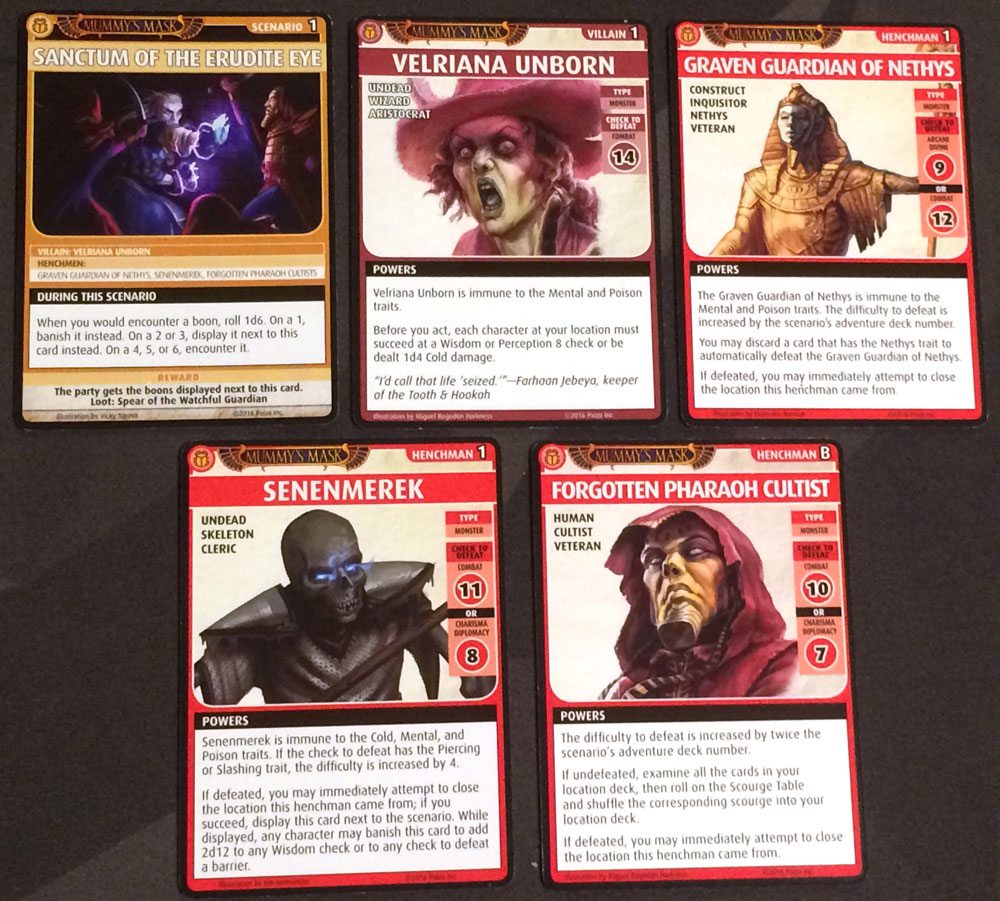
In this scenario, every time you encounter a boon, you roll a d6, and then you’ll either banish it, encounter it, or display it next to the scenario card. At the end, if you succeed, part of your reward is all of the stuff that’s been displayed. It means that you might acquire boons that would have been hard to acquire, but you also don’t get the benefit of adding cards to your deck to keep you alive during the scenario.
Mavaro found our first henchman, the Graven Guardian of Nethys, at the Oasis. He didn’t have any Nethys cards to reveal to automatically defeat it, but managed to defeat it nonetheless, and recharged a Divine spell to close the Oasis. On a later turn, he also found the next henchmen, Senenmerek, guarding the Crypt. Mavaro’s ability to absorb skills from the boons he carries is pretty useful, and he defeated Senenemerek handily and closed the Crypt as well. Since we closed the location, Senemerek was displayed next to the scenario card, and could be banished to provide a hefty one-time bonus to a Wisdom check or to any check against a barrier.
Yoon encountered Velriana, who’s a little more undead than the last time we encountered her, at the Ruined Temple while Tup was with her, and neither of them were able to pass the Wisdom/Perception check to prevent Cold damage. They ended up with not enough cards to reach a Combat 14, even with Tup’s +4 help, and Velriana escaped.
We knew at least she wasn’t in the Embalming Parlor, since we had temp-closed it, so we continued to dig there. Mavaro encountered the Forgotten Pharaoh Cultist (I guess he’s just mad nobody remembers him) but we were able to defeat him, as well as the Natron Zombie, to close out the parlor.
At that point we spread out a little to cover all of the locations while looking for Velriana. Yoon and Tup were together again when they ran into her at the Stonework Passages. Once again, they both took Cold damage. We did manage to temp-close all of the other locations—Ahmotep used the bonus from Senenmerek just to be sure—and this time Yoon defeated Velriana. Since we had the rest of the locations temp-closed, we won! Although it was a short tale to tell, we only had 6 turns left in the blessings deck, so if she had gotten away again, we probably wouldn’t have had time to find her.
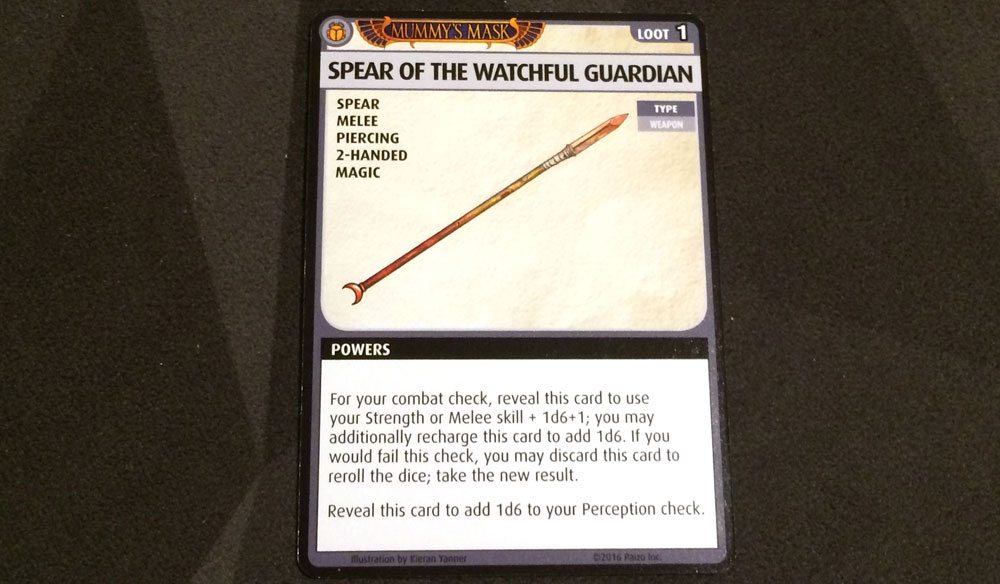
Our loot this time was the Spear of the Watchful Guardian—I guess that’s Senenmerek’s, and he won’t be needing it anymore, because he’s gone from undead to all-dead. It’s a magic spear that adds d6+1, and can be recharged (rather than discarded) to add another d6. Plus, you can reroll if you fail a check. It can also be revealed to add d6 to your Perception check. Ahmotep considered it, but decided she preferred her Shock Glaive, so Mavaro added it to his arsenal instead.
Our other reward, now that we finished the adventure path, was another power feat. Yoon quickly chose proficiency with weapons, because Mavaro had been carrying several weapons for Yoon up until now, so Yoon finally swapped out a couple of hers. Tup took a power that reduces the amount of fire damage he does to us when he helps. Estra decided to go for hand size, increasing from 5 to 6 cards. Ahmotep really likes the ability to add or subtract 2 from a roll, and now has the ability to use that for other characters at her location instead of just herself. Mavaro already has an ability to discard a card to add a die for acquiring weapons, armors, and items; he checked the power that lets him also use that ability for other characters at his location.
Next, we’ll start Deck 2: “Empty Graves.” It looks like, now that we’ve got some treasures, we’re headed off to cash them in.
Disclosure: I received a review copy of Pathfinder Adventure Card Game: Mummy’s Mask.