Shortly after my daughter was born, I stumbled onto the Howtoons series and ordered their books as soon as I could. Tools of Mass Construction was my favorite for its diverse range of topics. The pages run the gamut from teaching you how to make soap bubbles to how to draw in perspective. From making marshmallow guns to tying Monkey’s Fist knots.
But one page stuck in my memory the most: making your own stuffed animals. I knew that people make stuffed animals, of course, but they always seemed too complicated for my modest sewing skills. The Howtoons guide keeps things simple: Focus on blobby central shapes with pieces of felt poking out for appendages and stuck on for eyes and other decorations. Sew two pieces of fabric almost all the way together with the felt bits sandwiched between, turn inside out, stuff, seal up the last bit. It seemed pretty doable, even for someone of my ability. I mean, the book is aimed at kids, right?
A few weeks ago on a rainy day, I decided to try it out. My daughter and I looked at their ideas, and she pointed to one and asked for the “vampire squid.” (Yes, we love Octonauts.) It came out… Well, it came out. But now that I had the idea, I went on to another one—these were small. She wanted a turtle who could be a Scoot to her stuffed toy Mossy (if you don’t know the Jan Brett book, it’s a favorite in our house). It came out a bit better. Even, dare I say, kind of cute.

Emboldened by this small success, I decided to tackle something more complicated. Why not up my game by a lot, right? I thought of the big, blobby shapes they suggest, and then I thought of Owly, Andy Runton’s character who moves through sweet, mostly wordless comics. We like the books quite a bit, and Owly was made for this kind of stuffed animal. Look at the tutorial on how to draw Owly, and you’ll see what I mean.
I had a vision in my mind of how this would work. Cut out the two circles for the body. Then two smaller circles for the eyes. Freehand a beak, the pupils, some wings, some ears, some feet. That was about as much definition as I thought I needed. My daughter agreed.
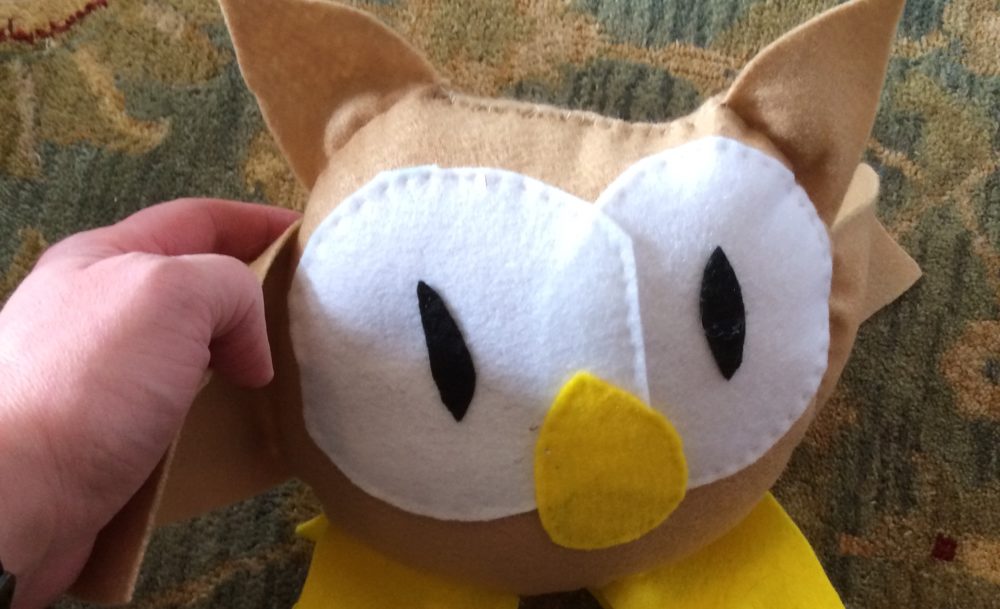
We planned out our colors—beige, white, yellow, black—and went to buy felt. The original instructions suggest cotton print for the body and felt for the appendages, but there is always a use for felt in our house. I made one body circle and then the other from the brown. I made white circles one-quarter the size of the brown ones for the eyes. I used the body pieces and eyes to figure out how big to make the rest: brown for the wings and ears, yellow for the feet and beak, black for the pupils.

I stitched the eyes to one large brown circle. Then the pupils to the eyes, and then the beak on top. I lay that piece down eyes up and lay the ears, wings, and feet on top of that so that all the pieces were near the edges and pointed inward. I put the other piece of the body on to sandwich the external bits between the body. A number of pins to hold everything steady, and then I stitched the front of the body to the back, going along the edge and through the sandwiched appendages.

Once it was turned inside out—a delicate process—my daughter started the stuffing game. This turns out to be perfect for little hands, especially ones that can’t yet do all the sewing. She and my wife packed Owly full of stuffing, and then I whip stitched the hole where the stuffing had gone.
Astonishingly, this all worked. I had made an Owly! And she (Owly, like all otherwise unspecified characters, is a “she” in our house) came out pretty well. Sure, one could improve things, but one always can. My daughter drew on a piece of pink felt to make Owly’s friend Wormy, and we had our own custom-made stuffed animal to be cuddled and featured in stories. It was hugely satisfying to finish, and my daughter has a one-of-a-kind Owly toy. I’m totally hooked.
Thinking of making your own stuffed animals? Here are some tips I’ll pass along after a whopping three simple ones.
- At first I told my daughter we’d have to buy some stuffing for our early tests, but she pointed out we had felt scraps and thread we could use. Still, real stuffing packs a bit more densely.
- Hand sewing works just fine. At least it did for me.
- Go slowly. Think through how things are going to fit. Remember you’ll be turning it all inside out before you stuff it!
- Involve your child. My daughter’s stitching skills are still developing, but she was still able to stuff the animals and make suggestions. She still got restless that it was taking so long, but she got to see every step of it.


Thanks for this project and inspiration. I’ve been wanting to make some little critters with my kids.