Gaming and Crafting with the Kids – Part I
Last month, I wrote about my family taking a break from electronics for the month of February; the first week was a bit tough, but now they don’t even ask for the iPads when homework is done. Instead, we’ve been playing a lot of board games and card games, practicing baseball (Spring season practice starts in a week), doing some crafts, and anything else we can come up with that’s fun and doesn’t rely on something called an app. One of the primary things I wanted to do with them was introduce them to Frostgrave: Fantasy Wargames in the Frozen City.
Terrain creation and painting minis are two key hands-on activities you’ll discover if you investigate Frostgrave — the game’s setting is the defrosted city of Felstad that spent 1000 years under the snow. Now, wizards and their hirelings rush into the remains of the city, looking for treasure and magic. The ruins are a key part of Frostgrave; the gaming area is supposed to represent the crumbling remains of this legendary city, and players frequently create their own terrain from cardboard, card stock, styrofoam, and other materials. The game also involves the strategic movement and combat and spell casting of the wizard and his warband, and for this most players turn to plastic or metal miniatures.
Creating ruins hasn’t been problematic for my boys and me. I have plenty of hot glue, cardboard, card stock, foam, paints, etc… the only problem I’ve encountered is that they boys would rather play the game than create ruins. I totally get that! But me? I am absolutely loving creating the ruins other terrain items. I’ve done my best to get them to help me, and they have learned how to be careful with a glue gun as well as some painting techniques, but being kids… they just want to get to the game.
Before we could play, however, I needed them to do two things with me:
- Create some miniatures
- Learn the basic rules
These two tasks weren’t difficult, and below I’ll provide some details and photos and links that can help you should you decide to give Frostgrave a try with your own kids.
Create Miniatures
If you’re like me, you might be a little hesitant to drop some money on miniatures. I do love the official Frostgrave Soldier minis, but until my boys show a clear interest in continuing with Frostgrave (possibly starting a campaign instead of one-off games), I’m wanting to avoid a large investment… so I’ve come up with a different solution.
The first thing you need to know is this — each player begins the game with 10 combatants — one wizard, one apprentice (optional but recommended) and eight soldiers. The term ‘soldier’ in Frostgrave covers a wide range of classes — thug, thief, barbarian, archer, etc. The rules provide for more than two players, but my 6 year old plays on my team against my 9 year old. This means 20 combatants. Most minis can run anywhere from $1-2 up to $10-30+ depending on quality, materials, and brand.
For my boys’ first few games, however, I chose to go the paper route. I won’t go into the nitty-gritty details of how I made these, so instead I’ll point you to a previous post I wrote here on making inexpensive paper minis.
NOTE: Two things I do differently now is (1) size the fronts and backs simultaneously so they match in size, but otherwise I still use images.google.com to grab images and use Pages to create the small squares that will hold the images, and (2) create 1.5″ squares boxes versus 1″ so the figures are just a tad larger. I cut around their profile, so they still fit in a 1″ square grid.
For my boys, I wanted to make it as easy as possible for them to identify their combatants. And because I still needed to teach them the basic rules, I went with a mix of only six different classes – wizard, apprentice, thug (x4), archer, crossbowman, thief, barbarian.
NOTE: Other than the wizard (which is free), every class costs the player gold (crowns), and each player starts with 500 gold. The apprentice costs 200, a barbarian 100, and the others anywhere from 10-80 gold. I spent all 500 gold for both teams (blue and red) and selected the same quantity of each.


My boys helped me pick four unique images for the four thugs. I also re-used the same class images for both red and blue teams EXCEPT for the Wizard and Apprentice; these four combatants have unique images. I put 10 on a blue background and 10 on a red and printed them out. Next, we folded them, glued them together, and I let the boys run them through the laminator. Our final step was hot gluing the images into little stands that I 3D print by the dozens (for my D&D gaming sessions).
If you’d like the PDF that contains the two teams, you can download it here.
With the paper minis in hand, it was time to learn the basic rules. We were not yet done with all the various ruins and terrain pieces, but that’s okay. For learning the rules, I chose to keep things simple.
Learning the Frostgrave Rules
This may seem a little odd, but for the first game I used my large cutting pad. It’s gridded, flat, and allowed us to spread out on the floor and go over the basics of combat that include using the Shoot stat for archers and crossbowmen.

To make things a bit easier for both boys, I created two identical ‘character sheets’ — these hold the wizard, apprentice, and soldier details that include all their stat modifiers. The warband generator I used is this one — it offers up drop-down menus and keeps track of your 500 gold coins at the bottom.

NOTE: The only error I found with this generator was that when you choose a hand weapon plus dagger for the wizard or apprentice, it’s supposed to increase your Fight from +2 to +3. This bonus isn’t added to the stats bar.
I also printed off and laminated two copies of the official Frostgrave Quick Reference Sheet for the boys to reference as we played.
As I mentioned, both boys played with the same mix of soldiers, but I also had them using identical wizards and spells (in terms of the 10 schools of wizardry you can choose from) for a bit more fairness. After a few more games, I’ll probably go over the various schools and spells and let them customize their wizards. For now, however, I’m more interested in having them grasp the basics of combat and movement and developing a bit of strategy. I’ll slowly be adding obstacles for them to hide behind and/or interfere with line of sight.
We haven’t finished an entire game yet, but there’s a reason for that — games can last 1 to 2 hours, and I was worried the boys would be a little impatient. The 9 year old seems okay, but the 6 year old lost interest after about half an hour. I think when I start to add terrain and ruins, he’ll show more interest as the playing area will be more visually interesting.
Craft Time!
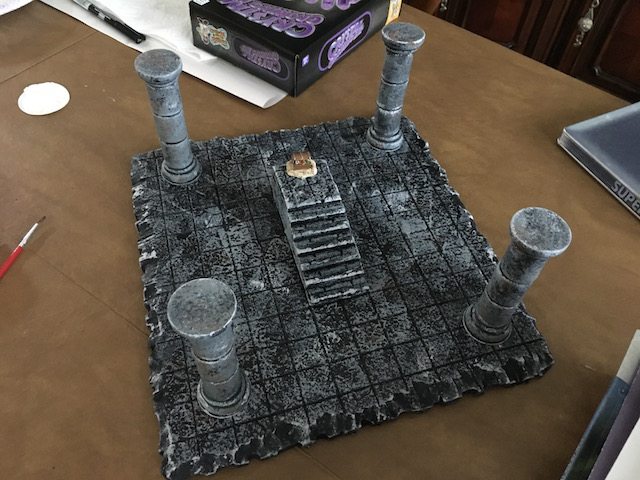
Gaming is fun, but I’m also trying to encourage them to get their hands messy and learn some new skills. This week featured three projects — (1) four columns, (2) a staircase, and (3) a large gridded faux-stone platform. The boys really enjoyed helping with painting the platform… more on that in a moment. FYI — DM Scotty’s videos are super-fun to watch and duplicate. You really can get similar results by following his instructions as you’ll see in my photos below.
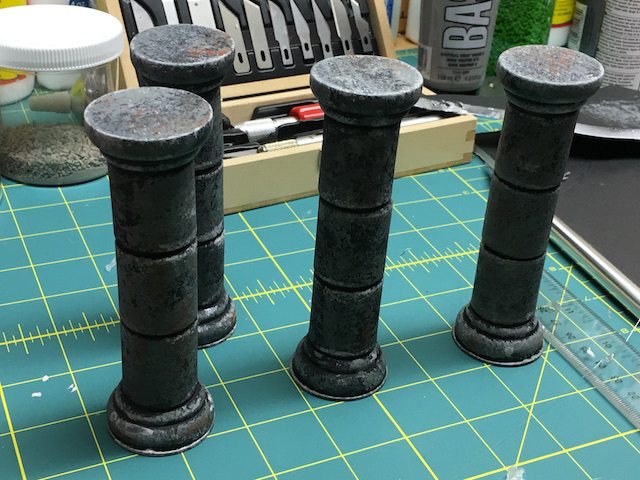
- The columns — This one is from DM Scotty and involves gluing some marshmallow-shaped foam pieces together along with some wooden bases and some washers. We created four standard pillars and have the pieces to make the collapsed one, but we haven’t finished it yet. (The DM Scotty videos for the columns and the stairs will be at the end of this post.)

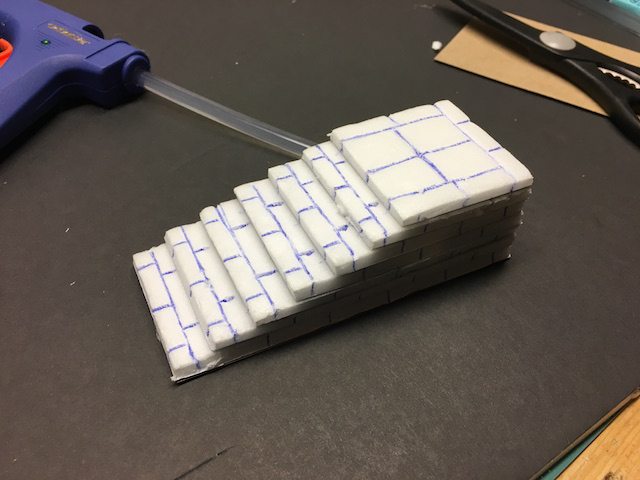
- The staircase — I did this one on my own as a surprise for the boys. It will probably be where a chest or two is placed during a game. It was easy to make from card stock and I used the same painting methods for the columns to cover it up.
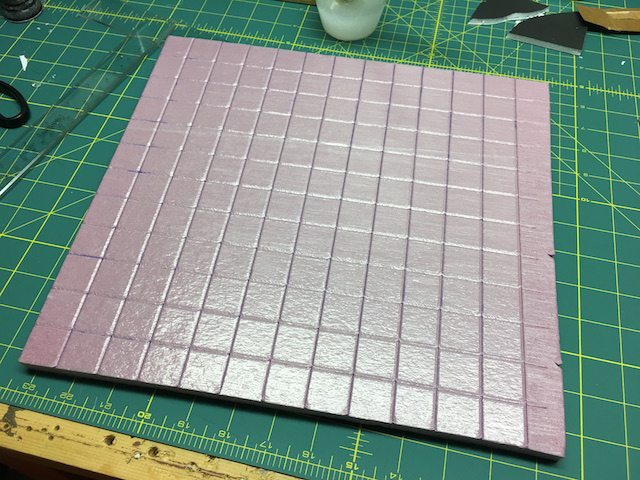
- The platform — The boys helped me lay out the grid with a ruler. We took turns using a ballpoint pen to deepen the gridlines, and I showed them how to use a handheld foam cutter to cut away bits of foam. (I’m not quite ready to let them use the foam cutter just yet.) Painting was fun; we used some paint brushes to give it a flat black coating first. We didn’t spray paint because aerosol spraypaints will melt the foam. After the black, the boys and I took small wet sponges and dabbed a dark grey over the surface (three hands with different pressure — this should explain the ‘marbling’ you see on top of the platform). I then showed them DM Scotty’s technique for using a lighter gray to hit the edges. I think it turned out quite good!

My boys are having a blast… and I am, too. I’m looking forward to our upcoming FULL game, and will share details after it happens. In the meantime, though… I’ve got a few more upcoming posts regarding the crafting my boys and I are doing for the gaming area. I’ve also got a review of the new Frostgrave Folio book due out in early March PLUS the results of a Q&A with Frostgrave creator, Joseph McCullough where he talks about Frostgrave and his new game (set in the Frostgrave world and out in Sept 2017) called Ghost Archipelago: Fantasy Wargames in the Lost Isles.


NOTE: If you’re looking for more details about Ghost Archipelego, check out Joseph McCullough’s blog post on the subject here.
