Gaming and Crafting with the Kids – Part I
Gaming and Crafting with the Kids – Part II
My boys and I continue to have fun during Frostgrave February — the iPads have been put away for three weeks, and we’ve played a lot of card and board games as well as some Frostgrave skirmishes. Frostgrave continues to surprise me with its rule system; my boys have picked up the mechanics fast and have begun developing their own strategies (lots of sprinting and hiding behind obstacles but also some well-timed spell casting by their wizards and apprentices to provide bonuses to their soldiers), and I find the much simpler resolution of combat (more on that in a moment) more enjoyable than D&D!
I wish I could report that my boys have continued to help me make the various ruins and structures that make up a Frostgrave table, but they’ve had their fill. And I’ll go ahead and admit it here — I’m okay with that! Why? Because I am absolutely LOVING being able to create the terrain elements on my own time (mostly after the boys’ bedtime) and to my own specifications. I’m not a perfectionist by any means, but I like being able to make a piece and decide when it’s done. My boys would make a few cuts here, a few cuts there… paint, paint, slap more paint… done! They just wanted to get to the game table, and I really can’t blame them.
Anytime I head to the workshop, I’m trying to imagine how best to create something that can serve two roles — Frostgrave and D&D. I will be returning to the DM’s chair in a few months at my regular Wednesday night game (shout out to Titan Games & Comics) and I’m trying to step up my game a bit for my players and give them more than just game tiles and 2D terrain. (That said, I do enjoy 2D terrain and don’t see myself moving 100% away from it.) This means trying to find interesting structures to create for Frostgrave that would fit right in with many D&D settings.
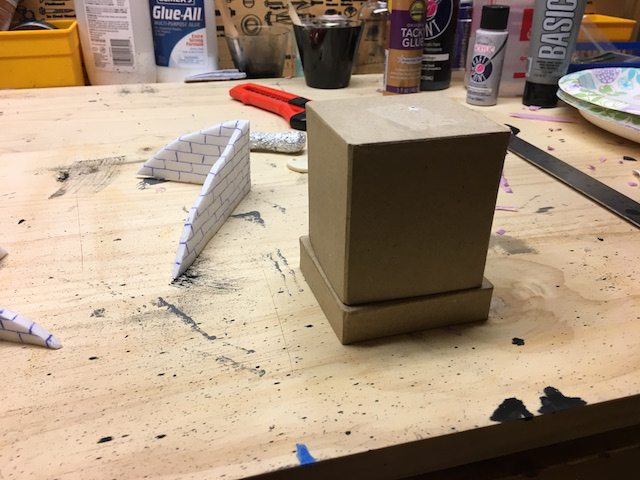
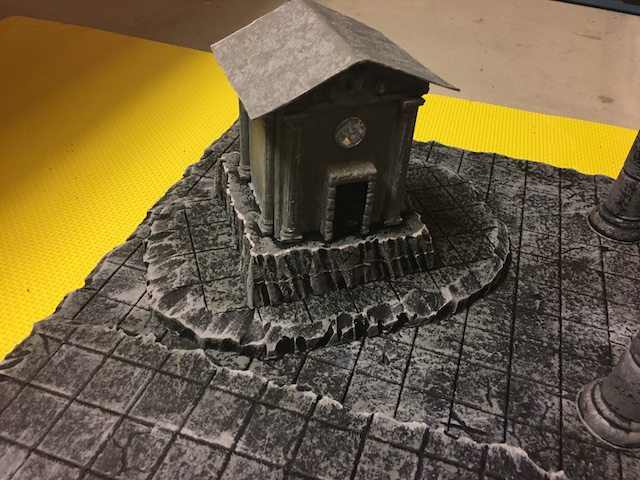
This week, I’ve been working on a new piece to add to my games. While I do love making stuff from scratch using cardboard and foam and other materials, I’ve also got this 3D printer sitting on my desk. I started wondering what I could do by combining basic crafting materials with custom-printed items. A few sketches on my whiteboard, some measurements of a few things in my workshop, and I found my new project… a simple mausoleum. I was able to get my 6 year old son to help me glue on the bits and pieces, so that was a win.
It all started with a small $1 cardboard box and lid. I flipped the lid over to make a base, hot glued the box open-side down, and then headed to Thingiverse.com to find some embellishments. I also scanned through all the various Dragonlock .stl files created by Fat Dragon Games. Here are the ones I selected to use:
Steel Door – Movable — Expansion 9
Decorative Lintel — Expansion 8
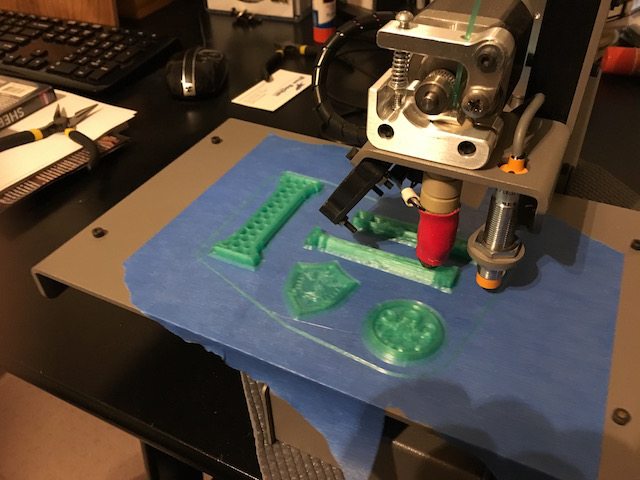
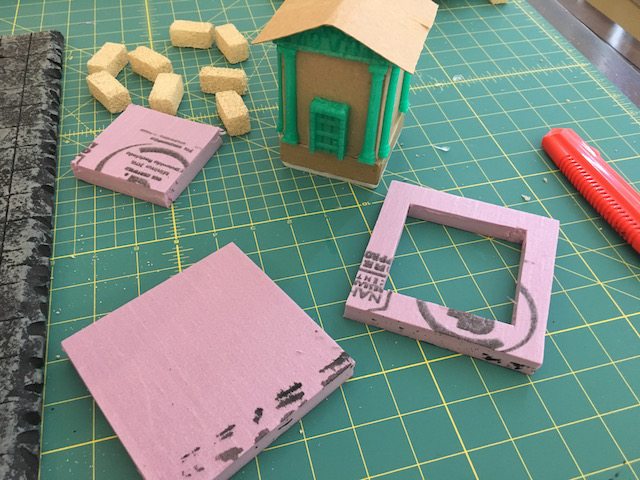
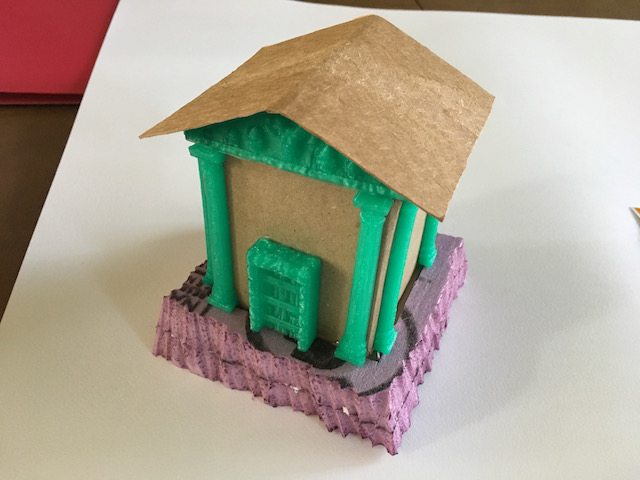
I chose two different column styles from Thingiverse.com and used Tinkercad.com to cut them in half before printing. One column was wide, the other thin. After printing and testing how they looked, I went with the thin column and printed seven more. I also printed a couple shields (yes, that’s Hydra’s symbol on the right and Link’s shield on the left) but discovered they were too large to play nice with the door so I moved the Hydra shield (it looked better) to the rear of the mausoleum. I then added the door and cardboard roof over the lintel. I also started on a second mausoleum but paused until I see how the first one turns out.

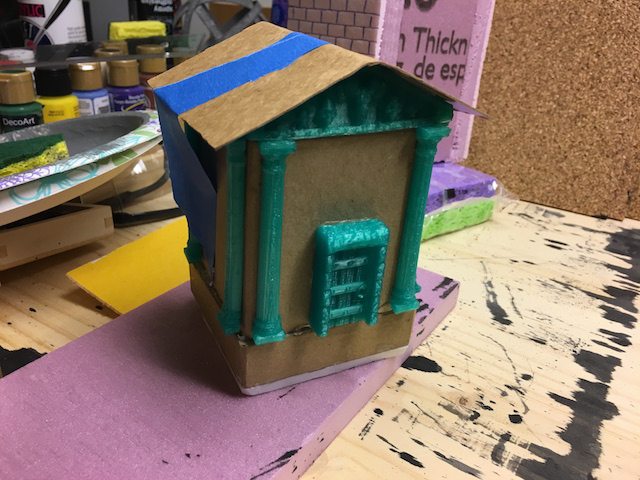


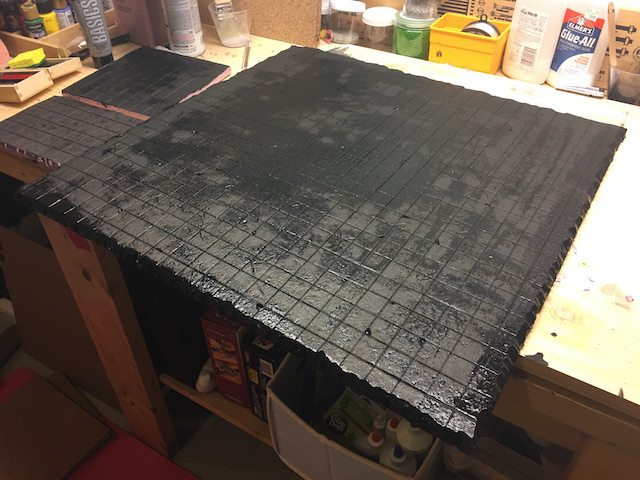
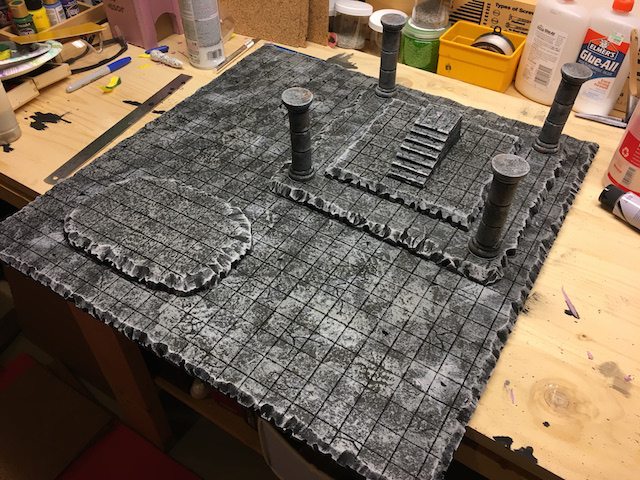
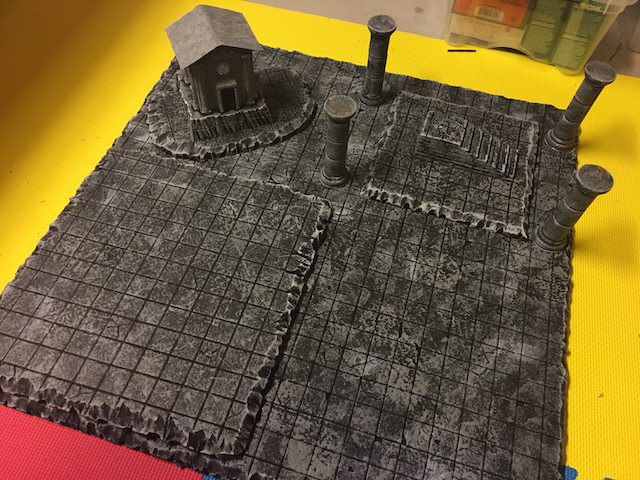
As you can see in the pictures, the door and columns sort of hang in space. That’s because I wanted to add a larger foam base to the bottom. I watch a lot of crafter videos and many seem to gradually move to a consistent style. From the start, I wanted to develop a series of gridded terrain tiles with a darker, stone-like appearance. While I was waiting for glue to dry and 3D objects to print, I started working on additional terrain tiles in various sizes. I created 24″x24″, 18″x18″, 12″x12″ and 8″x8″ square/rectangular tiles and a more rounded 8″x8″ tile. (The 18″x18″ was created specifically for a larger ruin project that I should be able to share next week after it’s completed.)


With the glue all dried, I added the foam base. I cut two 1/2″ thick squares of pink foam and then used the base of the mausoleum to trace the smaller square I would cut in both foam squares. If you look closely, you’ll notice I added a very thin layer of white foam to the bottom; this gave it just enough height to provide a surface to glue on the two layers of 1/2″ pink foam. I added some Tacky Glue and pushed the foam onto the mausoleum until it touched the door and columns. I also took a hot wire foam cutter and gave the foam base a rough edge to simulate rock. Then it was time to paint the mausoleum. Because I used a foam base, I can’t use spray paint because it’ll melt the foam. I could have used white glue to coat the base and then hit it with spray, but it was faster to just hit it with some flat black acrylic paint (crafters call it blackbombing) that will dry in about the same time as the white glue.

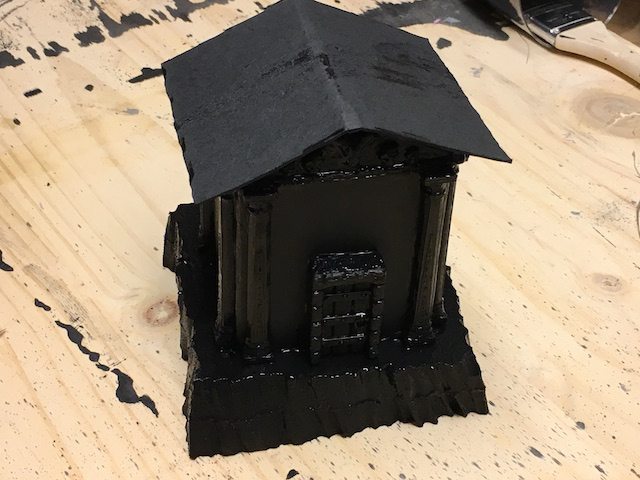
The foam base and the mausoleum itself will be two different colors. To create the stone texture of the terrain tiles, I used a wet sponge dipped in gray paint and randomly dabbed it all over. The same is done on the foam base around the mausoleum. I’m using two different grays, however, because I want the mausoleum to be a lighter gray (more like cement color). A small cheap ornament was glued on the front and all that’s left is for me to paint the front door.

Total cost in plastic, paint, and craft materials probably is around $2.00. It’s hard to estimate time but if I eliminate glue and paint drying time, the 3D printer took about 45 minutes to print the eight columns, shield, and door. Cutting and test fitting and painting was a few hours spread over two days. More importantly, however, I had a fun time building this little thing and I now have ideas for some larger ruins. I definitely enjoy combining 3D printed elements with traditional crafting materials like cardboard, foam, and foam core. It’s addictive, and I don’t care.
Frostgrave Combat
I mentioned earlier that I like Frostgrave‘s combat rules, and I think that deserves an explanation.
First, weaponry is greatly simplified. Swords and axes, for example, are hand weapons. Crossbows and bows are treated the same, too. Damage isn’t calculated by weapon type, but instead relies on a comparison of a successful hit roll to the AC. To determine a hit, you and your opponent both roll a d20. There are roll modifiers, but there aren’t many. After modifiers are figured in, the highest roll hits (ties mean both combatants hit); this results in much faster combat resolution since damage can be applied to either combatant. That means, for example, your 10 would hit against your opponent’s 6. But just because you win the combat, doesn’t mean damage is delivered. If you manage to hit, you subtract your opponent’s AC from your die roll and any positive value left over is the damage that goes through. So that 10 you rolled hits the Barbarian, but the Barbarian’s 12 AC means that the blow glanced off the armor and delivered no damage. The same mechanism goes for bows and crossbows — you pick your target, both players roll the d20… add any modifiers (the attacker adds his Shoot modifier), and a hit occurs if you beat your opponent’s roll.
Things like obstructions (walls, statues, etc.) are simply counted and applied as negative modifiers per line-of-sight obstruction. Spell modifiers also come into play, but not distance — either something is in range or it isn’t.
With D&D, if you attempt to step out of combat or run by an opponent, the opponent gets an opportunity attack. With Frostgrave, if you move within one inch of an opponent, the opponent can force combat. You must stop until combat is resolved. If you win, you can shove your opponent back and put an inch between you.
Initiative is rolled at the beginning of each turn instead of being a constant until combat is one. This can really turn the tide in some situations, especially if you’re attempting to flee with a treasure or low health.
All in all, my boys do enjoy Frostgrave combat rules; I’ll take the reduction in rules and complexity over the fast moving combat that we get to enjoy together.
What’s Next?
I’m not done with my boys and crafting terrain. Next week I’ll share with you a larger ruin I’ve created with their help and give you some feedback on our first game using all the completed terrain pieces and ruins and structures and statues and… more. I also plan on sparking a discussion about wargames in today’s gaming world. More to come…


This is great James! I also do plenty of cardboard modelling which must be D&D, Frostgrave, Kings of War and whatever-else-comes-along compatible.
I’ve also been considering a 3D printer for a while, which one have you got? It would be for gaming and getting the kids involved in general design and making.
Thanks for the article, Andy
I have a Printrbot Metal Simple (the first version), and I’m really impressed with the new model. That said, there was a geekdad.com post a few days back that had a $200 3DP that should easily be able to do this kind of thing.
Thanks for the kind words… already finishing up my next bit of ruins.
I have enjoyed your rpg crafting projects but how do you transport several terrain pieces to a game at another location without damage?
The flat foam pieces stack easy and I have a large canvas sack to hold them. I also spray all my foam stuff with polyurethane that gives them a bit of strength and prevents scratching them up.
This is pretty awesome stuff here! Gotta love that foam insulation. And what a great use of the 3D printer to add details without having to print the entire object/building.
Fat Dragon and a bunch of others are constantly releasing new 3D models. The 3D printer can be a big expense, but these bits and pieces can be printed for pennies given the cost of filament.