 One of the most cost-effective ways to get a cool prop for your cosplay is to buy a resin kit. It’s a lot less work than making your own, but usually quite a lot cheaper than getting a completely finished custom prop. But once your resin prop or kit arrives, how do you finish it yourself?
I get this question a lot since I make and sell resin prop kits, but there are a ton of other prop makers out there that do the same (Punished Props, Coregeek Creations, Downen Creative Studios, Allen Amis Creations, and Volpin Props to name a few). It’s a great way for us prop builders to get our props into the hands of folks who want a quality prop that they can make their own without spending too much money. Here is a quick how-to on finishing a resin prop along with some of my favorite supplies to use when I’m finishing my own.

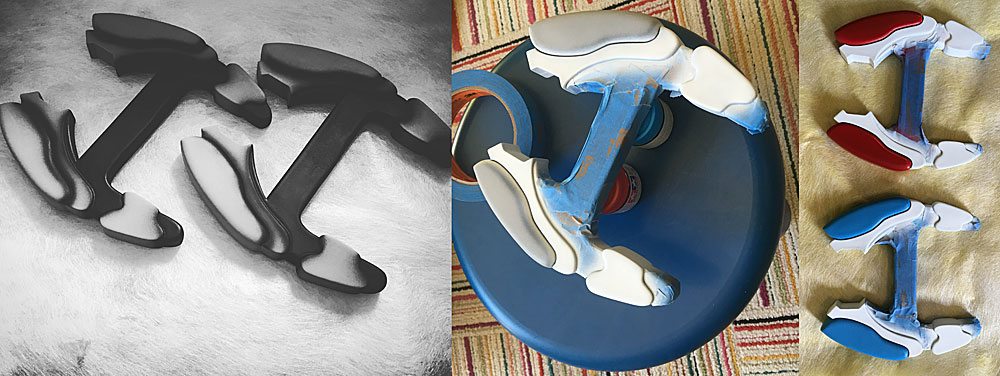
The first thing I do with a fresh resin kit is to cut off any sprues or their remnants. These are the pieces that stick out from pour holes or air spouts in the mold. You can use anything, but flush cut nippers like these from Mr. Hobby are great. They will let you take off almost the entire sprue, leaving little additional clean-up to do.

Next, I take a blade–either an X-Acto or a box cutter depending on how big the prop is and how bad the seams are–and scrape. The seam lines are where the two (or more) parts of the mold came together. Depending on the quality of the resin casting, you may be able to skip this step (or you may need to do a LOT of scraping). But it’s exactly what it sounds like–holding your blade at an angle, just lightly scrape around the prop along the seam line. This will speed things along on the next two steps by quickly doing a lot of the smoothing work.

The next step I do is round one of sanding. You will be doing many rounds of sanding if you want a nice, smooth prop, so be prepared. My current favorite way to sand is with 3M Sandblaster Flexible Sanding Sheets or Rolls. I use a combination of 100 and 220 grit for 95% of my sanding. They are great because they not only do a great job of sanding but they also have a rubbery plastic backing instead of paper, they seem to hold up a lot more to wet sanding. Speaking of which, try to always wet sand. It doesn’t kick up as much dust (though you should still be wearing a mask), the sand paper will go further, and you will get a nicer finish.
Most likely, you will need to fill in some spots. Even the highest quality resin kits will need at least a few spots filled. My go-to for spot filling on resin kits is Bondo Spot Putty. It’s cheap, doesn’t require mixing like normal Bondo, and does a great job of filling everything in nicely. It dries pretty quickly and can also be wet sanded. My first Bondo pass is only to fill in the big, plainly visible stuff. Make sure your resin casting is relatively smooth before moving on to the next step.

Next up is priming the kit. The primer I use is the Rust-Oleum 2-in-1 Filler and Primer. It’s a nice filler primer so it can help smooth out small imperfections quickly, it can be wet sanded, and all the different paints I’ve used have all adhered well to it. You spray it on like any other primer, but it will actually fill in any scratches and pin holes. This is why I skip Bondo on the small stuff for the first pass. Once the primer is dry, you guessed it, wet sand it again. Once it’s dry, you’ll have a nice combination of primer and Bondo showing and you should be able to easily find any more places you need more Bondo. Now, you just repeat the above steps as many times as necessary until you have smoothed everything out and have a nice finish.
Before moving on to paint, I’d recommend one last pass with a finer sandpaper, like 400 or 600 grit. This will still give your paint something to grip on to, but will make for a nicer finish. As for paints, I personally prefer acrylic paints because I like the easy clean-up and try to lessen chemicals when I can, but I’ve tried other paints and they pretty much all stick to this primer pretty well. I mostly paint my props with an airbrush using Tamiya acrylic paints, but they can also be brushed on. I’ve also used Rust-Oleum spray cans.
After the joy of the masking and painting dance, I seal everything in with a clear coat. I’ve tried a lot of different ones, but I’ve been the happiest with Varathane Polyurethane. It’s intended for things like wooden furniture, but it gives a really nice hardy clear coat on plastic props! It comes in both Glossy and Satin.

If the prop does need a gloss finish, I have a final, final step. I finish it off with some Turtle Wax. This will help protect the finish from most scratches. It’s also a nice way to replenish a prop if it has some minor scratches in the clear coat. Apply the wax with a sponge or buffing pad, let it dry, then buff it off. You’ll have a nice shiny prop, all ready to go!


