Last week, I wrote about my goal of introducing my boys (ages 9 and 6) to the Frostgrave fantasy miniature wargame from Osprey Publishing. During the month of February, it’s my hope to squeeze in quite a few games with them, but I’m also hoping to get their help in creating some of the terrain that the game recommends for creating a 3D gameplay area. The setting is the ancient city of Felstad, a wizarding city that was covered with snow and ice for a thousand years and that has now begun to thaw and be explored by wizards and their treasure-seeking hirelings.
If you do a Google image search on Frostgrave, you’ll find tons of examples of players who have created some amazing dioramas filled with crumbling towers and walls, snow-covered tombs, and rickety bridges. The Frostgrave rules call for gaming areas of 2’x2′ or 3’x3′ layouts, and it’s incredible what some players manage to squeeze into these small spaces. I’ve shown these images to my boys and suggested we try our hand at creating some of our own terrain and learning some new crafting techniques. But where to start?
There is no shortage of online tutorials for learning how to make things, and I’ve used many of them to help me with crafting when I DM’d for the weekly D&D game. (I’m taking the season off and playing side-by-side with my 9 year old in his first D&D adventure.) One of my favorite teachers is DM Scotty. DM Scotty is the host of The DM’s Craft, a source of over 500 videos (!!) that show you how to create tiles, terrain, props, and more.
My boys and I talked about the diorama we wanted to create first and looked at some other Frostgrave players’ creations for ideas. We wanted to start with something simple, and one object we all agreed on was some pillars. A quick search of DM Scotty’s videos provided us with the below tutorial on creating simple pillars:
Following these instructions, my boys helped me layout three pillars on the backs of some cardboard taken from some cereal boxes. My 9 year old did some cutting and I let my 6 year old help me come up with some designs for the embellishments. Below you’ll see some photos of the progress on one pillar.
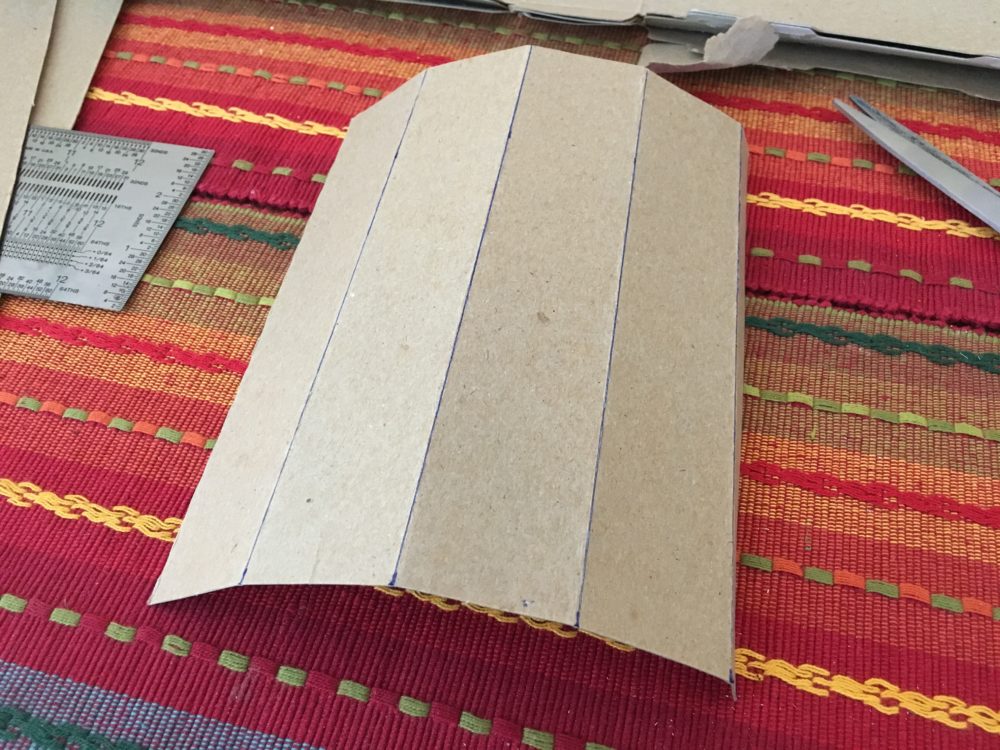
It all started with cutting out the pillar’s sides (and a tuck flap). I first showed my boys how to use a ruler and t-square to create a true rectangle from the cardboard. That followed by letting my oldest make marks every 1-1/4″ at the top and bottom of the rectangular sheet and then using a straight-edge to mark fold lines between the marks. We did this for three pillars. I let each of the boys cut out a column (I did some cleanup on the 6 year old’s but he does have pretty good scissor control) and showed them how to use a straight edge to fold along the lines to get what you see here. (Unfortunately, the tuck flap is hidden beneath the right edge, but it’s 1/2″ wide.)

Next, I helped them with the hot glue gun to put a good bead of glue down the tuck flap. We glued the flap while holding the pillar vertically to make sure it was level with the surface. I also intentionally glued the cap piece in with the cereal box graphics showing — I did this because I wanted the boys to see how priming the cardboard would hide the graphics.
A little extra hot glue was added around the top edge to seal the cap piece. We did this for the two additional columns and turned to creating some decoration for the plain pillars.
(If you’re wondering why we didn’t create four pillars, I’ll explain shortly.)

Next, I measured out some simple angled designs that my 6 year old liked for the tops and bottoms of the pillars. Both designs have a flat end, not a sharp point.
Cutting and gluing these pieces didn’t take long, and they really did add some nice detail and break up the boring looking pillar.
All that was left (before painting) was to add a base to each pillar. A 2″x2″ square was cut from the same cardboard and the edges were clipped off at a small angle before hot-gluing the pillar down.

Total time to make the three columns was about an hour. (I probably could have made them faster on my own, but this was some great time with my boys and hopefully they’re learning some tricks and skills that will come in handy as we continue with our terrain creation.
After watching DM Scotty’s video, I found a matching video that showed how to create a crumbled pillar. It calls for making an identical pillar, but cutting it into sections after gluing the tuck flap. Here’s that video:
This one was fun to make, but unfortunately we got so into the work that I forgot to take photos! I did manage to take some photos of the primed pieces (below), so hopefully you’ll be able to make out the matching details on the three “broken” pieces.


After finishing up our columns, we headed to the garage for some priming. I used flat-black primer and gave the boys a chance to do some light spraying. I explained that the best way to do this was to hit them with a bunch of single, light coats so that pooling wouldn’t occur. I did take some extra cardboard and showed them how a heavy blob of paint would look and how it would dry slower. I think they got the general idea, but they were still impatient to get the pillars painted so we were in and out of the garage every 30 minutes or so to add more paint.
While the paint dried, however, I showed them another video from a different source — Mel… The Terrain Tutor. Mel is another great source of instruction, and I highly encourage you to take a look at his collection of videos, including this one that we used as a source of inspiration for our own foam tower:

Again, I totally failed on taking photos of the measuring and cutting, so all I an offer you at this point is photo of the small foam structure we created. I did the cutting of the foam, and my boys helped with the gluing. We’re not done with it yet, so more to come on this little building — adding a roof, some detail work on the sides, and more.
We’ll also tackle painting the pillars next and adding weathering and a base and some rubble around the topped pillar.
So, what’s next? Well, I’m going to get my boys to watch another DM Scotty video with me so we can start building some crumbling walls. Below you’ll find the video we’ll reference.
Finally, a few weeks back I shared a dice tray I created using Fat Dragon Games’ Dragonlock tiles. I was quite pleased with how it turned out, and I should have known my son would ask for his own dice tray to take to game night. I didn’t want to make him one exactly like mine, so I went with a few curved walls and a doorway. Below you can see an image of our dice trays, side-by-side. If you’re interested in making one, you’ll need the Dragonlock Starter Set and Expansion #5 that provides the half-height walls (straight, corners, and curved). For my son’s tray, I went with a slightly lighter gray for the walls — the photo doesn’t make that all that apparent, but it’s a few shades lighter. And the door opens and closes… a hit with my son.

We’ll get the pillars painted up, do some more work on the foam tower, and keep moving forward with developing our Frostgrave game area, and I’ll be posting more photos and details as it develops. Stay tuned.


