
I do a lot of mold making and prop building and one thing that plagues me is air bubbles. The best way to get rid of air bubbles when making molds, is with a vacuum chamber, so I teamed up with Best Value Vacs to try out on our their kits.
This video is my unboxing, setup, and first test run making a mold with the vacuum kit. If you’re a visual person or feel you’ve heard enough, you can probably stop right here, but if you want to read about the vacuum chamber and pump in more detail, keep reading!
The vacuum chamber kit I was sent consists of three main pieces.
- Best Vacs 3 Gallon GlassVac Aluminum Chamber
- CPS Products VP6S Pro-Set Single Stage Vacuum Pump, 6 cfm, 50 micron
- 9″ heating pad
Obviously if you already have a vacuum pump, you probably wouldn’t need another, and, depending on what materials you’re using, the heating pad may or may not be useful to you. For the silicone and resin I am using right now, the heating pad would actually speed up curing which I didn’t want since I needed more not less curing time. I may use it in the future, but for now, I didn’t try it out.

The first thing I was struck with after unboxing the aluminum chamber is how well made and sturdy it is. The pot itself is thick, solid aluminum, and the lid is thick glass with a bright orange seal. I have to admit that the color scheme was a big bonus for me since I love orange and grey. I was also surprised to find that the gauge and valves were all pre-assembled. This was all a huge relief to me. I had briefly considered doing a DIY vacuum chamber, but decided I wasn’t confident enough in my abilities to do so without building something too risky to actually use. The only assembly required is screwing the filter onto the right hand valve and the hose to the left hand valve.

A third, optional, step is to cut the tip of the cap off of the valve. This allows the gauge to equalize to the pressue in your environment to get the most accurate reading. Even though I’m not doing anything that requires that accurate of a reading, I did it anyway because I’m an instruction follower!

With my pot all setup and ready to go, I unboxed the vacuum pump. The pump is also very solid and sturdy, and pretty simple. Getting into something new like vacuum chambers and pumps is always a little intimidating, but this was really simple. The only setup required on the pump was filling it with oil (and you MUST always make sure there is enough oil in the pump or you will burn out the motor and ruin a pricey piece of machinery). The pump comes with a bottle with enough oil for a complete fill. It does not come with a funnel, and I highly recommend using one so that you don’t spill oil all of the place like I did.
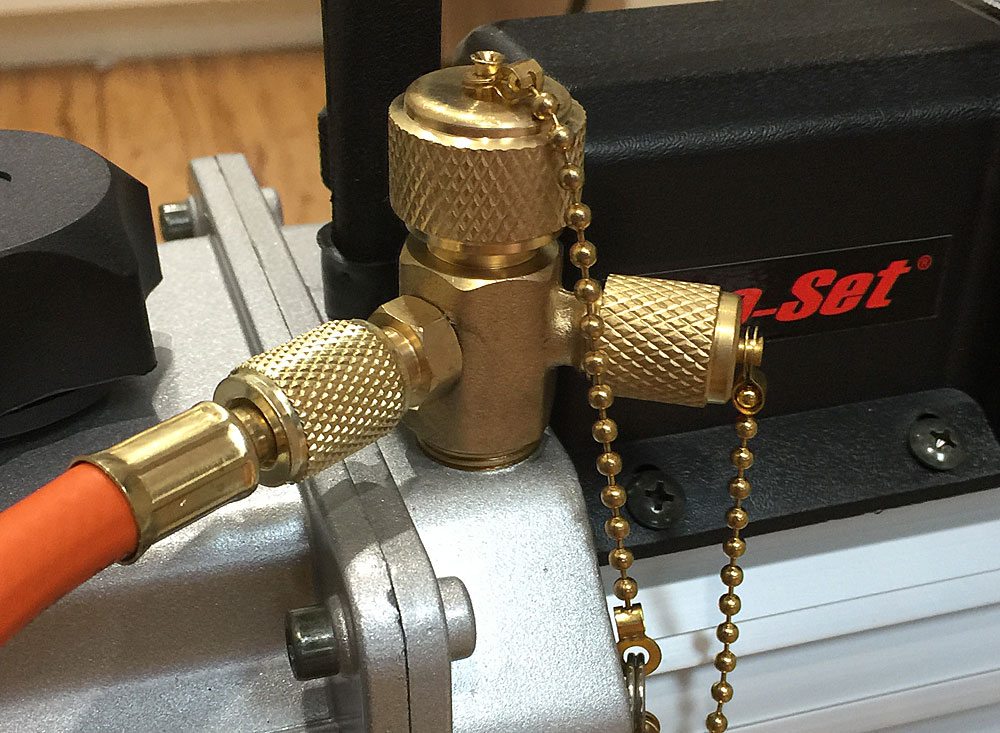
This particular pump actually has three hose connectors so you can use different hoses, or, I suppose, even connect multiple vacuum chambers at once. For both the pump and the chamber, finger tightening the hose is all that is required so no tools are even necessary.

With everything setup, the first thing I put into the chamber was the Part A and Part B of my silicone into the chamber. Normally for degassing, I should have used something like Smooth On’s Mold Star 15 SLOW. This would have given me enough time to mix the Part A and B, degass it, and still have enough pot time left to pour it. For better or worse, I only had Mold Star 16 FAST on hand, so I figure degassing each part before mixing and doing a quick degassing post mixing would be better than nothing. And it worked out quite well! I will also say that watching the air get sucked out of your chemicals is so satisfying.

While a pressure chamber is better for preventing air bubbles in your poured resin (and hopefully I’ll get my hands on one and do a series on that as well), if you have the time (again will depend on the pot life of your resin), it certainly doesn’t hurt to degass your resin before pouring it. It won’t help with trapped air bubbles in your mold, if you’re having that sort of trouble, but it will help lessen the amount of air in your final resin piece.

Here is the first set of Voltron Challenge Coins that came out of the mold I made. I wish I had the coins from my original junk mold to show as a comparison but they were so bad, I tossed them and the mold out long ago. Even without the silicone being in the vacuum for as much time as I wanted, the mold came out so much nicer and cleaner than any previous mold I’ve made. If you’re doing a lot of mold making, I highly recommend getting yourself one of these vacuum chamber kits from Best Value Vacs.
Now, I know you’re probably wondering, “can we put stuff in it for fun?” I haven’t yet tried anything other than what its intended, but I have to admit, I’m curious and have been wanting to watch a marshmallow and a few other things undergo the vacuum chamber. Post here or on twitter if you have any ideas of things I could try!
Note: I received this vacuum chamber kit for review purposes but all thoughts and opinions above are my own.


You’re NOT getting air bubbles out of the resin, the organic solvents are boiling off and are there to aid in the initial mixing so DON’T degass the resin before mixing it. For best results pour both parts into the same mixing cup and measure by weight with the mixing cup on the scale. This ensures exact ratio without harvest m activator stuck to the side of a cup. Then use an appropriately sized electric mixer to rapidly mix ther resin. Then degas the resin. DON’T TURN OFF THE PUMP WHILE DEGASSING !!! Degassing only occurs at the extreme vacuum so you need to keep the pump on until it stops bubbling. If it’s about to boil over the mixing cup, use the valve to let some air back in to deflate the rising resin then close it and allow the vacuum to increase again. After pouring the resin in the mold you need to place it in a pressure chamber while the resin cues. That will remove all bubbles.
You’re NOT getting air bubbles out of the resin, the organic solvents are boiling off and are there to aid in the initial mixing so DON’T degass the resin before mixing it. For best results pour both parts into the same mixing cup and measure by weight with the mixing cup on the scale. This ensures exact ratio without the activator stuck to the side of a cup. Then use an appropriately sized electric mixer to rapidly mix the resin. Then degas the resin. DON’T TURN OFF THE PUMP WHILE DEGASSING !!! Degassing only occurs at the extreme vacuum so you need to keep the pump on until it stops bubbling. If it’s about to boil over the mixing cup, use the valve to let some air back in to deflate the rising resin then close it and allow the vacuum to increase again. After pouring the resin in the mold you need to place it in a pressure chamber while the resin cues. That will remove all bubbles.