Well, we’ve finally come to the last adventure in the Pathfinder Adventure Card Game: Wrath of the Righteous. The sixth deck is called “City of Locusts,” and we’ve finally completed our journey.
First, a look back at where we’ve been so far:
- Overview – a quick look at what’s new in Wrath of the Righteous compared to previous PACG sets
- Into the Abyss – a little bit of history about my PACG group, and picking characters for Wrath of the Righteous
- Get This Party Started – in which I introduce the characters we’ll be getting to know over the course of the year
- Deck 0: Into the Worldwound – in which our brave (foolish?) heroes charge into the Hellmouth
- Deck 1: The Worldwound Incursion – in which we narrowly avoid Khorramzadeh the Storm King, find some new cohorts, and rescued the Wardstone Fragment—and then gained our Mythic Paths
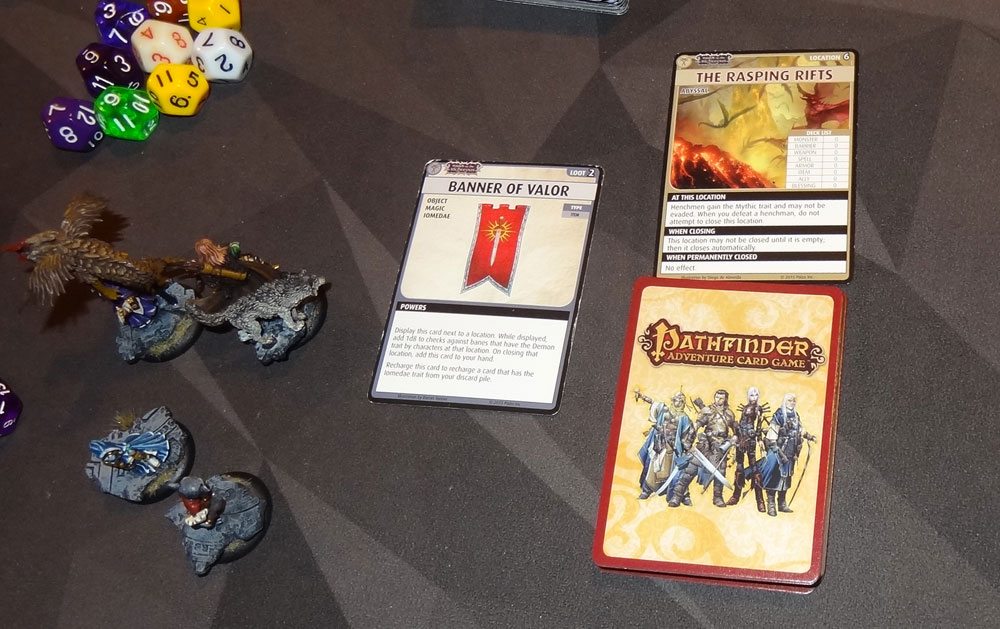
- Deck 2: Sword of Valor – in which we faced a horrible new type of henchman—the army, risked the blood of Eustoyriax, and gained the Banner of Valor
- Deck 3: Demon’s Heresy – in which Arueshalae joined our party (and Shardra left), we fought a bunch of dragons, and earned our Role cards
- Deck 4: The Midnight Isles (Part 1) – in which we survive Demondome and gain Nocticula’s blessing
- Deck 4: The Midnight Isles (Part 2) – in which Shamira offers a tempting gift
- Deck 5: Herald of the Ivory Labyrinth – in which we get lost a lot, and become the new Herald of Iomedae
At the end of Deck 5, the reward was that one character could change their mythic path to become either the Sword of Iomedae or the Shield of Iomedae. We ended up deciding that Balazar would become the Sword of Iomedae because he uses two of the three traits that would be boosted—most of the other characters would lose an important bonus by taking either of them. Plus, we wanted to keep the Sword’s ability to fully heal a character on hand, because we were worried going into Deck 6 that we might need that.
Unlike most of the previous decks, Deck 6 has six scenarios: the first five finish out the main Wrath of the Righteous Adventure Path. And then there’s this instruction:
After you complete Closing the Worldwound [the last scenario], each character gains a card feat, a power feat, and a skill feat. Then—if you dare—you may attempt the scenario Justifiable Deicide.
“If you dare”? Well, of course we were going to play that. But first, we had to survive the City of Locusts.

Scenario 1: Onslaught on Drezen
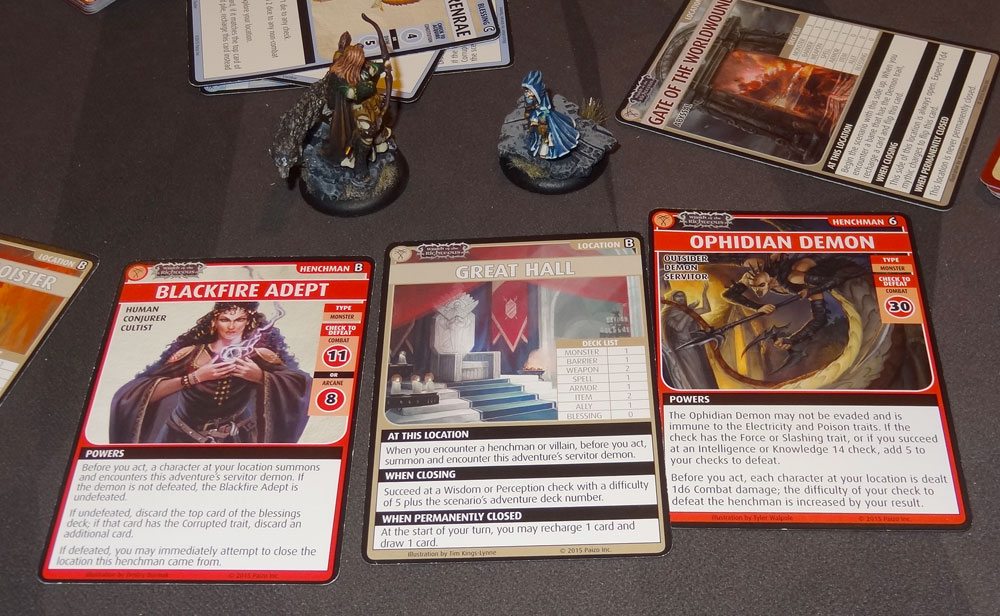
Deskari, the Big Bad for this deck, is assaulting our stronghold at Drezen by sending his general, Aponavicius, with her Abyssal Armies. (We won’t see Deskari himself for a while.) This scenario starts us off with several familiar cohorts from previous decks: Anevia Tirabade, Aron Kir, Aravashnial, Horgus Gwerm, Irabeth Tirabade, and Sosiel Vaenic. Whenever I see a long list of cohorts, I figure there’s going to be something nasty to make up for all of the extra cards we get.

We also got a new Troop card: the Champions of Mendev. Like the Knights of Kenabres from Deck 2, the Champions give everyone a boost, but it’s a little different this time. The Knights only helped against barriers with the Army trait (which was specifically Army henchmen), but the Champions can help you for any type of card—at a cost. You must spend 1 mythic charge to gain any of the checked skills, and it adds a skill that’s tied to one of the basic skills +5. For instance, if you check the Mythic Medal of Valor, then anyone can spend a mythic charge to gain the skill “Melee: Strength +5” for that check. With the Knights, there were several skills we didn’t have represented at all, like Diplomacy, so you would get an extra d6 from the Knights but your base die would only be a d4. In this case, you get a +5 on top of the base skill, so it’s potentially a much better boost.
At the start of this scenario, we get to check a medal immediately, and we picked the Melee skill—Ekkie and Balazar both use Strength to fight, and every so often other characters have to rely on Melee if they don’t have weapons or spells handy, so we figured it would be a good start.
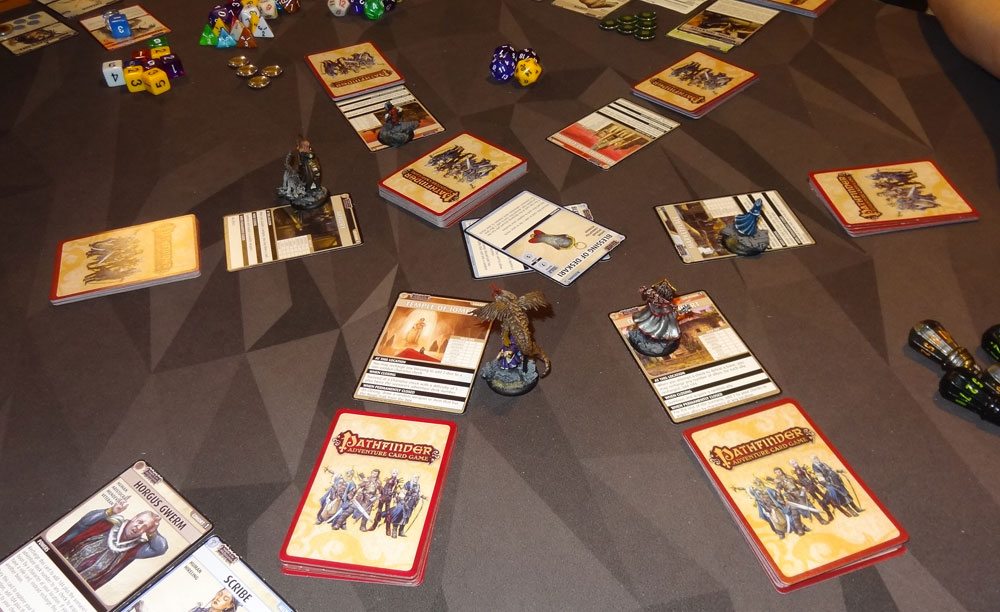
The other special rule in this scenario is about the Sanctum location. When the scenario starts, the Sanctum is not put into play, and there is no villain: all of the locations have the Abyssal Army henchmen. It’s only when you close a location that you summon and build the Sanctum with Aponavicius in it—plus all of the banes that were left in the location you just closed. So basically as you close locations, the Sanctum gets harder and harder, and you know the villain is hiding in there somewhere.

In our scenario, Arueshalae was the first to encounter a henchman at the Defender’s Heart, so we broke out our little scraps of paper so we could distribute the various checks and see who was going to do what. Like the other Army-based henchmen, the Abyssal Army has six checks, and each character must take a different one. We have two Combat 40 checks, Arcane 23, Knowledge 23, Divine 23, and Acrobatics 23. This army was actually not as bad as the earlier ones because the skills line up a little more closely with what our party happens to have. Enora can pass Knowledge checks with her eyes closed. Balazar took Arcane, which is easily boosted with his Sword of Iomedae mythic path. Ekkie, of course, took one of the Combat checks. Adowyn is our only character with Divine. Finally, Arueshalae took the Acrobatics check. We all passed, closed the Defender’s Heart, and the Sanctum location came into play.
We thought it might be nice to close just a few locations and then go after the villain in the Sanctum when we had enough people to temporarily close locations, since we didn’t want the Sanctum to get filled up with too many banes. Ekkie encountered an Abyssal Army at the Citadel when we were all low on cards from the last fight, so she evaded it—which allows her to shuffle it into a random other location. But since she had the Manual of War, she could also use the skill that let her put it on top of a location instead. She used that, and we got really lucky: the Abyssal Army was on top of the Sanctum! We figured, once we got ourselves ready for another fight, we could go there to fight the army and close the Sanctum, and then we could chase the villain into a location that wouldn’t keep piling up with more monsters.
Well, on the next turn, Arueshalae encountered yet another Abyssal Army at the Cathedral. We managed to defeat it and closed the location. Then the lone remaining Monster got shuffled into the Sanctum… along with that Abyssal Army we had known was at the top. Oh, well.
Enora’s new skill at peeking ahead at her location let her find another Army at the Marketplace, so we waited until everyone was geared up and then defeated it—and the Marketplace had no other banes to shuffle into the Sanctum, which was nice. Shortly after that, we defeated the army at the Temple of Iomedae as well.
Finally, we felt ready to take on the villain. Enora got lucky and located Aponavicius, putting her at the top of the Sanctum. Adowyn got in position to temporarily close the Armory. We had just enough time for everyone to take a round to reset their hands to get the best chance of blessings and useful spells or weapons to help with the battle, and then Enora attacked. Aponavicius requires you to do a Knowledge or Perception check before fighting or else she does d6 Combat damage to you and from the Blessings deck, but Enora (as we mentioned before) is great at those. The two fights, 32 and 35, were not too bad with everyone helping, and we succeeded. Our reward was another medal for the Champions of Mendev, and a power feat for every character.

Scenario 2: The Pleasure Center
The next scenario takes place in the city of Iz, home to the Yearning House, which is pretty much exactly what it sounds like. For the setup, you first set it up as usual, but then any remaining henchmen for the scenario (usually returned to the box) get shuffled into the Yearning House. In our case, since we have 5 players and are using almost the maximum number of locations, the Yearning House only had one extra henchman.
But lest you think: hey, extra henchmen are additional opportunities for closing a location, the Yearning House has its own special rule: defeating henchmen does not allow you to close it. So the only way to close it is either by defeating a villain there or by plowing through the whole thing. We joked about why this was the case: “You know, we better explore this Yearning House really thoroughly. There might be more monsters over in this room. I’ll go check.” Also: any time you encounter a Demon monster there, you could banish an ally to defeat it… basically throwing your friends to the wolves, I think.

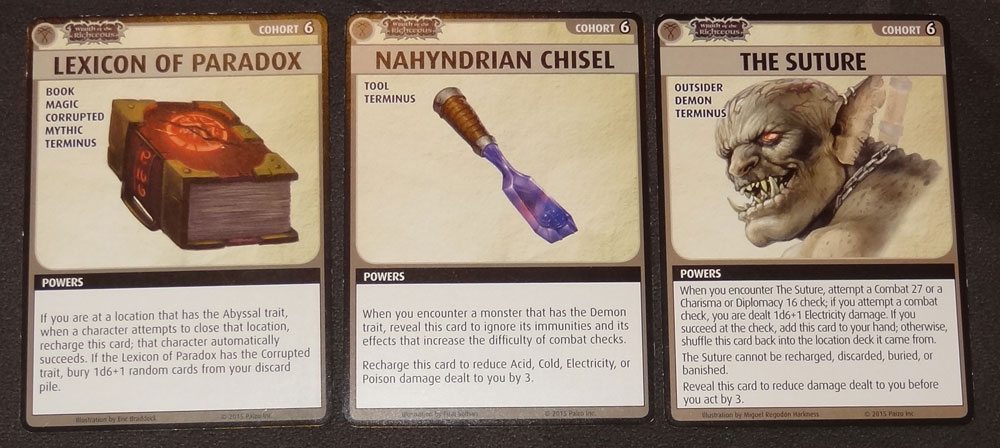
Our extra cohort for this scenario was the Lexicon of Paradox, which we gave to Enora because she can use books for all sorts of powers other than their regular abilities. The Lexicon of Paradox lets you automatically close Abyssal locations, but it also buries cards from your discard pile if it has not been redeemed. And since we never had it before, well, we decided it was best used only in case of an emergency.
Ekkie and Balazar both started at the Cavern—it requires a Constitution Fortitude check to move away from it, so we figured we’d just try to get it closed out as quickly as possible. Well, then Balazar ran into the villain right away, a giant spider-elf-cleric named Mistress Anemora. She makes you throw away a spell and everyone takes Poison damage, but Balazar and Ekkie were each able to make one of the checks to defeat her, so we chased her out of the Cavern. In the meantime, the rest of the team managed to temporarily close all of the other locations except the Gray Garrison and… the Yearning House. But at least the Cavern was closed.
Ekkie and Balazar both moved to the Grey Garrison after that, and Ekkie found the Pleaser henchman, who is much easier to defeat using Wisdom or Diplomacy than Combat. Of course, Ekkie the goblin isn’t known for her wisdom and diplomacy, so she just fought it. The Pleaser’s ability is that if you use any allies during the encounter, they are banished unless you spend a mythic charge. The Pleaser also doesn’t do normal damage, but instead buries your allies or takes away random boons. The Grey Garrison was closed, so now we knew that Mistress Anemora was hiding in the Yearning House, which seemed appropriate.
Knowing that, we were able to focus on getting other locations closed or at least covered to temporarily close them. Arueshalae, who is very good at Diplomacy, defeated a Pleaser at the Manor House and closed it. Enora peeked ahead at the Occult Library and found the one other henchman, Sister Perversion, a creepy demon who makes you first summon and encounter the servitor demon, and then pass a Wisdom or Knowledge check or lose 2 mythic charges. Enora opted to not explore and instead wait to close the location.
With everything in place, Ekkie and Balazar (what a pair!) teamed up again, this time at the Yearning House, and found and defeated the villain. Our reward: another medal for the Champions of Mendev (even though they weren’t even in this scenario!) and a skill feat for each character.

Scenario 3: Death of the Storm King
Remember Khorramzadeh, the terrible Storm King who didn’t end up making an appearance back in Deck 1? Well, now he’s finally showing up to fight. We have finally discovered the three things needed to close the rift: the Lexicon of Paradox, the Nahyndrian Chisel, and a sloth demon named The Suture. I don’t know how that works exactly—it’s very technical, I’m sure. But Khorramzadeh is keeping a close eye on The Suture. To make matters worse, he’s using the undead dragon Terendelev, the former protector of Kenabres, against you.
In this scenario, Ravener Terendelev replaces the servitor demon, so any time you would encounter that, you get a dragon instead, and it’s pretty terrible. There are a couple of henchmen in this scenario, plus Abyssal Armies to complete the set. And The Suture? Well, he doesn’t start off as a cohort but is instead mixed in with the henchmen. I’ll show you later what happens when he shows up.
We started this scenario with two cohorts: the Lexicon of Paradox, and the Nahyndrian Chisel, which is an item that gives you some special effects against demons in particular or can be used to reduce certain types of damage. We had the brilliant idea to give Enora the Lexicon and then try to close out a location with it before she got too much in her discard pile, so that she wouldn’t have to bury much. Well, we needed it to be an Abyssal location, so we all started at the Sanctum. The plan was to have Enora take the last turn, so that we had an entire round to plow through the Sanctum, find the henchman, and then use the Lexicon to close the location. Well, right away we ran into an Abyssal Army, which was horrible—we succeeded, but just barely. Enora did get to use the Lexicon to close the location, but we were all limping a little after that.
Enora used a Pegasus ally to fly to the Lab to explore… and found Lord Stillborn, another henchman. She defeated him and closed the Lab—which then brought Lord Stillborn back for another fight. Enora had to face him one more time at the beginning of her next turn before continuing.
Balazar then encountered The Suture at the Abattoir. Good, right?
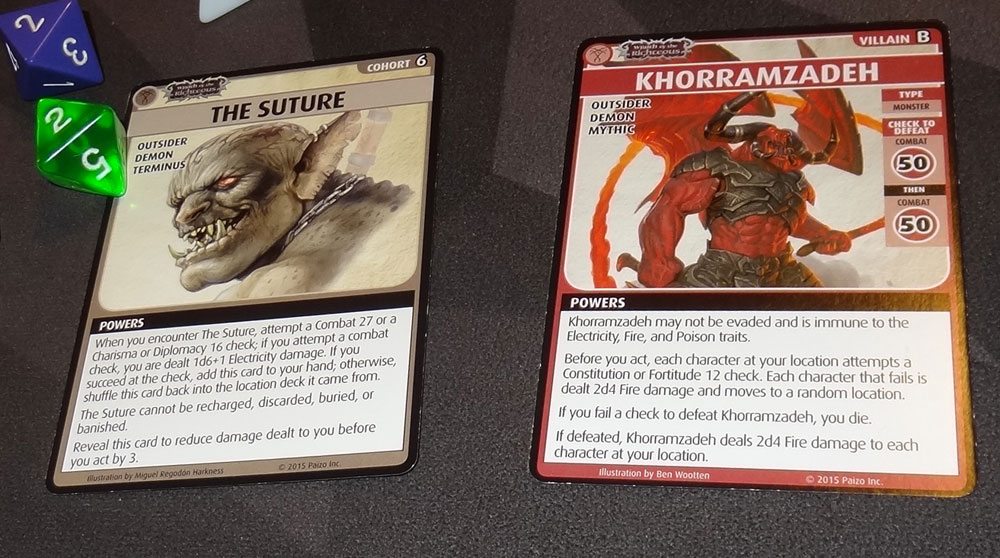
When you encounter The Suture, you have to do a Combat 27 or Charisma Diplomacy 16 check, with extra damage to you if you do the Combat check. Then, if you succeed, it goes into your hand—otherwise it goes back into the location deck. Finally, in this scenario, as soon as you put The Suture in your hand, you have to encounter Khorramzadeh. Well, Khorramzadeh is a nasty guy. Aside from the fact that he has two Combat 50 checks to defeat, you might not even get to fight him at all. Before you act, everyone at your location has to attempt a Constitution Fortitude 12 check. Fail, and you take damage, and move to a random location. And then? Well, the people who are left get to fight him—and if you fail a check to defeat him, you die. No armor, no reducing damage. Just kaput. Not to mention that at the Abattoir, everything is a little bit harder.
Balazar decided that he wasn’t quite ready to take on the Storm King on his own, so he purposely failed his check against The Suture, took the damage, and shuffled The Suture back into the deck.
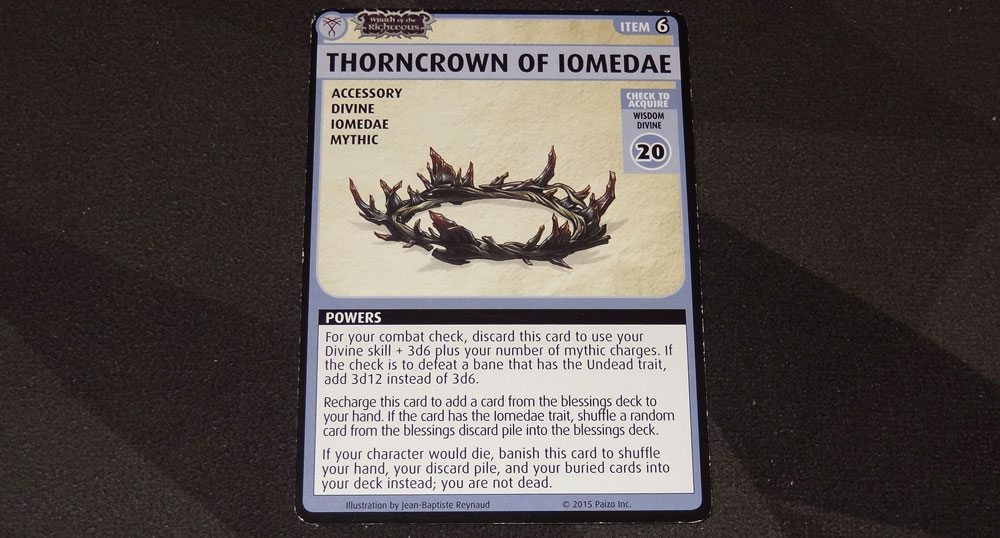
Enora found the Temptation of Lucre barrier, which lets you draw a few items, and then pick one of them—if you keep it, everyone else has to discard a card from their deck. Usually, we just pass on the temptations anyway unless there’s something really valuable. In this case, one card was the Thorncrown of Iomedae. Enora took one look at it and said, “nah, it’s Divine,” and was about to throw it away when everyone else said, “Wait wait wait!” We decided it was worth keeping for Adowyn, who has the Divine skill, because not only can it be used for combat or to get blessings from the blessings deck, but it also can prevent you from dying. Basically, if you’re about to die, you can banish the Thorncrown for an extra life and full health. We decided it was worth everyone discarding one card so that Adowyn could get the crown later. I guess Enora wasn’t tempted by the lucre, but the rest of us were.
Our next plan involved Ekkie—she went to the Abattoir, found The Suture, and evaded it, which meant that it got shuffled into a random location: in this case, the Cell. That way we could go look for it when we were ready to face Khorramzadeh. Unfortunately, Arueshalae, who was already at the Cell, wanted to explore at least a little and found The Suture again… and evaded it again, since Arueshalae also has that ability.
Our next henchman was at the Great Hall: Adowyn encountered another Abyssal Army, and we all succeeded at our checks, except Ekkie, who failed by 2. Arueshalae used a Blessing of Desna to give Ekkie a re-roll, and she succeeded the second time. Whew! The Great Hall was closed.
Balazar and Ekkie plowed through the rest of the Abattoir. Since there wasn’t a henchman there, we had to go through the whole deck to close it. Adowyn found another army at the Molten Pool, which we defeated, and Enora used her ability to absorb Fire damage to close it.
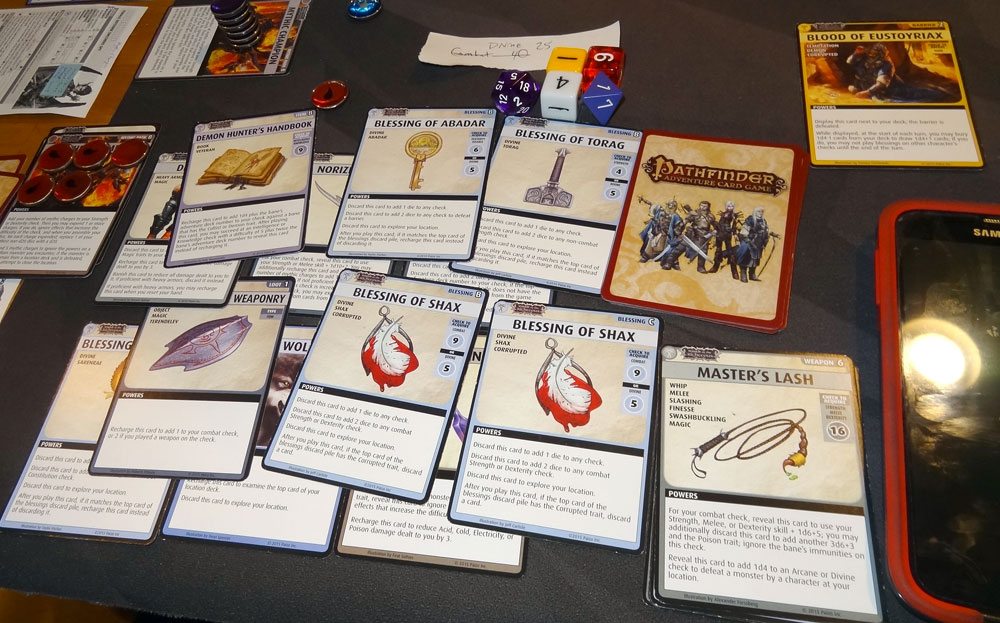
By this point, we were almost running out of time. Fortunately, Enora had been hanging on to the Book of the Damned, which allows each character to add 1d4 blessings back into the blessings deck. Since we had redeemed it, we didn’t have to worry about whether they were corrupted blessings or not. We banished the book and added 18 more blessings—more than half the starting number.
Balazar then fought the Flayed Man, who apparently has something against dwarves. He does damage to dwarves, and then damages characters at his location equal to each dwarf’s mythic charges. But—ha!—we happened to have no dwarves in our midst, despite our short average stature. The Flayed Man was defeated, and Balazar used his Terraform spell to close out the Soul Foundry.
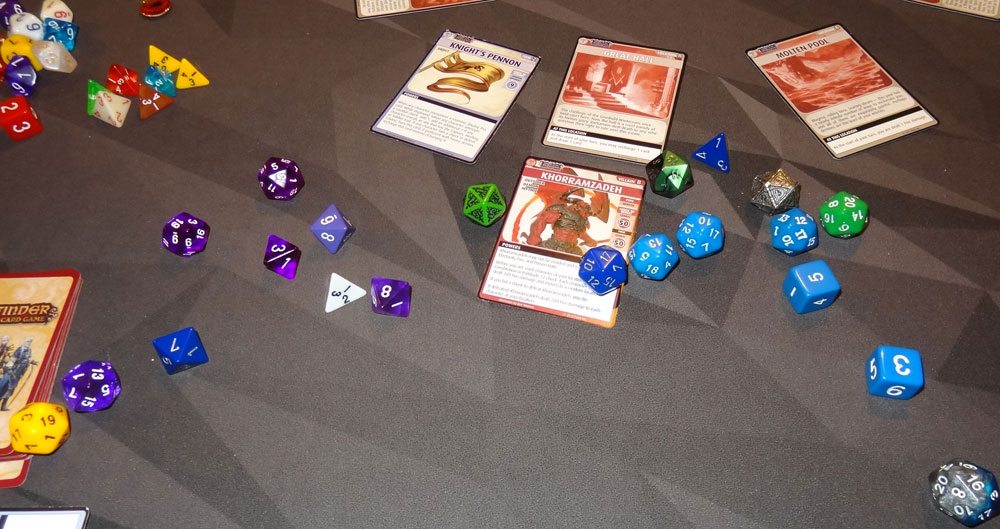
So that left the Cell. We got ourselves prepared (thanks to the plenty of extra time the Book of the Damned bought us) and we went to the Cell. Ekkie took The Suture and Khorramzadeh appeared. Thanks to the Banner of Valor, we all got help with our checks against Khorramzadeh and we didn’t all get pushed away to random locations. Ekkie and Balazar took the final fight, spending all of our mythic charges and blessings to roll a whole bunch of d20s. Goodbye, Storm King.

Our rewards were another medal on the Champions of Mendev and a power feat for every character, plus a weapon loot: Norznigath, Khorramzadeh’s sword. The sword we gave to Ekkie, our melee fighter—you can recharge the sword and spend mythic charges to add a d20 for each charge expended. Costly, but effective. And if you succeed, you can also spend an additional charge to heal.

Scenario 4: Threshold of the End
So we thought we killed Khorramzadeh in the last scenario, but he just won’t stay down. Now we get to fight the undead Storm King—he’s perhaps a slightly easier fight, but he gets harder and harder if we fail. In this scenario, when you defeat Khorramzadeh Reborn, you put a marker on the scenario card—and each time you encounter him, you first take Acid damage based on the number of markers. So you really want to corner him and defeat him as quickly as possible, rather than chasing him from location to location, because the Acid damage gets worse each time that happens. On top of that, most allies are one-time-use during this scenario, as any discarded allies are buried instead.
We decided to try the same strategy again: give Enora the Lexicon of Paradox, start everyone at the same location, and try to close it with the Lexicon before Enora has a lot to bury. This time we started at the Wounded Lands, and we encountered the new Army barrier henchman: the Rasper Dragon Riders, who are apparently a swarm of insects dressed like a person. Really.
Before you fight, you have to pass an Acrobatics check: Balazar and Enora both failed. Apparently, long robes with flowing sleeves aren’t great for dodging. (And even if you do succeed at the check, you still take damage.) Still, we did manage to defeat the Riders, and we used the Lexicon of Paradox to close the Wounded Lands, even though it did cost Enora, who had to bury some cards. The checks to defeat the Rasper Dragon Riders aren’t too bad—in fact, slightly easier than the Abyssal Army for our party.
Adowyn and Enora then went to the Abyssal Rift, and Enora used her scouting ability to look at the top three cards, spotting the villain. We decided to fight it once and chase it out of the Wounded Lands, closing it, even though that meant Acid damage for the next time we encountered him. We knew that he had escaped into either the Threshold, the Collapsing Bridge, or the Abyssal River.
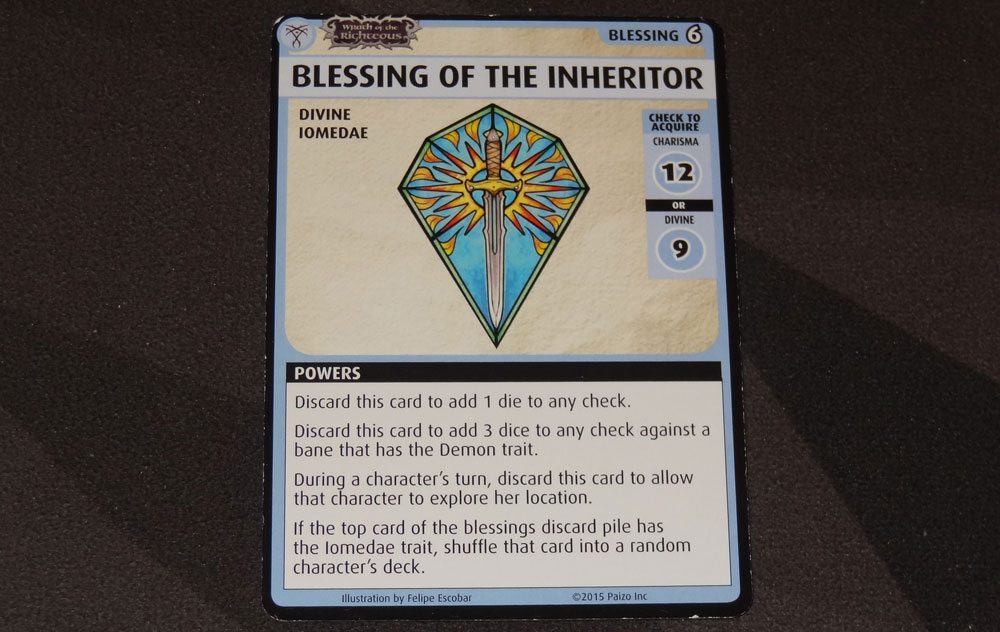
At the Collapsing Bridge, Arueshalae encountered Suurlahetas, an ally who can let you search a location for a boon and add it to your hand. But to acquire Suurlahetas, you must first shuffle a random monster into every open location. We decided it was worth it, so that Arueshalae could search a location and we could see if the villain was there while she was at it. She searched the Threshold—no villain, but she did take the Blessing of the Inheritor, which is the new blessing for Deck 6. It gives 3 dice against any demon bane and also can be discarded on anyone’s turn to allow that person to explore again, plus if you use it when the top card of the blessings discard pile has the Iomedae trait, a random character will gain that blessing. Then Arueshalae found some more Dragon Riders at the Collapsing Bridge. Balazar got to use his newly acquired Immolation Cloak—”The Dread Pirate Roberts is here for your SOUL”—to help Ekkie with her combat check. We defeated the Riders, closed the bridge… still no villain. So now we knew he had fled to the Abyssal River.

At the Abyssal River, we peeked ahead and found two especially terrible monsters, the Black Flame Vrolikai and the Umbral Dragon. Both of them have effects that can force you to bury your role card, robbing you of your more advanced powers until the end of the scenario. We didn’t want to risk it at all, so Arueshalae used her Mythic Warrior power, spending 5 mythic charges to ignore the Vrolikai’s powers and defeated it. Then Ekkie encountered and evaded the Umbral Dragon, shuffling it into the Abyssal Rift, before finding the Rasper Dragon Riders in the Abyssal River. We defeated them, but just barely, closing the location. Khorramzadeh Reborn was the only card left at the river now.
Once again we used the (newly reacquired) Book of the Damned to buy ourselves some more time—15 extra blessings this time—because we needed to get some more locations closed. Enora peeked ahead at the Watchtower and found the Diurgez Broodlord henchman, which Ekkie defeated. We were finally ready: one person camped out at the Abyssal Rift to temporarily close it (since it flips back and forth and is never permanently closed), and the rest of us set up to support Enora in her fight against Khorramzadeh. She even got to use the Thorncrown, borrowed from Adowyn for the occasion.
Our reward: another medal on the Champions of Mendev, and then one power feat for each marker on the scenario card. We had debated whether it was worth fighting Khorramzadeh a third time (letting him escape one more time) to check off an additional power feat, but we decided that twice was enough.
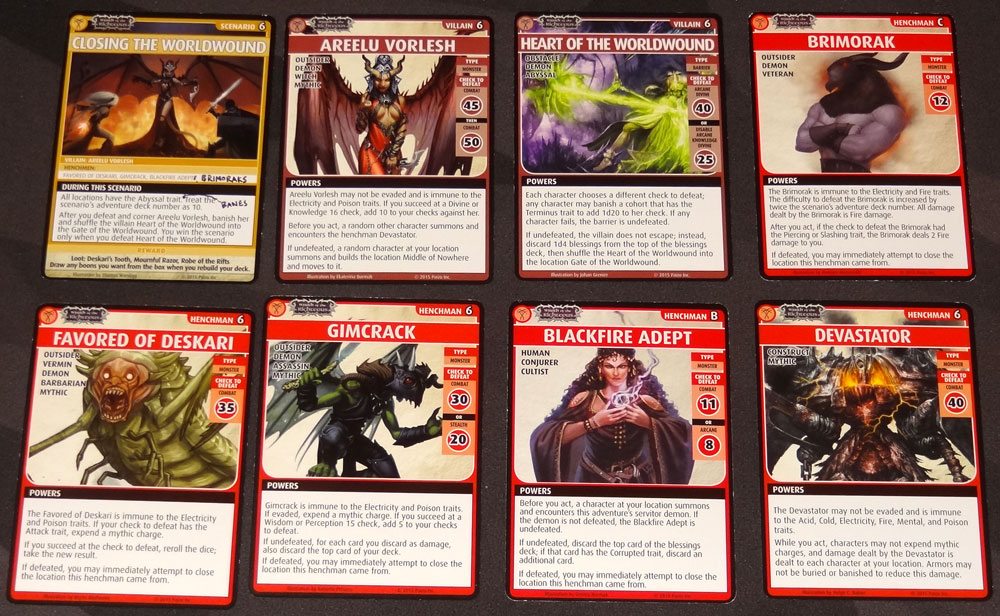
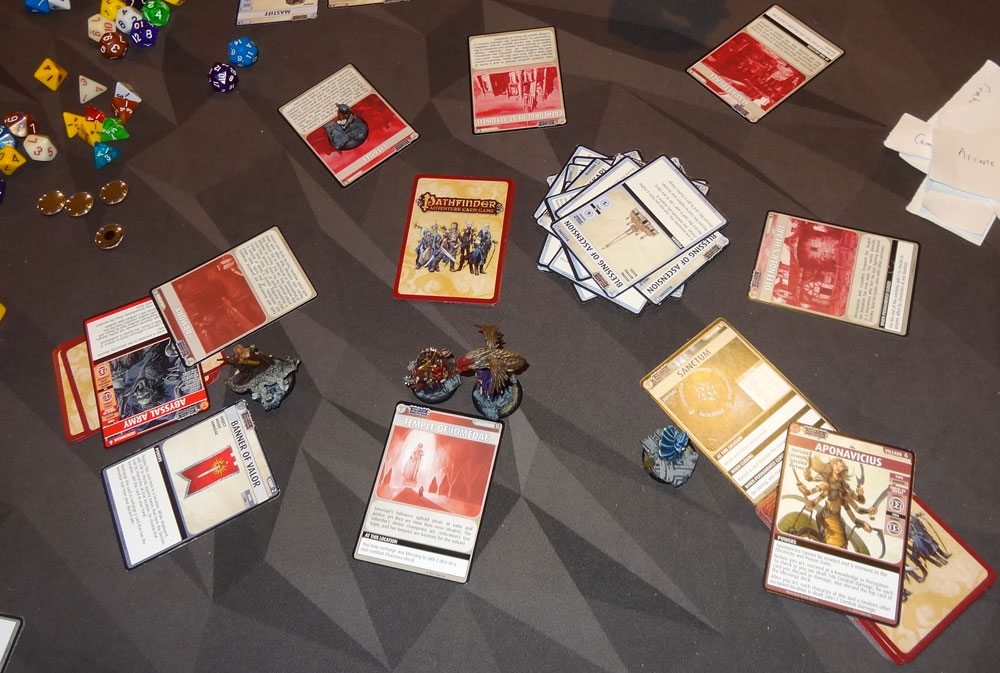
Scenario 5: Closing the Worldwound
And now we’re finally ready to attempt our primary mission: closing the rift. We’ve got our three necessary items—the Lexicon of Paradox, the Nahyndrian Chisel, and The Suture—and it’s time to face Areelu Vorlesh, the witch demon who opened the Worldwound. The one annoying thing about The Suture is that it cannot be recharged, discarded, buried, or banished. Which means that whoever has The Suture is essentially down one hand size, because it just sits there. Balazar took it, though, because Balazar has a power that lets him put a card on top of his deck in order to boost his combat, so he figured The Suture would be a good choice for that.
In this scenario, all locations are Abyssal, and banes treat the scenario’s adventure deck number as 10. So all of those veteran banes that increase their difficulty based on the deck number are now a lot harder. Also, Areelu Vorlesh is mixed in with the henchmen at the start of the scenario, but after you defeat and corner her, then you add the Heart of the Worldwound villain card to the Gate of the Worldwound location, and you only win when you defeat that villain.
Enora started us off, peeking ahead at the Occult Library—she didn’t see anything she wanted to encounter there, so she left and went to the Great Hall, where she immediately encountered the Blackfire Adept henchman. The Adept isn’t actually that hard to defeat—only a combat 11 or Arcane 8, which Enora can do without even rolling dice, but first somebody has to face the Ophidian Demon—and if you fail against the demon, the Adept is undefeated and wastes time from the blessings deck. Fortunately, Adoywn and Enora made a good team, defeating both the demon and the Adept, and then closing the location.

Meanwhile, Ekkie plowed through the Forsaken Cloister until she encountered the Favored of Deskari, a giant armored buglike creature that you have to defeat twice. Ekkie’s Blackhammer is particular good against vermin, though, and she smashed the bug. Twice. Then a fight against the Ophidian Demon, and Ekkie closed the Forsaken Cloister.

Arueshalae encountered Areelu Vorlesh at the Occult Library. First, a random other character summons and encounters Devastator, who really does look a bit like a Decepticon. You can’t spend mythic charges against Devastator, and you also can’t bury or banish armors to reduce damage that it does. Adowyn had to face Devastator, and won, and then Adowyn and Arushalae each took one of the Combat checks against Areelu to defeat her—she fled to either the Sanctum or the Torture Chamber.
Checking at the Torture Chamber, we found the Umbral Dragon (remember it?), so Arueshalae evaded it to shuffle it back in. Then Adowyn encountered a Brimorak henchman at the Torture Chamber, defeating it to close the location, confirming that Areelu had escaped to the Sanctum. Balazar defeated another Brimorak at the Gray Garrison, and then Ekkie and Balazar both had to fight Cultists of Deskari to close it.
Finally, having pinned down Areelu’s location, we found her at the Sanctum. Arushalae fought and defeated Devastator, and then Ekkie fought Areelu, rolling exactly the number needed to defeat her. Whew! But the scenario wasn’t over yet: now we had to face the Heart of the Worldwound at the Gate of the Worldwound.
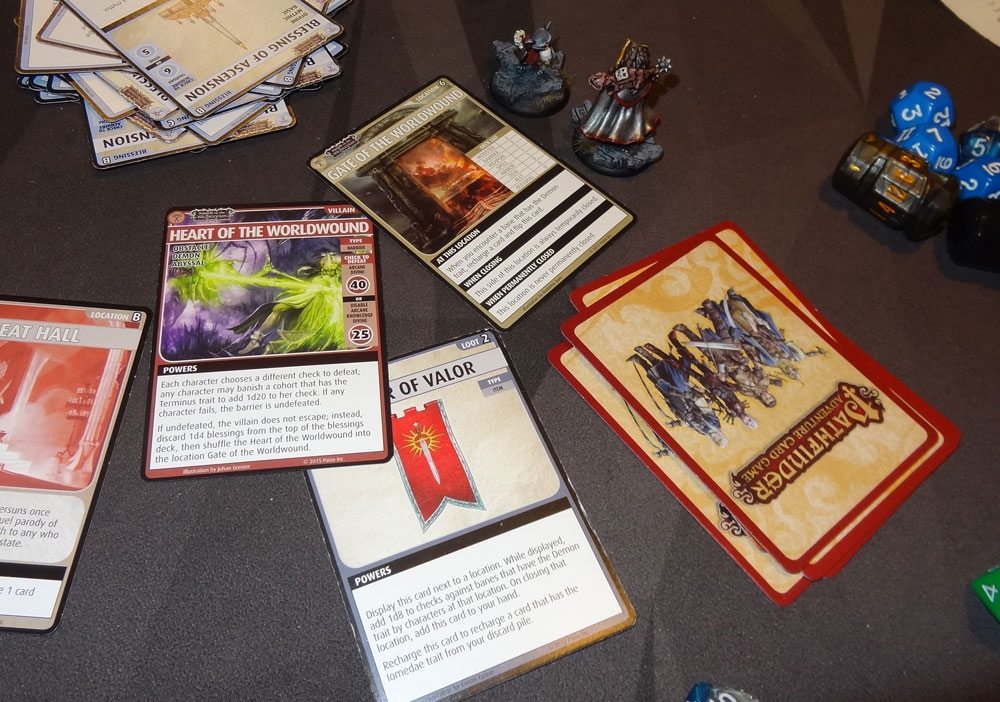
Fortunately, Arueshalae managed to find the Heart pretty quickly, so we didn’t have to buy ourselves more time. The Heart is another army-style barrier, with everyone required to make a check. If you have a Terminus cohort (remember those three things?) you can remove it from the game to add a d20 to your check.
Since it was the last battle of the game, Ekkie decided it was time to use the Blood of Eustoyriax, a temptation barrier she had acquired earlier in the scenario. It lets you bury d4-1 cards from the top of your deck in order to draw d4+1 cards. She had just enough cards to risk the maximum without dying, and she was able to draw 5 more cards. That, plus another card that Enora had loaned her with the Silver Raven, brought Ekkie’s hand to 12, with plenty of blessings to share with everyone else.
We defeated the Heart of the Worldwound, closing the rift for good and, you know, saving the world. Hurrah!
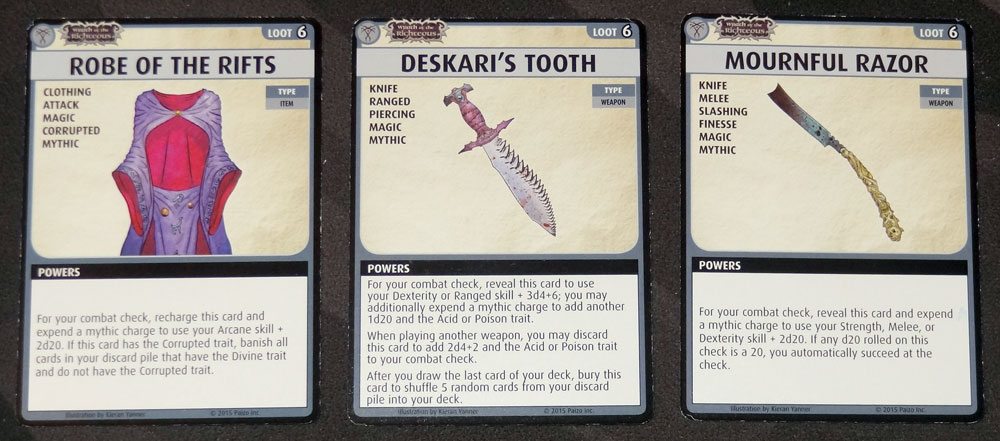
We got three pieces of loot for our reward: the Robe of the Rifts, Deskari’s Tooth, and the Mournful Razor. Balazar was tempted to take the Robe of the Rifts, but since it was Corrupted (and there wasn’t a good way to redeem it), he ended up passing. The bigger reward, though, was that we were able to rebuild our decks with anything we wanted from the box.
It was fun looking through all the things we hadn’t acquired, and deciding what to put into our “perfect” decks.
Finally, we came to the “if you dare” scenario, Justifiable Deicide. Not content with saving the world, we wanted to go after the locust king Deskari, the one responsible for all this madness. This scenario only has a single location: it’s filled with henchmen from Decks 5 and 6—five per character, so we had 30 henchmen. At the very bottom is Deskari.
The Rasping Rifts do not allow you to close the location when defeating a henchman, and it has to be emptied out. The scenario rule adds that all henchmen gain the Mythic trait, but also that if you spend a mythic charge to use the Champions of Mendev, you get a charge back—so essentially you get to use them for free.
I’ll admit that we cheated a bit on this one, because the rules written for this one are a little unclear: we weren’t sure if there were things to work around closing the location, since usually the “when closing” rules apply when you attempt to close the location after defeating a henchman—but usually if you defeat a villain the location closes automatically and bypasses those rules. Halfway through the scenario, I drew the ally Runelord Alderpash, who lets you permanently close a location by banishing him and discarding your entire hand, so I did that and we narrowed the location deck down to Deskari. I’ve since read that this has specifically been declared an illegal move, but we didn’t know that at the time—but I’m still not sure what happens if you defeat Deskari but there are still other henchmen left in the deck. That would have happened after about five more turns, because we had lost one fight with a henchman and Deskari had actually gotten shuffled closer to the top of the deck.
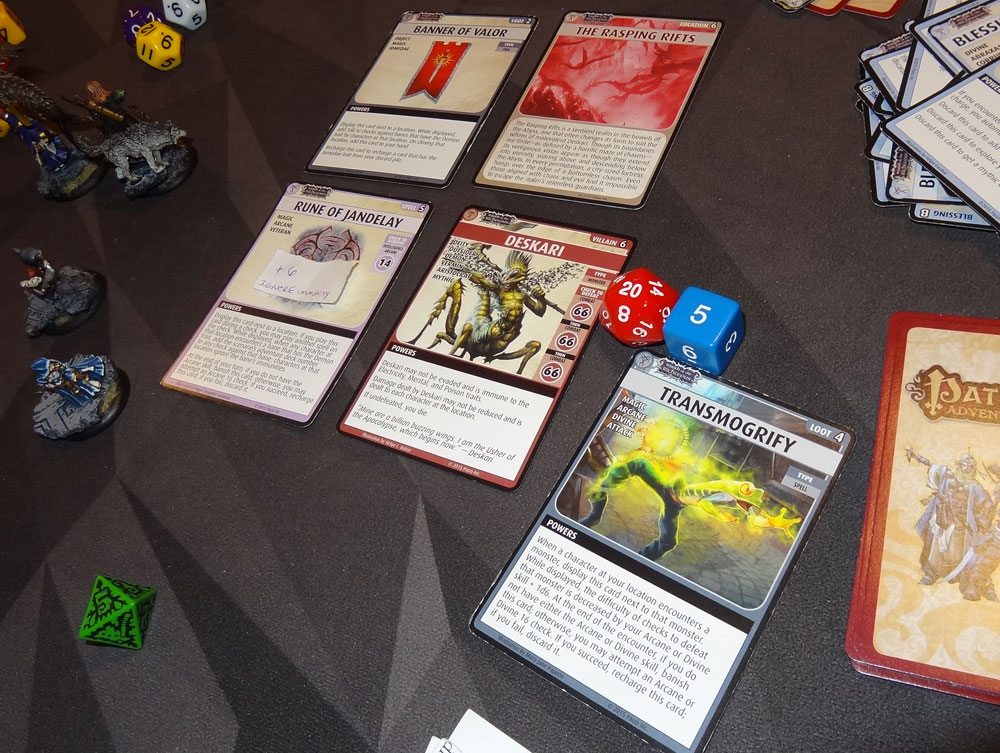
The fight with Deskari himself requires three Combat checks of 66 each. He can’t be evaded, and damage affects everyone at your location, and if you don’t defeat him, you just die automatically. We had a lot of things to boost our attack: the Banner of Valor gave everyone an extra d8 against him, and the Rune of Jandelay spell cast by Enora gave everyone a +6 and ignored Deskari’s immunities. Finally, Enora’s Transmogrify spell reduced the difficulty of all of the checks, eventually bringing Deskari down from a Combat 66 to a Combat 35, which was much more easily done.
Would we have defeated Deskari if we’d plowed through all of the henchmen first? It’s hard to say: we did have two Books of the Damned, so we could have bought ourselves a lot more time, and we also had several ways to resurrect characters: the Thorncrown, the Wardstone Fragment, and two Breath of Life spells, not to mention Balazar’s Sword of Iomedae ability to heal. Either way, we decided it was a fine way to close out our journey through Wrath of the Righteous… plus we were excited to pick our characters for Mummy’s Mask!
I hope you’ve enjoyed following our trip through the Worldwound. For Mummy’s Mask, we are considering streaming our gameplays rather than using the written write-up format—let me know in the comments if you’d prefer one over the other!