Note: Much of this post will make no sense if you don’t sew. You’ve been warned.
I’ve been sewing most of my life. As a kid, I used my mom’s sewing machine, making a few basic things such as shorts with elastic waists. And, for my 19th birthday present, my mom got me a machine of my very own. I love this machine. It’s a Bernette, an all-metal behemouth. In the 24 years since I’ve owned it, I’ve made countless pieces of clothing, bags, pouches, bean bags, toys, and more.
One of my favorite things to sew is clothing for myself. I rarely find anything I like in the stores these days, but perusing the pattern books at Jo-Ann Fabrics always leads to great discoveries. Simplicity‘s collection of Vintage patterns is always entrancing. As a student of American history, I’m especially drawn to those, and Simplicity has some particularly interesting patterns from the 1960s.
The 1960s were a fun decade for women’s clothing. There were miniskirts, shift dresses, trousers for women, clothing inspired by the Space Race, and the ever-famous pillbox hat.

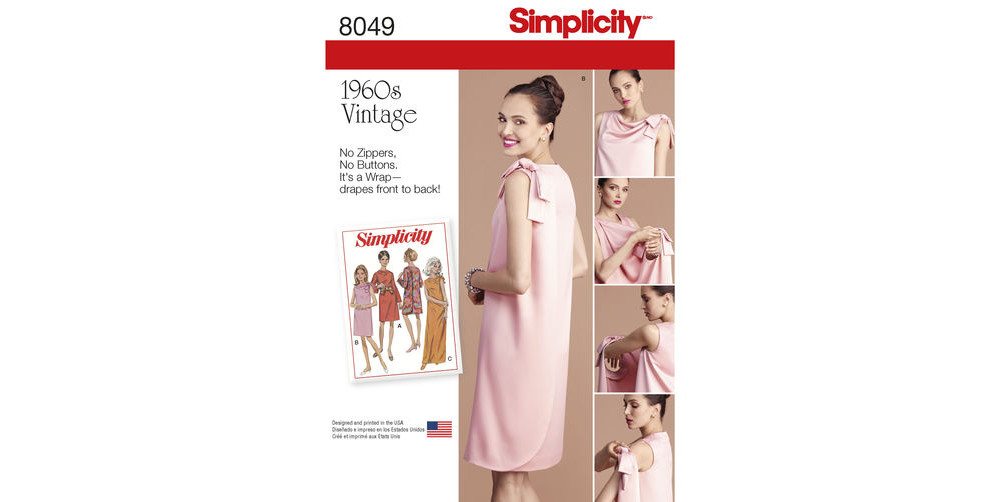
Shift dresses were fairly shapeless tube dresses, easy to sew and easy to wear. (And great for wearing to those all-you-can-eat buffets, beginning to be popular in that decade.) I found a Simplicity pattern for a dress that at first glance appears to be similar to a shift dress, but is actually a wrap-around dress. It’s in their 1960s Vintage line, Simplicity pattern 8049. The pattern even says on it, “No Zippers, No Buttons, It’s a Wrap—drapes front to back!”
This sounded like the perfect dress for me to try out. The pictures on the pattern made it look very simple with clean, clear lines and not a lot of pieces to cut out. I had Space Age stars in my eyes.

And the only fasteners are two small snaps at one shoulder! The dress goes on very easily. Put your left arm in and then your right, as if you’re putting on a jacket. (No Hokey-Pokey required.) And then wrap it around your front, putting your left arm through the third arm hole. Then snap at the shoulder, and you’re good to go. You can even add a belt if you like.
Fabric
Now that I had my pattern, I needed fabric and notions. The pattern listed some recommended fabrics, but finding those at my local Jo-Ann is sometimes difficult. (Our local store caters to the retired generation, which is great, if you’re into quilting, but quilter’s cotton doesn’t work well for clothing.) So I ignored the recommendations—at my peril—and searched for fabric that I liked and wanted in a dress. I planned to wear the final result to a fancy event, so I needed to look the part. I found one fabric which looked very Mod, but was just a basic cotton. Not dressy enough, but it pained me to put the bolt back on the rack. I reluctantly moved on to the brocades. Yeah. This was the ticket.

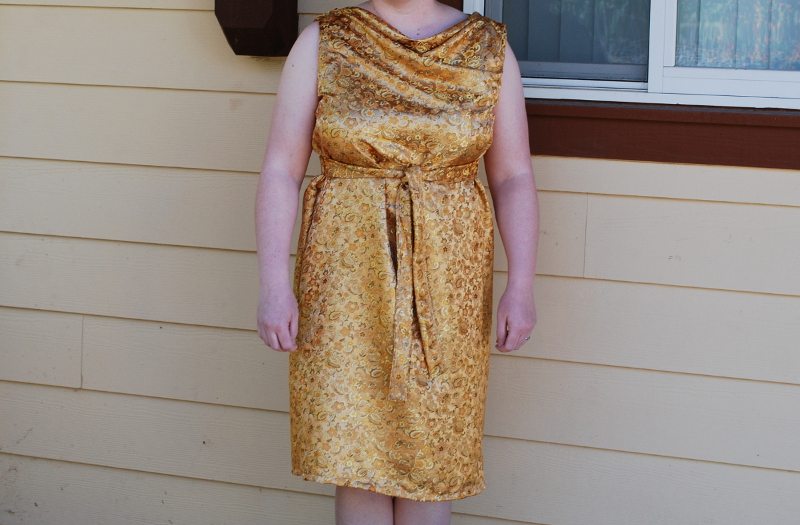
Though made of polyester and nylon, this brocade struck me somehow. I knew this would look nice in a dress. After having made my self-measurements at home, I procured the requisite number of yards of fabric. When the lady at the cutting table cut it with pinking shears, I knew I would have to worry about fraying. But it was also a thick fabric which is flattering on many body styles. (What I did not know was that this kind of brocade does not take well to an iron. I ended up having to make some adjustments to the instructions later.)
Another note: Your size in a sewing pattern will likely not match the clothing size of clothes you wear off the rack. You may grow 10 sizes. No joke. Do not be alarmed. Just be sure to measure yourself before you choose a pattern size and have fabric cut.
Now, on to the notions!
This dress takes very few notions, fortunately. Two snaps, thread, lace hem tape, and fusible interfacing. The snaps I already had, and I bought two spools of thread, matching it as closely to the fabric as I could. I also bought the required two packages of lace hem tape, and I already had fusible interfacing at home. I was all set. (In the end, it took less than one spool of thread, and only one package of lace hem tape.)
I won’t go through the dress sewing step by step, as there were many, many, many steps. So, I’ll just hit the highlights.
Though the shape of the dress looks incredibly basic and simple in the drawing (there were no zippers, after all), I falsely believed that the pattern would also be easy. I thought I could whip it up in a couple of sewing sessions. Needless to say, I forgot about the subtle gathers, darts, and facings which always complicate matters, especially with fraying fabric.
Note: This pattern says nothing about it being a simple or quick; all assumptions were on my part. I do wish, however, that Simplicity had a difficulty rating system, perhaps ranging from level 1 (a pillow? a placemat?) to level 5 (a wedding gown).
Dress Sewing Challenges
- The fraying. Oh my god, the fraying. Our house is filled with little fibers of yellow brocade. I keep finding it on clean clothes and in my family’s hair.
- Brocade doesn’t iron well, so I ended up doing extra tacking at the neck and armhole facings and top-stitching on the back facing to make it look like a finished product and less like a balloon.
- When I tried the dress on, I looked like I was wearing a tent because the fabric is very stiff and not clingy, but Rory and my daughter suggested I add a belt.
- The dress was supposed to come to the knee, or be just a bit above the knee. Mine ended up below the knee.
- There were very few pattern pieces, which was nice, but the two body panels for the dress were large. Wider than my dining room table. It was a challenge to pin them and cut them out.
Dress Sewing Successes
- By choosing a patterned fabric, I was able to better hide the small stitches necessary for tacking down facing or doing extra top-stitching.
- The added belt did the trick and made me look like I was wearing an outfit from Ancient Greece instead of an oversized muumuu.
- No zippers! I hate sewing in zippers. And, while I hate sewing on snaps, they are nothing compared to my extreme distaste for sewing in zippers.
- I ended up skipping the fusible interfacing entirely (or any interfacing). I knew that the purpose of interfacing was to add stiffness and weight to fabric, which was unnecessary for the fabric I choose. Skipping these steps turned out to be a fine choice, as everything lay nicely in the end.
- Though the dress option I chose (short dress, sleeveless) suggested a bow at the fastening shoulder, I skipped the bow; the style just wasn’t compatible with the fabric. Another good choice there.
And here’s one that could go either way: While the sewing instructions were sufficient for me, someone who has sewn many dresses and used many sewing patterns, there were a couple of obvious holes in the instructions that might trip up someone with less experience.
The instructions for adding the armhole facings were very sparse, for example. There were three armholes, and one of the facings was cut out with the pattern piece upside down. There was no commentary about which armhole facing went with which armhole. It was trial and error. I was thankful for having transferred the markings because they were helpful for lining things up properly.
Also, despite measuring myself well, the finished dress was much larger than I expected, so I think I should have made a size or two smaller. The dress billows out, bunches up, and isn’t the most flattering shape on me, though perhaps that is from the fabric I chose. It was less flattering without the belt.
But, in the end, after several evenings of sewing, I have a complete dress. With the optional belt. So, when I wear the dress, depending on how I’m feeling, I can have a totally tubular (sorry, wrong decade) wrap-around dress, or a Grecian-Asian fusion dress.
You can buy this pattern, other Vintage patterns, and anything else from the Simplicity catalog from Amazon, the Simplicity website (here’s their site, their Vintage collection, and this pattern), or from your local fabric store. If you love vintage but the ’60s aren’t your bag, Simplicity has Vintage line patterns from other decades. While making this dress was a rewarding experience, it was also exhausting. I think I’ll try one of their Jiffy or Super Jiffy patterns next!
Note: I received a pattern for review purposes.


High-five, other retro-clothing sewing lover!
That’s all I wanted to say.