
The Form 2 SLA 3D printer is a breeze to use and produces amazingly detailed prints with ease. The printer is a Stereolithography (SLA) 3D printer that uses various resins for its print material. Formlabs sent me some grey and clear resin, as well as a flexible resin to try out. Also available is black, and white standard, as well as tough, castable, and dental resins. The Form 2 has a build volume of 145×145×175 mm and a layer thickness of 25–100 microns.
I’m still pretty much a 3D Printing and modeling noob, so I’m really looking for ease of setup, how quickly a novice can be printing, and minimal, if any, tweaking. I want something that’s easy to use; I don’t want to be troubleshooting my printer when I could be designing. The Form 2 met all of these objectives. Setup went without a hitch, and while I I used up most of the three resin containers Formlabs sent me, I never had to tweak or adjust the printer.
Unboxing
I received multiple packages for the trial. The Form 2 printer, the Finish Kit, and a box with two resin cartridges and containers (I received a third one later.) After unloading everything and downloading the PreForm software, I was ready to go pretty quickly.


The Software
The software that comes with the printer, PreForm, will support .STL and .OBJ files as well as its own .FORM files. I found the software straightforward and easy to use. PreForm lets you load the model, resize and reposition the model, as well as duplicate your work on the build platform, should you wish to print multiple copies at once. You can also add and delete supports. The best feature is the “One Click Print” button that will automatically position and add supports to your model. I found this to be the best way to go as it usually got it right. Sometimes it would position the model in a way that supports were hitting the most important print area, so I would just reposition and have it automatically add supports again. Occasionally I’d remove supports that had automatically been added, but then sometimes I wandered into the territory of messing up the print. To help prevent support-related mistakes though, the PreForm software uses color coding on your model to warn you of potential print issues. In spots where you see red, you may need to add a support.
PreForm also allows you to select your printer should you somehow be so fortunate to have more than one, and select the resin, as well as the layer height. I used a USB cord for uploading, but there is the capability to upload prints wirelessly, as well as track your print progress online.


The PreForm software tells you the volume of your print, so you can get an idea of how much the print will use of your resin cartridge, and thus the cost. The five DRAGONLOCK miniatures above will use up 26.48 mL of my clear resin, which costs $149 per liter. So, that’s $3.70 for the five lizard men. Certainly more than they cost on the FDM printer I used, but as you will see later, quality of the prints is also that much better. Further, this information lets me calculate that I could print around 190 single lizard men with the one resin cartridge.
Printing
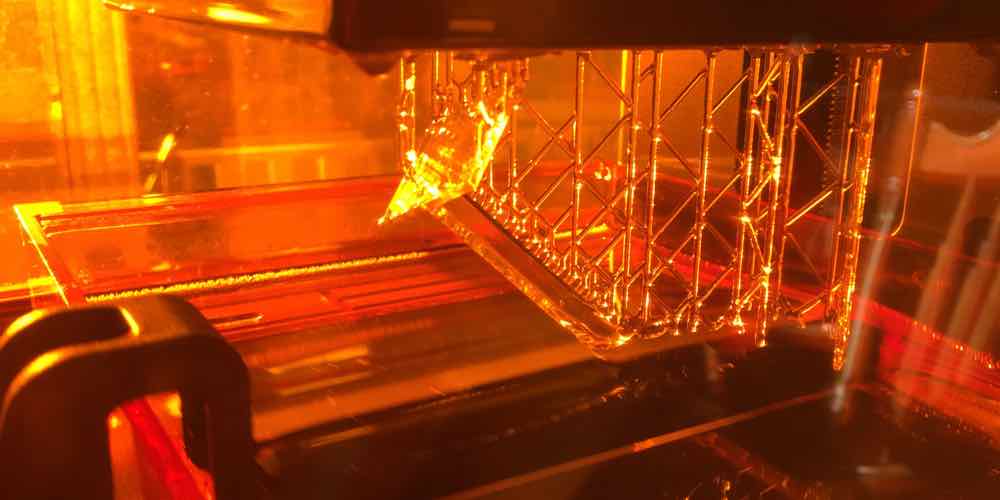
Resin is inserted into the back of the printer, the build platform is mounted upside down within the printer, and an empty resin tank is inserted at the bottom of the printer.
When the printer starts, resin pours into the resin tank. Because of this, and to prevent you from having to pour unused resin back into the resin cartridge or clean the resin tank when you switch resin types, each resin tank is permanently linked with the type of resin cartridge being used. There is a chip on the resin cartridge and the resin tank to link them. When you switch from one type of resin to another for printing, you switch both the resin cartridge as well as the resin tank. If you use mismatched resins the printer will not allow you to continue, preventing you from accidentally using a resin tank filled with grey resin and the clear resin cartridge for instance.

I was interested in how the Form 2 would do with something like a 28mm roleplaying miniature so I loaded up my DRAGONLOCK lizard men files and printed away. The printing process involves loading the models, and inserting the resin cartridge and matching tank you wish to use. There is a cap on the resin cartridge that the printer will remind you to open so that resin can flow out as necessary.
While printing, there’s a handy timer on the Form 2’s display informing you of how much longer until the print finishes. The lizard men took a little over 5 hours to print.

I was thrilled with the results and surprised at how detailed and smooth they were. While I was printing at a similar layer thickness (25-100 microns), as I did with more common FDM type printers, the stair-stepping layered effect you see in the FDM printers was not evident with the Form 2 printer.


The lizard men models are designed for 3D Printing, and as such, the models are designed to need minimal supports. Because of this I thought, “Why don’t I just place this nice flat stand on the build platform and not worry about supports.” That was a mistake. They were very difficult to remove from the build platform. Later I saw in the Form 2 documentation that you shouldn’t do that. When you let PreForm position the models, it builds a print bed on the build platform that has an edge designed to be pried against to release the model. Do that.

In the video below you can see another print building down from the build platform. The clear resin is cool because you can see the laser working away. You probably shouldn’t look at it.
Finishing Process
The finishing process is more laborious than with an FDM printer because you’re dealing with liquid resin dripping off your model as well as the build platform. You need to ensure it does not drip onto the mirror below the resin tank, otherwise you’re in for a cleaning job. Before working with the resin-coated model you don some nitrile gloves, and follow these steps:
- Using the prying tool provided, remove model from platform. There is a jig you can attach the build platform to to help stabilize the model for prying.
- Using the provided tray, lower the model(s) into a bucket partially filled with 90%+ Isopropyl Alcohol (IPA). Leave in the solution for 10 minutes, agitating occasionally.
- Move the tray to the second bucket of IPA and let sit another 10 minutes. Again, I agitated by raising and lowering the tray occasionally.
- Remove the models and let dry.
- Snip off the supports with the provided snipper
- Voila!


Print Quality
One way I test the printers I’m reviewing is with a model designed specifically to test the capabilities of 3D printers. The model includes various difficult print tasks. I have used a model called “Test Your 3D Printer! V3” by user ctrlV on Thingiverse. I let the Form 2 use supports to raise the model so I would have a base to pry off the build platform; I missed a couple of other supports, but the resulting print shows how spectacular of a printer the Form 2 is.


Print Samples
Here are some other models my kids and I printed. Again, we mostly focused on gaming, figures, and the like.


Again, my experience and skill with 3D printers as well as 3D modeling is limited, but I wanted to try my hand at a project. I decided to use the flexible resin to make a belt-mounted lens holder for my PhotoJojo lenses which I now take with me to most events. I did the design work in SketchUp, and with the help of some YouTube tutorials, a couple hours effort, and a couple of test prints, I was able to design a first pass at a holster. Other than some mistakes and lack of understanding of SketchUp that resulted in my lid not actually being attached when printed, my design is pretty close to final.
Summary
The Form 2 is by far the highest quality 3D printer I have had experience with. It was easy to use and printed excellent, high-quality, durable prints. With the variety of resins from various colors of standard, to clear, to flexible and castable resins, the Form 2 can fulfill many needs.
At $3,499.00 for the printer, and at least $149.00 for each resin, it’s not the cheapest option, but the prints are so superb, I can easily justify the extra cost of this printer. Printing miniatures in lieu of purchasing armies of Flames of War tanks, or mass producing miniature armies for other table top war gaming, fixing and improving household items, the list of what you can create is endless.
Pros
- Superb detail, Sweet prints: Could easily replace purchasing miniatures (as models/miniature design tools become more available)
- Quiet: The Form 2 is much quieter than the FDM printers I’ve used. I would be able to keep the Form 2 in our main living area (while the FDM one would have had to be banished to someplace out of earshot.)
- Minimal smell: With standard resin the Form 2 did not put off a chemical smell as I’ve experienced with the FDM printers. The flexible resin however was pretty smelly (but not as bad as the FDM.)
Cons
- Potentially messy, you have:
- a resin container that pours out the bottom
- a resin tank full of liquid resin
- a build platform dripping resin
- containers of Isopropyl Alcohol
- More expensive than an FDM printer
- Base printer is more expensive
- Per print cost is higher
I am always considering printers for personal use as well as for use at the school where I work. The Form 2 is a superb option, and what I hope to acquire for home. In the school situation, due to the potential messiness of resin, the Form 2 would need to be a supervised printer, especially with younger students. I don’t think I’d let elementary students handle the resin or the fresh prints. With that in mind though, in a maker space where multiple printers are available, the optimal solution would be to have some cheap FDM printers on hand for initial prints and design work, and the Form 2 for the final prints.
The amount of potential that 3D printers offer is astounding. There are so many general household things that could easily be repaired or improved with a printed part, and so many ideas that can be realized with the ability of a 3D printer to bring concepts into the real world. I would love to do an experiment to determine how quickly I could pay off a 3D printer by tracking everything I printed in lieu of purchasing.
The Form 2 is an amazing printer that offers endless creative potential, especially for the price and for an amateur such as me. The Form 2 really is one step closer to having a Star Trek replicator in your home.

Disclosure: Formlabs provided a Form 2 printer for review.


Great overview of the Form 2 SLA printer. It is an incredible piece of technology that is really easy to use. As a desktop unit, it is vastly superior to competing FDM printers. Even if you are new to 3D printing, the Form 2 is worthy of consideration if you need to make high-precision parts.
Thanks. It really is amazing.
Just wanted to finally say thanks for the info, this (and a few other articles) really helped my purchase decision. Now that I’ve been using my Form 2 for a while I wrote my own review here in case it helps anyone: https://lookinto.com/tech/49476/formlabs-form-2-3d-printer-review-tech