
Minecraft‘s boxy, pixelated style looks practically antique beside the 3D, photorealistic graphics of a lot of modern video games, but that comes with its own perks; things from the game are almost as easy to build in real life as on screen. LEGO was a natural fit even before the company started releasing actual licensed Minecraft sets. You can draw Minecraft pictures just by coloring in squares on graph paper, or even creating art with sticky notes. And when your kid says they want to be a Minecraft character for Halloween, it’s time to start collecting boxes.
Now, I love to sew. And with Halloween coming up, my mind goes to sewing costumes. I’ve just started my daughter’s fourth homemade Disney Princess costume–last Halloween she wore an older one. My son isn’t as quick with the costume ideas, so last year I had to badger him about it awhile so I’d have time to sew it. So when he finally said, “Oh, I know! I want to be a Creeper!” I blinked. How would I sew —? OH. This is a non-sewing project if ever there was one. This is a classic Box Robot!
Ah! A classic box robot! What could be simpler than that? If I had thought about it, I would have pulled out one of the countless “easy costumes for kids” books or done a web search to get some tips, as, in my over-confidence, I over-complicated it. I will share here what I did as well as what I maybe should have done.
The first step is to find boxes that are the right size and shape for your kid. We found a nice square shipping box in the recycling bin that sat right around the boy’s head and came to just below his chin. Perfect! The body was harder to track down; most shipping boxes large enough open the wrong way. You need to find a box that opens on the shortest ends, leaving the larger surfaces smooth. Luckily his dad had just gotten a bike carrier for his car for his birthday. The bike rack was still in the box, but the box was perfect, so I moved the bike rack to one of the wrong-opening shipping boxes instead.
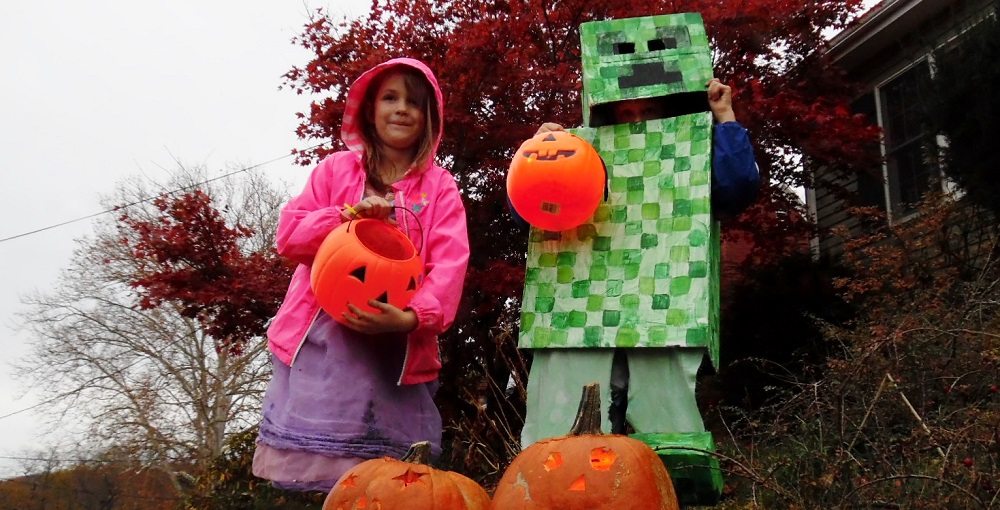
Unlike box robots, which often have dryer-vent arms and other rounded touches, Minecraft characters are ALL right angles. One could, theoretically, use long boxes or wrap cardboard around for the arms and legs, but for safety and mobility’s sake, I skipped that. FEET, on the other hand, would work. For those, I used shoe boxes, lidless and upside down. I cut holes on the bottom (now top) just big enough for my son to fit his foot through without shoes. (This turned out to be bigger than I first estimated. Make sure you have the actual foot to try it until you get it right!) Once it was around his ankle, he’d put his shoes on, and the box foot would be secured right on top.
Other Minecraft costumes have enough boxes at this point, but Creepers have a second pair of feet at the bottom. How to pull this off without tripping my kid up? I used two snack bar boxes, which I eventually hung from the bottom front of the body, just above his real feet—far enough up that he wouldn’t trip, but still low enough to actually make a four-legged effect as he walked.
Boxes acquired, now for the cutting. Here’s where I overcomplicated matters. If you look at the typical box robot, there’s a round hole in the top of the body box just big enough for the wearer’s head. I, on the other hand, cut off both ends of the box completely, instead of just the bottom. I cut arm holes a couple of inches from the top.* It fit the boy perfectly. But if he wasn’t holding his arms out in a T, the box slipped right off him to to the floor. This wouldn’t have been an issue if I’d cut a head-sized hole. The remainder of the box top would have rested on his shoulders.
So I added straps on the inside of the box, which would lay across his shoulders like overall straps. First, I tried to duct tape them to the box, but this did not hold. So I stapled them instead. And added some more duct tape for good measure. Finally, the box stayed up.
Now for the head. Again, box robots seem to have approached this more simply. Some attach the head box right over the neck hole in the body top. Even if I had left the box at the top to attach it to, I felt like this would be more claustrophobic than my sensitive boy would feel comfortable with. He’d do better with a head he could remove separately.
But that left the head sliding this way and that, usually toward a corner and then off entirely. So I took a sturdy ball cap and fit it onto my son, brim to the back and down. I stuck several loops of duct tape on top of the cap, then set the head box over the top and lined it up just right, giving a little press so the duct tape would stick to it. Then I took the whole thing off and secured the cap a little better. Now the head could come on and off and stay just right on the boy every time.
Besides, this head was a mask as well. If we could cut a large chunk out for his face to show through, an attached head might not seem so bad, but to get the distinctive Creeper face the best we could do was eye holes. Once we had the cap lined up, I estimated with my fingers about where his eyes would be in the box, marked it, took it back off his head, and cut two tiny holes. He tried it on again, and, this time, I could see where his eyes were in relation to the holes. Back off again, I adjusted the holes accordingly. Back on to check. We kept checking and adjusting until the holes were big enough to see through in all directions.

Once all the parts were cut to size, it was painting time! This took several days. We gave all the boxes a base coat of white, let it dry, then another base coat of very light green. When THIS coat dried, I drew a 1.5-inch grid over all the boxes in pencil. Now we could make sure our painting looked pixellated. I mixed touches of yellow and black into my green paint and filled random grid squares with each new shade. I more carefully shaded the black areas to make the Creeper’s face and toenails. The eyeholes didn’t exactly line up with the grid, but from a distance, the effect still worked.

He still has the head, perched atop his dresser like a trophy. The rest of the boxes eventually made it into the trash, which ruins his first costume idea for this year, which was to just repaint these boxes into a different Minecraft character.
So now he wants to be his Roblox guy instead!
*Technically, Creepers do not have arms. But for my son’s comfort and safety, we let that slide.


The traditional cylindrical box for making Lego heads, etc, is a cheese ball cannister.
For the roblox guy, you might try using a bucket for the head.
Great! This community sure knows how to put together costumes!