(Warning: Minor spoilers for the PAX West 2016 ‘Acquisitions Incorporated’ live show.)
The highly entertaining Acquisitions Incorporated live Dungeons & Dragons game at PAX West 2016 served as the final episode of the first season of Acquisitions Incorporated the Series. If you haven’t seen them yet, both the live game at PAX and the series are available for viewing online. If you care about spoilers, then go watch those and then come back here.
It also turns out that the amazing castle terrain used in the game is inspired from a portion of a recent D&D adventure. So, proceed with caution as you will be seeing a map from that module.
Acquisitions Incorporated has always been one of my high points of PAX whether I’ve watched the stream or been able to watch live. There’s so much to rave about the game; from the DMing, to the antics of the characters as well as the players, but something that I always wait with anticipation for is the reveal of the 3D terrain used for the session. This year I had the great fortune of being able to interview Mat Smith of Czarofhappiness Props and get an inside view on the build process for an Acquisitions Incorporated prop piece.

Many of the prior games’ props have been created by Czarofhappiness Props and every year they just get more stunning.The Burrow Dawn Inn is an amazing piece that served for an entertaining encounter for the Acquisitions Incorporated team.
The Burrow Dawn Inn was inspired by an encounter that took place years ago in one of Chris Perkins’ D&D campaigns, where an enormous Purple Worm erupted into a giant cavern in front of our adventuring party (and over 1,000 gnomes we were escorting through the Underdark.) In the first round of combat, the gnomes simultaneously freaked and shot the worm with Magic Missiles, killing it outright. The Burrow Dawn Inn is my notion of what might’ve been done with that worm’s carcass. – Mat Smith.
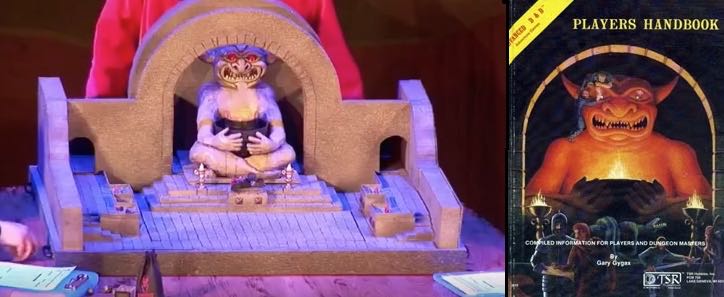
Check out this photo gallery covering the creation of the Burrow Dawn Inn. If you look through all the prior PAX Prime live games you can see more of Mat’s handiwork. The terrain from the 2012 PAX Acquisitions Incorporated session included features dear to anyone familiar with 1st edition Advanced Dungeons & Dragons. The centerpiece statue is inspired by the cover of the Players Handbook.
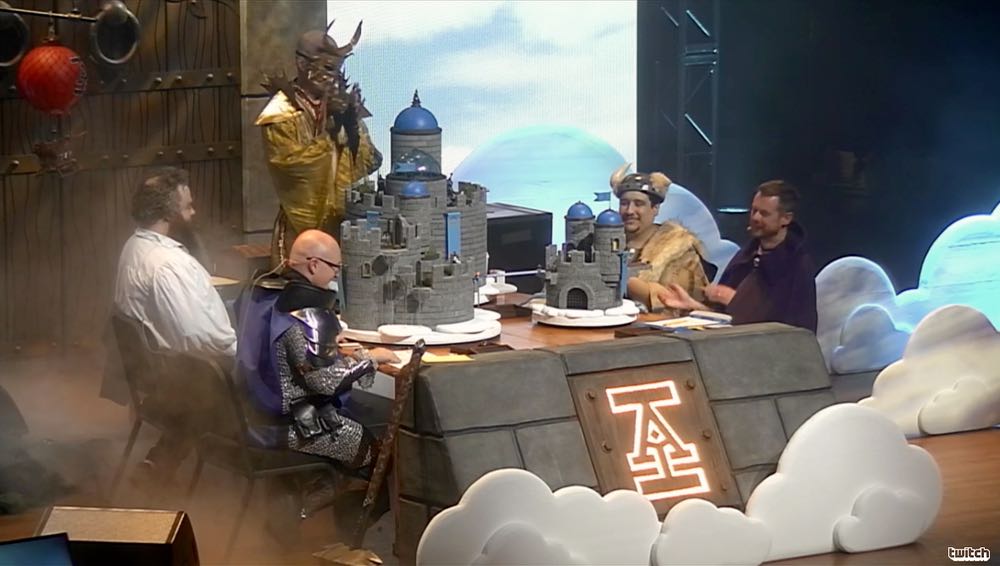
This year’s game was no different. Both the live game, as well as the terrain, were leagues beyond expectations. Chris Perkins, the dungeon master, as well as the players, Jerry Holkins, Scott Kurtz, Mike Krahulik, and Patrick Rothfuss, were all on top of their game with banter, creative gaming solutions, innuendo, and D&D-style action to easily fill the three hour session. Chris Perkins runs a game that should be the envy of any gaming group.
In addition to resolving this year’s plot, the group began by solving the major issue that came about at the end of the last episode of Acquisitions Incorporated the Series. There are plenty of questions left over though and we can only hope that we get another season of Acquisitions Incorporated episodes. It’s a great way to prime the story for the PAX games, as well as it’s just a joy to see these four play. Again, to avoid spoilers, watch the episodes and the Twitch PAX session!
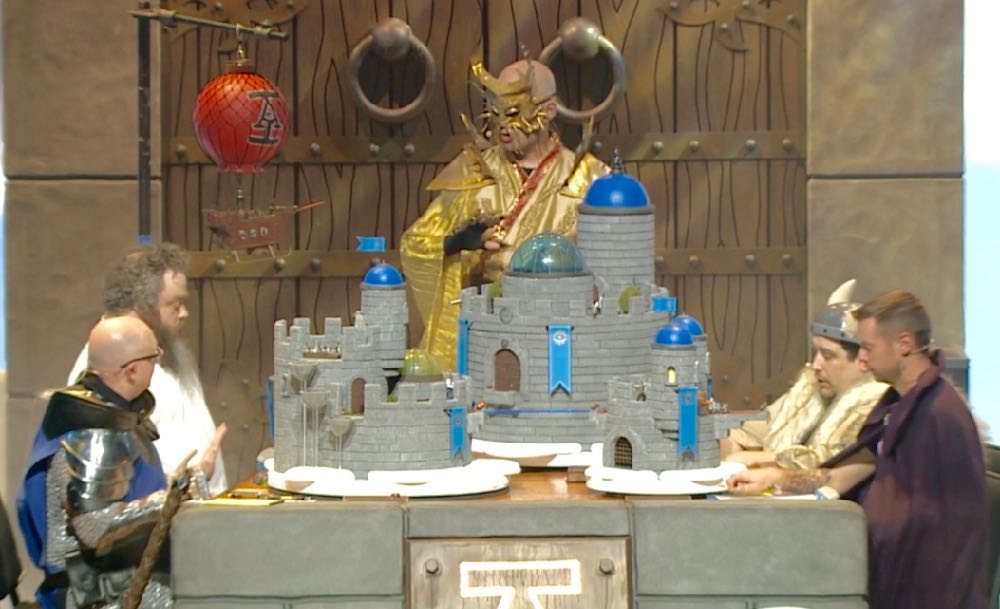
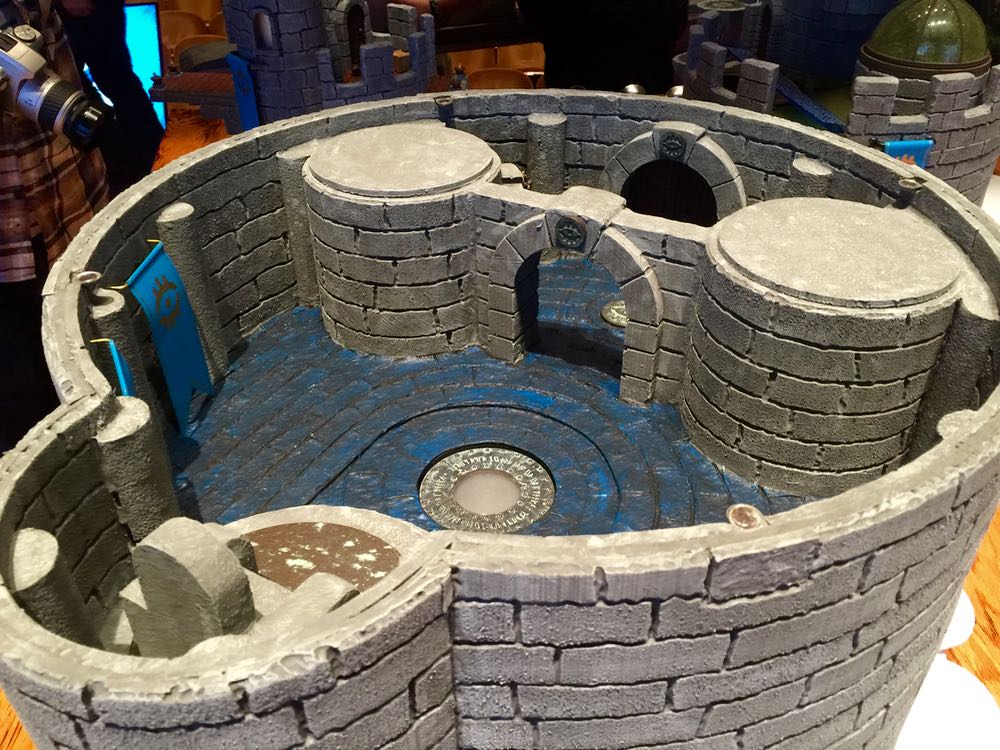
The live game was, as always, a joy, but the terrain provided by Mat Smith literally overshadowed the players. The massive depiction of a cloud giant’s castle was better than I could have ever hoped! When Jerry Holkins saw the castle towering over him he asked, “What the F#$@ is going on here?” Chris Perkins proclaimed, “I was given a budget!”
As a terrain-dabbler myself, I have interest in the terrain building process. I am awed by the skill necessary to create these works of art and wanted to discover the secrets of the greats, so I contacted Mat Smith to cover the build process for the PAX West 2016 game.
Mat wanted to make sure to also credit Zara Nelson who not only took many of his work-in-progress pictures but deserved thanks “for working on all of this stuff as well—she put in 100s of hours on the diorama and the stage set too. Couldn’t have possibly pulled this off without her help, ideas, and talent.”
GeekDad (GD): When you make an Acquisitions Incorporated piece how much direction does Chris Perkins/Wizards of the Coast give you? Can you share what they asked you to create for this year’s PAX West session?
Mat Smith (MS): Once the project is rolling, I’d say the direction I get is relatively minimal. When Chris and I meet to talk about the Acq. Inc. pieces, he always knows what he wants. Sometimes it’s specific, like “the temple (and idol) from 1st Edition Player’s Handbook” and other times it’s more general, such as “a cavern in the Underdark.” But where we go from there has always been a combination of collaboration and trust in what I’ll deliver. I’ve been really fortunate in working with him (and WotC) on these projects, as far as the amount of freedom and artistic license I’ve been allowed.
This year’s project edges into the specific direction arena— a cloud giant’s castle, based on a castle called Lyn Armaal. But since that castle would be too big to be practical for the Acq. Inc. gaming table, we headed off into the world of creative interpretation.

GD: How many design iterations do you present for feedback? How does the concept change from initial idea to the final product? Do you have some initial and iterative designs/drawings you can share?
MS: After that initial collaborative meeting with Chris, I spend a lot of time thinking and planning my first design—so it usually hits pretty close to the mark. Sometimes there’s an element or two that needs tweaking, but once that’s sorted out, I’m good to go.
That said, I do make a lot of small changes to the design along the way, based on need/practicality or aesthetics. (For example, I’ve swapped conical rooftops on the castle turrets for domes.) Probably the biggest changes to this design will take place in the throne room. That’s the one area we tweaked up front, and I’m still reworking the plans as I’m building it.


GD: How long does the process take from the initial meeting to placing the piece on stage? How many hours do you put into an Acquisitions Incorporated project?
MS: The whole process spans several months. A lot of that is planning/designing as well as researching/testing/experimenting—I don’t seem to be able to do one of these projects without delving into some new material or technique. The actual construction probably takes 5-6 weeks or so—and those are very busy 6-7-work-day weeks. I’d estimate I sink around 350-400 hours into the diorama (plus another 100 or so hours from my patient and talented girlfriend.)


GD: What are your go-to materials and techniques? What is the one technique that a would-be terrain/prop builder should know?
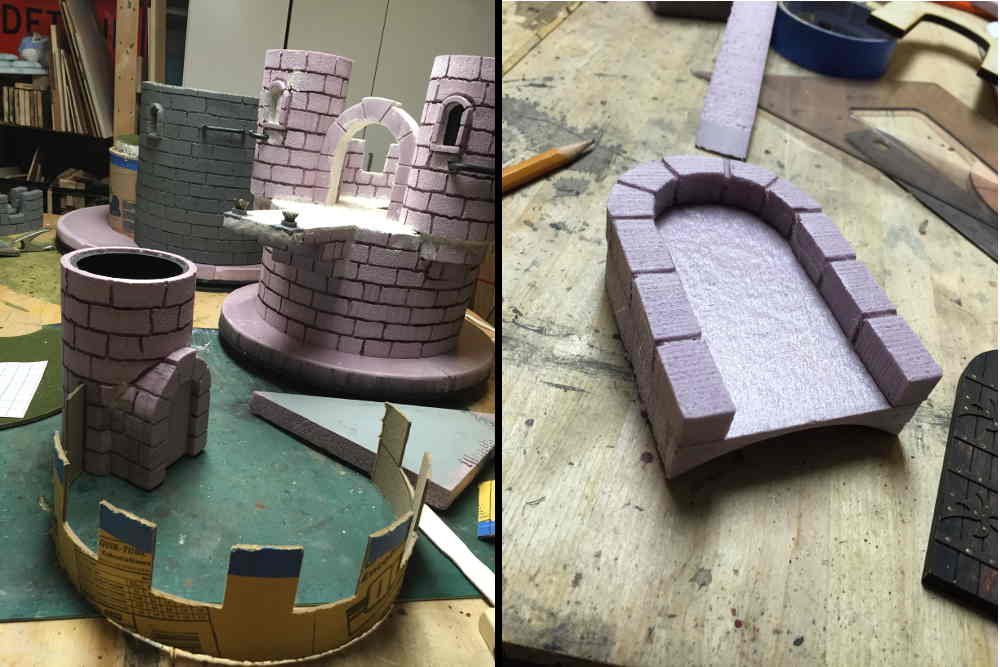
MS: The two materials I use the most are Polystyrene (rigid foam insulation) and Sculpey (a polymer clay,) probably because they’re both so versatile. (GeekDad note: find Polystyrene at your local home improvement store in large sheets – it comes in varying thickness.)
This year, I leaned heavily on polystyrene for *everything* you’ll see during the game. The stage set pieces are probably 85% polystyrene and the cloud castle is entirely clad in thin strips of the stuff.
MS: I think a lot of propmakers and model builders use polystyrene because it’s lightweight, strong, and extremely easy to work with. (i.e. Cutting, carving, sanding, shaping.) You have to pay attention to the glues and paints you use, to avoid accidentally melting the stuff, and need to wear a protective mask when doing things like sanding or cutting with a hot knife. (you really don’t want to breathe particles or vapors from this stuff.)
Sculpey played a much bigger part in last year’s diorama (most notably, on the Burrow Dawn Inn.) This year, I really only used it for detail work (grotesque heads over the doorways and the giant koi in the Bridge Tower’s pond.)
Sculpey is a great material for small-scale pieces. Since you have to bake it in to cure/harden it, it remains workable for as long as you want to continue working on a piece. And because it doesn’t shrink when you bake it, you can build it over an armature or even re-bake a piece several times (so you can “lock in” work, then add to it.) It too is very workable, specifically after baking.
Technique-wise, my favorite part of any project is the detail/finish work—and I particularly like weathering and aging things—so I’d say drybrushing and paint washes are my go-to techniques, as well as being a one-two combination anyone who’s interested in this kind of work should know.
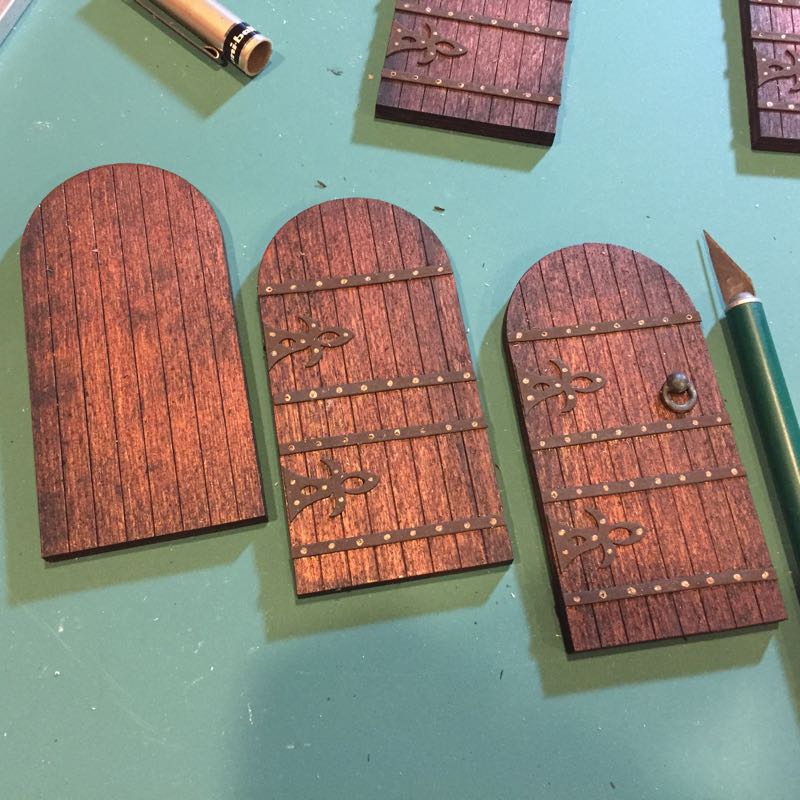
I learned how to do both of these painting techniques when painting D&D miniatures when I was a kid and have found great use for them in nearly every project I take on.
A paint (or ink) wash is simply a thinned/watered-down paint you apply fairly liberally to your piece, in order to get color down in the lower recesses and texture of your piece. It adds a lot of depth and grunginess with very little effort. (Though, I find that I often apply a wash, wipe it off, apply again, wipe, again, and again, until I’ve built up the effect I want.)
Drybrushing is at the opposite end of the painting technique spectrum—used to highlight the raised areas and detail/texture of an object. You load up paint on your brush, wipe most of it off (on a painter’s palette or something), then lightly drag the tips of the brush across the surface you’re working on. The paint catches on raised surfaces, highlighting them.
GD: You said you don’t “seem to be able to do one of these projects without delving into some new material or technique.” What was the new material or technique for this project? Keeper, or never again?
MS: I played around with a few new materials this year—all of which I’d use again.
- Modern Masters Metal Effects paint—I discovered this stuff at an art supply store while scouting around for materials and ideas for the stage set, and used them liberally on both set pieces and the diorama. They’re metallic paints impregnated with actual metal and oxidizers you apply after painting, so you get a natural patina effect (something that I’d normally create using washes and drybrushing.) The only challenge I’ve had with them is gauging the amount of oxidizer to apply, so I get enough of a reaction but not more than I wanted.
- Woodland Scenics Realistic Water—After melting the underground cavern’s lakebed with the heat generated by the resin I poured, I was excited to try out a new way to fill the castle’s koi pond with less threat of tragedy. Straight out of the railroad model building area of a hobby shop, this is a bottle of liquid you pour into a basin and let cure. You have to be sure everything’s sealed and have to pour in 1/8” layers (maxing out at 1/2”)

- Celluclay—This is a dry, powdery “instant paper mache,” to which you add water, creating a thick slurry of material you can use for filling, covering, and texturing surfaces. Once it dries, you can cut, sand, drill, and paint it. I used it to patch loose joints in the Cloud Castle’s stonework here and there and to create all of the flooring tile.

In addition to learning to use the new materials, the other new technique I tried out this year was using a hot wire tool on the polystyrene strips to “carve” the stones/mortar lines into the castle’s façade. I was able to get a really good rough-cut look on the edge of the stones (which picked up drybrushing nicely.)
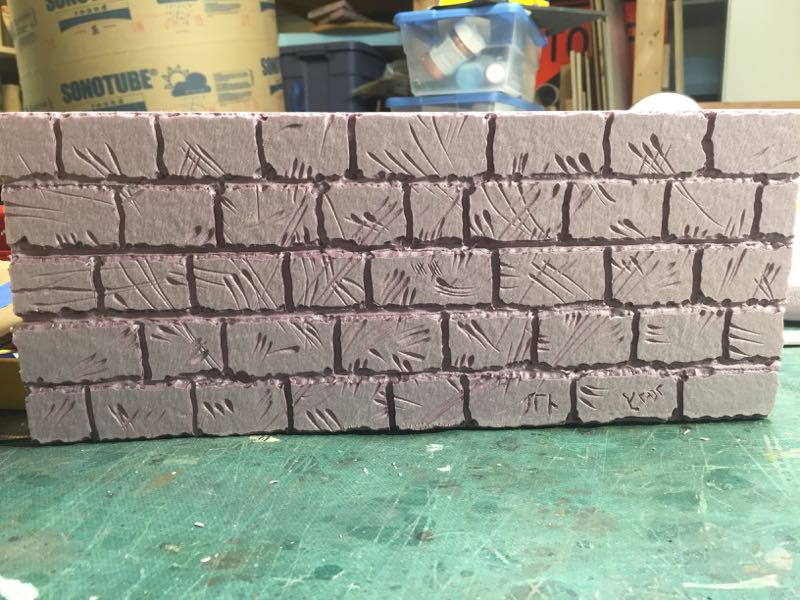
While it was a laborious process (slicing foam strips, cutting them to fit, gluing, then using the hot wire), it was far more efficient than the way I covered Dragonspear Castle a couple years back, when I sculpted, placed, and set each tiny stone separately.
GD: What was the most difficult aspect of this year’s piece? What part of the design are you most proud of?
MS: The most difficult part of this thing was absolutely the “Moon Door.” Its two biggest challenges were: 1) getting adequate/acceptable lighting into the pit and 2) figuring out how to get the door to slide open (‘cause that’s way more cool than having to have Chris reach in to pick it up.) The thing I’m most proud of is the magic bridge/rotating tower. It ties the three towers together as a unified fortress and provides an opportunity for some interesting combat/movement challenges.

GD: It must be a treat to see the Acquisitions Incorporated team using your terrain live with 1000’s of cheering spectators. What pleased you the most with how the players interacted with your terrain? What was the most unexpected use of the model?
MS: It’s unbelievably satisfying to see the reactions of the Acq. Inc. guys as they explore the diorama and discover all the little details. And it’s fantastic to be in that opera hall, surrounded by all those other fans that are reacting and commenting on those details.
The thing that was most pleasing was just how much of the diorama saw some action this year—they leaped, flew, and charged all over just about every part of the diorama. And nearly every area they didn’t explore was occupied by bad guys and/or allied creatures. I think the only bits that didn’t have a mini on them were the Koi Pond and the Floating Stair Platforms on the Bridge Tower.
The most unexpected thing was having a character actually fall into the Moon Door pit. I didn’t think anyone would go near it. But Patrick Rothfuss played his character to the hilt and had Viarai charge right in there.
This kinda goes back to your earlier “most-difficult/most proud of” question too—all the work and anticipation that went onto that most-complex part of the build really paid off. The mechanism slid open smoothly and easily, making for a great reveal. And not only was the lighting bright enough, it was blinding—blowing out the overhead camera so you could only see a blazing circle of sunny doom.


GD: This piece really was simply amazing. Before this one, what has been your favorite ‘Acquisitions’ prop piece built to date?
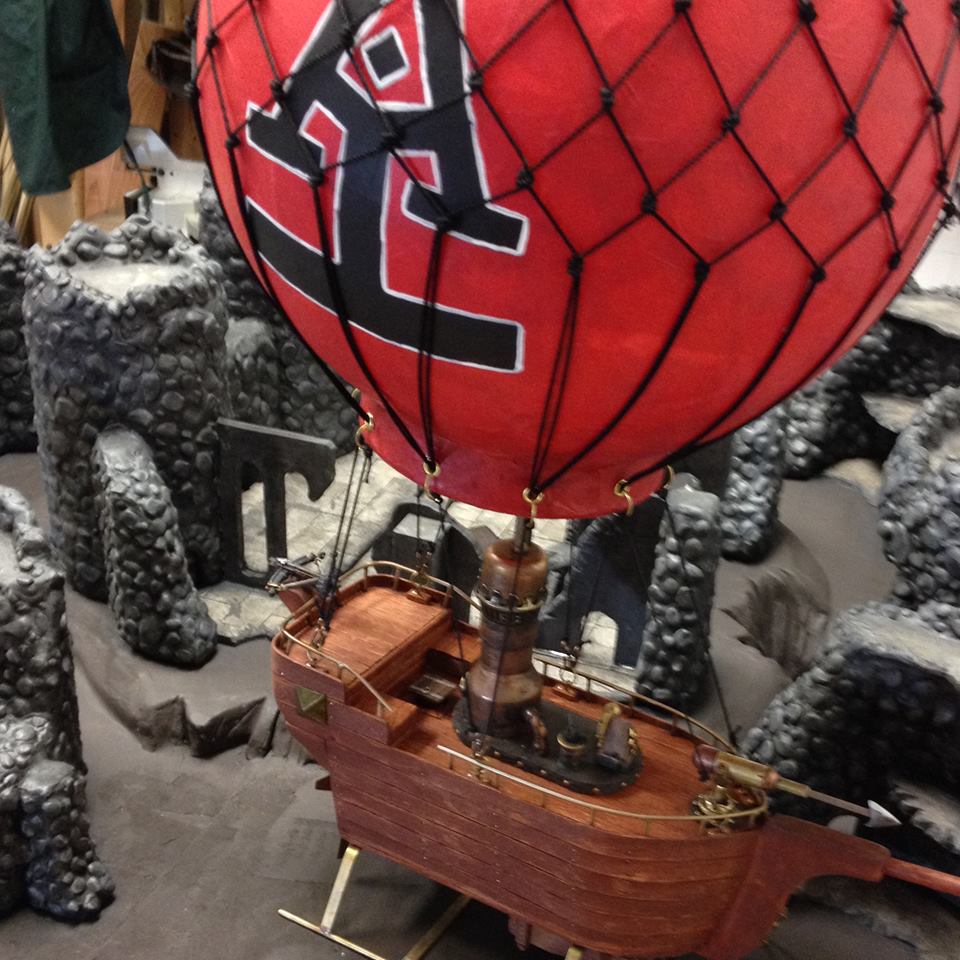
MS: That’s a tough one—a toss-up between last year’s Burrow Dawn Inn and the previous year’s Battle Balloon (which floated back into this year’s game.)

GD: Are you a tabletop gamer? If so, what’s your game of choice? It seems like you’d have the luckiest D&D group in the world if you were the DM!
MS: Ah, I started playing D&D back when I was 12. I’ve dabbled in a few other games, but D&D is definitely my game of choice. I haven’t DMed a game in a very long time, but I’ve been kicking around the notion of running a game again. I used to make little props (like campfires) or encounter-based pieces (like a castle gate) for those games, so these Acq. Inc. props are just those on steroids—maybe I’ll hafta dust off the DM screen again.
GD: How did you get into prop making? What was your first project?
MS: I got started building props and costume accessories for myself and friends (for Halloween and cosplay conventions)—some anime stuff, but mostly things drawn from or inspired by the post-apocalyptic world of Fallout.
My first commissioned piece was an Arm Cannon for a Samus Aran costume (from Metroid) to be worn by a burlesque dancer who was putting together a new act for a video game-themed show.
GD: Thanks! Seeing the game and the prop piece up close was a great experience. I’ve learned so much just from looking at your build pictures and hearing your answers.
Interested in hiring Mat for a project, contact him at czarofhappiness at yahoo.com
Fans can best connect with him via the Czarofhappiness Props Facebook page page or Twitter @czarofhappiness. If you want to see more of his work, “check out my Facebook page-right now, that’s the repository of *everything,* including annotated “Making Of” albums filled with WiP photos. I try to post highlights and interesting bits to Twitter. And I’ve maintained a page on DeviantArt to serve as a portfolio of finished work.”
I don’t know about you, but seeing the Acquisitions Incorporated players interact with this terrain, and getting an inside look at some of Mat’s techniques has certainly inspired me to try and make terrain like this for my campaigns… The Eye of Avarice, anyone?
Ogre and out.


Awesome work!
This is Awesome, Really enjoyed the show this year
Yeah, it was the right balance of awesome and stellar. Great roleplaying all around and Mat really outdid himself with the castle.