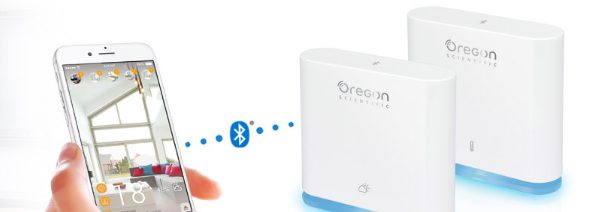

For those who don’t know, I’m GeekMom’s resident weather weenie. I’ve had the privilege of reviewing numerous weather-technology-related products. I was excited to get a chance to check out Oregon Scientific’s latest weather sensor in their extensive family of products: the Weather+ Bluetooth-enabled weather sensor.
The concept behind these sensors is pretty straightforward: for any space for which you need to monitor temperature, humidity, or barometric pressure, use a Weather+ sensor. Use numerous sensors in any spaces you need, and use the Weather+ app for iOS or Android to monitor up to 20 of the sensors in one convenient location.
The Weather+ comes in two models, the basic EM221 and the advanced BAR228. The major capability difference between the two models is the ability for the advanced BAR228 to measure humidity and barometric pressure along with the temperature.

What Comes in the Package
My Weather+ sensor came in a plastic blister package with the following items.
- BAR228 Weather+ sensor unit
- Quick start guide
- Warranty information
- 3x AAA batteries
Setup
By itself, you can’t really do much with the Weather+ sensor. You HAVE to have a smart device. Go to the iTunes App Store or the Google Play store to download the Weather+ app. Admittedly, it wasn’t straightforward to find the correct app. I had to scroll through a couple pages of options even though I had searched for “Weather+” in iTunes, as suggested by the Quick Start guide. If you attempt to include “Oregon Scientific” in the search string, it still isn’t the first return: the company’s Weather@Home app will show up first.
Once you have downloaded the app to your phone or tablet, get it going to connect with the sensor. Simply follow the prompts on the app, which will guide you through installing the batteries and getting the sensor into “discoverable” mode so it can communicate with the app via Bluetooth.
The rest of the setup is very easy and is totally app-guided. The Quick Start guide is pretty minimal, to be honest. If you want more details, you can download the full manual from the Oregon Scientific website.
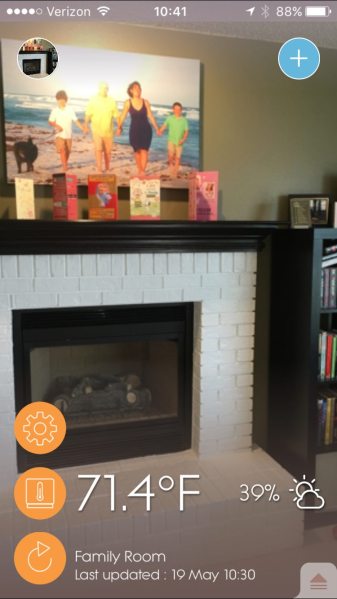
One of the things you will do when setting up the sensor is take a photo of the space. When you can follow up to 20 sensors in one app, having the photo will help you easily scroll through which sensor is in which space.
Siting the Sensor
Something I learned early on is that the placement of the sensor is quite important. If you are trying to get a more accurate sense of temperature trends in a space, it’s important to take into account variables such as proximity to a door or window, or to a heating/air conditioning vent.
The Weather+’s minimal size and appearance means you can tuck it into smaller spaces and still get rather accurate readings.
This is an indoor/outdoor sensor. So be sure to take shade vs. sun and proximity to buildings into account when siting it outside. You might also want to secure the sensor (with the mounting hole on the back); it’s very lightweight at a mere 3 ounces. Here in Colorado Springs, it would blow away pretty quickly if not secured.
Capabilities
The advanced Weather+ sensor will measure temperature, humidity, and barometric pressure. The basic model gives you temperature only. On the current conditions page, which is the one featuring the photograph of the space, you will only explicitly see the temperature and humidity measurements. Not the barometric pressure. However, the pressure readings will help make a short-term forecast that is presented on the current conditions page.
Because this is a Bluetooth-connected device, if you take your device outside the Bluetooth range (about 30m or 98 feet), you will need to reconnect. On most devices, this will happen automatically, but if not, you can hit the orange “refresh” button in the lower left to refresh. Not only will you update the current conditions, but the device will also download the history, which goes back about 20 days.
Swipe up on the arrow on the lower right corner and you can look at the history data. To me, personally, this is far more useful than just the current conditions. There are numerous drop menus that allow you to choose which variable to view, as well as what timelines to view, from daily to annual trends. The daily trend graphs look very nice, but I’m not a fan of the longer-range trend graphs. You lose data resolution pretty quickly, as you can see by comparing the daily vs. weekly pressure trends below.


Another thing you can do is set alerts when the temperature, pressure, or humidity fall above or below thresholds you establish. The app will give you a custom alert message notification on your device, such as “The baby’s room is too hot!”, and it will prompt you to adjust the temperature. It would be really cool if the app could take you straight to a thermostat app (if you have one) to make those adjustments, but that’s not a capability right now.
Observations and Feedback
Let me make clear that I’m not a huge fan of Bluetooth-enabled weather sensors. I had reviewed Oregon Scientific’s Weather@Home weather station in 2014, and ended up not using the mobile-device-enabled features. It is a perfectly good weather station that works very accurately on its own, but if I want to know the temperature at a certain place in my house without being home, it’s likely I’m more than 100′ away and outside of Bluetooth range.
In the case of this Weather+ system, there is no digital display to serve as an alternative to accessing the data via Bluetooth. So if you don’t have your device nearby (which, understandably, is quite rare these days), you cannot access the most recent data. I think a system such as this would be much better suited if it was Wi-Fi enabled instead of just Bluetooth. Alternative, if there was a way to connect this information to a smart hub-type system, such as one that’s used to manage lighting, climate control, and door locks in your home, there could be quite a bit of potential.
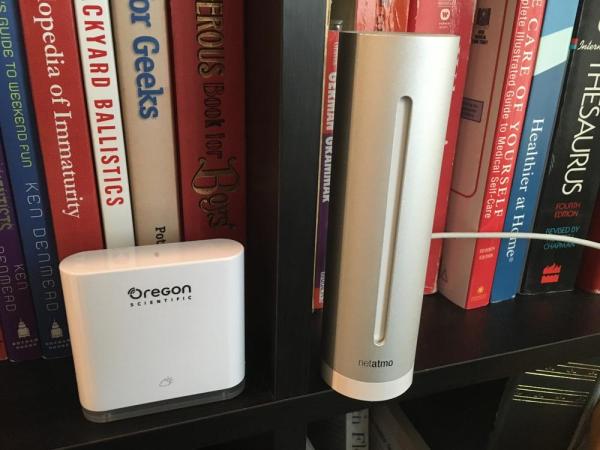
In 2012 I had reviewed a Wi-Fi-enabled system called the Netatmo Urban Weather Station. Like the Weather+ sensor, there is no on-site display of the weather information. But unlike the Weather+, the Netatmo is AC-powered and WiFi-capable. Additional sensors use Bluetooth to communicate with the main station, and the main station transmitted all data via Wi-Fi.
I thought about why Oregon Scientific would choose to lean towards Bluetooth vs. Wi-Fi technology in this sensor. I asked a fellow GeekDad writer about it and he helped brainstorm a couple of reasons. It’s very likely that Bluetooth was chosen because this is a battery-operated system. Wi-Fi requires a near-constant communication with a router, which would use quite a bit of battery compared to Bluetooth. In that respect, perhaps this is a wise choice.
Another feedback item, which I had mentioned earlier, is the extreme lightweight nature of this sensor. It’s only 3 ounces, so if you choose to use it outdoors (which is okay, the sensor is rated for indoor or outdoor use), it’s important you secure it somehow. Mounting hardware isn’t included, but with a simple nail or screw, you can easily hang it on a wall with the hole on the backside of the sensor.
Who Would Like the Weather+ System?
After getting over my angst about this being a Bluetooth-only system, I pondered what users would find the most benefit from this system.

First of all, if you have a tablet or iPod-type device that never leaves the house, consider installing the Weather+ app on it. I first installed the app on my iPhone 6S, which comes and goes in and out of the house with me almost daily. But then I installed it on my 2011 iPad 2, which sits in my kitchen and serves as a cookbook more than anything else.
If you are in a position such that the tablet never moves outside of the Bluetooth range, you’re in business! And that’s who I figured would be among the first to benefit from this device: small business owners who have reason to care about temperature, humidity, or atmospheric pressure conditions. Perhaps a restaurant with a wine cellar? A refrigerator? A cold-room food preparation area, which requires temperatures below 41°F? A violin shop, which requires humidity monitoring to keep the wood from drying out? Or maybe a walk-in humidor? Indeed, there are numerous applications that would work well for small businesses.
In the home, this device is useful for monitoring a baby’s room, or a basement storage space that might have wine or other foodstuffs. In our family, we plan to use our Weather+ to keep tabs on a cold space for my husband’s beer brewing operations.
My husband has been brewing his own beer since about 2008. We even grow our own hops for it! However, the military moves every 2-3 years makes all of this somewhat complicated. When we were living in Florida, in fact, we didn’t try to do it at all. We don’t keep our house cool enough to do it while we were in Florida*, but in houses with basements, such as when we were living in Nebraska, we could allow for bottle-based fermentation with temperatures in the low 60s.

*We don’t use a Kegerator. Perhaps one day we will… but that’s for another post.
Here in Colorado, we are hoping we can attempt lagering. This requires taking beer down to much colder temperatures, as low as in the mid-30s. The Weather+ sensor can help us monitor a certain part of our garage that gets pretty cold in the winter. Those who are familiar with homebrewing understand that temperature plays a very critical role in the beer’s fermentation. It’s important to choose a yeast that appropriately ferments in the temperature ranges you have available.
Summary
In summary, the Weather+ sensor is available through online retailers such as Amazon or else directly through the Oregon Scientific website’s online store. The EM221 basic model retails for $29.99 and the BAR228 advanced model retails for $39.99. The app used to control the Weather+ sensors is available for Android through the Google Play store and in iOS through the iTunes App Store.
I feel this product has a very niche audience, but if you happen to fall within its parameters, give it a shot! It could prove to be quite useful.
I received a complimentary review sample of the Weather+ BAR228. The opinions expressed here are completely my own.