
The Star Wars universe’s newest hero, Rey, struck a nerve with many viewers of all ages and demographics. Everyone has their own reason and theory of why she is so popular.
For me it was simple. Rey was someone’s daughter, and I couldn’t help but see in her the strong, intelligent, and fiercely independent person my own two daughters are growing up to be. One little detail in particular cemented this perception for me: Rey’s doll.
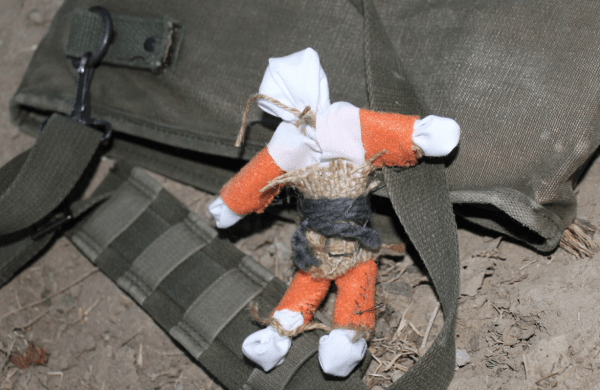
I was able to get a good look at the grimy little prop when glancing through the Star Wars: The Force Awakens Visual Dictionary, and learned Rey crafted this out of debris (including a rebel flight uniform) she found around the war-scarred Jakku landscape when she was just ten years old. In addition, I learned in my daughter’s book, Rey’s Survival Guide, she and this little doll would explore the area and together they would “find lost rebels and get them back to their ship.”
Through this little piece of scrap, seen only briefly in the movie, Rey created an escape for herself from her own isolation and sadness. She created a doll for comfort and company, and an action figure for adventures abound. With one short glimpse of this doll, I saw Rey in both the heartbreaking capacity of a lonely little child, and a creative and resourceful artisan and engineer in the making.
I knew my daughters and I had to make one of these ourselves, so I thought up this simple little craft both kids and adults can make in just an hour or two.

What You Need:
One piece of orange felt, or a plain orange cotton bandana
Scraps of white cloth
Two chenille craft stems (pipe cleaners), any color
A small piece of burlap or burlap ribbon
Plain black thread
Thin brown or grey yarn, rope, or twine
This particular DIY will make a little rebel about 5″ to 6″ long, but older crafters can use heavier floral or crafting wire to make a larger one. Rey likely used wiring she pulled from a crashed Tie Fighter, but those might be hard to come by.
For the body: Fold one craft stem in the center, and bend the ends back to make feet.
Do the same with the second stem, except leave a loop in the center for the head. Place one end of the first stem through the loop, and twist it together for a little body. The result should look like a little stick figure.

For the hands and feet: Cut four squares of the white cloth scraps, about 2″ x 2″ big, and one square about a half-inch longer on each side. Using a piece of your twine of choice, tightly tie each square to the ends of the body (hands, feet and head). Stuff a little extra cloth in the square for the head to give it a little shape. If the stems show through the white cloth, double up two pieces of cloth.

For the jumpsuit: The orange jumper is the only part that will take any sewing. Fold the piece of felt in half, and cut the folded piece in half (one piece of felt can easily make two dolls). Use the simple basic “doll dress” pattern people have been doing for ages by cutting a small slit for the head in the center of the folded edge of the felt. Place the body on top to see where to cut out the arms and legs.
Pull the suit over the doll’s head sew the edges of the sleeves and pant legs directly over the doll using very basic overcast stitch with black thread. It’s okay if the thread shows. If the neck hole is too big, you can use a stitch or two to make it fit more snugly around the neck.
Remember, this is a toy a ten-year-old who likely didn’t have access to a sewing kit made, so don’t try to be a perfectionist. Also, don’t cut the thread ends off too close. Leave a little bit hanging.
For those needing a better look at this “dress” method, the series My Froggy Stuff has an easy doll dress tutorial using a similar method.

For the Straps and Belt: Tear or cut two thin foot-long strips of white cloth. Place one around the little rebel’s waist, bring each end up over its shoulders, and back to the front. Make sure they to cross them on both sides of the doll. Use the second strip to tie around the middle and secure the first strip.
Finally, take a piece of burlap or burlap ribbon, and tie it around the doll’s waist (it will cover some of the white). Use the remaining twine or rope to tie it in place. Make sure you have enough to wrap around a few times, or tie over the shoulders, if you want.

Now, if your kids plan to have many adventures with this doll, feel free to reinforce the hands, feet, and head with a few extra stitches. This will keep them fighting the good fight longer.
Make a few extras for your child to give to friends or classmates when they are feeling sad or lonely. There’s nothing like your own personal rebel pilot to make you feel strong and more confident.
Just as Rey did.


I’m so glad someone finally made this! Great tutorial, thank you for sharing!
You are very welcome!
Thank you very much for this tutorial.
Thank you so much! My baby godsister wants to dress up as Rey for a local comic convention and she’s super excited to make Rey’s doll to go with her costume! 🙂
Cool. I hope she’s a big hit!
Excellent posting
I used your site as an example
I created a little more realistic one for my daughter
I have step by step pictures if your interested
I would love for you to see and share mine with everyone if possible
Tweet me a photo @lisathegeekmom and I’ll share it! Sounds awesome.