The professional grade optical quality Photojojo Iris lenses are available for iPhone 6/6+, 6s/6s+, and Samsung S5 and S6. I loved the pictures I could take on my iPhone 6+ with the Photojojo Iris lens set, but the lenses would not mount on my over-the-top-protection Otterbox Defender series case. I used a second, less protective case with the Photojojo, and it worked great, but this left me worried throughout the entire photo shoot that I was going to drop and break my phone. If you’re not the type to put battle armor on your phone on a daily basis, then you’ll have no qualms about using the Photojojo Iris with your case, or with no case if that’s how you roll. For me, however, I planned to keep my iPhone safely locked away in the Otterbox, but also wanted to be able to quickly mount any of the Photojojo lenses.
This meant I was going to have to modify the Otterbox. For experimenting, I found what appeared to be a genuine Otterbox Defender on eBay for around $20. Once that was in hand, I set it aside and started modifications on my old, beat up, Otterbox.
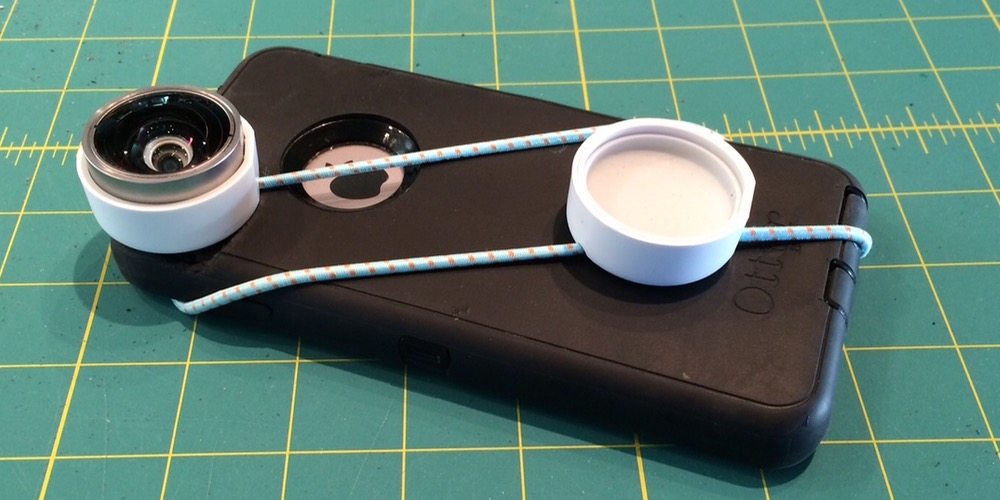
The way the lenses mount is by putting a lens plate inside the case. This provides a peg that the lens is inserted on, with the Photojojo elastic strap wrapped around the phone to help secure it. This works great if done with a case that is not too thick such as the one in the images below.


The problem with the Otterbox Defender is that the peg does not clear the case so the lenses cannot be mounted. The case is simply too thick.

Another issue is that the lens plate makes it pretty difficult to close the case completely due to the added thickness. This was not a problem with the non-Otterbox case. To alleviate that problem as well as lessen some of the thickness, I removed the soft inner cushion where the lens plate fits in the case.


I gained a millimeter, but the peg was still not far enough out to affix the lens. This left the task of getting enough peg sticking out of the back of the Otterbox to hold the lens. There are two parts of the case that have to be reduced to do this. First, the black hard plastic ridge around the camera opening needs to be lower. Second, the rubber case needs to be lowered to match the now lower hard plastic ridge. This has to be done everywhere the lens makes contact with the case.
A Dremel or belt sander would help make quick work of this, but I just sanded by hand with 80 grit sandpaper, using finer sandpaper to smooth out my work later.


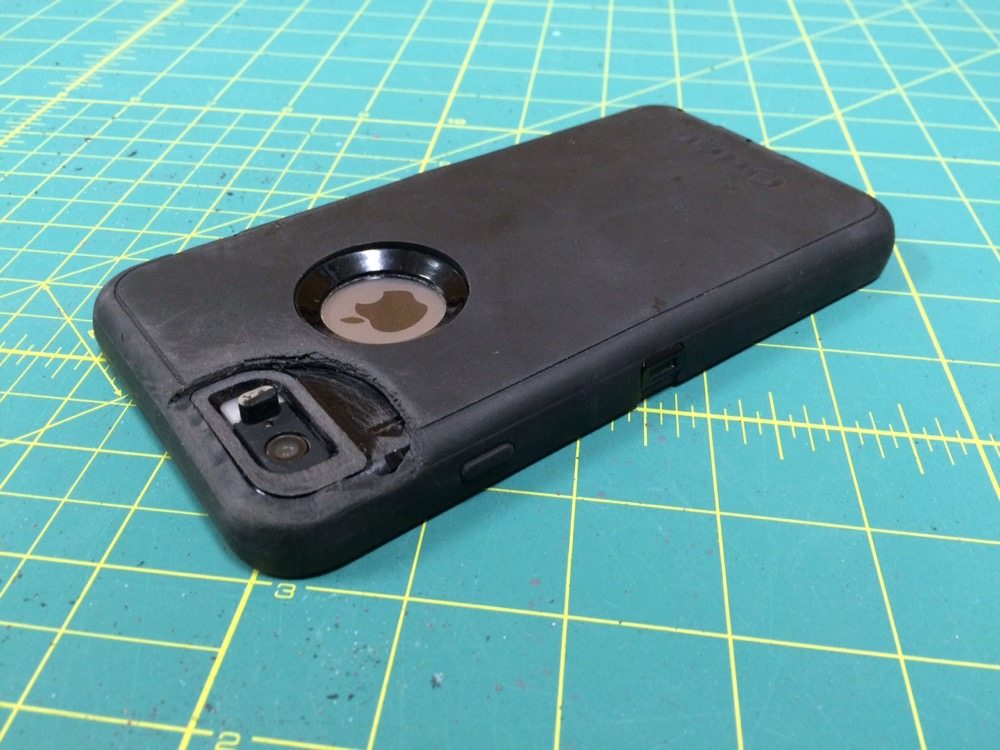
My original intent was to remove just enough of the ridge and rubber case to hold the lens secure. It appeared as if I would have to go extremely thin on the rubber to do this. Maybe with a Dremel or other method I could have. The picture below shows my attempt at just thinning the case. You may have better luck, but I was not happy with that result.
Do not do this if you end up removing all of the ridge and the rubber section like I finally did. Just cutting the rubber off will have a better end result than the remnants of my sanding attempts.

What I finally did was sand the hard plastic ridge down flush with the phone. This still leaves a pretty big lip of protection around the camera while allowing quite a bit of the Photojojo mounting peg to stick up. This means I then had to cut the rubber case all the way off where the lens hits so that it could sit flush with the phone.

Now that it’s been adjusted to work with the Otterbox Defender, be sure to remeasure and set the Photojojo mount to the correct setting per the Photojojo Iris instructions.

One issue I discussed in my original review was that the flash was useless with the lens plate in as the light refracted through the clear plate and washed out the image. I rarely use my flash anyways when taking a regular photo as the pictures are almost always better without a flash. So I only use a flash when I absolutely need to. I do, however, often use the flash when I am taking a picture of a serial number I need to enlarge to be able to read, or if I am trying to get the model number I can’t read off of a piece of equipment by reaching behind it to take a picture for instance. So, I want the flash somewhat operational.

Another mod I tried was painting portions of the lens plate black to allow the light to come through while not washing out the picture.


While it’s not pretty, this case-mod keeps my iPhone safe and secure in the super-tough Otterbox Defender while allowing me to quickly attach the high-quality Photojojo Iris. Now that I can use them, I will be carrying the Photojojo lenses everywhere. They pack up nicely to go in a pocket or, more likely, my computer bag.

Now that I’ve done this once and know how I would go about it, I may use the new rubber case cover and make a cleaner version.
I would love to hear from anyone with other ideas for making this modification.
Disclosure: Photojojo provided an Iris lens set for my initial review.


Hey Ryan, I’m one of the designers are Photojojo that made this product come to life. This is really awesome. I like all this hacking around you’re doing. You bring up a good point about the adapter not working with flash. It was a design decision to make it clear vs opaque since we wanted to allow flashlight useage if the lens was off without having to remove the adapter. Remove adapter = no iris fun in the future. So it isn’t intended to work with flash.
Really interesting mod to the otter to make it work! Keep hacking. -Kevin
Thanks for commenting Kevin! I love the lenses, so thanks! With these mods I’m good-to-go. The Otterbox now looks a little more utilitarian than it already did, but pretty much full protection while still being able to mount the lens.
I figured that was the case with the flash. In most cases a flash is just going to ruin your phone anyhow, so choosing to allow the flashlight is smart. My quick fix works though too… I get a reasonable flash for when it’s necessary, and I get most of the light from my flashlight still.
Here’s what the flash mod looks like in the case… https://www.flickr.com/photos/132836690@N07/23847324549/in/dateposted-public/
Again, thanks for creating some great lenses!
awesome shots! If you tag them on instragram with #photojojoiris, we could repost them on our IG account
Hi. Great hack by the way! I want to protect my phone but also use the iris lenses as well. I have an otterbox too(commuter I think) , but the case surrounding the lens goes inward instead of protruding like yours. How would you hack it?
@Va Nessa: Thanks! So, the Commuter MAY work as it. If it’s not as thick as the Defender then the peg may reach. Also, there are three “settings” on the lens to handle depth of the peg. My Defender with the raised portion sanded down leaves an inset that looks a lot like the Commuter case naturally does.
What you might run into is that the edge of the Commuter case looks raised a little in the picture I found online. You could try it with the raised edge and see if it’s fine, or you may need to sand down the edge where the lens hits to keep the lens flat.
Sadly, I am not finding anyone online saying that they have used the lenses with a Commuter case. Maybe contact Photojojo? Or, if you can get an accurate measurement of the depth I could compare that with the depth of my modified Defender case. You could also ask a question on Amazon and see if anyone responds.
Good luck!
I’ll give it a shot. Thanks for replying!
Instead of getting all invasive with my hacking, I ended up cutting up some Velcro strip so that they fit just around the lens. It’s not the most aesthetically pleasing, but it’s pretty effective. Easy on easy off. Can’t wait to shoot with them now.
@Va nessa: Cool! Please report back here how it goes. I figure one of the points of the mounting peg and the “depth” setting step on the mount is to get the lens at the right distance from the camera lens. If it’s too far our you’re likely to get dark corners and vignetting. Curious if the focus works if it’s at the wrong distance (might not be). In any case I and I’m sure others would love to know if the velcro method works!
You’re right. I do have some *slight* darkening of the corners and vignetting, but i can just crop it out/ edit and still have a decent photo. I may end up sanding down my case in the future though.
Very interesting way to adapt the lenses to your Otterbox case Ryan. I was hoping to find a way to adapt those lenses to my new iPhone 5SE. I decided to trade in my iPhone 6 for a more manageable 5SE with same quality camera, but now I wish I could use my iris lenses with my new iPhone. I did like using them so much in the past.
What case do you have? Seems like this could be done? I have a 5/5s lying around somewhere, I’ll try to take a look…
I have read your blog its very attractive and impressive. I like it your blog.