Things are wrapping up for Season 3 of Adventurers League — I’ve been DMing a table of players for the last 18 weeks (minus a few sessions due to sickness, travel, etc.) as they’ve tried their best to escape the Underdark in the Out of the Abyss storyline. The adventure started with them escaping from a drow prison with no weapons or armor, and along with many encounters in the tunnels and caves beneath the surface they’ve also been present at the destruction of the Kuo-Toa city of Sloobladop and have recently landed in the Duergar city of Gracklstugh where they’ve helped uncover a sinister plot. My players are fast approaching level 5 for their characters (and have earned each and every XP point the hard way), and I’m hoping they’ve enjoyed the adventure as much as I have enjoyed running it.
Note: If you haven’t already, please read Tales of 2D and 3D ‘D&D’ Adventuring Part I.
For most of my weekly sessions, I tend to use an oversized photocopy of my 24″ x 36″ gridded map from Roll 4 Iniitiative to draw the terrain and obstacles that my players encounter — for $3/week, it’s an inexpensive way to speed things up by having the maps drawn ahead of time and give the players something to use to plan attacks, place their minis, and basically visualize the areas I’m describing. But every five or six sessions, I like to do something different and special for my players. And three times this season, I’ve found myself relying on Fat Dragon Games.
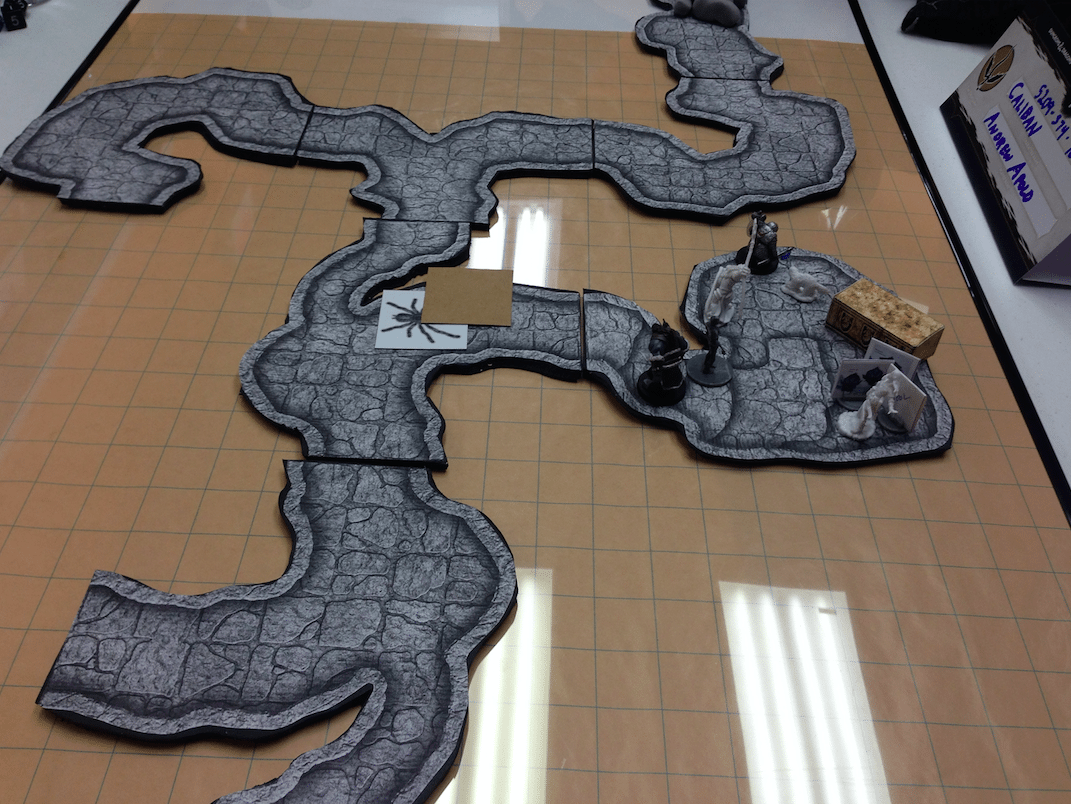
Early in the season, the players escaped the drow prison and found themselves lost in the Underdark’s caverns and tunnels. I knew the players would find themselves in tunnels many times during the season, so it occurred to me that having something I could re-use for tunnels and small caverns would be extremely helpful. To save the day, I purchased two PDF files from Fat Dragon Games — Caverns 1 and Caverns 2. More on this in a moment.
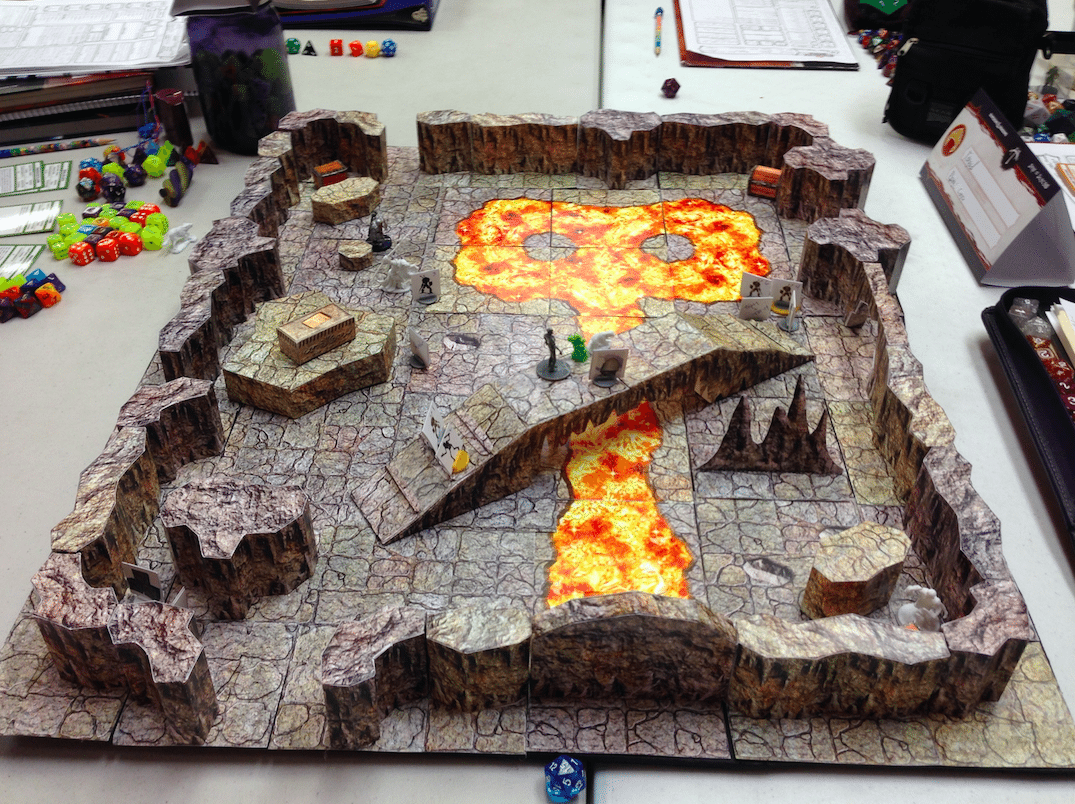
The second time I used a product from Fat Dragon Games was when the players wandered into a mad warlock’s large cavern for a version of Thunderdome, with the players being pitted against wave after wave of creatures that had been “upgraded” by the warlock. For two sessions, I used the Caverns of Chaos product to create the oversized arena. It had walls, a bridge, a lava flow, and other obstacles.
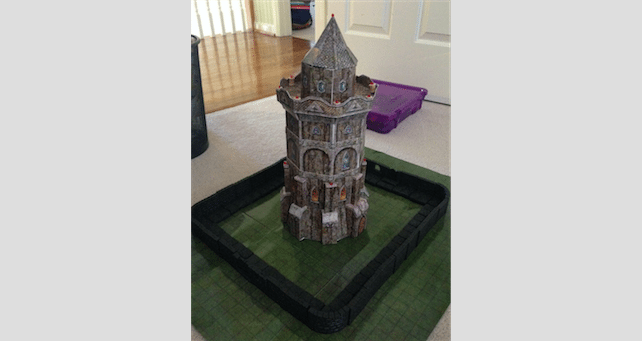
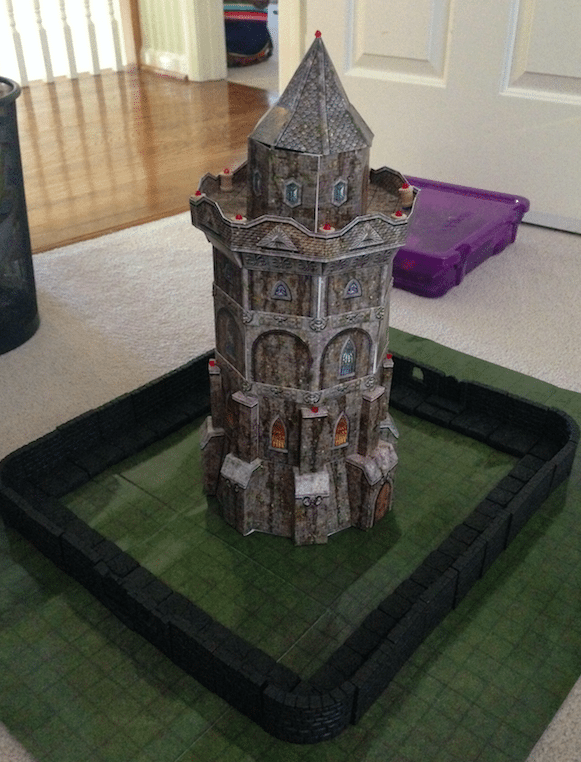
I already posted about how I used these three products during this season of Adventurer’s League, so click here if you’d like more details. Suffice to say, after seeing the players’ reactions to these products, I returned to Fat Dragon’s website to see if there was another product that would fit into this storyline. For the last few weeks, my players have been in the city of Gracklstugh, harassed by the Duergar (dark dwarves). I knew a confrontation was brewing between the players’ characters and a certain secretive group in the city, so I was pondering an assault on the group’s headquarters for the players. Needing a suitable location, I purchased and downloaded the Winterhawk Wizard’s Tower and printed up all 41 pages PDF pages. Yep… you read that correctly. Forty-one pages.
The Wizard’s Tower PDF file is $8.99 but it is frequently – FREQUENTLY! – on sale at RPGNow (along with all Fat Dragon’s other files), so keep your eyes open and you can save a few bucks. And if you don’t have a color ink jet that can print on card stock, expect to spend about $20-25 at the print shop. That said, the details on this thing are INCREDIBLE. Plus, I really had no idea about the size of the final tower… it’s BIG!
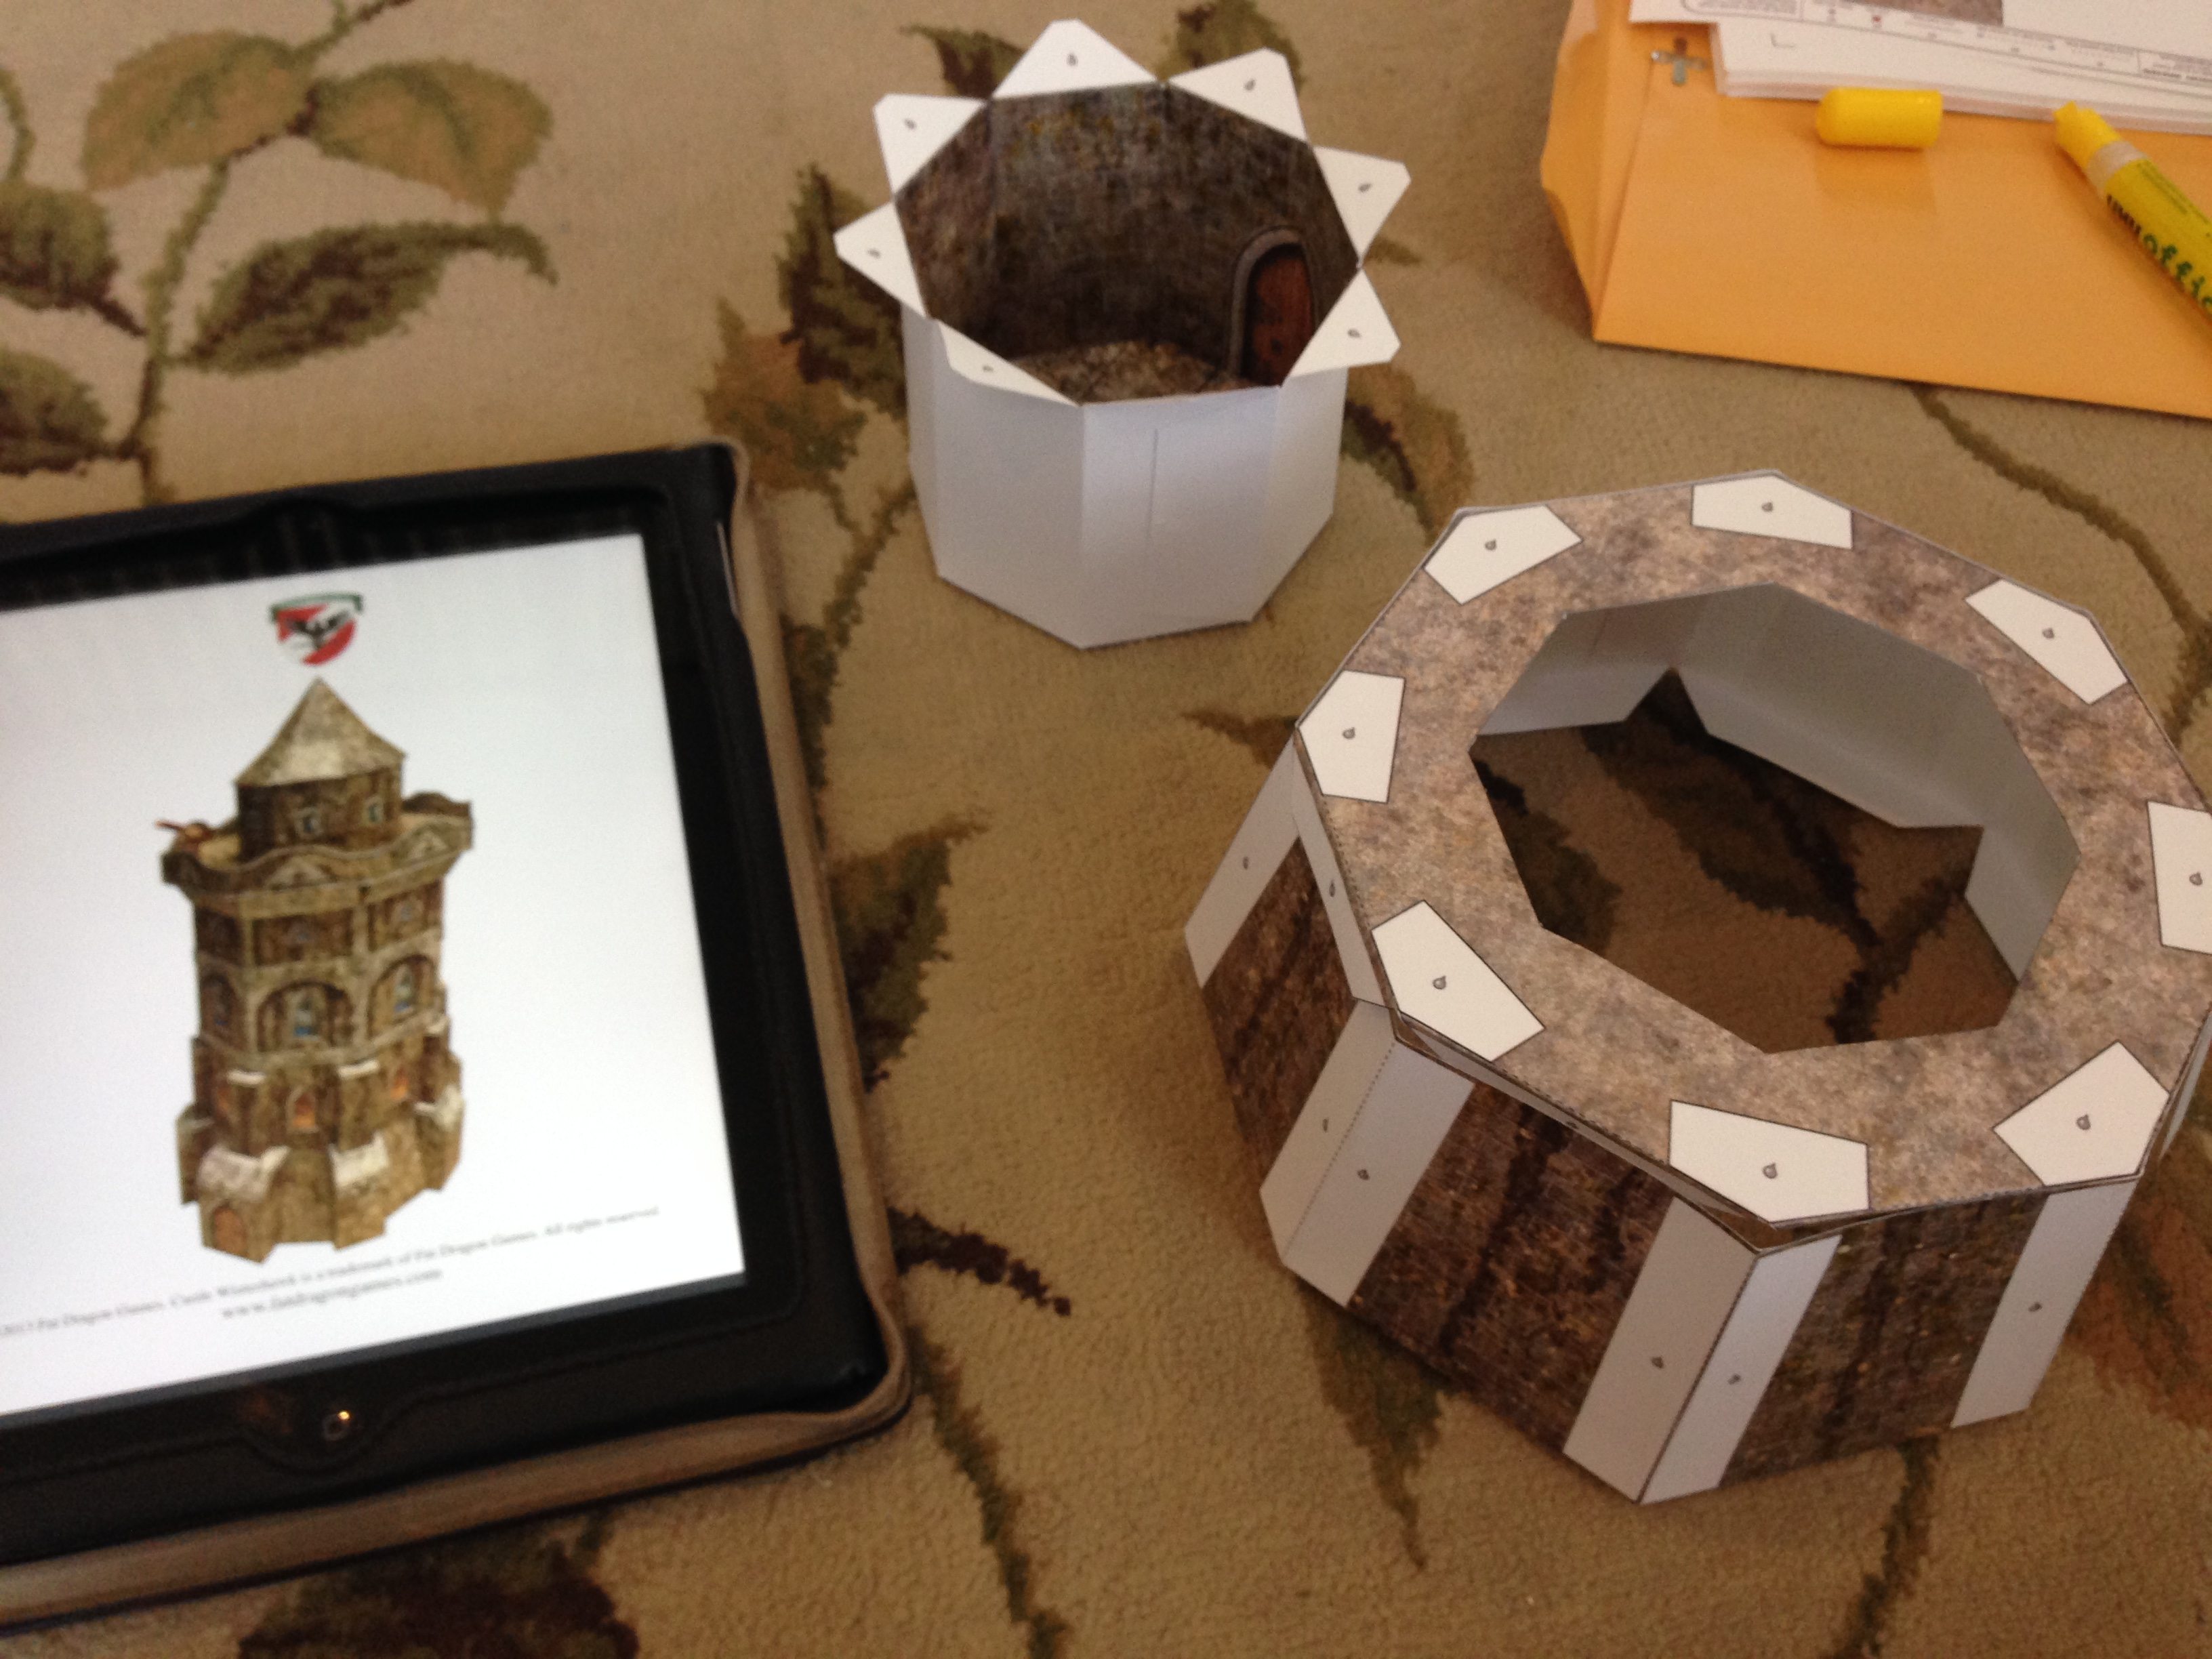
You’ll want to be careful when examining the PDF file. Many of the sheets will have a large 2X or 4X printed on them, so you’ll know exactly how many duplicate sheets to print. When all is said and done, you should end up with 41 pages to print (three of them include accessories like stairs, table, chair, etc.).

Cutting all the parts out took about an hour. Folding all the parts took about two hours. I thought gluing would be the most tedious but because the tower has five levels, you can glue some pieces for level 1, then glue some for level 2, and so on… by the time you’re done with some of the parts of level 5, you can return to level 1. I estimate I spent about two hours gluing, but spread it out over a few weeks. No offense to Fat Dragon Games, but I fold by hand and do not use a straight edge to score a fold edge first… tried that and discovered it just takes too long. I got pretty good at slowly folding on a dotted line and adjusting to get it dead-on. I used colored markers to shade in any white paper showing through here and there and blend in with surrounding colors/textures. All in all, I’d estimate I got the tower fully built in under five hours (spread out over two weeks).
When done, you’ll be surprised at how well all the levels fit together. You’ll also be surprised at how light the structure is… it’s paper, obviously, and it probably won’t even register on a scale. The thing is just incredible to look at, too, and it got a LOT of looks (and comments) from my table and the other three tables when I placed it on the tabletop. I loved revealing each new level as the players climbed the stairs to see what was waiting for them next…
What will I do next? I have absolutely no idea. Season 3 ends in just over a month, and details for Session 4 haven’t been released yet. I have purchased the EZ-Dungeons: Deluxe Edition PDF but haven’t yet printed anything from it… but I’m certain it won’t be too long before I find a use for it (and it currently has 11 Expansion Sets). I’m also quite impressed with the Winterhawk Castle Base Set. Too many kits… too little time!
Be aware that Fat Dragon’s website breaks up its terrain products by 2D and 3D options. While the 3D options are outstanding, don’t ignore the 2D terrain files. Like the Caverns 1 and Caverns 2 PDF files I purchased, you can find 2D dungeon tiles as well as forests, water hazards, villages and more. I print them out, spray some fast-dry adhesive on to some foam core boards, and apply the sheets and cut. They’re thick and heavy and work great.
I’m looking forward to Season 4 of Adventurers League. I have no idea what is in store, but I’m sure I’ll be returning to Fat Dragon Games once I get some details. I’ll also be stocking up on some more tacky glue…


Casting Thread Resurrection! Success! 🙂
I have most of the Fat Dragon paper models and Dragon Tiles sets I have slowly accumulated. I’ve build the Watchtower, the DM screen 2, a few of the ruined buildings, the ruined top of the Watchtower, and the Medieval Cog Ship.
Now that you’re printing in 3-D, my advice will probably be null, but I use scrapmaking glue to glue the pieces. Tom recommends a particular glue that I recently discovered at one of my local fabric stores. Unfortunately, they went out of business. I should have bought more, but there is amazon Prime to take advantage of.
I printed a ton of the dungeon walls and house interior walls and printed up a stone based board, gluing the pages to a sheet of foam core craft board and cutting the locking squares out so the columns won’t shift. Yup, I used the bobbypins to lock the pieces together. It was a hit, but I had to scale the map to twice size so the miniatures would fit in the hallways.
Anyway, one day I’ll have a 3-d printer or someone will start a maker space here with access to one. Sigh.