
 How’d you like to ditch your garage door remote control and move that functionality to your mobile phone? If you’re thinking to yourself “sounds cool, but way beyond my technical abilities,” then I’m going to tell you that you’re wrong. If you’ve got 15-20 minutes and can use a screwdriver, you can do this. (It’ll probably take you less than 15 minutes, but take your time… there’s no rush.)
NOTE: Read through this entire post before getting started, so you’ll know everything you need to buy, measure, and connect.
The basic steps you’ll take (and I go into more detail below) are:
- Configure WeMo Maker to join your home WiFI network.
- Move WeMo Maker to a garage power outlet.
- Connect ends of two wires to garage door push button.
- Connect other ends of two wires to WeMo Maker RELAY ports.
- Test the WeMo app to open/close garage door.
The entire thing relies on the WeMo Maker device. I’m a big fan of WeMo products, and have a few WeMo switches in my home already that perform a variety of uses depending on the month (such as giving me control of the Christmas lights on my house in December). The WeMo line of products is from Belkin, and they’re tried and true… they just work. The WeMo Maker (seen above) will run you $80, but keep in mind that a replacement garage door opener (of which I was in need of anyway) typically runs around $20 or so. The WeMo Maker will give you the ability to press a button on your phone and open or close the garage door wherever you may be, even via your data connection if your phone isn’t able to find a WiFi network to join.
Buy/Procure:
- The WeMo Maker kit – comes with a USB adapter to provide power.
- Two lengths of insulated wire – I used two 36″ lengths of 20-gauge speaker wire but you’ll want to measure the distance between the Maker’s two RELAY ports and the push button on your garage wall that opens/closes the garage door and cut to length as needed.
Tools Needed:
- Wire strippers
- Phillips screwdriver for WeMo Maker RELAY ports and possibly garage door button if it uses Phillip-head screws
- Flathead screwdriver if garage door button uses slot screws
DISCLAIMER: I make no guarantees about my documentation below. Try at you own risk. I’m not responsible for any damage you do to your garage door, your house, your neighbor’s house, or your marriage.
Step 1: Start by downloading the free WeMo app for your phone (Android and iOS supported) and follow the instructions that come with the WeMo Maker to get it connected to your home WiFi network. This shouldn’t take any longer than a few minutes… it’s very easy to do and involves first connecting your phone to the WeMo Maker’s WiFi network and then using the app to point the WeMo Maker to your home network name (SSID) and providing the password so it can then join your home network. You’ll also configure the switch by giving it a new name (mine is called “Ashley Garage”) and make certain you configure the Switch Type as MOMENTARY (see image below). For now, don’t mess with the Reset Options or the Sensor setting.
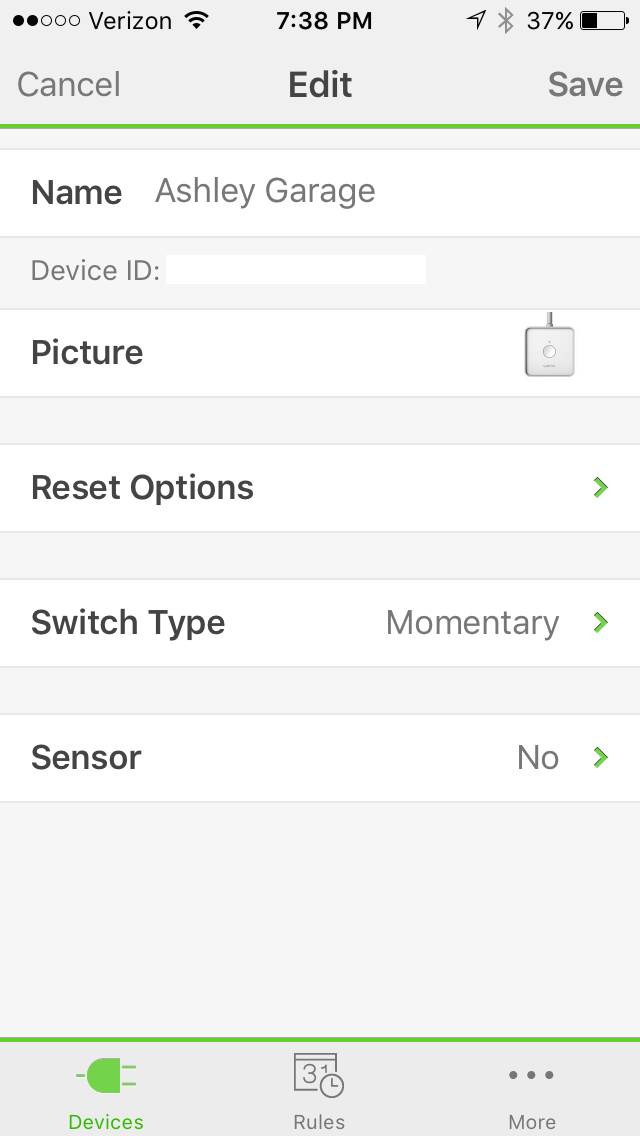
Step 2: Once the WeMo Maker is joined to your home network, take the device to the garage and find a free wall plug. Plug it in and use your phone’s app to test it. When you press the button for the WeMo Maker switch, you should hear the relay inside the Maker box click. It’s not wired up yet, so it can’t open or close anything yet. If the button on the WeMo app turns green and stays green, you’ve not configured the button for MOMENTARY — this is required because it simulates pressing and releasing the button. Use the Edit feature if this happens and change the Switch Type setting to MOMENTARY and try again. The button on the WeMo app should turn green for a second or so, and then return to non-green status.
Step 3: You’ll need to cut two lengths of wire that will run from the two ports on the back of the WeMo Maker (labeled “RELAY”) to the garage door button. I gave myself some extra wire just to be safe — once I’m 100% satisfied, I’ll trim the wire down to a better length and buy some plastic runner from the hardware store to cover the wire and protect it (i.e. keep it from getting pulled or yanked on by the kids). Strip off about 1/2″ from each end of both wires. Let’s call one of these WIRE 1 and the other WIRE 2.
Note: You don’t have to turn off the power to the garage, but it’s also never a bad idea when working with wiring. Just remember to turn it back on at the breaker box should you choose to kill power to the garage.
Use a screwdriver and unscrew the garage door button from the wall. Behind the button, you should see two screws, each holding down a wire. Unscrew just one of these and insert the stripped end of WIRE 1 (keeping the original thin wire in place) and then tighten down the screw again. Unscrew the screw holding down the other thin wire and insert one stripped end of WIRE 2 and tighten down with the original thin wire still in place. In the image below, you can see the original wires (the very thin wires – one blue, one white) and the two new wires (thicker) that I added. As far as I can tell, it doesn’t matter which of your new wires (WIRE 1 or WIRE 2) goes to which screw.

Carefully reattach the garage door button to the wall. My button has a small notch on both ends that lets the new wires exit out without cutting into them – you might have to use a file to create a small gap.

Step 4: Unplug the power to WeMo Maker temporarily and then use a small Phillips screwdriver to screw in the WIRE 1 and WIRE 2 free ends into the RELAY ports. There are two RELAY ports (they are labeled — see image below), one per wire. Insert one wire into the left RELAY port and then tighten down the screw. Insert the other wire into the right RELAY port and tighten down. Plug the Maker back into wall power and give it a minute to boot up and find your home WiFi network.


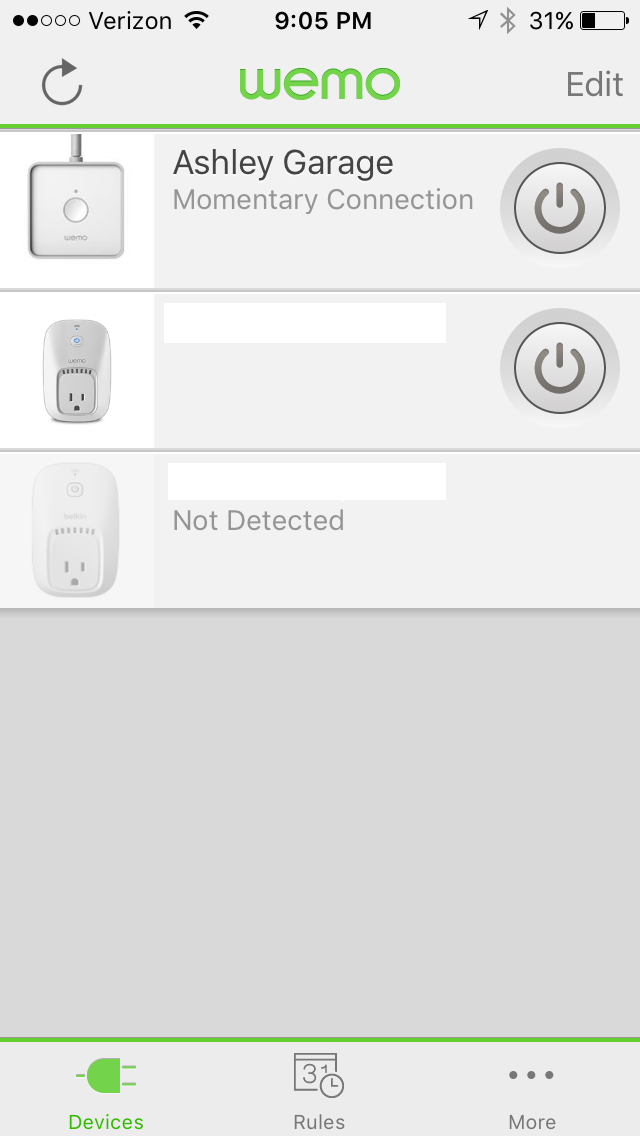
Step 5: Test it! Open up the WeMo app, find the button with the little picture of the WeMo Maker (see image below), and tap it. The button should turn green for about a second (and then go non-green) and the garage door should start opening.
A few notes/observations:
- I turned off my phone’s WiFi and tested it with my carrier’s data connection and it worked.
- I installed the app on my wife’s phone, too. I just texted my wife at her office and asked her to push the button. It worked. Cool. I like to do odd things like this to keep her on her toes during the day.
- My next step is to wire in a magnetic switch (that connects to the SENSOR ports (to the right of the RELAY ports) so I’ll be able to tell if my garage door is open or closed. A message will appear beneath the switch name (Ashley Garage) telling me if the sensor is active (garage closed) or inactive (garage open). If it’s open, a push of the button will close it – peace of mind! (Link to walkthrough here.)
- There’s a button on front of the WeMo Maker that you can push to activate garage. The garage door button also still works, as does the little garage door opener. The Maker doesn’t interfere with any of the other methods you have for opening/closing.
- The WeMo Maker works with IFTTT, as well as the IFTTT DO Button app that puts a big button on your phone’s screen (see image below) but I noticed the DO Button app has a 3-5 second lag. The WeMo app itself is almost instantaneous (but doesn’t look as cool, IMO, as that big green button). Your mileage may vary.
- BONUS IFTTT feature — I can create a recipe that sends me a text message or email (or both) when my garage door is opened. I believe there’s an option to specify a time (IF “after 10pm” THEN “close garage”) and I’ve heard there may be a way to even use geolocation (IF “within 1 mile of home” THEN “open garage”) — will look into that.
- Yes, there are PLENTY of online tutorials for doing this same thing with an Arduino or Raspberry Pi but they can be overly-complicated, especially for those not comfortable working with electronics or programming. I like the WeMo Maker because (a) the app already exists… no coding on my part required and (b) I like the self-contained enclosure that’s wall-mountable and keeps everything protected.

Honestly… anyone who can hook up a DVD player and join a mobile device to a WiFi network should be able to do this. It’s NOT hard. I did it in less than 15 minutes and just finding my wire strippers took about five of those minutes. Give it a shot (but don’t wait too long — I’ve seen the Maker go in and out of stock). If you have any concerns or questions, you’ll also find a lot of WeMo fans on the WeMo Community forum who can answer questions.
It’s the little things in life that often bring the biggest smiles, right? I’ve wanted to have access to opening/closing my garage with my phone for a long time now, mainly for convenience. Once I add in the magnetic sensors to tell me if it’s open or closed, I’ll also be able to stop the “Did I leave the garage open?” worries. I’ll try to do a follow-up post after I get the magnetic switch added in… good luck if you give this a try!
Note: I purchased the WeMo Maker from Amazon.com.


Added bonus: You can also integrate with the Amazon Echo and tell Alexa to open your garage door verbally 😀 Just bought the stuff to do this tonight.
That’s pretty slick, Gerry. I know about Echo but don’t own one. May have to check it out.
You “can’t” control the Wemo Maker with Alexa – the Wemo Maker is complete garbage in the sense that it doesnt have even the basic capabilities that the wemo insight, light switch or switch have. In addition you can only use IFTTT with Maker as a trigger but can not have events “IF” trigger Maker as a “That”. Even though there are recipes for it.
Hi James, I was just wondering with your installation. Is the switch for your garage door to open and close, where you piggy backed (parallel connection) with the relay output of WeMo, a push button switch or standard SPST? Thanks.
The set-up looks pretty simple to be honest. I may have to check into one of these for myself. Thanks for sharing!
I’ve set this up, but my issue has been with power outages. As soon as the power turns on, the garage door opens. So if you are asleep, you won’t know until you wake up (unless you leave your audio on for all night notifications, which I don’t). I am trying to find a way to prevent this, but have yet to. Any ideas?
I’m considering the wemo maker for my garage. Did you resolve this problem of the door opening after power outages?
We’ve had power outages and I’ve not experienced this issue with my WeMo.
I like your setup but on my installation, I mounted the maker to the side of the garage door motor and ran two jumpers straight to the back of the opener where the two wires coming from the wall switch connected. Since there is typically already an outlet in the ceiling it makes for a clean install. Also, it leaves you the ability to still use your current switch since there was nothing wrong with mine. Also, you don’t need extra wires running up the wall to go to a magnetic sensor, the wires run along the ceiling.
I have a chamberlain/liftmaster slightly complex door opener that doesn’t play well with the maker, so it was just easier for me to wire the Wemo maker to an extra remote I had laying around. makes positioning in the garage easier as well.
How did you get the Echo to work with the Maker? Echo seems to find and work with other Wemo devices but not the makers. 🙁
Mine is a gate opener. I used ifttt. You turn on ifttt connectivity on both Alexa and on the Maker. Then you go to your ifttt account and create3 a new applet. Select alexa as the “iF” and it will ask you your trigger words, like “gate open”. Then select the “then that” or “action” to be for the Maker to turn the relay contact on (close contact). Add a similar if/then applet to turn it off. Your second time around only takes 5 minutes.
I’m curious too about power outages. Any solution so garage door doesn’t open during a power outage?
I’ve never had problems with that. We’ve lost power. All it does is reboot the Wemo. Because this is a momentary switch emulation, if the garage is down when power goes out, it stays down when the Wemo comes back.
I tried Wemo on my GTO Mighty Mule gate opener. The momentary switch only stays on for 300 milliseconds. That is about 1/3 of a second. My gate needed at least 500 milliseconds and maybe more like 1000 milliseconds, which is a full second. Had to use a smart switch attached to a relay to make it work. I sent the Wemo back
Can you provide more detail on what the “smart switch” option is. I have the same issue.
I too have a GTO gate opener and would like to hear more about the smart switch. I would like to program it to check is the gate is open at a specific time at night, like 11p, and if so , close it.
GTO gate operators ( most ) have an auto close timer.
I noticed a couple of people mentioning that a power outage is causing the garage to open again.
This is likely due to the fact that the Wemo Maker is set to “Toggle” mode which means it stays in an On or Off position like a light switch. When the power is restored, the Wemo Maker will reset itself back to the state it was in. So if it was in the “On” position at the time, and power is restored, it will be turned back “On” which will likely trigger the garage to open again.
Setting the Wemo Maker to the “Momentary” mode should solve this. This basically turns the switch on and then quickly back off (300 millsecond delay).
I’ve never had a power outage cause my Wemo Maker to re-open the garage.