
In my prior post, Dungeon Casting Part 1: Creating Dungeons With Hirst Arts Molds, I showed you how to create the crypt from Pathfinder’s Crypt of the Everflame game module. The key feature of the crypt is Kessen’s sarcophagus. This sarcophagus lid is cast from a custom mold that was surprisingly simple to create. In this post I will show you how to create your own molds that can be used to cast your own pieces similar, or identical, to Hirst Arts stones. One reason you may want to do this is to create a custom piece otherwise not available, such as this sarcophagus lid.
Another reason is to speed up the process of casting Hirst Arts pieces by copying his into piece specific molds. How is this legal you ask? Well, when I contacted Hirst Arts with this question, Bruce Hirst replied with, “There’s no problem making molds for your own personal use. Many of my customers do this to speed up casting time. You would not need a license agreement for that. You would not be allowed to sell or trade these molds, though.” So, yay, this is totally fine to do. If you’d like to see all the legal mumbo-jumbo or are interested in selling what you create, have a look at the complete Hirst Arts legal statement. There is a nice, in-plain-English summary of each section of the legal document for the legalese-impaired, so, really, check it out.
With that out of the way, let’s see how I built the sarcophagus lid; replicating anything from the Hirst Arts mold is just a simpler version of this.
Materials needed for the sculpting and making a mold
- Hirst Arts mold making instructions
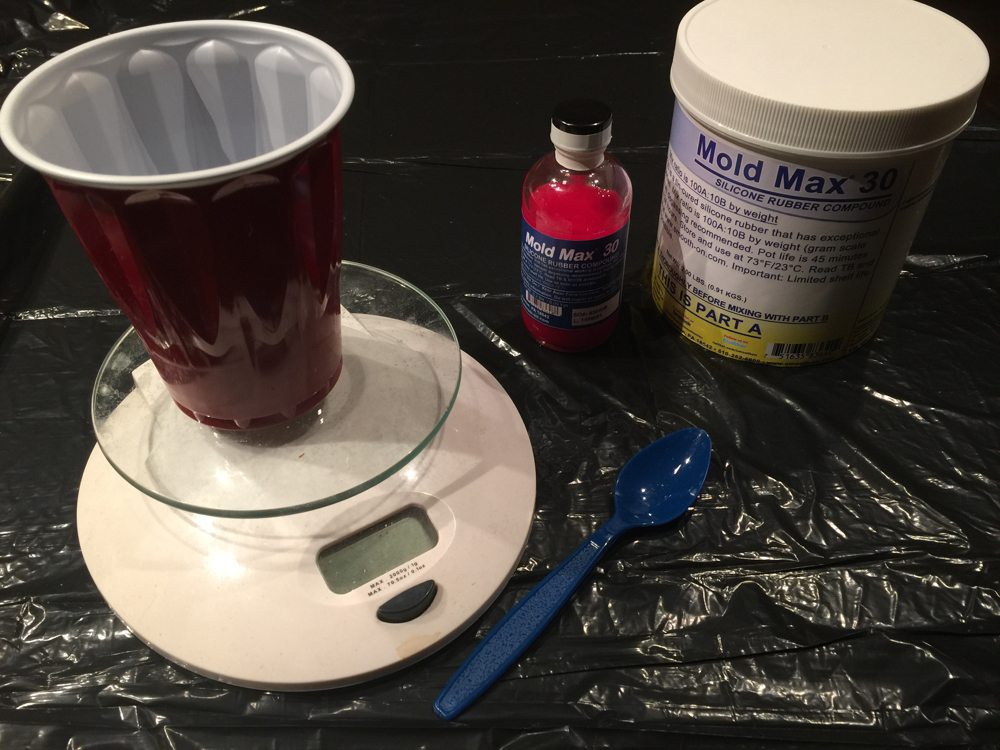
- Mold Max 30 – This is the material you pour to actually make the mold
- Super Sculpey – For sculpting your original piece
- Green Stuff – For sculpting. You can probably just use the Super Sculpey for most things. I am just including this as I used it for statue bases. Green Stuff is used for sculpting more detailed things like miniatures.
- I also used a miniature in-lieu sculpting my own “statue”
- LEGO blocks – For containing the liquid Mold Max
- Plastic cups and spoons – For mixing
- Chemical resistant gloves and eye protection
- Scale – To mix the Mold Max 30 by weight
Once you’ve created a mold, you need the same materials you did from the prior post to cast bricks.
- Merlin’s Magic Hobby Stone – I bought the 50lb box – Shop around, shipping kills you on this one, this link is gray. I had white.
- Black and White latex house paint and Hirst Arts Painting Instructions
- Aleene’s Original Tacky Glue
- Plastic cups and spoons – For mixing
- Four inch putty knife
My goal with the sarcophagus cover and the statues within the crypt was to represent Kessen, for whom the crypt was erected. I could have sculpted my own miniature, but why do that when countless miniatures that are way better than what I can currently sculpt are available? I searched for a miniature that was posed appropriately for a statue as well as for the carved relief of a sarcophagus and found D&D Miniatures, Desert of Desolation #12 – Merchant Guard as a good match. He’s pretty well contained, without extended arms or weapons that would break off as a sculpture, so I purchased a few copies of him. Back when I did this (years ago) I am sure I found a better price than the miniature in the above link.
Mold Making Steps
Again, these are covered in more detail on the Hirst Arts site and you should check that out, but, briefly, here’s what I did.
- The first step is to get something to make a mold of. I was making a custom sarcophagus lid, so my first step was to sculpt that. Using the Sculpey I created a lid shape with the figure embedded in it as if it was carved in stone.
- Using LEGOs I created a frame to hold the poured Mold Max. If you’re a parent you can probably find these just lying about, maybe stuck to your bloody feet.
- Follow the directions on the Mold Max and mix it in a plastic cup. Do this in a well-ventilated area and use gloves.
- Pour the Mold Max with a thin stream to slowly cover and prevent bubbles. Totally cover your sculpture.
- When the Mold Max sets, break off the LEGOs, remove the sculpture, and with a little bit of clean up you have a ready-to-use mold!
- Cast it just like we did the Hirst Arts molds from the prior post on casting.


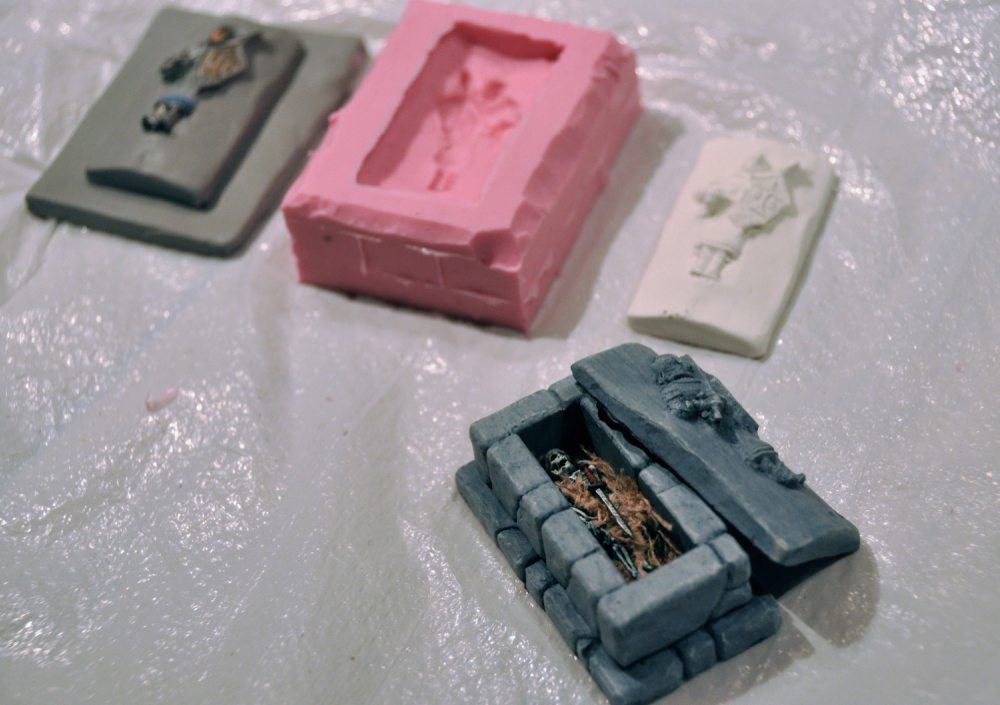
With the sarcophagus finished, I then created a mold for the base of the statues in my Crypt of the Everflame model. For this I use the Green Stuff miniature sculpting material, but could have just as easily just used more Super Sculpey. Once I had the mold and cast the statue bases, I cut the bottoms off of four more of the Merchant Guard miniatures, attached them to the bases I cast, and painted them with the same dark, medium, and light-grey paint.

Note that all I have cast so far always has a flat base and is not so intricate as to be difficult to remove from the mold. You could cast a 3D object like the statues, but that would require a two-part mold, something I have yet to do.
Another reason you may want to create your own molds is to speed up the process of casting Hirst Arts pieces. For my Crypt of the Everflame project as well as my next project that I will detail in tomorrow’s post, I mainly needed just a few pieces reproduced many times. The Hirst Arts molds I purchased only had one or two of those pieces. I could, of course, have purchased many more identical Hirst Arts molds and cast just one cavity on each, but instead, I used pieces already cast to make a mass mold. Again, this is allowed for personal use as discussed in the Hirst Arts legal statement. The molds aren’t as precise as the Hirst Arts ones, but they are good enough.

As you can see from this post, the mold-making process is not at all difficult. The one thing that definitely takes some skill is the sculpting. I made that process easy by using a miniature as my sculpt, but you could just as easily sculpt, or even 3D print the object you want to make a mold of. The ability to make your own pieces greatly increases what you can do in your dungeon building. If you’re interested in how to make modular, reusable, Dwarven Forge-type, dungeon tiles, check out my next post.

Part 1: Creating Dungeons With Hirst Arts Molds | Part 2: Creating Custom Molds | Part 3: Making Modular Pieces

So a question about how you made the copies of the Hirst Arts mould.
Did you cast a “negative” and then use the Mold Max 30 to make your pink molds? If so how did you go about it?
Or did you take a number of cast blocks and create a “new” mold that had more of the pieces you desired?
I just took a bunch of cast blocks and created a new mold.
I imagine they were slightly different in size. Hirst says on his page, “Besides, making exact blocks (within 1/1000ths of an inch) is fairly time consuming, not to mention shrinkage factors and other silicone problems. I doubt there will be very many people out there willing to repeat all the work I’ve done to make a mold they could easily buy.”
Again, I imagine mine ended up being slightly different in size and definitely quality, but they were good enough and I did not notice any issues. Size-wise if I stuck to my copies they’d all be the same (if I cared or needed them to be within 1/1000ths of an inch of each other!) But I mixed and matched my copy blocks and the Hirst originals.
Thanks!
I figured it was the latter option, it is nice to have “dungeon dressing”, but when one just needs wall blocks and you only have one mold, players might wonder “Why does this place have so many barrels?”
There’s quite a few papercraft options out there as well for dungeon dressing, and for the whole dungeon for that matter!
And this mold max 30 doesn’t seep under the flat part of the casted Hirst pieces?
I believe I glued them to my surface. That glue could be used to seal the bottom. I also do believe that sometimes it seeped a little (the result of which I tore/cut off.
Nice project, I can’t seem to find any competitors to hirst molds, and at $34 each I can’t bring myself to buy the 5 molds I want to start my hobby project, I’m new to this idea and not sure how it will hold my attention any suggestions on a cheaper way to start out testing the waters with a hobby like this?
Yeah, at a minimum you’re going to probably need two molds… some form of brick for walls, and some floor material. If you have some bricks that you like, using the info in this post you can make molds of them. Or with some skill you could craft some of your own bricks to make molds of.
A whole other concept to maybe try is modeling with foam. Check out what Czar of Happiness did in here… https://geekdad.com/2016/09/acquisitions-incorporated-at-pax-west-2016-the-making-of-cloud-castle/.
Basically, sheets of insulation foam from Home Depot or somewhere, and a way to cut/sculpt it… hotwire cutter… some examples here… https://amzn.to/2DofkTg. Great potential with it.