 Over the past couple of years, I have gotten interested in cosplay, especially cosplay with my son. Coming up with father/son costumes and attending cons together has been a great bonding experience and something I hope we can do for many years to come. Like many folks, I go to cons, see all the glorious armor people have made, and am envious and awed.
With a desire to also be awesome, I recently interviewed Bill Doran, one of the top foamsmiths, and reviewed his book, Foamsmith: How to Create Foam Armor Costumes. I then set off to make my first piece of armor–Link’s Hylian Shield of Zelda fame–using all of my new-found knowledge.
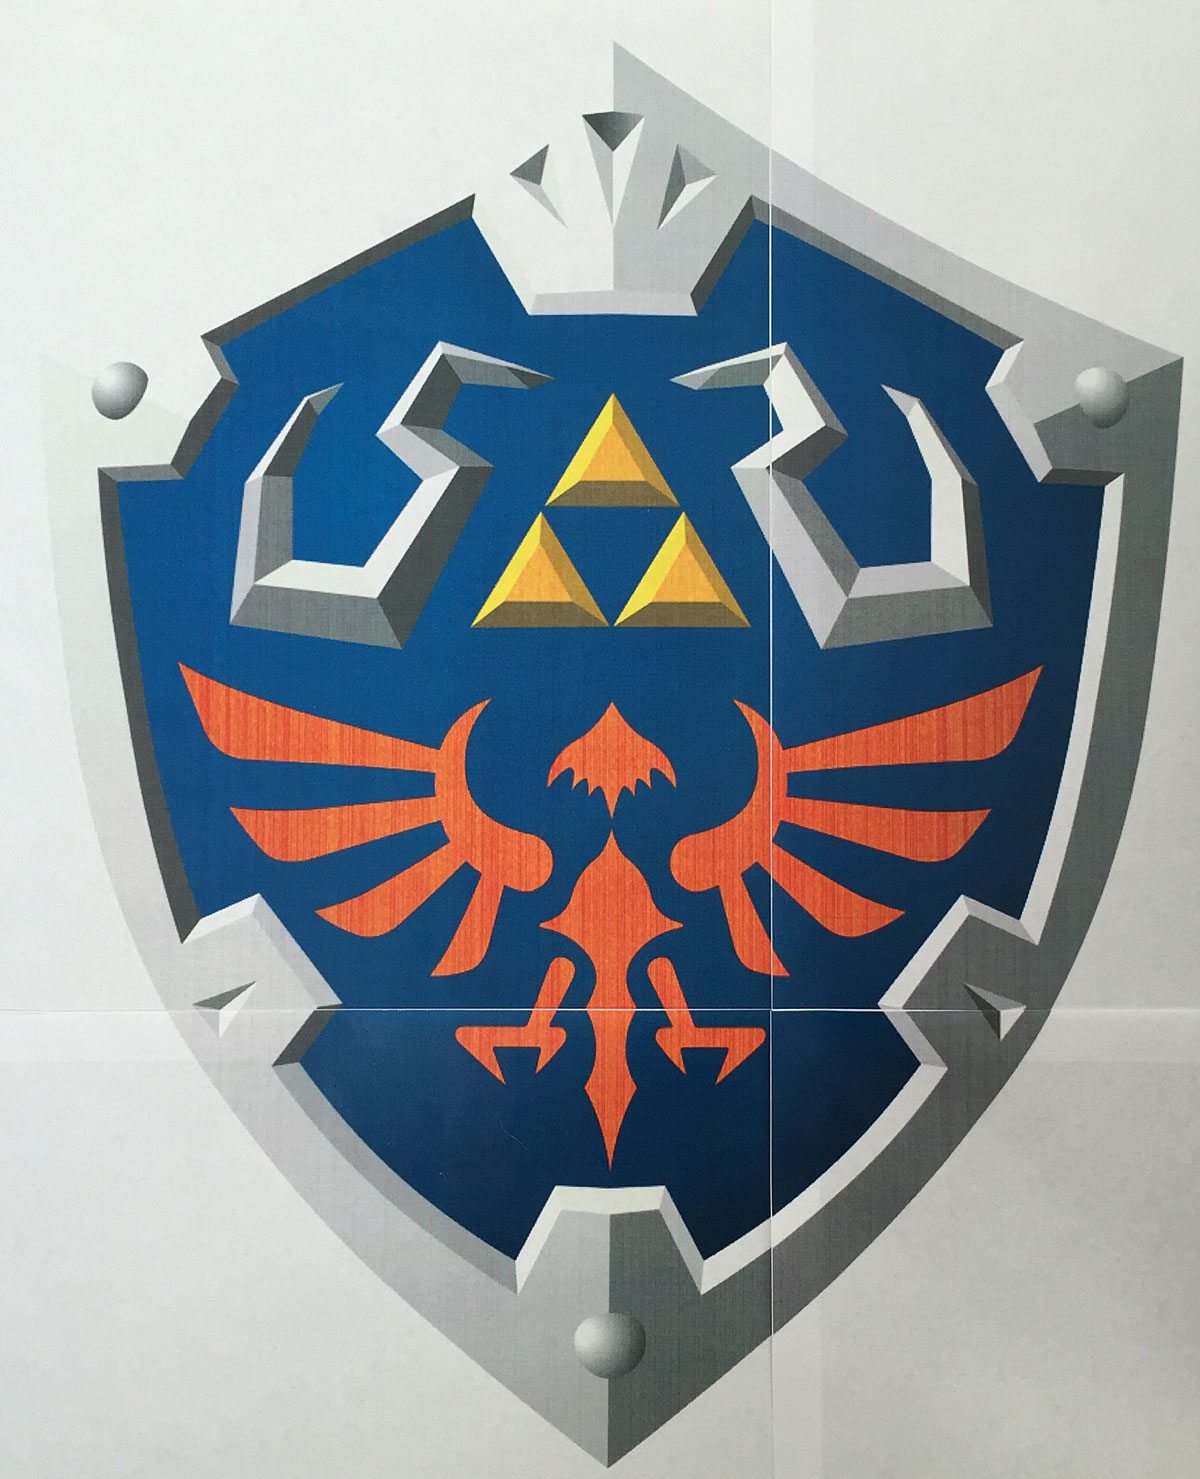
I sifted through a ton of images online until I found one that had a look I liked. Because this is going to be for my toddler, I sized it for him. The template I printed was about 16″ x 11″. Now with my idea locked in, I set off to get the tools I’d need.

Taking Doran’s advice, I tried to limit myself to only the bare minimum I would need for this first project. Here is my initial shopping list:
- Snap-off Utility Knife – These long bladed, easily sharpenable knives are recommended by pretty much every foamsmith.
- Kershaw Blade Sharpener – What good is a knife if it isn’t sharp? Foam dulls blades very quickly, and you will need to re-sharpen every couple of cuts. This is the most valuable tool in the foamsmith arsenal.
- Stainless Steel Ruler – A good long metal ruler is great for long straight cuts.
- Foam! – This one is a no brainer–no foam means no foamsmithing. I used floor mats as well as both 6mm and 2mm craft foam.
- Heat Gun – A heat gun is critical if you want to do anything that isn’t completely flat, which is pretty much any armor, so that you can shape your foam. You’ll also want to heat seal your foam before applying any coating or paint.
- Barge – This is a contact cement that pretty much every foamsmith uses. You’ll need plenty of this for gluing pieces together.
- Disposable Brushes – The glue will tear up paint brushes so getting a bunch of cheap disposable brushes for the Barge is key.
- Plasti Dip – There are several common methods for sealing your foam before painting, but this seemed like the best combination of fast and cheap so it’s the route I chose.
- Acrylic Paints – Depending on what you are making, you can probably skip this, at least initially, and stick with spray paints. Because I knew I had to do some detail painting, and I know I’m terrible at masking, I bought the paints. Doran also gives a lot of techniques on using them for weathering.
- Clear Coat – I assume you will want your finished work to last, so a good clear coat is essential. I went with a satin finish, but choose your finish based on the look you’re going for.
Here are some other important tools that you will probably need that, luckily, I didn’t need to buy:
- X-Acto Hobby Knife – Fortunately, I already had one of these. I mostly used it plenty for cutting out my templates but did need it for some of the small, detailed cuts I made.
- Self-healing Cutting Mat – Unless you already have a cutting work surface, you will definitely want one of these. I borrowed the one from my wife’s sewing table much to her chagrin.
- Kraft Paper – Ideally, you’ll need this for making templates. It’s sturdy, and your templates can be saved for later re-use or for when making multiple pieces that are identical. We use this a lot for projects with our son so had a big roll handy.
- Rust-Oleum Metallic Paint – I luckily had some left over from our steampunk cosplay at ECCC that I could re-use as the metallic base coat for the shield.
- Respirator – I already had one of these because of all the DIY work I do, but if you don’t have one, you should absolutely get one. You’ll be dealing with a lot of fumes and particles that you don’t want to be breathing in.
- Pens and Sharpies – you’re going to be doing a lot of drawing, tracing, and marking on foam.
- Rotary Tool – I happened to have a small wireless Dremel from a long time ago. It wasn’t ideal and was frequently underpowered, but I didn’t need it a whole lot for this project. That being said, if you’re going to seriously get in to foamsmithing, a good rotary tool is important (I have one on my wishlist.)
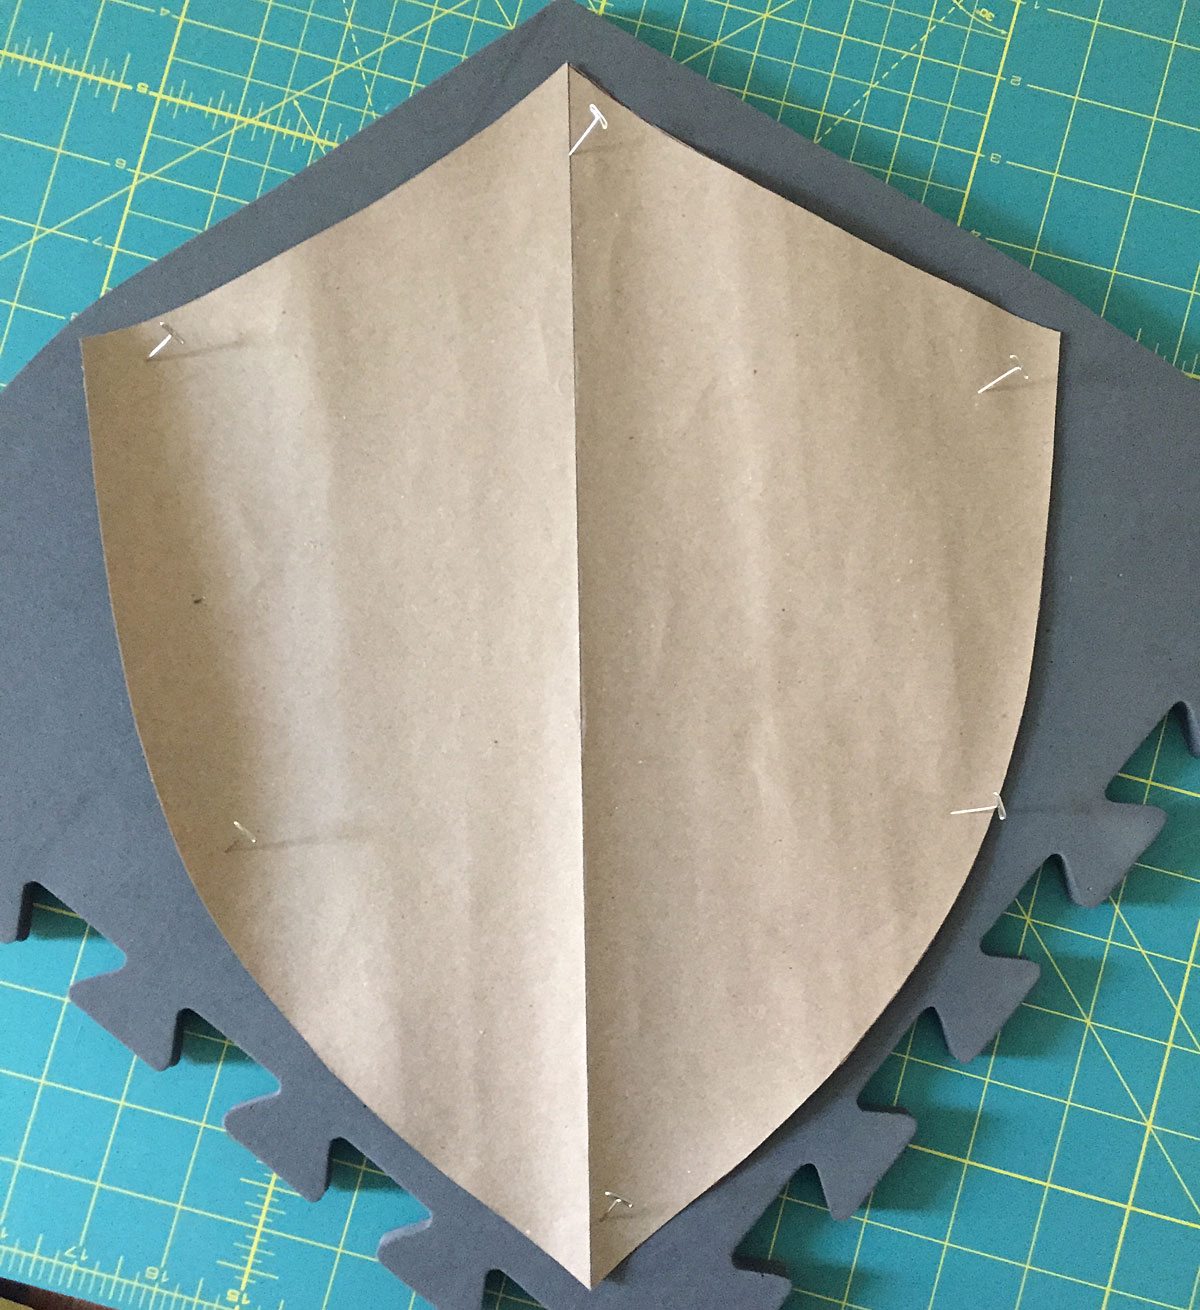
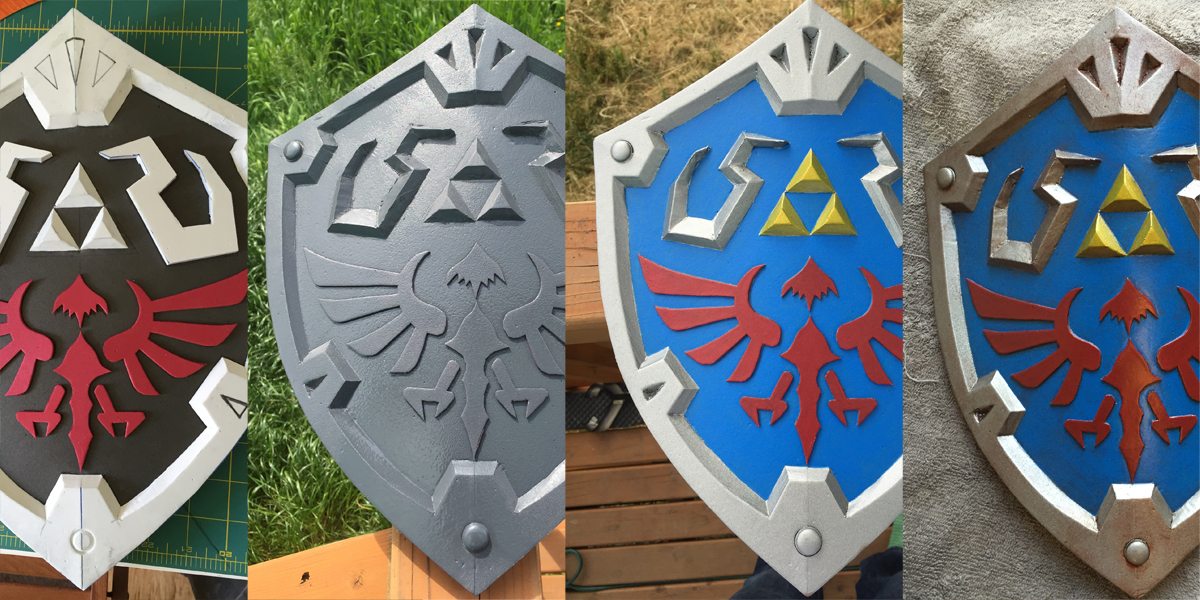
With all of my supplies ready to go, step one was to cut the basic shield shape out of my printed master. I then held it down over my Kraft paper and traced out half of the shield. Because I wanted to make sure it was perfectly symmetrical, I folded the paper in half and then cut out the template with my X-Acto. I then pinned the template onto my floor mat foam and traced it with a sharpie. Using my snap-off knife, I cut out the base shield form.
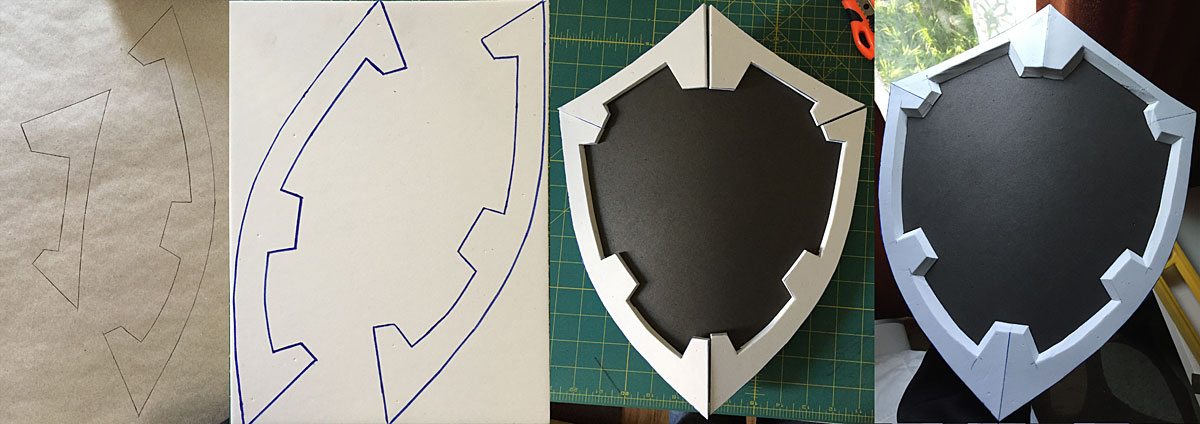
This is where the beauty of making Kraft paper templates really shines. Because the shield is symmetrical there was no reason for me to cut four different templates. I made the two right pieces, flipped the templates, and made the left two. The seams on these pieces are probably the thing I’m the least happy with on the shield, but, hey, it was my first time, and they aren’t terrible. These pieces were all cut out of 6mm foam. Gluing the foam together is really simple but does take some work. You have to brush the glue on to both pieces, and let it dry. Once it’s dry, you stick the two pieces together, and they will never part again. This means initial placement is critical but not having to hold things together while glue sets or dries is well worth the risk.
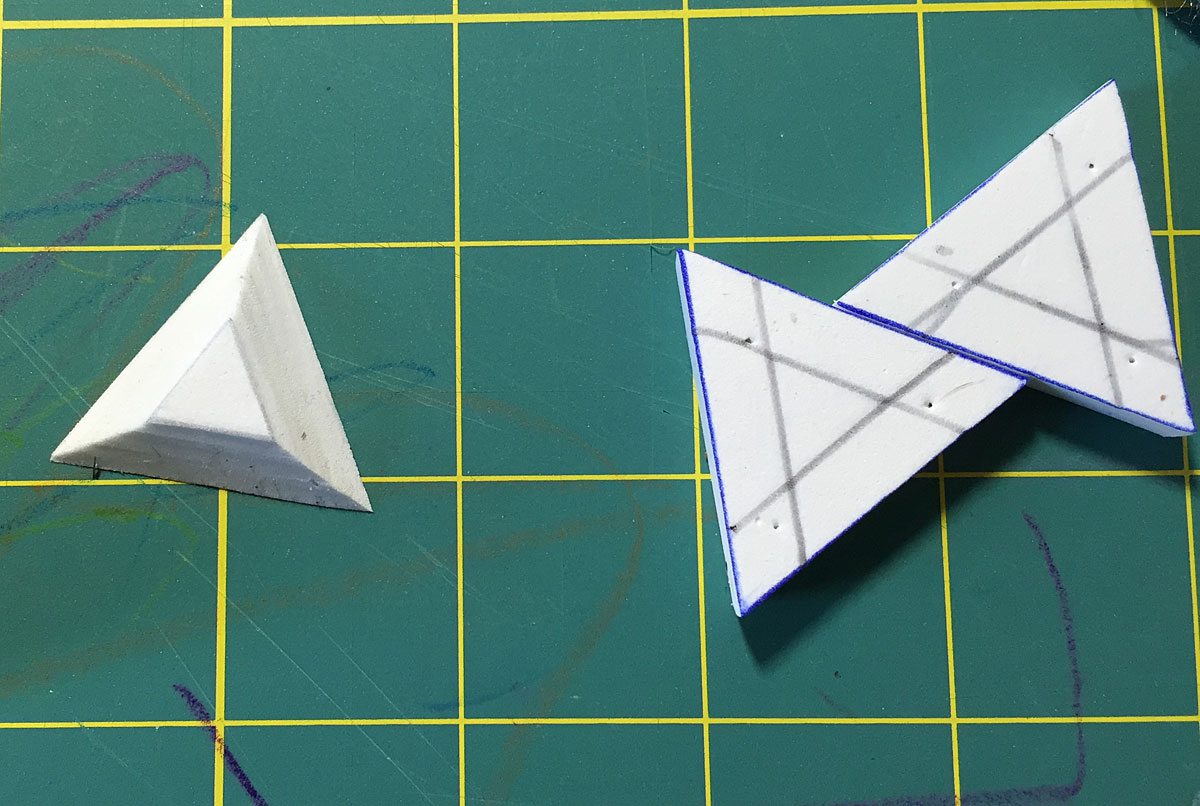
The Triforce pieces were easier than I expected them to be. I cut three triangles out of 6mm foam and then drew intersecting lines on them for my 45 degree bevel. I used the snap-off knife and free-handed these. I’m pretty happy with how they came out.
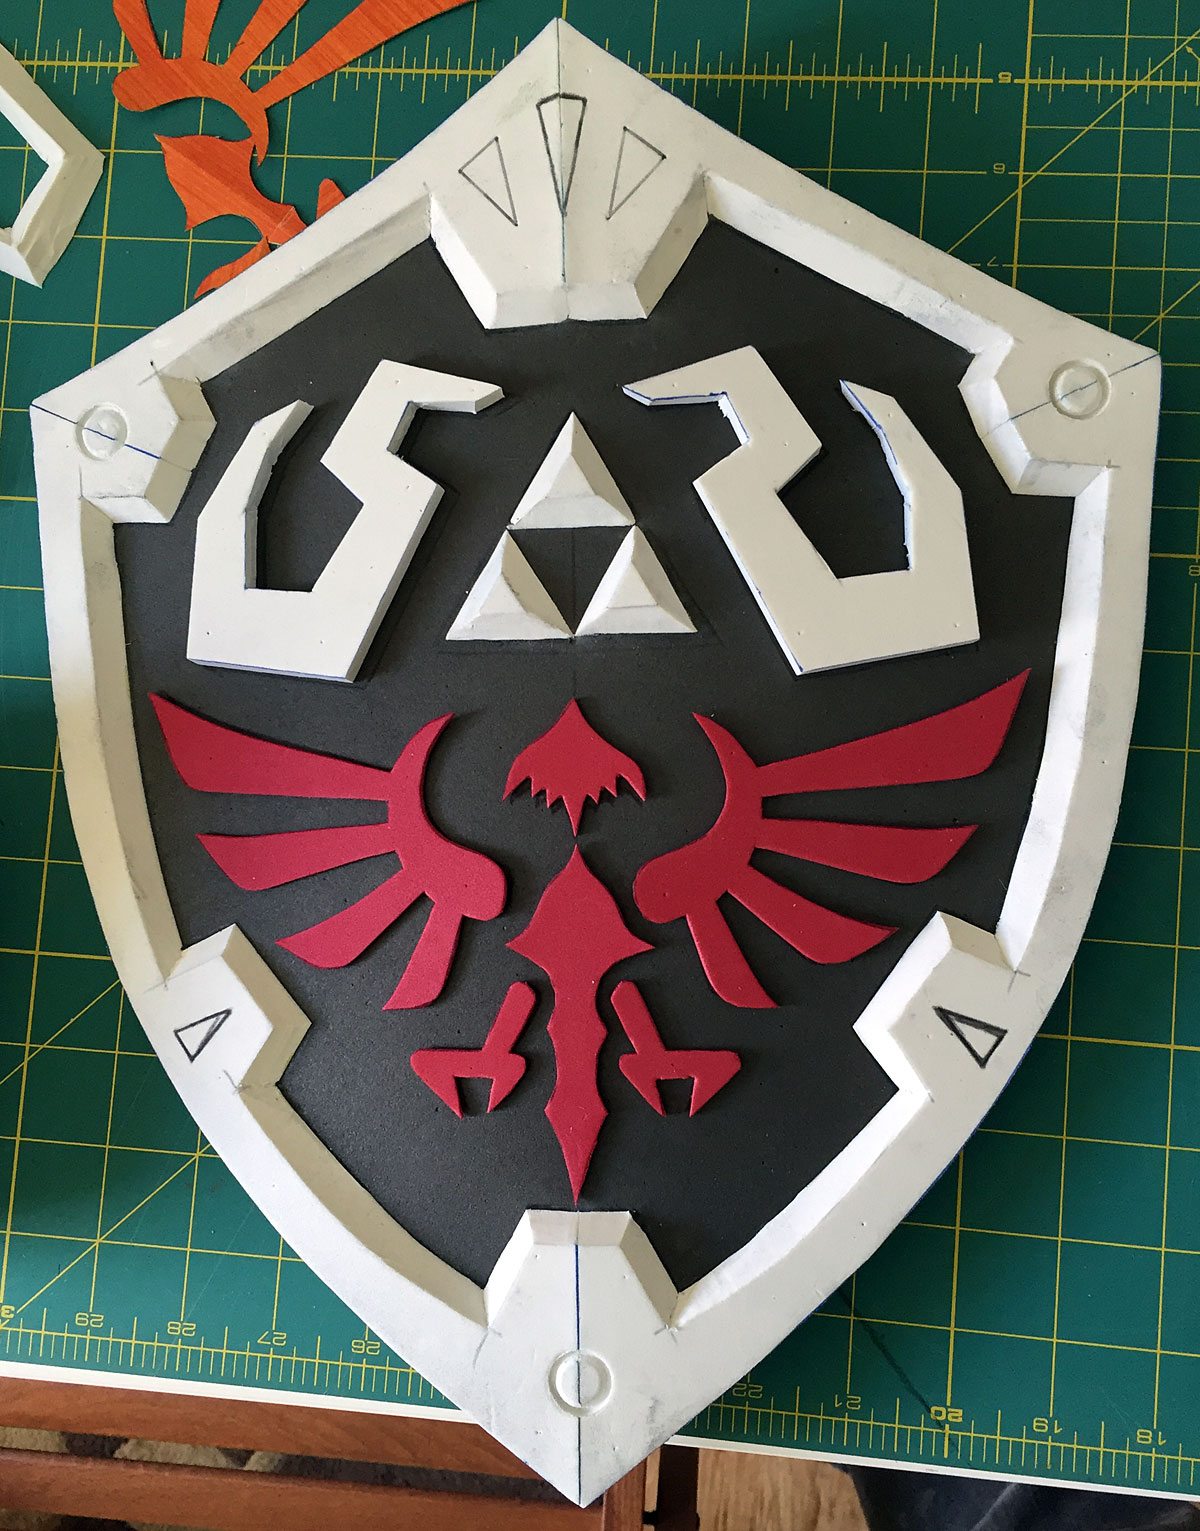
I then cut the Crimson Loftwing out of 2mm foam. Technically I probably should have just painted it on, but I wanted it to stand out so opted for foam instead.
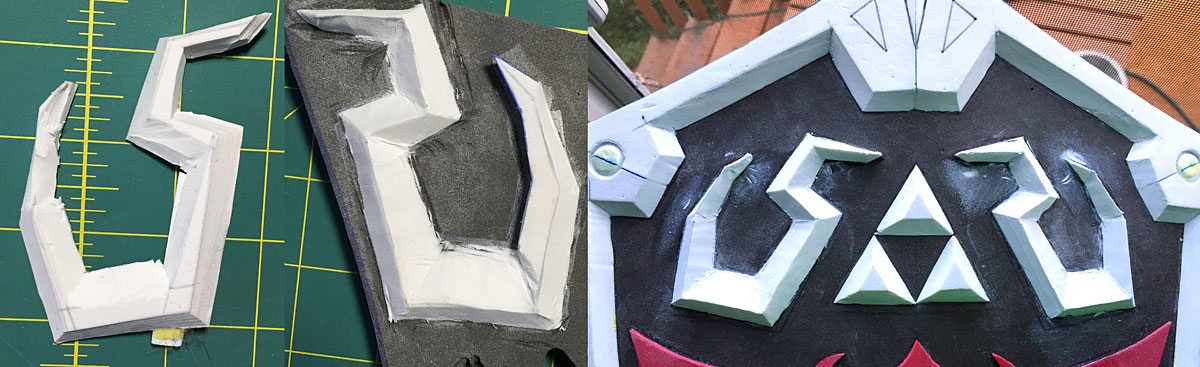
This was the hardest part of the entire shield. I tried several times to do freehand bevel cuts like I did with the Triforce pieces, but due to the complexity of the shape and angles (and my lack of skill) I ruined several pieces before I gave up trying to cut them. I then glued one onto a scrap piece of foam and did a combo of some cuts and a lot of Dremel practice work. I was pretty happy with how it turned out so I glued two of them onto the shield and went to town with my Dremel.
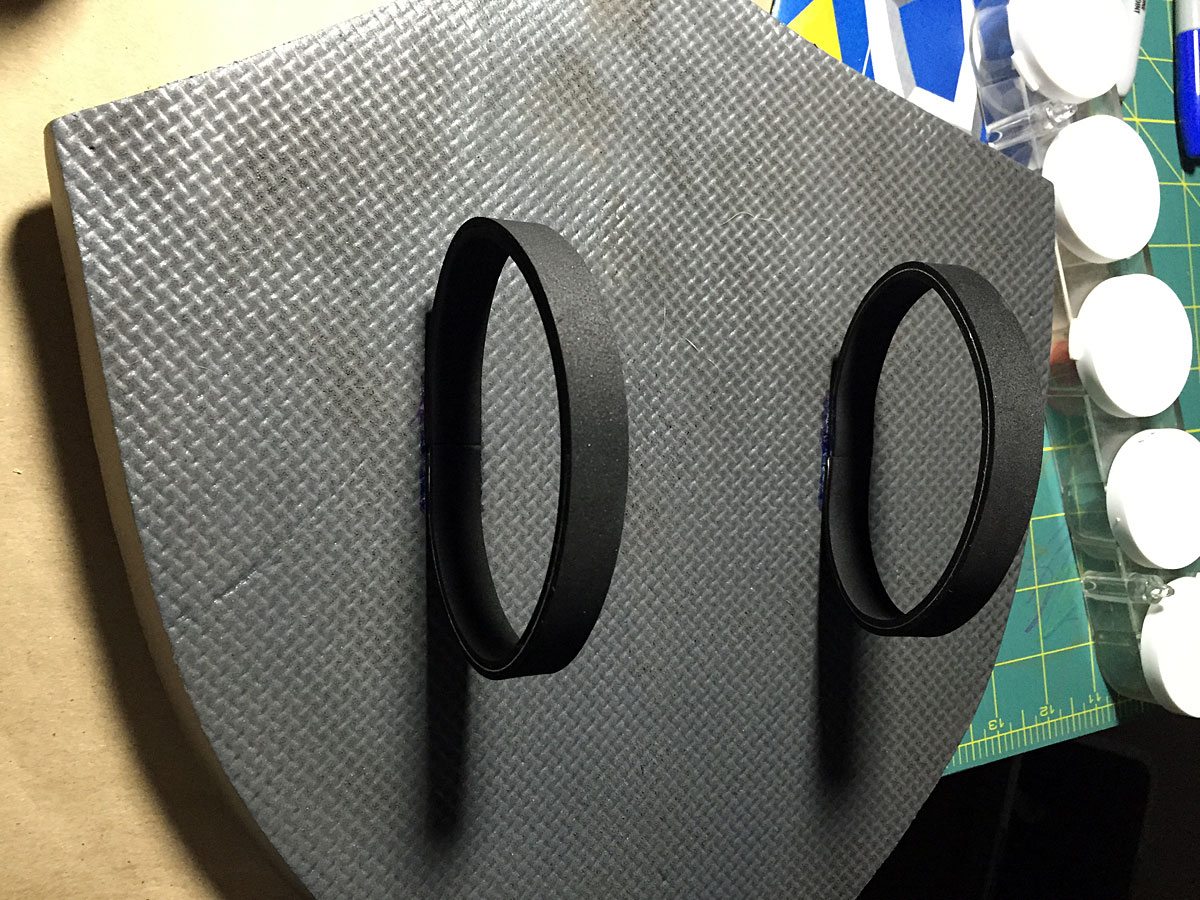
As a last touch, I did a quick sanding of the textured backside and added two loops of 2mm foam as straps before coating the finished build.

And then I ran in to my first big mistake on the project. I put on the first coat of Plasti Dip and noticed that my foam was a lot more porous than I’d expected, having seen lots of pictures and video of Plasti Dip-coated foam. And then I remembered that I hadn’t heat-sealed it with my heat gun! Basically, you want to zap your entire piece with a heat gun to very lightly melt all the foam. This helps seal up the pores and make a better base to start painting. At this point it was too late for me to do anything about it so I did several extra coats of Plasti Dip. Like with any spray, leave plenty of drying time between coats!
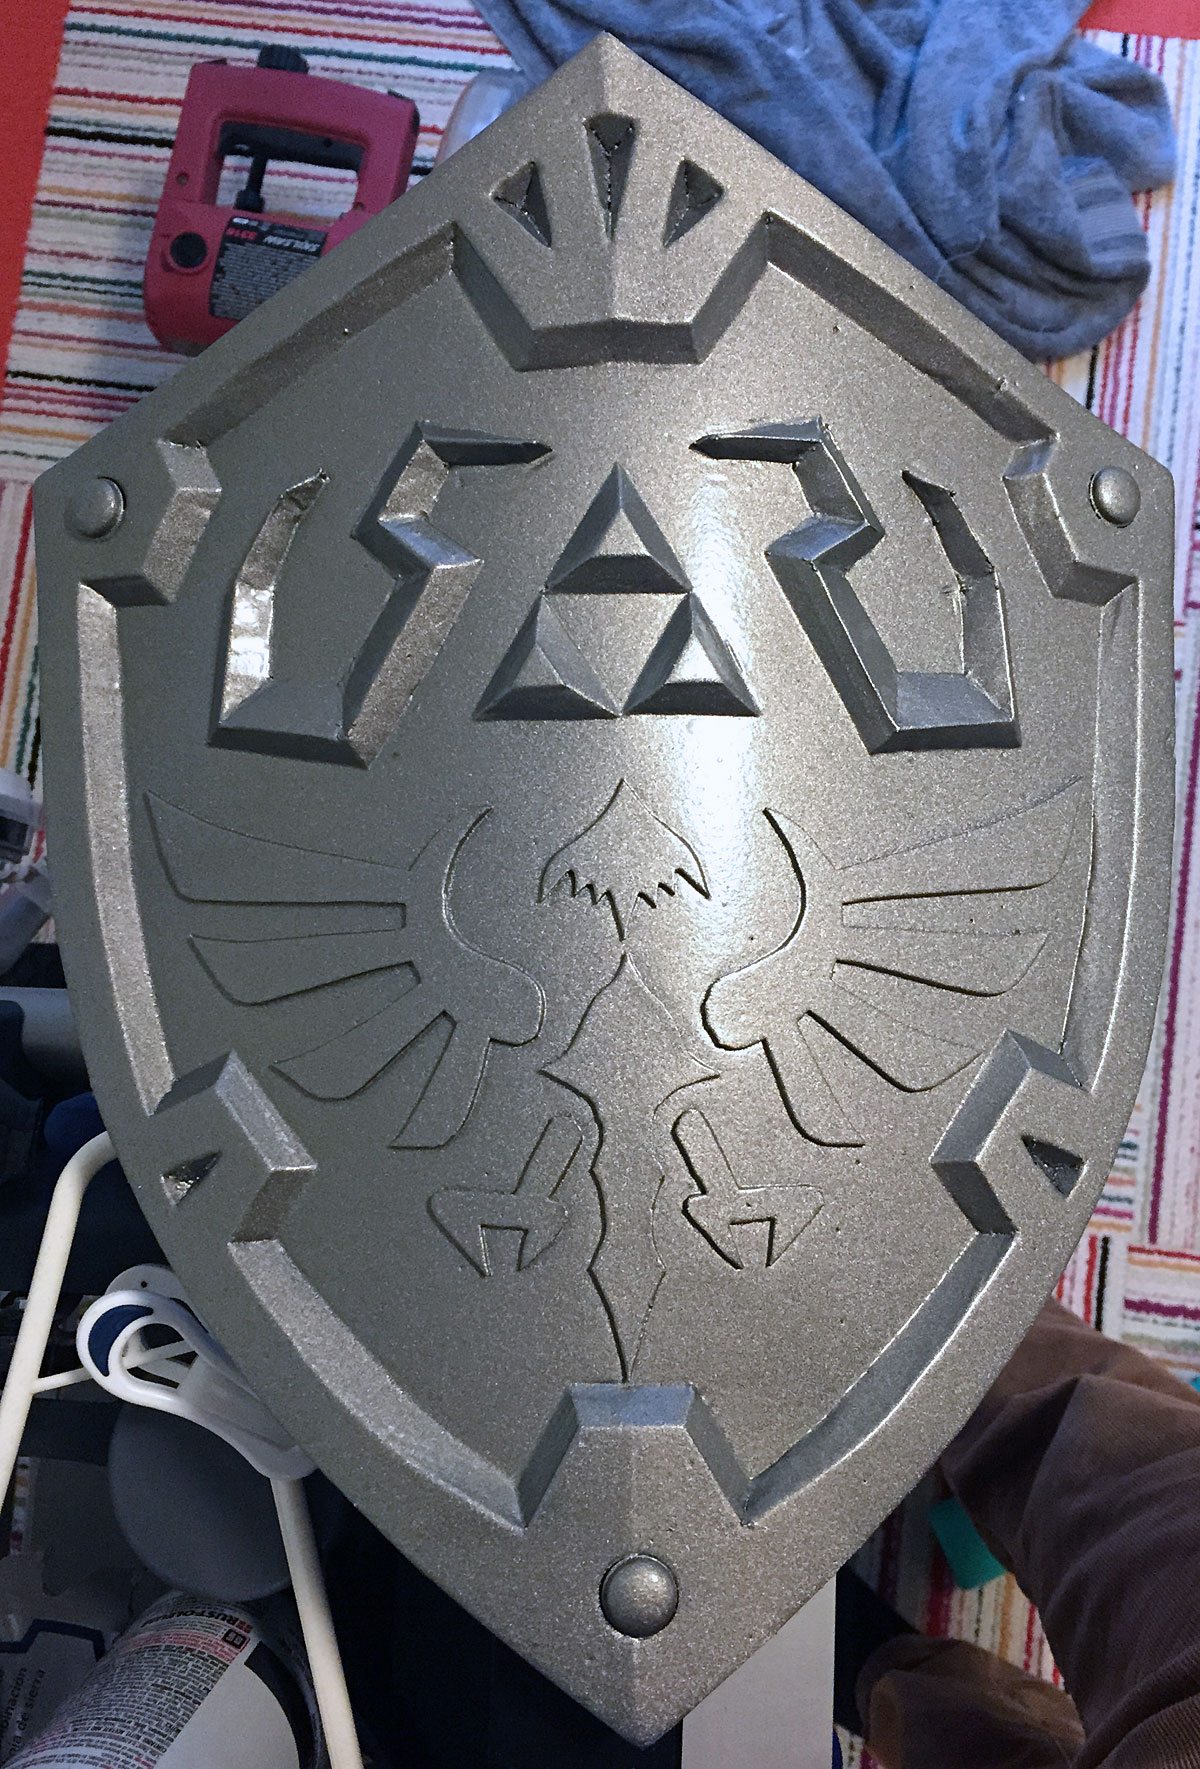
Once the final Plasti Dip coat was dry, I broke out my metallic spray paint. I did another several coats, also leaving plenty of drying time between coats.
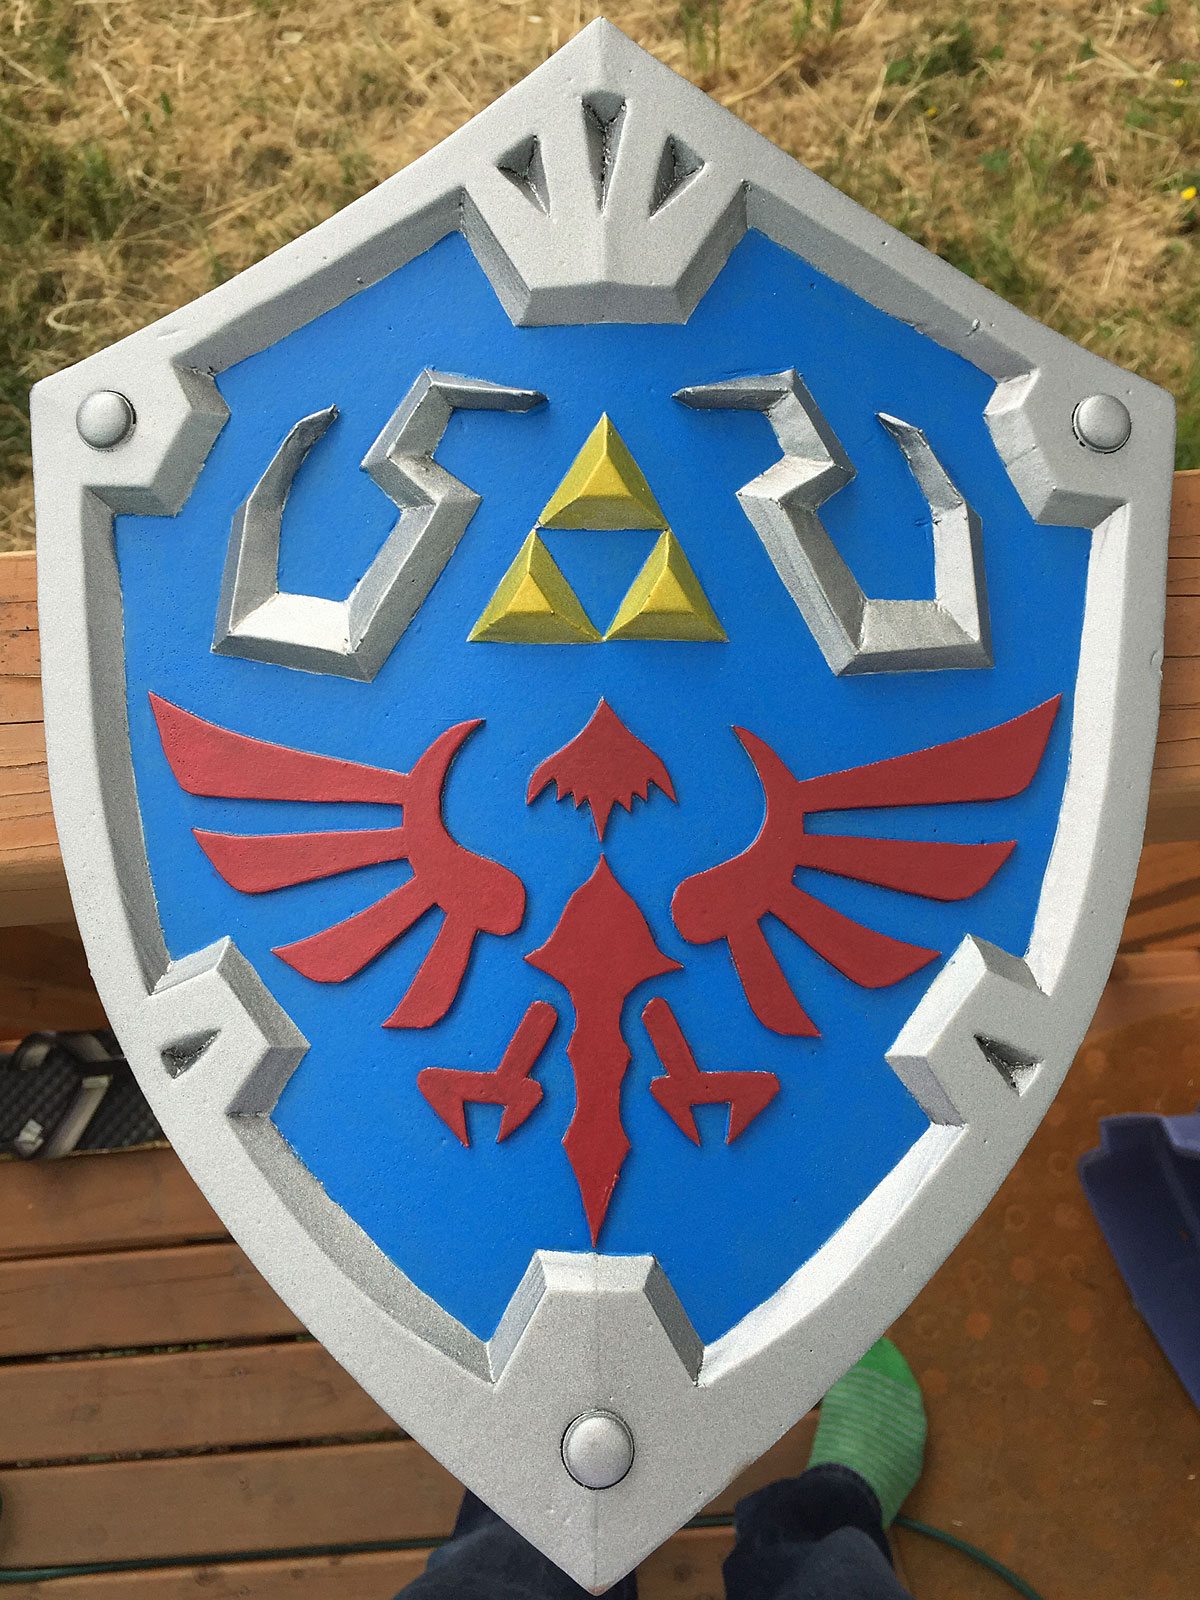
Once the metallic base coat was all dry, I broke out my acrylic paints and went to work. I was surprised at how many coats I had to use to actually cover the metallic paint; however, it ended up working to my advantage because, though you can’t really tell from this picture, I only did two coats on the Triforce gems, and they actually have some sparkle to them for a more realistic gem look. With all the acrylic painting done, I gave the shield several all over coats of my clear coat (again allowing plenty of drying time between coats.)

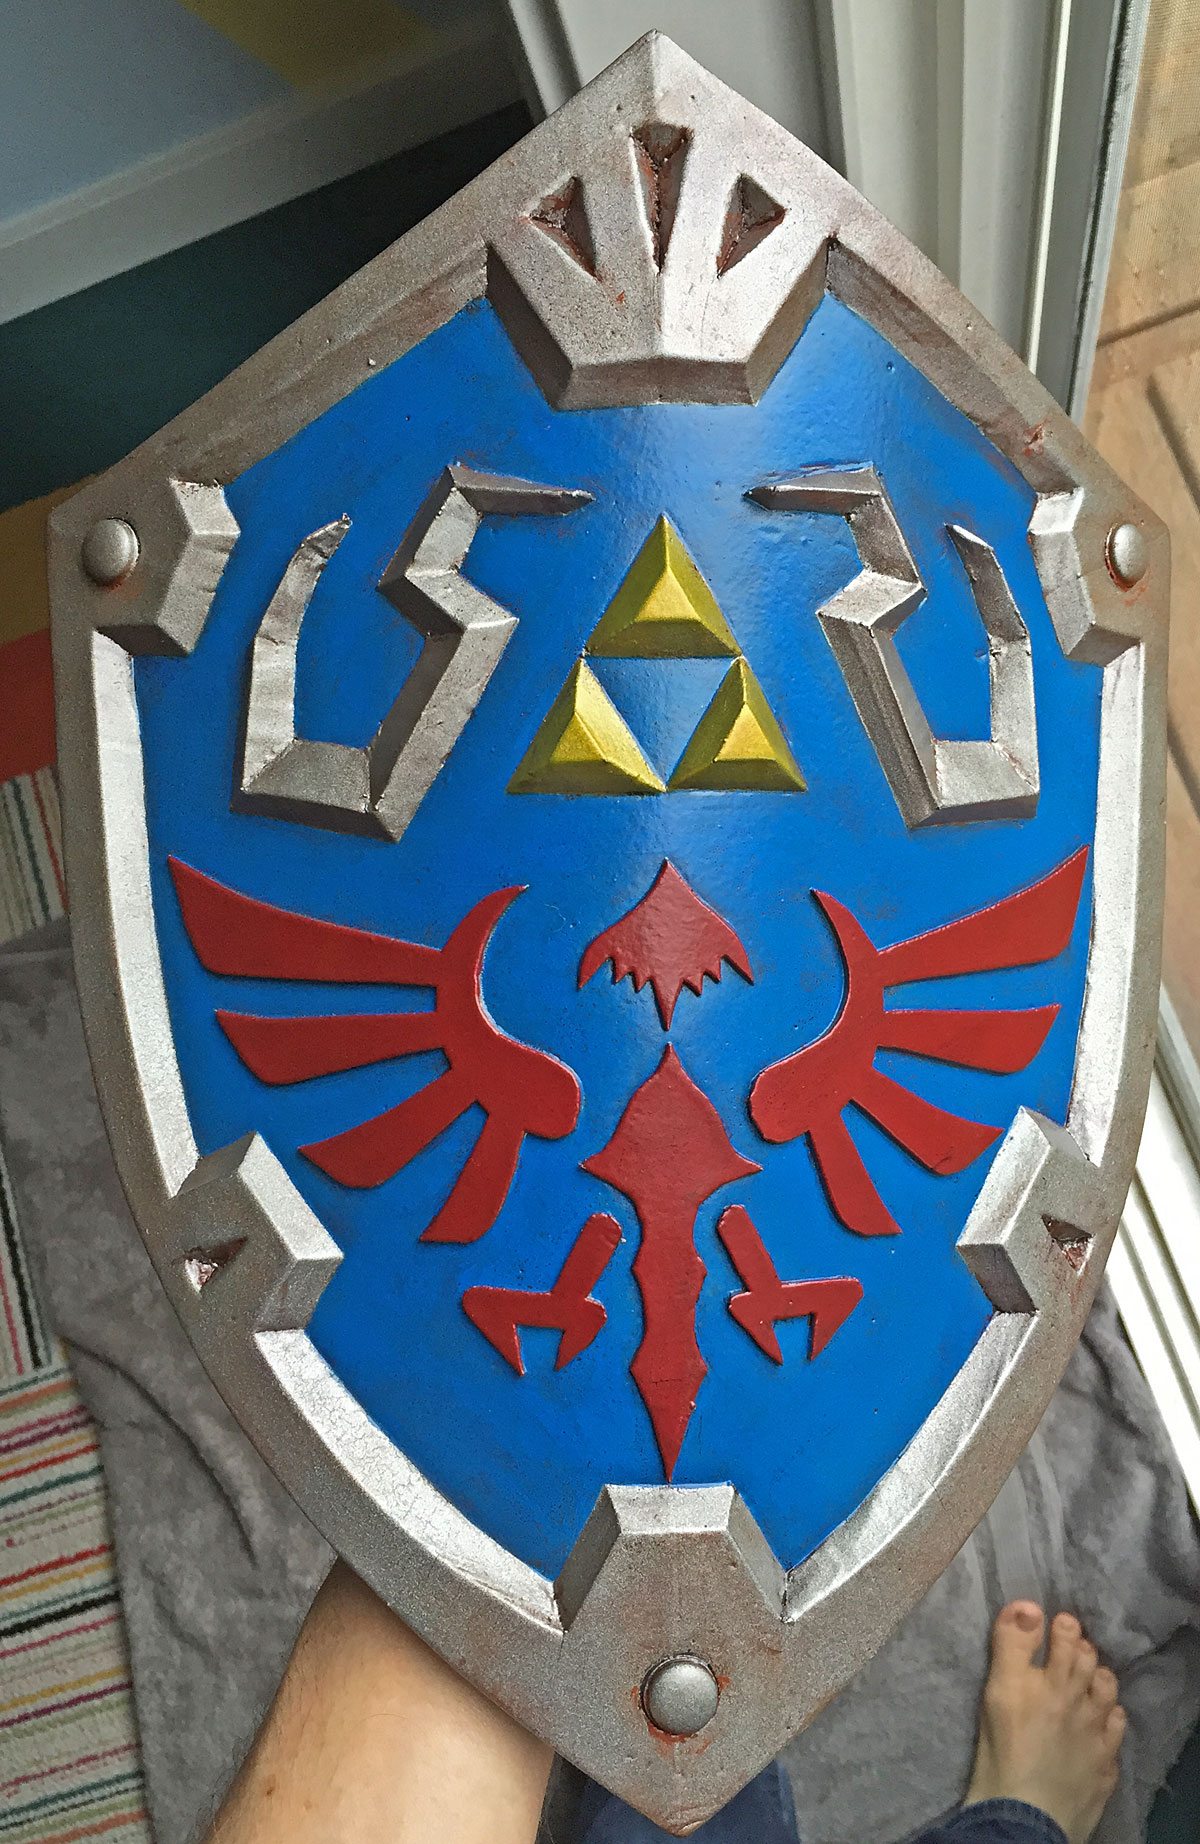
With the clear coat all dry, I went to work weathering the shield. I debated skipping this step and leaving it more “cartoony” looking since it was for my son, but I wanted to practice weathering techniques so went for it anyway. One of the weathering tips I picked up from Doran’s book is to use multiple colors, so i had a mash of rust, purple, and black that I painted into all of my cracks and crevices. I only let the paint sit for about 30 seconds before wiping it off. I also did a darker blue wash in some of the recesses on the shield face just to add a little depth. I think I rushed my weathering a bit (which is fairly common since it’s near the end of the process), so I will make a concerted effort to spend more focus time on it with my next piece.

Of course the true test of success would be whether or not my son liked it. I’ll let these pics of his unfettered joy as he ran around the room speak for themselves.
With a not so perfect shield under my belt, I’m starting on what currently feels like an impossible undertaking–a full set of armor. I don’t want to give out any details yet especially since it might be an utter failure, but it is something based on one of my favorite anime shows, and there will be a father/son component to it. My goal is to have at least part of it done for DragonCon this year to give it a test drive. I’ll definitely post about it and all the new things I learn when I’m done.


Nicely done, Will! I bought a copy of the book, too… but haven’t reached the point yet to make something. Still trying to figure out what to start with on my first project.
The shield looks great, and excellent writeup with the good photos!
Thanks! It was a lot of fun and I learned a lot about many things including patience! I have my next project picked out but am not sure where to start… Still trying to figure it out. Bill is a great guy and a great resource and his book is a truly great resource.
Great job. After years cosplay I can tell you that your worst critic and the only one to notice your flaws will be you. The ten foot rule will save you lots of grief and worry. Good one you next project. I’m guess Full Metal Alchemist?
Thank you! I had to also keep reminding myself that I was handing it over to a two-year old when I was finished so to not get too attached or stressed about the details 🙂 FMA is a good guess but I have to admit I’ve never seen it. I will say that you are not the first person to mention it to me though so I think I need to add it to my watch list! Thanks for reading!
What did you do to make the shield get curved? I’m searching for tutorials to try and make one for my son and yours is the best I’ve found so far, easy and accessible. Congratulations.
You have to heat the foam with a heat gun. Just wave the fun back and forth evenly on both sides for a few seconds and then bend the foam while it cools and it should hold its shape. While wearing jeans, I actually just bent the foam over the front of my calf to get the curve 🙂
Did you make the template yourself, or did you find it somewhere online? I don’t have much experience with prop making, and even less with making templates. Do you have any advice for making an accurate template for this project?
To clarify, I was wondering if you had any suggestions for drawing it out instead of printing it.
I did make it myself. I think I can dig up the file I used if you want it but it would need to be printed. The advice I would give if you are going to draw it out is to only draw half of it. Fold your paper in half, draw half and cut it out. That way it will be perfectly symmetrical. (With the obvious exception of the birds head but everything else applies).
If you could do that, it would be very helpful.
So this is embarassing, I forgot because it’s been so long, but I actually didn’t make it myself! I used this image that I found online : http://doctor-g.deviantart.com/art/Skyward-Hylian-Shield-347554925. Sorry for the confusion, but I want to make sure and give credit where its due!
This is beautiful! How did you curve the shield?