One of the many skills I’ve developed in my time as a creative geek is pixel painting, the art of painting video game sprites with acrylic paint on canvas. I recently started picking it up as a hobby again, and I thought I’d share some pointers on how to get started–in case anyone would like to paint their favorite old school video game character!
You’ll need the following:
- A canvas
- A pencil
- A straightedge (preferably a ruler)
- Two brushes (one small and one larger)
- A receptacle for water (like a glass you no longer care for)
- A palette for mixing paints (like a plate you no longer care for)
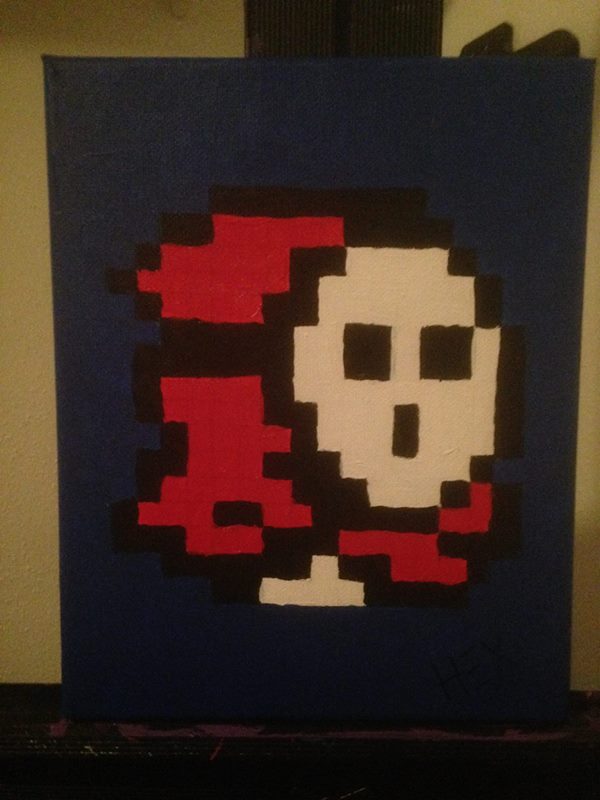
Now you pick the subject matter for your painting! I chose Shyguy from Super Mario Bros. 2, though you could really choose anyone. I highly suggest you try not to be over ambitious your first time out. Choose a simple 8-bit character. Characters from Super Mario Bros. or Legend of Zelda are really good launch pads to see if this is for you.

Once I have a sprite chosen, I like to open up some image editor (like Photoshop or just a simple program like Preview on my Mac) so that I can see the image large enough to get a feel for the pixels. Once that’s done, simply count the width and height of your subject by pixels. Once you have those numbers, measure out your canvas. I measure the canvas in centimeters since they’re easier to translate on a small canvas. Shyguy is 16 pixels high and across, while my canvas was 20 cm wide and 25 cm tall.
To make it easy on myself, I decided to make a painting where a pixel would be a square centimeter. Once you have your plan, it’s time to actually get to work on the canvas!

The first step on the canvas is to grid out your pixel playground. Mark out the area you’ll be painting in first. I gave my self a 16 square centimeter box first, and then measured and gridded out each centimeter line. Do that for both the x and y axis, and now you have a finished grid.

With the grid made, the next step is to mark out your painting area. For complex pieces, I like to assign numbers to colors, but this is a simple four-color piece (black, white, red, and blue for the background). I marked where the black would go with an X. I was able to identify where the other three colors would go from there. I also still have my computer open at this point, and I keep the original image enlarged as a reference through the entire process in case I ever forget what goes where.
Once you’re satisfied with your battle plan, now comes the real fun: painting!

One color at a time, paint within the areas you’ve already marked out. I hate to say it, but this part essentially just turns into a giant “paint-by-number.” If this is your first time playing with acrylic paints, don’t worry if you accidentally go over the lines. Once dry, you can just paint over it again and it won’t be an issue.
Do a solid coat of everything before double backing to give it second coat. Some paints (especially white) are light enough that you can still see the grid lines underneath them. Just keep piling it on until satisfied.
Once you’re ready to tackle the background, create a border of the chosen background color around your character so that your wilder large brushstrokes won’t go over your hard work.

The one bit of advice from my high school art teacher that has stuck with me was “always use as large a brush as you can get away with.” This will cut down on time when you have to paint a large portion of background. It’s for this reason that I recommend using the larger brush when working on the background, or just large areas of the same color.

I like to save the black layer for last. Personally, having the other colors to paint around helps me be more careful. Black will need the least amount of extra coats, since it’s so dark. Just keep adding more coats until you’re satisfied and, voila, you have your first pixel painting!
Below is a sped up video of the entire process I went through to create the Shuguy:
Thanks for reading! If you make your own painting, please link a picture in the comments! I’d love to see it! Also, if you’re interested in seeing more tutorials like this, let me know that in the comments too!
If you’d like to see more from me, I also have a Patreon for all of my pixel paintings.


This is ridiculously helpful, Than you. I realized at the grid point I’ve been overly ambitious.
Thanks for the good instruction, I can’t figure out how to share my pic here but it turned out great!!
Thank you for this guide. My painting:
https://www.facebook.com/photo.php?fbid=10213169573172714&set=a.4508686034021.183610.1196670347&type=3&theater
Cool beans!
https://www.facebook.com/photo.php?fbid=10213684868374115&set=pob.1176978583&type=3&theater