![]()
Emerald City Comic Con 2013 was originally planned to be my first con as a new father. As luck would have it, my son was late and decided to be born on the weekend of ECCC 2013. Needless to say, I had to give up my badge. My wife and I set out to make ECCC 2014 my first Dad Con AND our son’s first con. In addition, thanks to being inspired by Heroes of Cosplay we decided ECCC 2014 would also be my first cosplay and we would do father son cosplay!
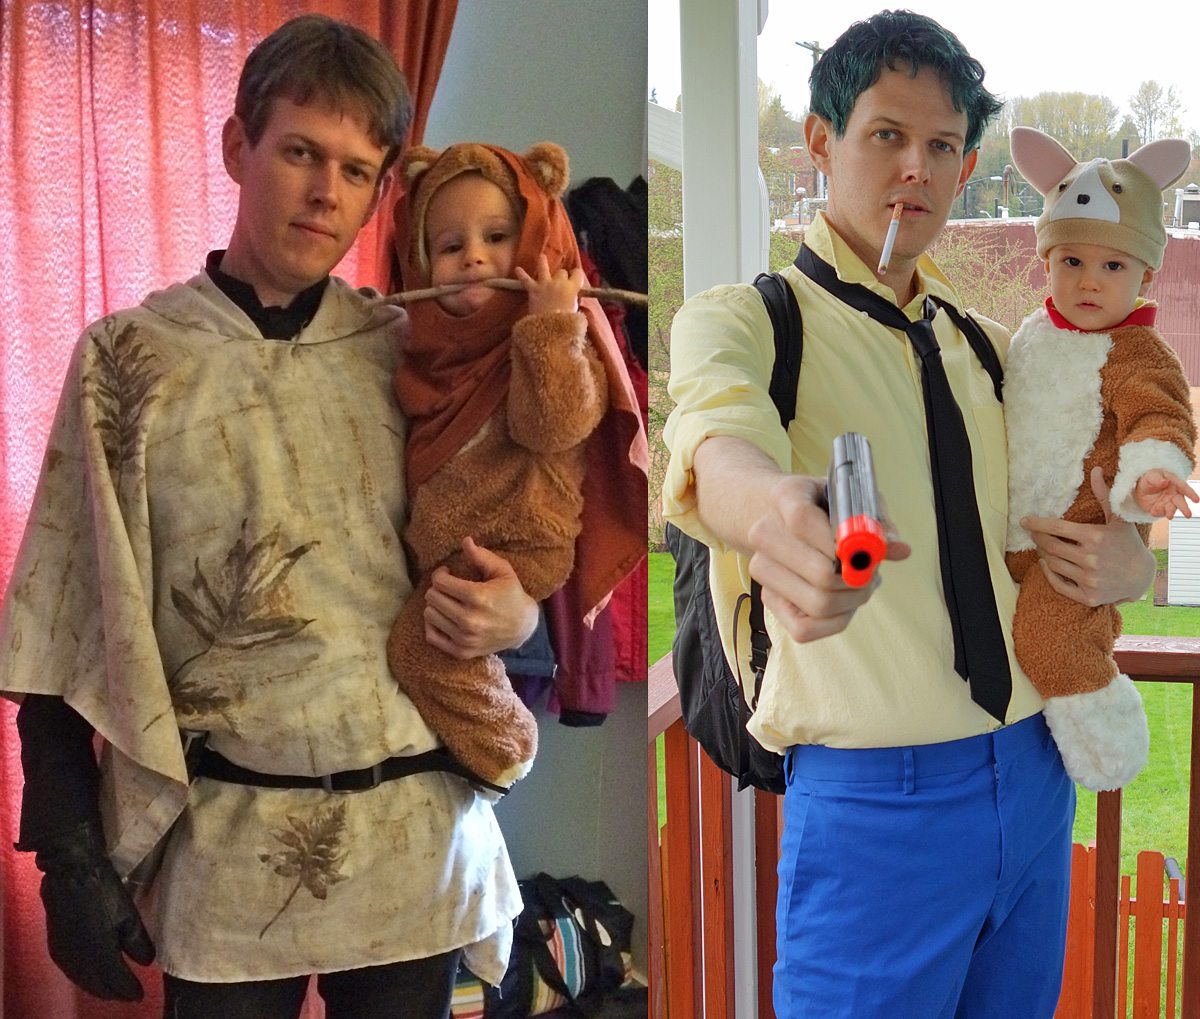
We decided on two different cosplay for our two days at con because why make it easy our first time? We decided on Endor Luke and an Ewok for Friday and Spike Spiegel and Ein from Cowboy Bebop for Saturday. We had a really great time walking around and getting photos taken by tons of people. We were determined to make 2015 even bigger and badder!
Well, as life often does, things got in the way and our original plans for really extravagant cosplay fell by the wayside and we were left with 2 months to figure out our cosplay and no ideas for what to do. My son and I are attending ECCC all three days and my wife decided to make this her first year attending ECCC for a single day so we needed to come up with a family cosplay AND a father and son cosplay. They all needed to be something we could quickly execute on as easily and, preferably, as cheaply as possible!
Father and Son Cosplay
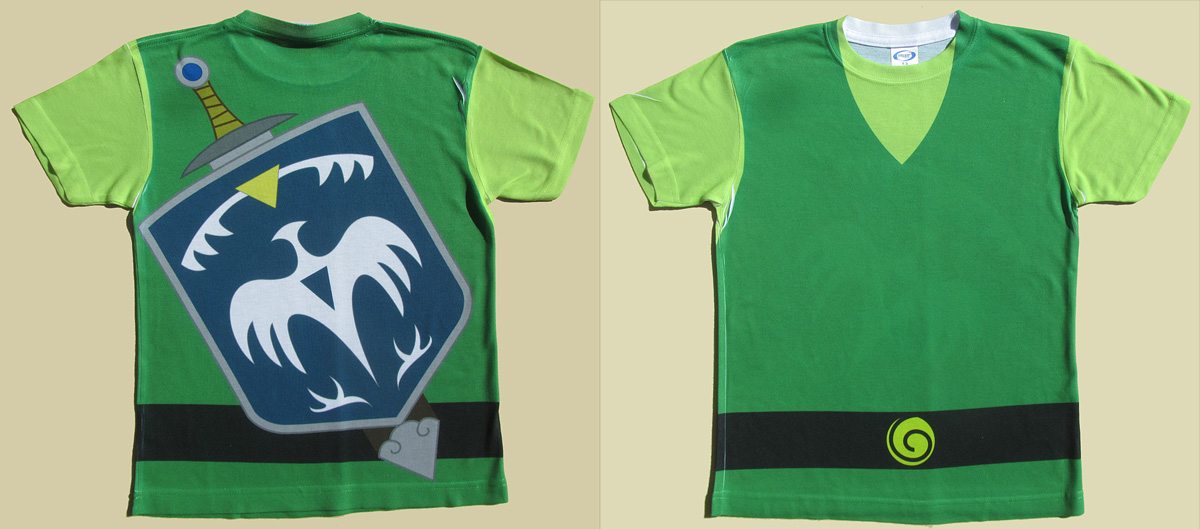
By pure luck, I found an advertisement for Nerdy With Children and after browsing their shirts, inspiration was born! The cosplay for my son would be pretty straightforward. With the Link (from Zelda) shirt ordered, we just needed some white pants and a hat. We already had a foam sword and boots my wife made him for Halloween. A quick search on Amazon returned a perfect pair of white leggings and we decided some green felt for a hat would round out and complete his cosplay.
Then we set our minds to figuring out what cosplay I could do to compliment his Link. We kicked around several ideas before settling on the most obvious–Navi. I was not going to get into a blue body suit with wings or rig up some elaborate LED system so how does a six-foot tall guy pull off a Navi cosplay? Hipster Navi!
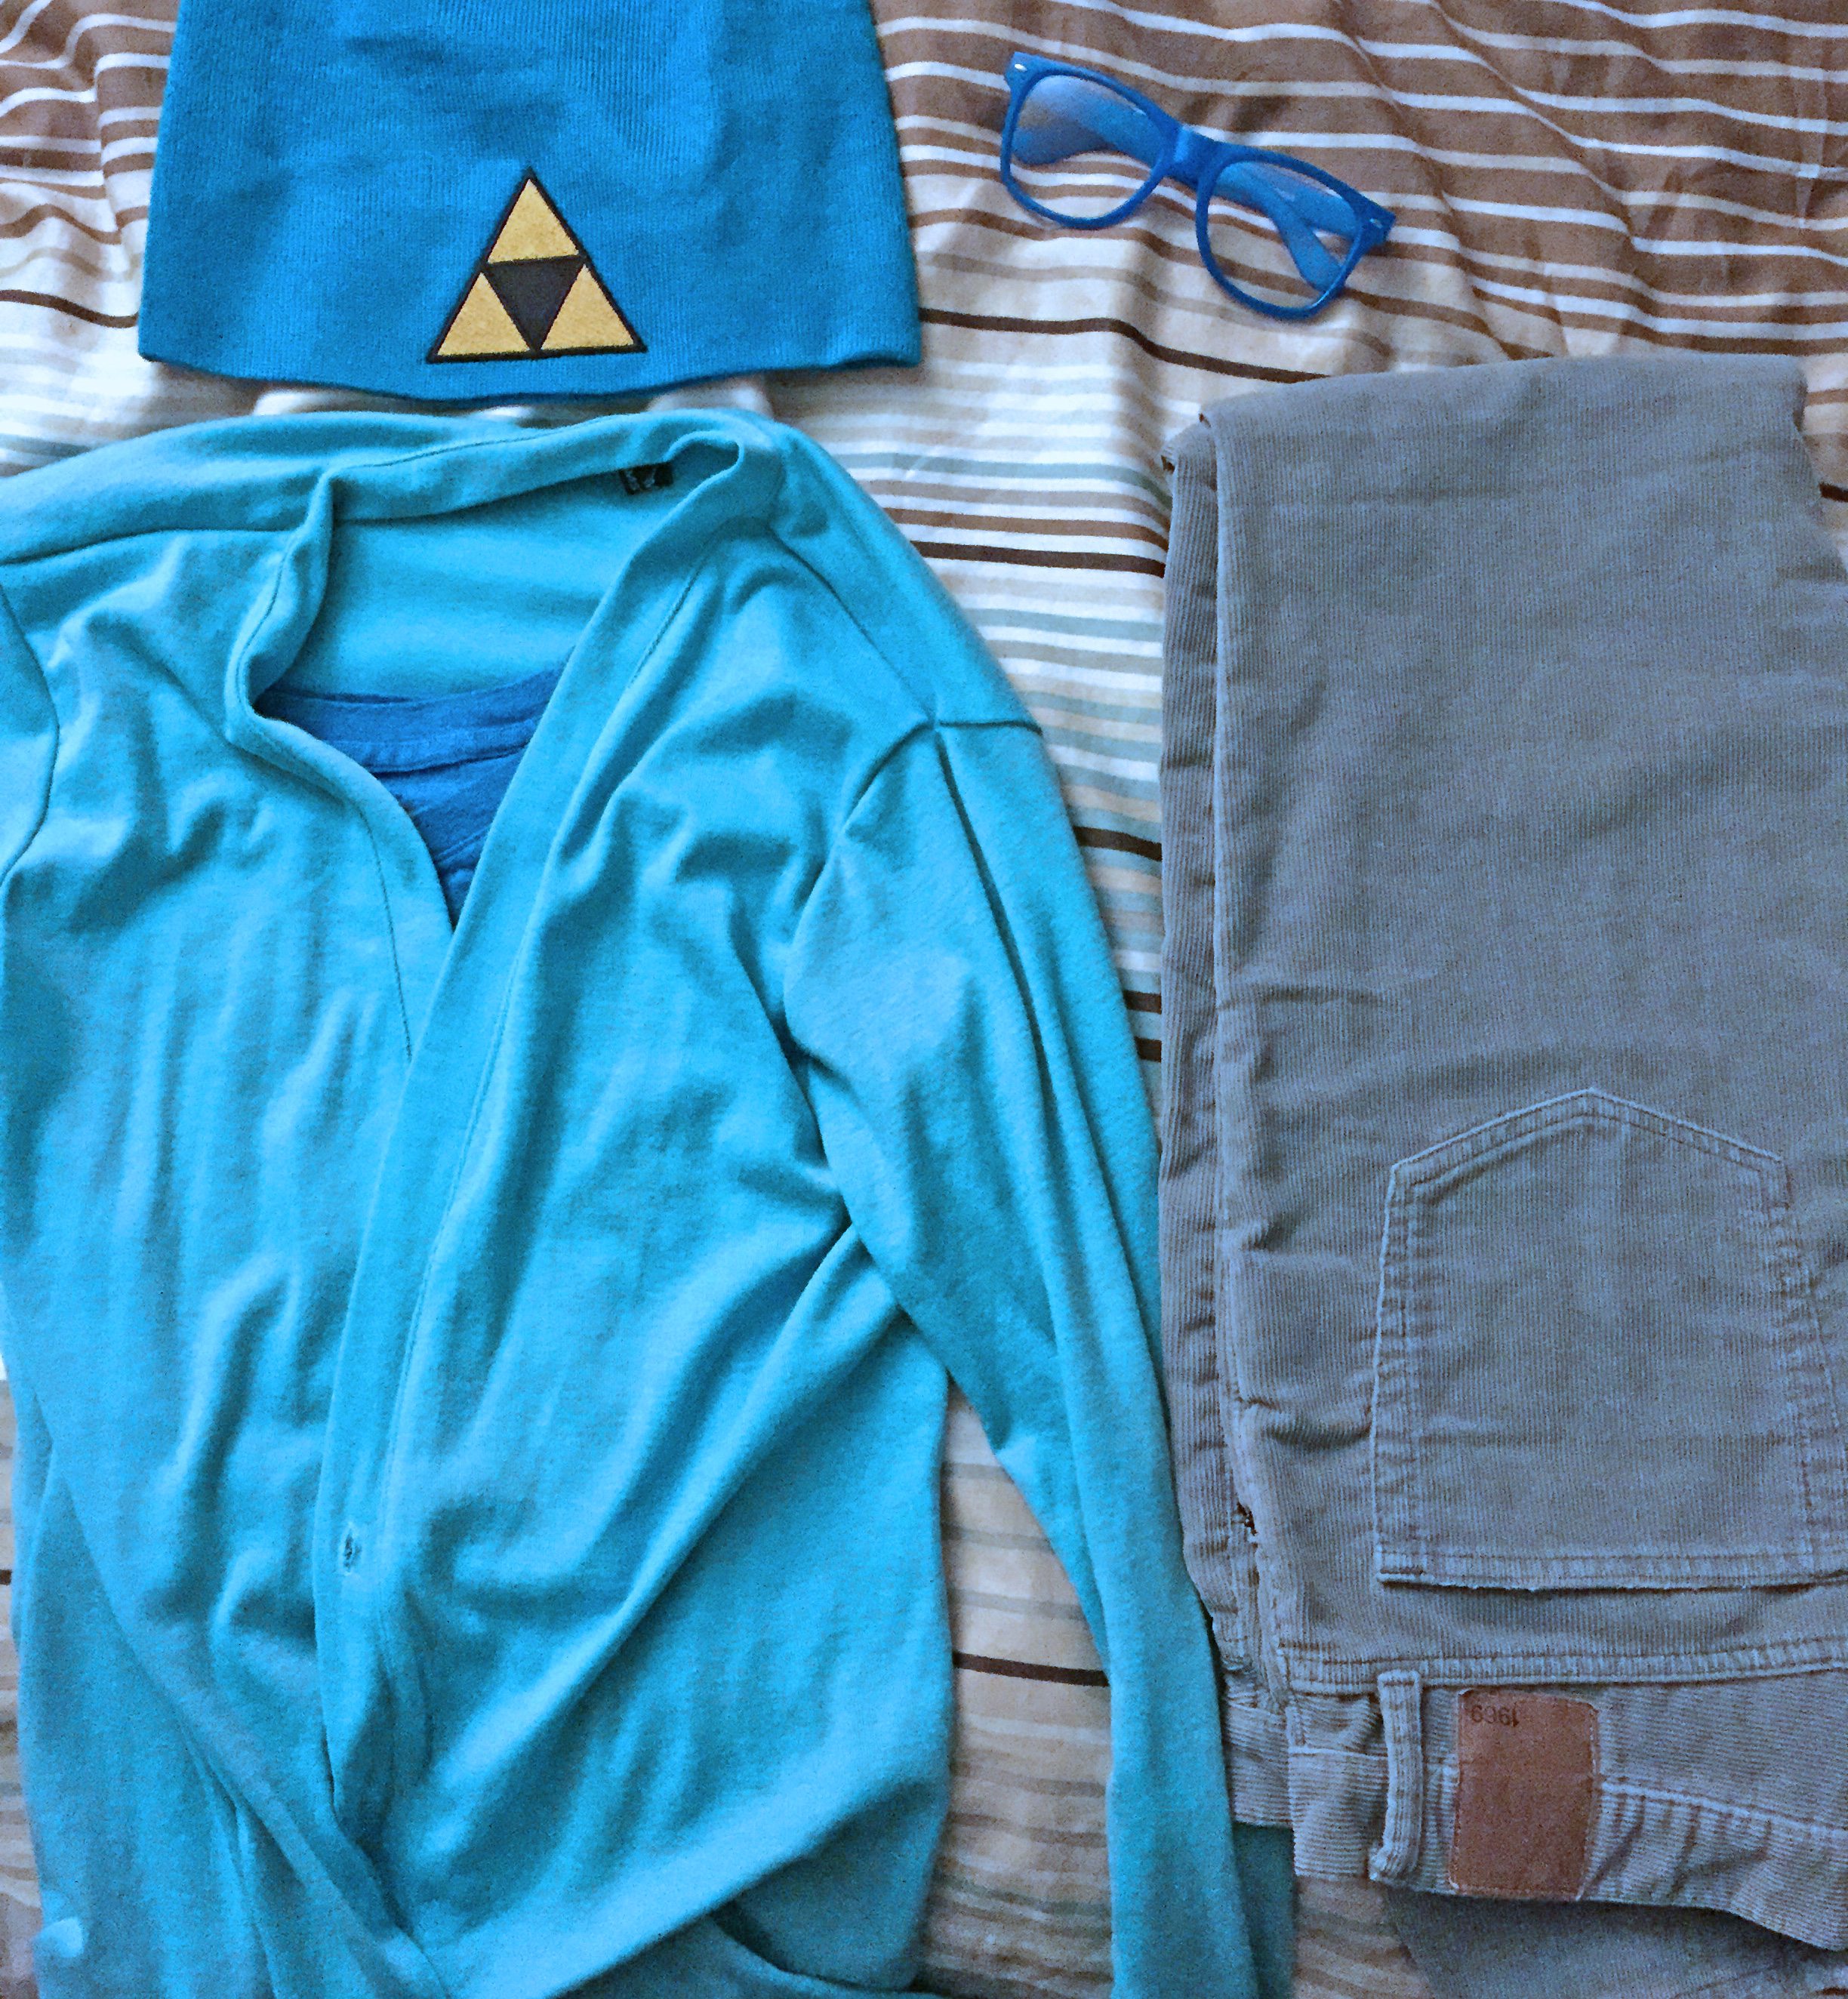
We quickly started brainstorming what items we’d need. I had a blue t-shirt and skinny blue corduroy pants. I’d need blue hair so we ordered some Atomic Turqoise Manic Panic. We also decided on a blue cardigan, a slouch beanie, and some thick framed glasses.
I knew that just wearing a bunch of blue stuff wasn’t going to be enough to sell the character so I added this great Triforce patch from Emmabellish to the beanie. I also made some wings using some white tights and following this Instructables.
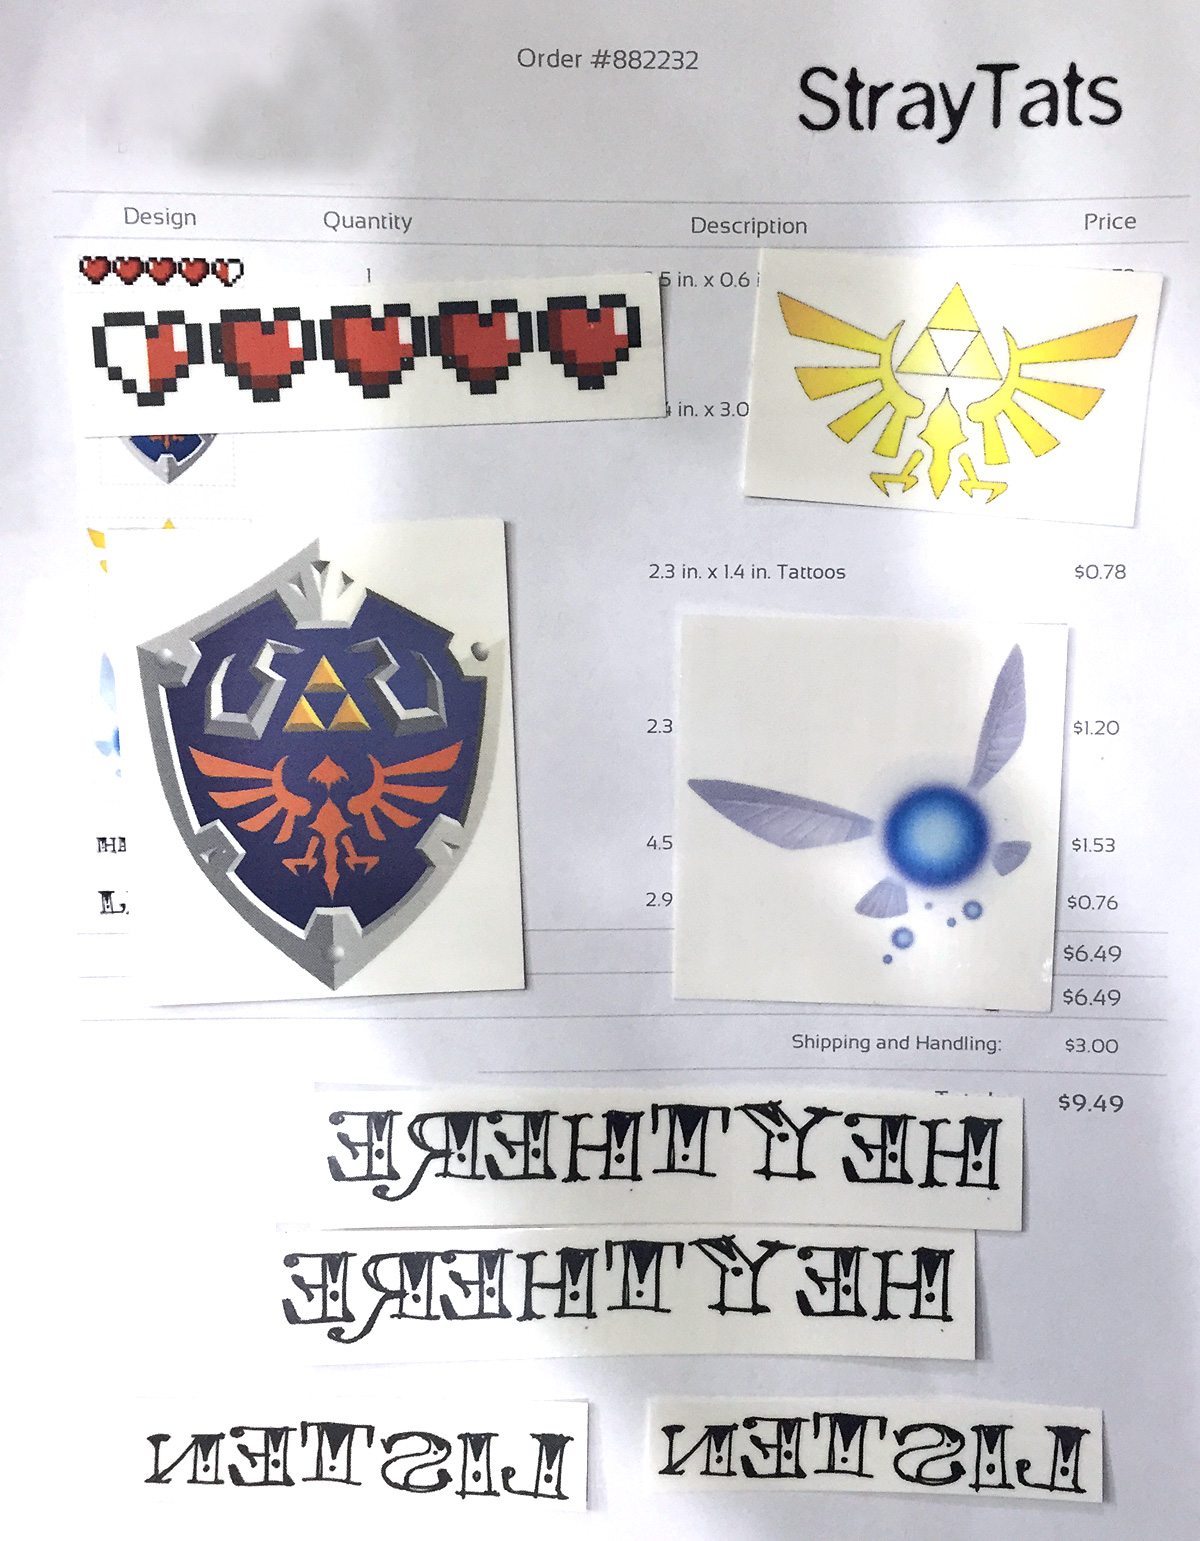
The Navi cosplay was still incomplete and I realized I was missing one crucial element–Navi’s annoying catch phrases! I thought long and hard about how I could project those sayings without breaking the “hipster” element of the cosplay and then it hit me–tattoos! I went to Stray Tats and worked up some fake tattoos–a Navi and a Hyrule Crest tattoo for the backs of my hands, Link’s shield for one forearm, a health meter for the other forearm, and, the final touch, knuckle tattoos that spell out “HEY THERE! LISTEN.”
Family Cosplay
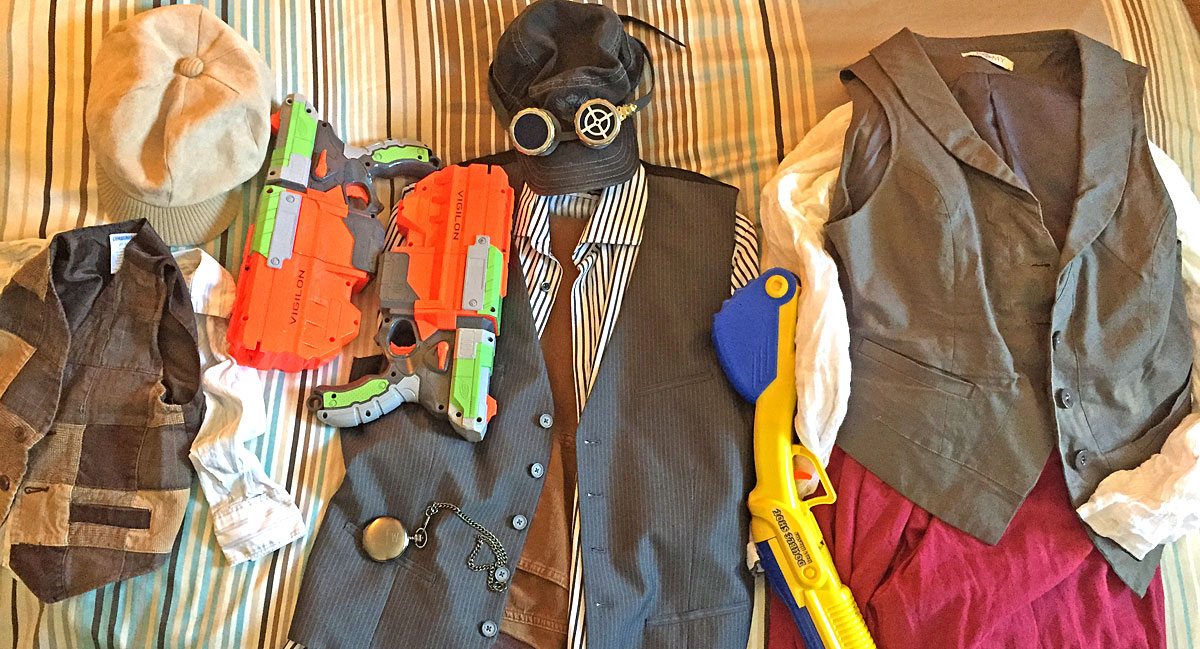
With our father and son cosplay all squared away, and only two weeks left until the con, we brainstormed some more and decided to take our first stab at doing Steampunk cosplay. With a scavenge through our closets and a quick trip to our local Goodwill store, we were able to get all of our clothing and a few Nerf guns to use as the base for our cosplay.
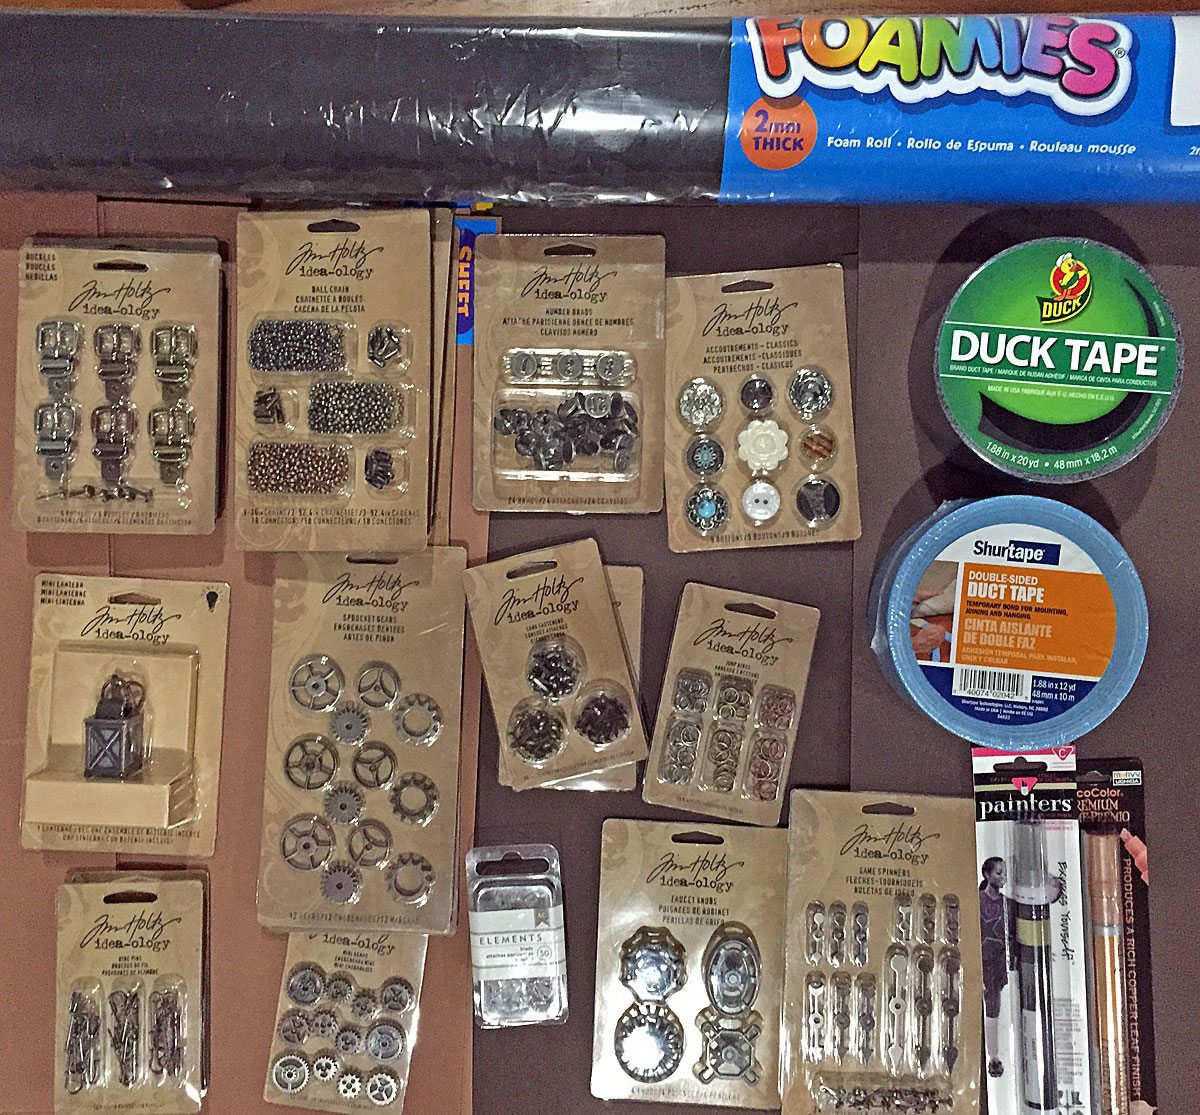
Armed with The Steampunk Adventurer’s Guide: Contraptions, Creations, and Curiosities Anyone Can Make written by Thomas Willeford and art by Phil Foglio of Girl Genius fame, we set about making a list of things we wanted to make to go with our cosplay. We went onto the Jo-Ann website to look at their foam and scrapbook supplies (as suggested by the book). To our great surprise and luck, all of the scrapbook accessories were 50% off! We went through everything they had available (and there is a lot) and narrowed it down to just the things we thought we’d be able to implement in the short time we had left. We placed our order and waited for our goodies to arrive.
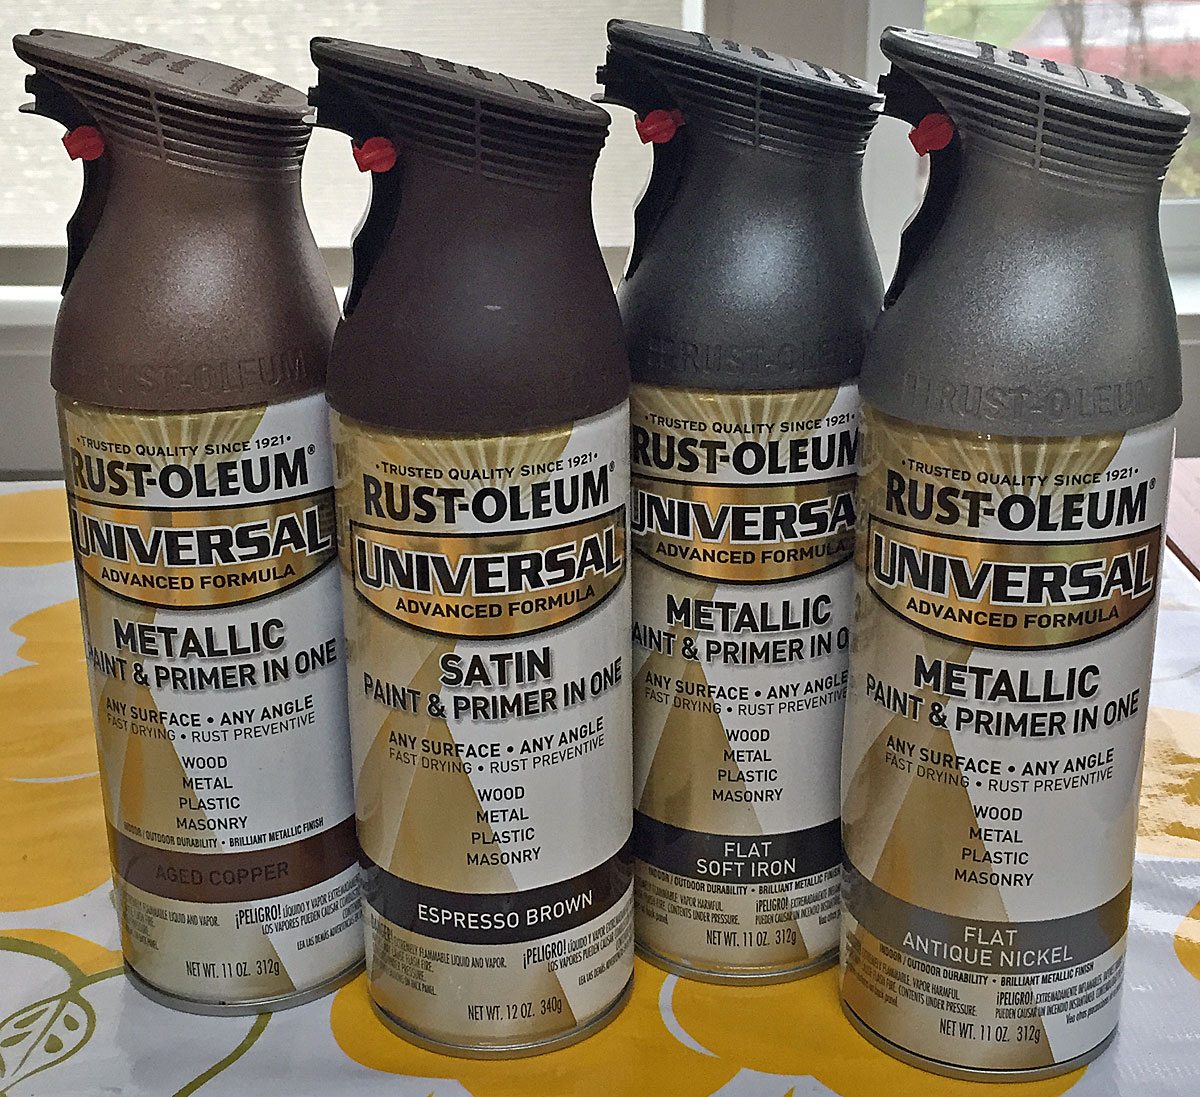
In the meantime, I took a trip to our local Lowe’s to get paint, sand paper, and masking tape for our guns. We decided on a Semi-gloss brown for the parts we wanted to look like wood and three different metallic paints — Antique Copper, Soft Iron, and Antique Nickel — for all the metal-looking parts.

Step one was to start painting our guns so I could work on other stuff while the paint dried. They turned out much better than I expected and took a lot more time than I expected due to all the masking, waiting between coats, and multiple colors. I think the combo of metallic and flat worked out well for a realistic look.
As seems common in cosplay, a little bit of drama and last-minute-ness are expected. On Monday before Con our UPS tracking finally started working and said all of our steampunk junk would arrive on Friday — the first day of Con! I took a trip to the nearest Jo-Ann, which was not that close, and got as many items as I could that they had in stock, which was not everything we wanted.

The next step was to make a bunch of fleather. Fleather is a fake leather made with craft foam and several kinds of duct tape that is explained in great detail in the The Steampunk Adventurer’s Guide. I started with the dark brown first.

I decided to focus on our son’s accessories first because his was the most important to get done. The first piece of his jet pack was a harness to make it wearable. Following the directions in the The Steampunk Adventurer’s Guide again, it was much easier to build a realistic looking harness than I expected!
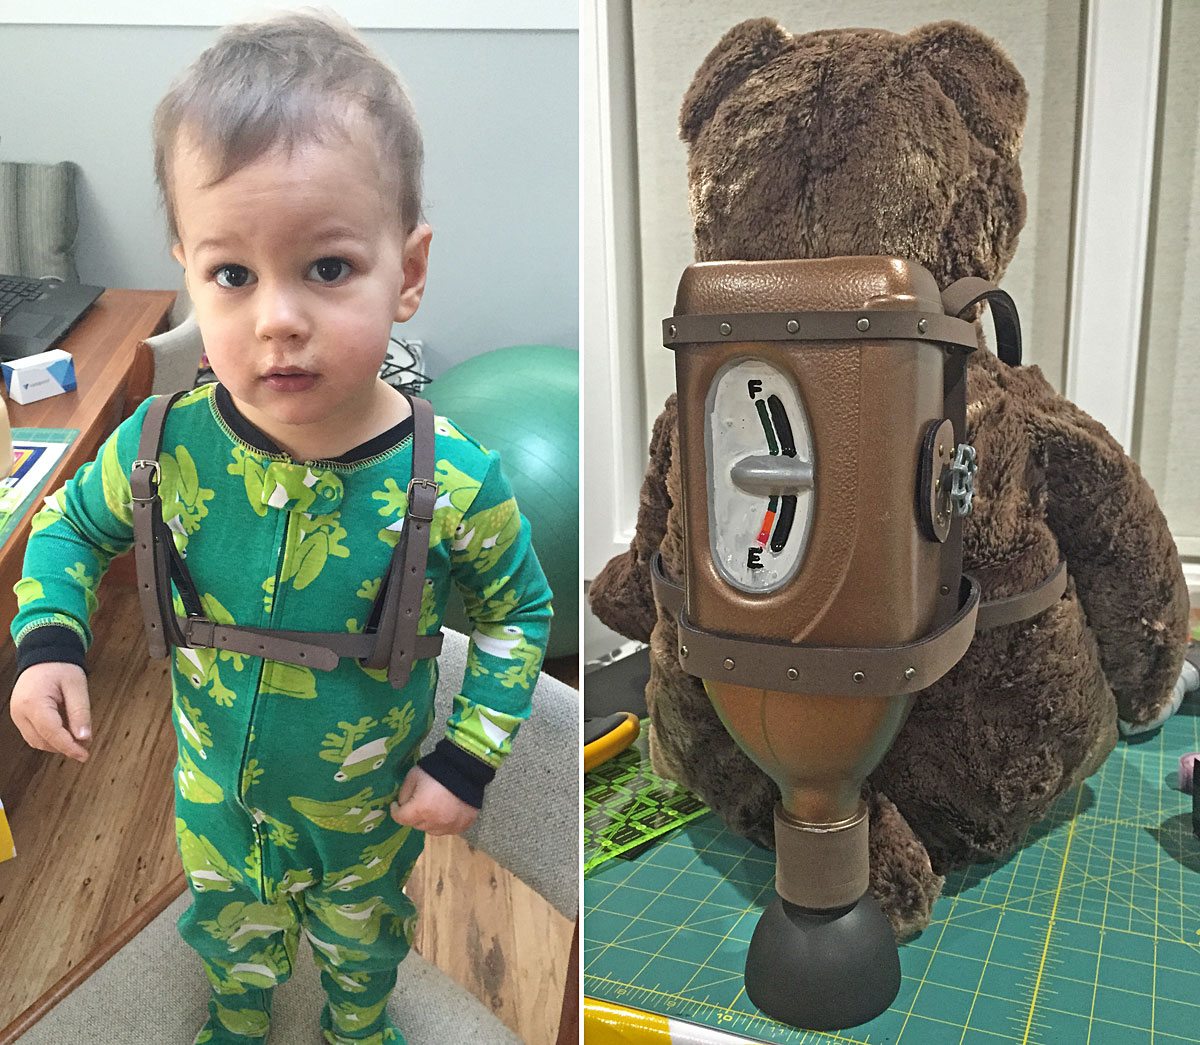
The second part was actually building the tank and attaching it to the harness. I painted this cool looking orange juice bottle with copper paint for the tank, created a knob patch, some rivet tape and mounted it to the harness. My wife had the brilliant idea of turning the ergonomic grip of the bottle in to a fuel gauge using a couple of paint pens!

With our son’s cosplay all done, I moved on to my wife’s. She was handling her wardrobe — mainly just adding some embellishments to her clothes — so my job was making her back holster for her shotgun. I made a load of fleather, this time in the lighter color brown. I first made a belt, then a shoulder strap, then the actual holder for the back. I’m so happy with how these turned out that I think I’m just going to make my own belts out of fleather from now on.
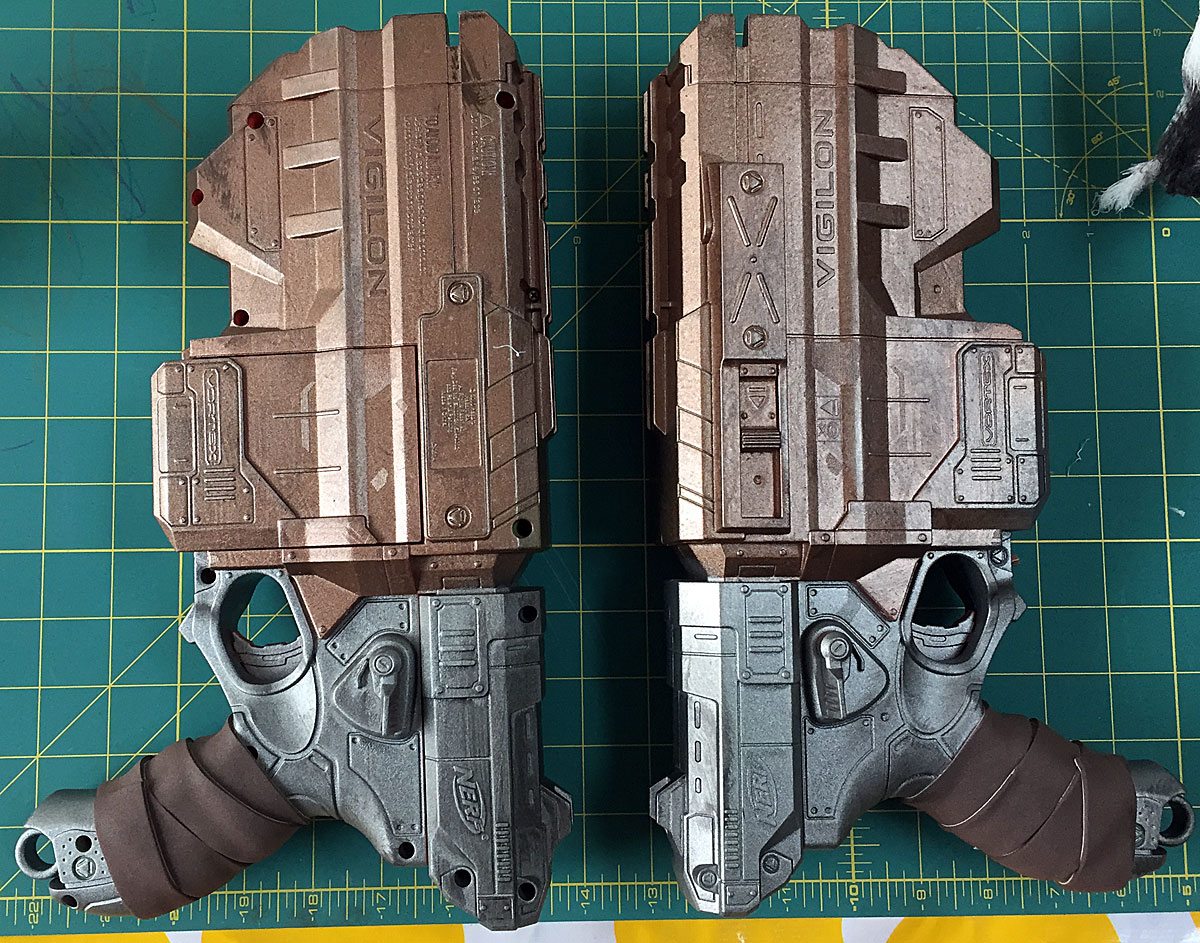
With that complete, I finally moved on to taking care of my own gear. The first thing I did was paint my guns. Paint always takes longer to dry than I expect so painting first so I could work on my other gear was very important. In addition to painting and weathering my two guns, I also added some fleather tape on the grips.
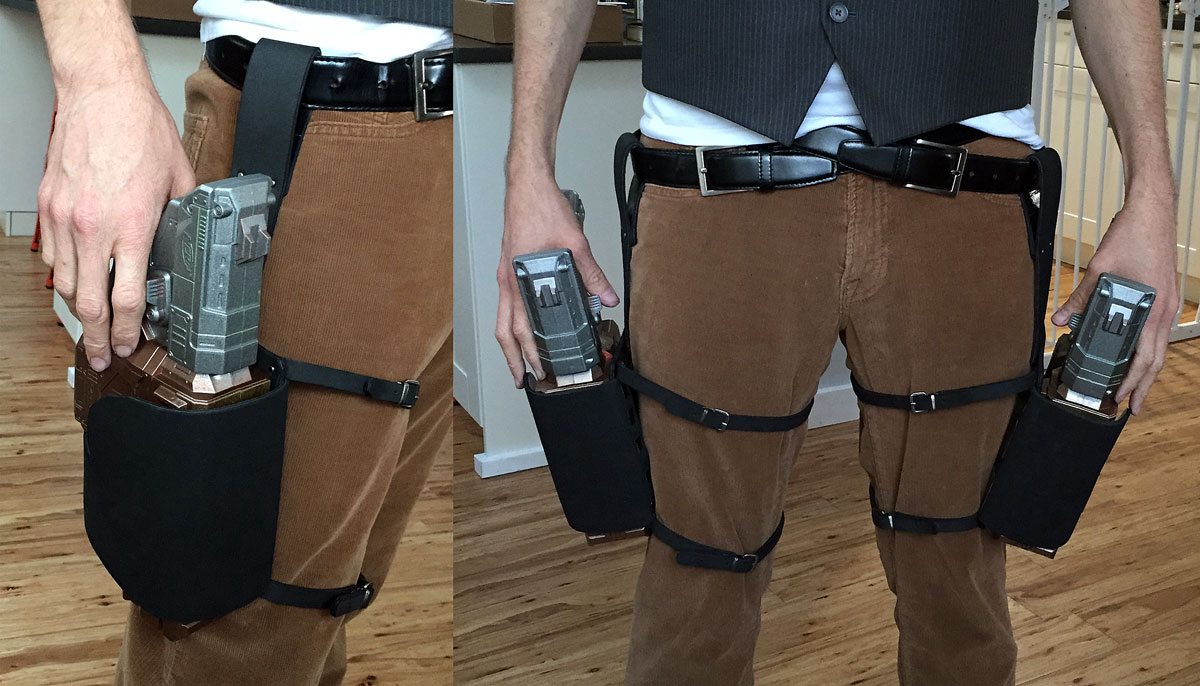
The final piece for my cosplay was the double thigh holsters. I saved these for last not only because I wanted to make sure my wife and son were all set first — I could always do without my guns — but also because I knew it would be the most complicated and wanted to build up some fleatherworking experience before I tackled these. I used black fleather for my holsters and am really happy with how they turned out for a first try!
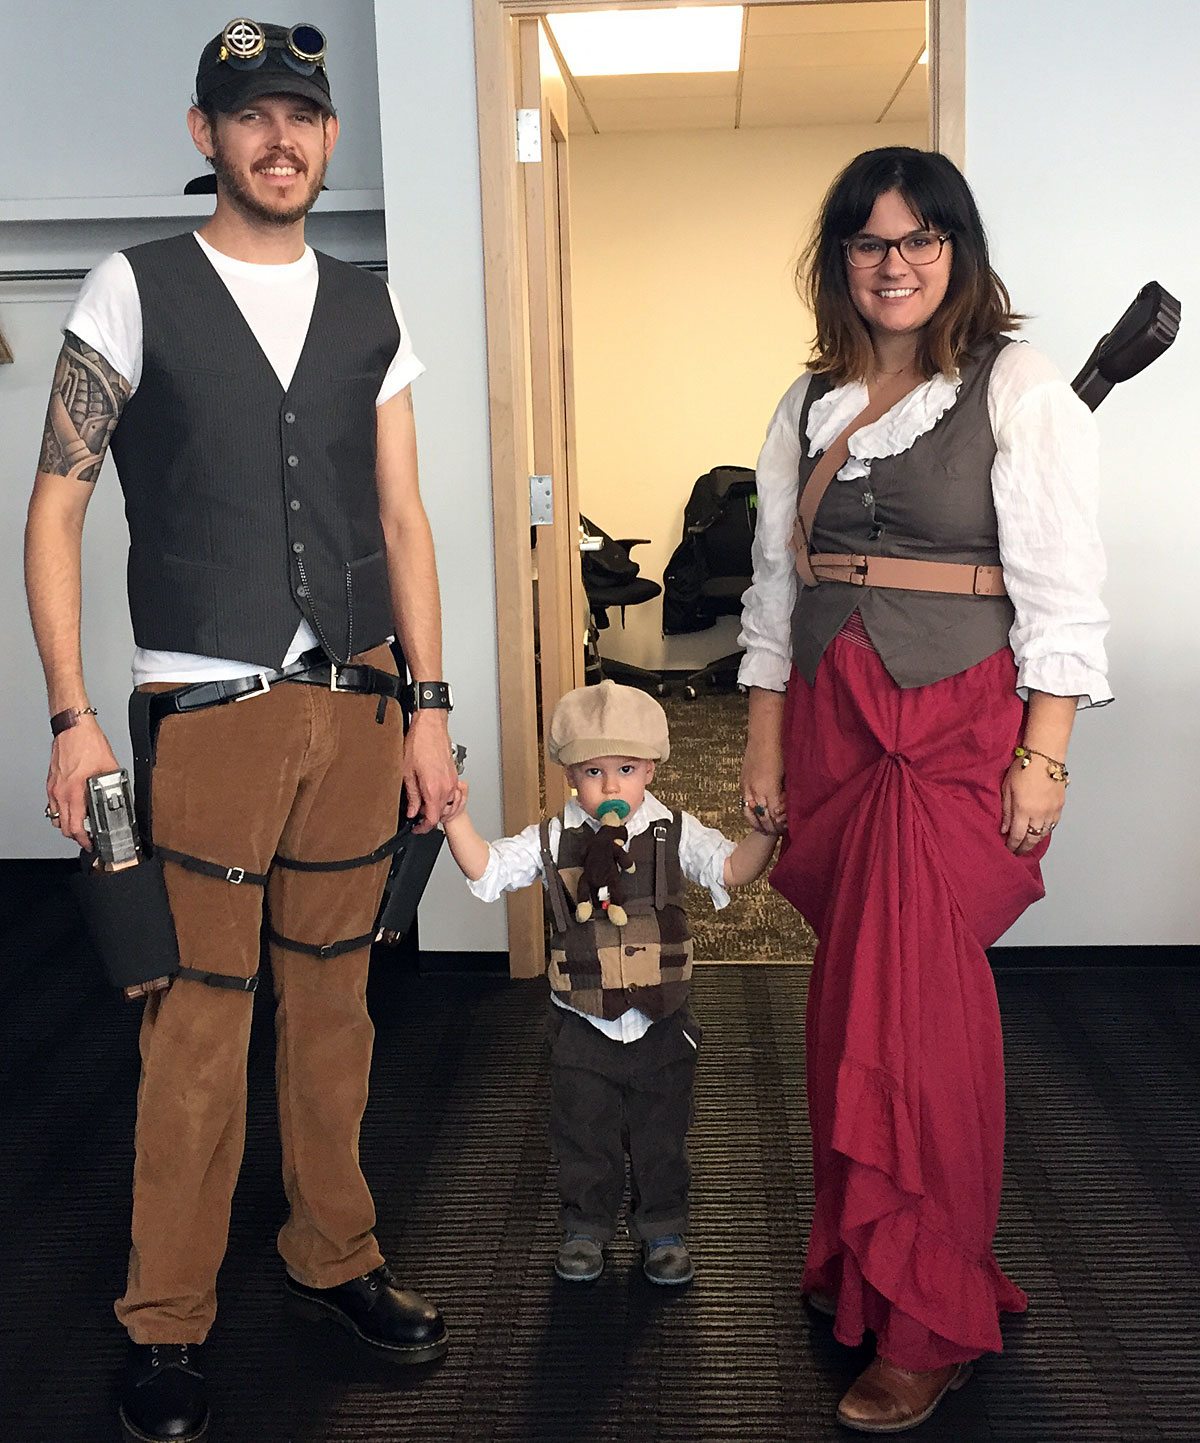
And today is the first day of ECCC – we’re all dressed up in our family cosplay and off to Con. Hopefully we’ll see you out there! If you do see us, feel free to take a pic and say hello. I’ll be posting a full Con write-up next week with pics of our father and son cosplay.


Haha, this was great. Thanks for the tips and inspiration.
I’m glad! I’ve been quite inspired by so many out there in the cosplay world so any inspiration I can give back is a bonus! Look for my follow up post about lessons learned on our cosplay, our other cosplay for the weekend, and all the things we saw and did at ECCC.
This work is all quite fine, but I really like your recycled work with the jet pack! Sharp! Wish I had seen you today, hope you had a wonderful time!
Thanks! We had a great time. I’ll have a follow up post coming soon about lessons learned on our cosplay, our other cosplay for the weekend, and all the things we saw and did at ECCC. Sorry we missed you!
Did you use a specific tutorial for the leg holsters? I’m looking for a tutorial for a Dark Matter cosplay and having trouble finding what I want. Thanks!
I wish! Unfortunately I just went for it and did it by hand. I cut a piece to serve as the ‘base’ and attached the two buckled straps to it for around my thigh. Then I made a thicker loop at the top for my belt to go through. Lastly, I wrapped a piece of foam around the gun to figure out the curve I wanted for the holster piece and made sure it was slightly longer than the width and height of the gun. I attached one side and then test fit the gun so it was snug but removable and then finalized the length of the outer holster piece. Once I was happy I then made a duplicates of all the pieces for the other side. Hope that helps! Feel free to ask more questions if you want.