
I have just found Scanner-Geek Nirvana.
Sitting on my desk are two scanners from Fujitsu — the iX500 (that I’ve previously reviewed here) and Fujitsu’s latest marvel, the SV600. It’s a bittersweet moment — I have absolutely loved my iX500, and a recent update from Fujitsu that allows the scanner to function completely disconnected from my desktop computer and work completely via WiFi is an amazing accomplishment, allowing me to relocate the scanner to a shelf and off my desk, freeing up even more workspace on my paper-free desktop. But now I have this beautiful SV600 sitting on the desktop and offering up so many unique features that I never knew I needed.
Arthur C. Clarke had a famous quote: Any sufficiently advanced technology is indistinguishable from magic. Well, I’ve spent a few weeks using the SV600 and all I can say is that this thing is pure and simple magic.
Overview
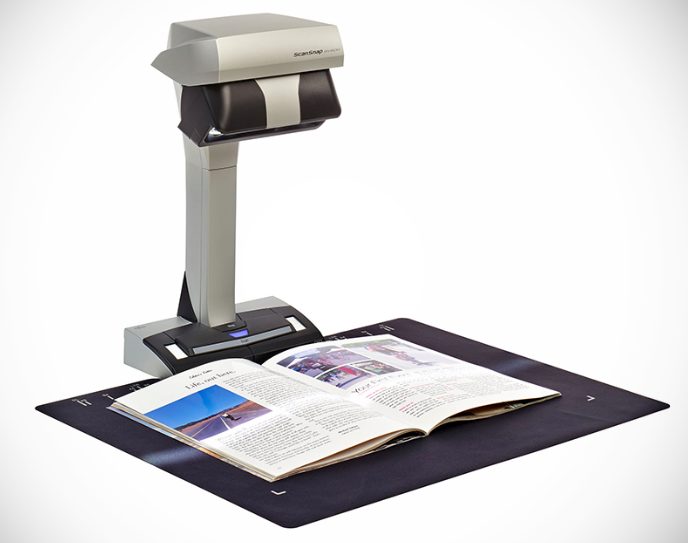
The SV600 is an overhead scanner that allows for scanning of books, magazines, individual sheets, business cards, photos, and much more. It has some very special software under the hood that allows it to not only identify multiple items placed in front of it, but it can also handle the curve of the pages from an open book or magazine scan, flattening the scan and performing clean up to create a clear image. Included software can also convert scanned text with OCR (Optical Character Recognition) directly into a Word, Excel or PowerPoint document. (Likewise, Evernote Premium service users can elect to have Evernote perform OCR on PDF files they upload.)
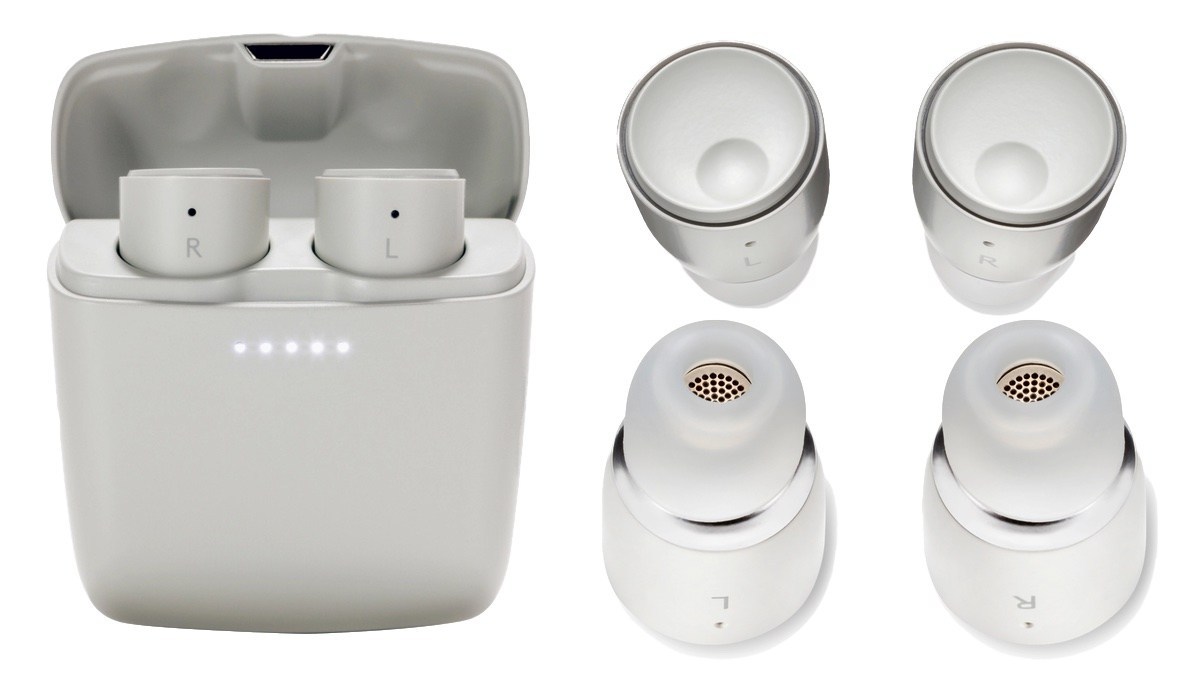
Included with the SV600 scanner are two small plastic bases (with adhesive) that allow users to create a “dock” that locks the scanner to the table and prevents it from tipping. Power cord and USB connector cable are provided along with the ScanSnap software, a copy of Adobe Acrobat X (great for tweaking PDF files), and the Rack2-Filer Smart with Magic Desktop software that allows scans of books and magazines to be kept in a virtual binder. Lastly, you’ll find a soft, black mat that you’ll unroll and place in front of the scanner — it has marks to assist with aligning various sizes of paper (up to A3 in size!), books, and magazines.
Total weight is 6.6lbs (3kg) and dimensions are 8.3 W x 6.1 D x 15 H inches ( 210 x 156 x 383mm). It’s ENERGY STAR® compliant and supports USB 1.1, 2.0 and 3.0.
The instructions for unpacking and preparing the scanner are simple and short — you’ll have this thing connected to your computer fast and be ready to go. There’s even a built-in tutorial you can go through after you’ve installed the software. (Remember: Install the software FIRST and then connect the scanner.) Once the scanner is setup and ready to scan, here are some of the things you can do with it.
Simple User Interface
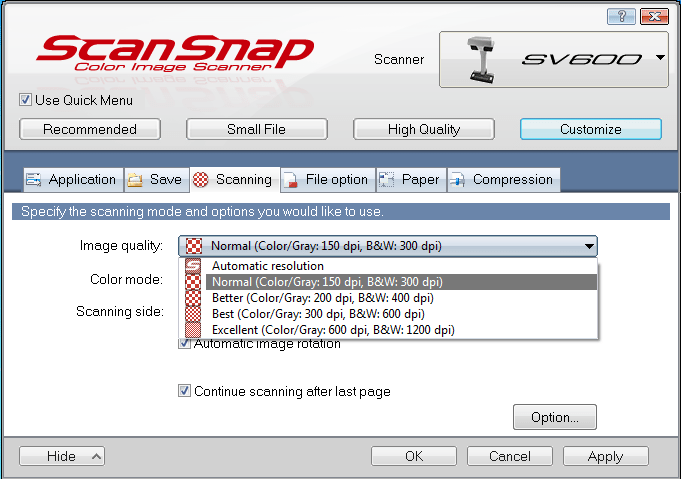
The primary controls are found in the ScanSnap Manager tool. From here, you can select the resolution you wish to scan (150dpi, 200, 300, and 600) as well as choose between color, monochrome, and greyscale. You can specify whether to scan to PDFs or JPEG files and where to save scanned images by default. Compression can be applied if you need it, and a drop-down menu at the top lets you quickly switch between the SV600 and iX500 if you have both scanners.
Multiple Item Scanning
If you’ve ever used one of the old flatbed scanners from the 90s, you may recall that the scanner would scan anything you placed on the bed.The problem was that all the items placed on the flatbed would be saved in one big image file. Not the most elegant solution. (Plus, opening and closing the flatbed over and over was just flat out annoying.)
The SV600 has made a HUGE improvement when it comes to scanning multiple items — the individual items will each be assigned to a single page of a PDF file (that you can also break into individual files if you like), and the scanner also doesn’t care how crazy you are in placing them in front of the scanner. In the photo below, you’ll notice I placed a photo and two business cards at odd angles in front of the scanner before tapping the Scan button on front.

After scanning, take a look at the next image and you can see that each item has been individually identified and scanned (I’ve grayed out the phone/address/name stuff). The orientation has also been corrected. The 5×7 photo is crystal clear, too.

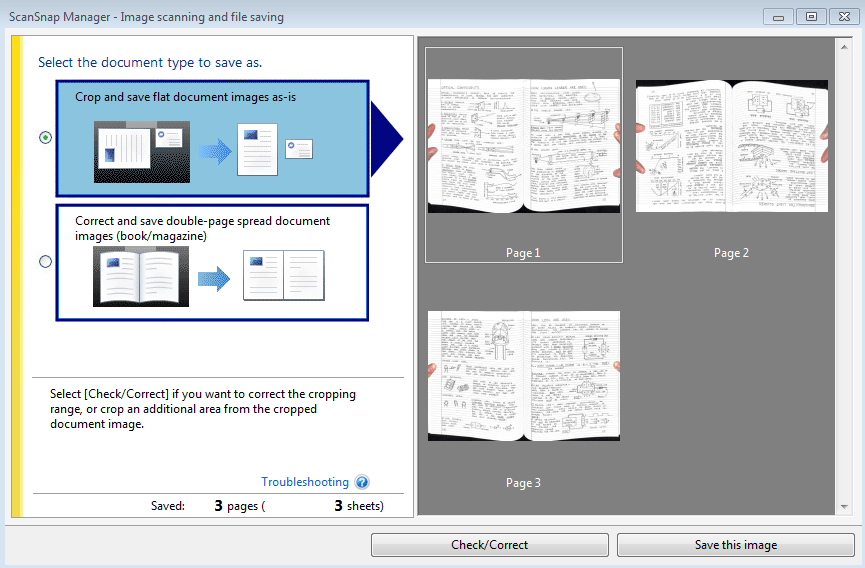
After you execute a scan, the software opens and gives you two options as shown in the following image — the first is the one I used above that identifies multiple items and attempts to separate them and fix their orientation (quite well, by the way).

Notice to the right of the screen you’ll see thumbnails of what the final items should look like if you attempt to save all the scanned items as unique files. If you need to correct the orientation a little bit or maybe crop some more, a button below the thumbnails will allow you to open an editor and tweak the multiple scanned items individually before saving them.
Again, all of the items you choose to scan at once will be identified and assigned to a single page of the larger PDF document — if you don’t choose to have each item immediately saved as a separate document you can use the included Acrobat X software later to break that single PDF up if you wish to have each item as a standalone document.
The second option shown in the above image is more for books and magazines that you’ll be scanning.
Book Scanning and Flattening
You may have seen some homebrew solutions to scanning books on sites like Instructables.com. These are scanning stations that users have built that typically use a camera mounted at a fixed point above a flat surface. You place a book or magazine below the camera, take a picture, and convert the photo to a PDF. Grab all those PDFs, merge them, and you end up with a digital version of your book. If you’ve got the DIY skills and the tools, you might find this a useful solution. I’ve seen some “digital books” created using this system, and they all differ in quality. Obviously a quality camera can make the difference, but you also need a mechanical solution to hold the pages as flat as possible before the photo is taken because the curve created when a book lies flat can often throw off the focus of the camera.
Once again the SV600 has solved this issue using some unique hardware and software… but don’t ask me how. I know it involves some pretty amazing software. Take a look at the photo below. This is an electronics book I have in print form. Rather than actual type, the book is filled with the author’s actual handwriting and sketches of various circuits and components on lined paper. I was very curious to see how it would translate to a digital book.

Once again, after scanning the two-page spread, you can see in the image below that the initial scan includes the slight curve of the book’s pages as they lay flat. But also notice that I’ve still got the first option selected (in blue) on the right side of the screen.
Now watch what happens when I select the second option that flattens page scans.

You can’t yet tell the detail of the page scans, but I’m hoping you can see that the curve of the book pages has been removed and the scans are now flattened. After flattening, you click on the Check/Correct button just below the thumbnails and you’re given a chance to do some more editing to the scans — this is where you’ll break a two-page image into two individual pages as shown in the next image. This is done by tapping the 1/2 button in the image below and then the Apply button (versus the 2/1 button you click if the first page is actually on the right — strange, but it’s there if you need it).
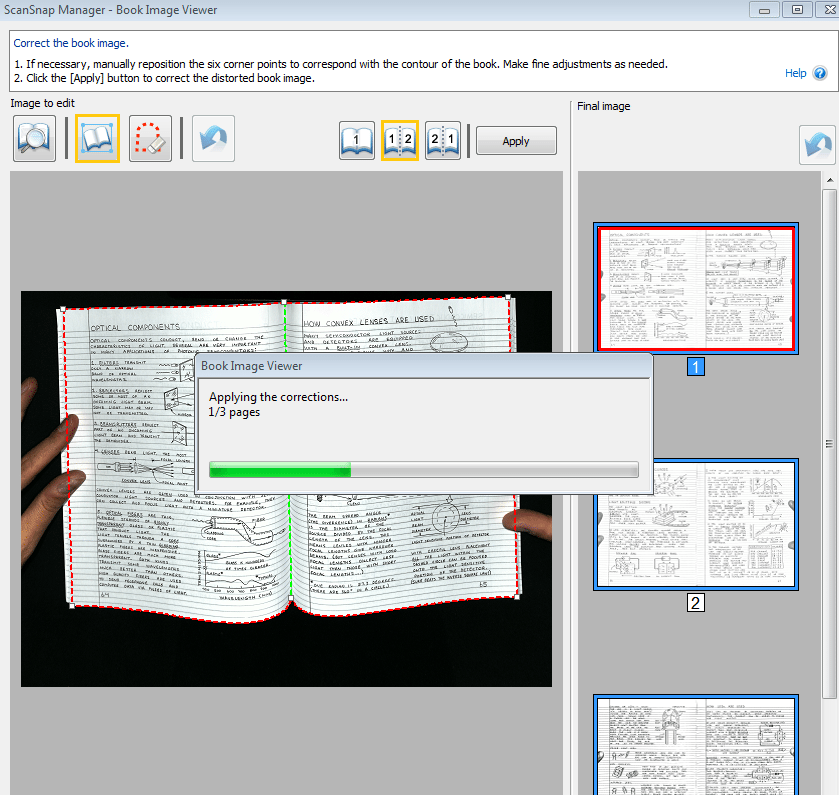
Look carefully at the image above and you’ll notice a red dotted line going around the two pages and a green dotted line running down the center of the book. You can manually drag these to make small or major corrections, but so far I’ve been quite impressed with how the software has managed to get it right. Below is one of the two-page scans split into two individual pages… take a look at the detail of the scan!

Now, take a VERY close look at the right side of the single page shown above. See anything unusual? Where did my fingers go?
That’s right… the SV600 software allows you to remove fingers. It’s noticeable here because of the lined pages of the book, but through testing I’ve discovered that if you keep your fingers on the white portions of the left and right margins, the Remove Fingers button works very well. Below you can see how the software allows you to tweak the edges of the fingers by dragging small squares and surrounding the fingers.

Auto Page-Turn Detection or Timer
One of my favorite features of the SV600 is the ability to set it to detect a page turn. You can also configure a fixed time (in seconds) to wait before performing another scan. During my tests, I found that a three second delay was sufficient for me to turn the page and place a finger on the left page and a finger on the right page. Even better, on thin books (maybe less than 200 pages), I didn’t even need to use my fingers to pull the pages flat — the flattening feature of the software was sufficient. For larger books, however, you’ll have to do your own testing… thick books scan better when you have a finger holding each page on a two-page scan. I do like the Auto Page Turn feature, but during my tests I found that sometimes after turning a page, I didn’t get my fingers into position fast enough before the scan began… so I switched to just a 3-second delay and everything is good.
Plays Well With iX500
I mentioned earlier that I still have my iX500 scanner. It’s not going anywhere — while the SV600 is great for scanning a sheet or two quickly, for those times when I have a stack of 20-30 or more 8.5 x 11 papers (or a magazine with the spine cut off for scanning the entire magazine), the feeder on the iX500 really saves the day.
The iX500 and the SV600 have their strengths and weaknesses… but they also work really well together. Without any change to my workflow, I can quickly load a page or ten into the iX500 and scan items that will be appended immediately to the items I scan with the SV600. I can’t use the scanners simultaneously, but I don’t have to close the software or lose any of the scans or edits I’ve done with one scanner to start using the other. Moving back and forth between the two is easy, and I can see the benefits this might offer a small business (or a large business) that needs to perform a mix of different items and sizes of items into a single file for long-term storage.
Some Additional Information From Press Release
I’ve covered what I mainly use the SV600 for, but below you’ll find some additional (edited) information I pulled from a press release:
* Versatile Imaging Technology: The scanner is equipped with “VI Technology” combining a deep depth of field lens, CCD linear image sensor and high directivity LED lamp to minimize unevenness in image quality and prevent the scans from being affected by the surrounding light to generate smooth images even when scanning from a distance.
* Digital Book Filing Cabinet Creation: Bundled with Rack2-Filer Smart with Magic Desktop, users are able to efficiently scan books or magazines and organize them into graphical e-binders and virtual cabinets. Users can fine tune scanned images in the preview dialog if necessary, create thumbnails using the front and back cover of a scanned book, and file away in the virtual bookshelf for anywhere, anytime access of their digitized books.
* Customizable Quick Menu: For additional convenience and flexibility, the ScanSnap Quick Menu is fully customizable and automatically appears after scanning providing a quick and easy way to send those scanned documents to several popular “Scan-To” applications. Furthermore, the Quick Menu incorporates new intelligence that anticipates the appropriate application while keeping users in the driver’s seat for easy and faithful disposition of content.
* Cloud Services Support: Users can scan documents directly to Evernote, Google Docs™, Dropbox, SugarSync, and Salesforce from their computer, giving them even more flexibility to store, share and access their paperwork.
* Scan-to Functions: Offers users a flexible way to manage PDF, searchable PDF and JPEG files, providing them with an easy way to scan to a folder, attach scans to an email, send scans to a printer, as well as to a variety of cloud-based repositories like Evernote, Dropbox, and others.
* Efficient Business Card Scanning: Users can capture a business card, extract the information automatically and export it to Outlook, Excel®, Salesforce and other contact management software.
* ScanSnap Organizer for PC: Offers users a convenient way to store, manage and view PDF and JPEG files as well as perform post-scan editing, keyword entry and searchable PDF conversion.
* ABBYY FineReader for ScanSnap: ABBYY FineReader for ScanSnap™ allows users to be productive by quickly transforming their paperwork into editable Word®, Excel and PowerPoint files at the push of a button.
My Experiences
Having had some experience with the Fujitsu family of scanners, it didn’t take me long to get scanning. The software (ScanSnap Manager) is 99% identical to the iX500 software, so there really wasn’t much of a learning curve except to figure out the two options I showed you related to multiple scans versus flattening of book/magazine page scans.
I spent about 30-45 minutes testing various books and magazines, trying to find the best methodology for each type of scan process I might use. For books and magazines, I quickly discovered that my best scans occurred when I placed the top edge of the book or magazine about 0.25 inches from the base’s front edge. I discovered the book doesn’t have to be exactly perpendicular to the base — the software manages to fix a little twist or turn if you don’t have the item lined up perfectly.
You’ll also discover as you work through scanning a thick book that the center line shifts at various points, so you’ll want to try and keep it lined up with the small notch on the front of the base that indicates the center-line of the scanning being done. Only when the book is about half scanned will the centerline stay centered, but the good news is there’s a Pause button on screen so you can stop an automatic scanning (either timed or with page-turn detection) to adjust a book back to center.
You’ll also want to spend some time practicing using just the very tip of your fingers to hold the pages. Again, for thin books or magazines, I rarely have to even use my fingers and let the software handle the flattening, but for thicker books you’ll definitely want to pull the pages a bit to the left and right to help with the flattening process.
I’ve found that a five second delay is too long between scans… and a two second delay is just a hair too fast to give me time to move my hands. With a short delay, I occasionally disturbed the page when I pulled my finger away too quickly.
Photos scan great, btw. Just drop a photo on the mat and press Scan. No lifting a lid like with the old flatbed scanners. Same goes for single page documents — drop it and scan… and let the software handle the orientation correction.
Occasionally the scanner gets something wrong… either a page scans upside down (happens rarely, but it does happen and I’m not sure why) or the curve of a page just can’t be fixed. With upside down scans, that can be fixed using a rotate button in the edit phase. But if I’m unhappy with a scan of a two-page book spread, I just re-scan the troublesome page(s) as an individual scan and then use the Acrobat X software to insert the fixed scan into the larger PDF file. It helps if the book pages are numbered, but if not just make a note so you can place it where it will finally go.
My 6 year old has now seen me use it enough that he knows how to use it. I allow him to take his homework or drawings and place them on the mat and then press Scan. The software opens automatically, so I’ve told him he can scan what he likes but that he’s not to touch the mouse or keyboard… I’ll handle saving the documents. It’s a fast, easy way for him to do some of the scanning for me. I also think my wife is going to be a fan — she frequently gives me things to scan… now I can just point her to my office, tell her to place the item on the mat, and press the Scan button. I’ll deal with the software portion at my convenience. The software queues up all the scans and I can break them into individual files (versus saving as one big PDF) later.
As with the iX500 and other Fujitsu scanners, scanned items can be saved to a variety of locations including Evernote, Dropbox, Word, a specific folder, and many more formats and options. There are dozens of hidden features in the software that can be turned on and off with a simple click of the mouse, and I’m still finding new and interesting ways to scan documents using a few tweaks here and there. Be sure to read the manual as you’ll find there are a number of settings that can save you time and stress if you simply make the correct configuration settings for the job at hand.
One last item: Right now, the SV600 software only runs on Windows XP, Vista, Windows 7 and Windows 8, but I’ve been told that a Mac version will be released very soon.
Price: US $795.00
Availability: Now
Click here for the official product page. And I cannot tell you how useful the ScanSnap Community has been over the years — it’s a dedicated website for fans of Scansnap products who have questions, need help and tutorials, and want to stay up on the latest ScanSnap news… I probably visit it at least a couple times a month.
Here’s a video if you’d like to see the SV600 in action:
Note: I’d like to thank Fujitsu for providing me with the SV600 to test out. A special thanks to Samantha for assistance with all my questions and for a speedy delivery!


I want to digitize some large (11″x17″) thick (4″-5″) books. I don’t need OCR. Do you think this scanner would work? Could I mount it on an elevated platform so it is still 15″ (height of unit) from the page being scanned?
I am your average user. I am using it because libraries do not let you take home reference material and copying pages with your iPhone take forever and you still need to correct them later.
I like the comments of the author, James Floyd Kelly. Don’t get too rosy of a picture of the process. That was how I was before I actually put my hands on it. I was ready to copy my home library and get rid of my books. Not going to happen.
I have not tried it to copy smaller books yet. How tightly bound books are affects how easy it is to lay the books as flat as possible. Cheap book binding fall apart. Thin books have a tighter binding and the more you open them wide for scanning they are apt to split.
The only caution I would say is that scanning mistakes have to be corrected before you can save the document. You can’t process the scans later after you save your document. The scans will stay on your computer in the SnapScan software and I guess you could return home to finish all the corrections before you save it in the many format options available to you.
The thicker the book the more corrections the software needs to make. Sometimes you still will get warped pages. You are not going to replace the work of Google or whatever company scanned those library books. It would be great to copy papers for tax records. Great office tool.
I am not certain what the advantage of putting it on a platform. I suspect that it will not stand a lot of stress as it is only plastic.
So, it has to be permanently installed in one spot? That’s a bit of a fly in the ointment.
No. I have used it and moved it around in it’s original packing box. It is light weight even in that bulky cardboard box. It needs a smaller padded case to carry it securely. It is very light and easy to carry along with the power supply and USB cable to hook up to laptop. It seems stable standing alone on a flat table. Because of it’s use to scan books that cannot be moved, it makes sense to carry it to the location where materials are kept.
It doesn’t take the place of a good flatbed scanner but good for books and loose sheets of paper. No jamming or tearing of pages or sheets of paper. It does take time to scan a book and the correction time for pages that scans missed the edges of the pages makes the process slower then what is shown in demos. You have to correct the scans BEFORE you can save the book. You could do the book or work in stages if you have a large job.
Do not count on the manual to help you get beyond started it up. I’ll take that back, I actually called the help desk because I didn’t know how to start it up from the “manual’s description”. Like most manuals they are just mostly about warnings and no helpful tips and methods for working on books. It still seems to magnify the curvature of pages. Text on pages is very legible.
I had to download the software for my Mac computer as the package did not have software for the Mac unlike its description on the website. Perhaps it was because it is a new product and things were left out.
I’ve been doing a lot of research on this and couldn’t find the answer to this- does this scanner prevent the moire pattern that typically shows up when scanning magazine pages on a flatbed scanner?
http://cache.documentsnap.com/files/sv600-dtower.pdf, I think this will help you.
Thanks for the review James.
It looks like Fujitsu does not make a model that is set up to scan larger documents.
I’d like this same solution to handle a 24″ x 12″ document.
Do you think this could work if the scan arm were mounted higher than the document platform ? (I’d have a permanent fixed setup so any one time tweaking would be fine)
concerns might be:
-how will this effect the auto correct (software element)
-does the mat physically connect to the scan arm ? Does the scanner use registration marks from the mat to calculate de-skewing, etc ?
– anything else that might make this scenario impossible ?
I’d probably scan at a higher dpi to achieve comparable results to the ‘lower/natural’ positioning.
Any insights ?
Thanks
-J
Thanks for a great review of the scanner. It is pretty magical! Having just purchased one for our local historical society I’ve run into a small issue that I can’t seem to understand or find a writeup on (which makes me think I’m missing something obvious). When I scan a newsletter or short document the ScanSnap software doesn’t seem to understand cover/back pages. Either I can scan it as a series of double pages or if I tell it to split the document it does this for all of the scans – which means I get the front/back page awkwardly split in half. Short of adding a sheet of paper for the missing side, is there some way to tell the ScanSnap software to not break apart the first/last pages. (I’m using the Mac software, if that matters.) Thanks to anyone who can point me to a solution! – dave
Hi – I am considering purchasing a ScanSnap SV600 for a specific project and thought it advisable to seek your advice on its suitability. We have photos mounted on black A3 sized photo album pages (approx 6000 sides). The photos cover the past 100 years and have labels detailing their content attached so we would rather scan them as a complete page rather than removing them individually. Photos are mainly colour but there are some black and white and sepia. We would like to scan these and store them on DVD’s/ External hard drive for future viewing on a TV screen/computer. If I scan at the 600dpi setting. Do you think the Colour scan Quality be OK? The pictures go to the edges of the page.
This is an excellent review, makes me want to buy one like right now. I have a paperback book I need to scan and convert with OCR and get on Amazon. This might be the trick to do it, I just need to decide to do it.
Nick, I believe the 600dpi would be fine for your use. I have a flatbed scanner now, a Brother muti function machine that I use that works just fine at this dpi for color photos. Sounds like you have a great project ready to get started on.
I like the scanner to convert books and magazine articles. It goes very well and fast.
However, an important gap in its technology does not allow to make it appears available directly in other applications usually able to importing images from a scanner connected to my computer.
So we must go through the native application coming with the scanner to pick an image or text.
For a scanner of this price is a bit frustrating because of this lack of fluidity usually available on mac.
Bought mine at Walmart.com. Used it for one day and then returned it. Even though the software flattened the pages the text was “wavy” in places. Trying to correct it was too time consuming.
It is probably good for quick cheap scans but to have quality copy of a book I would not recommend it.
Wow… that’s a bummer. I’m wondering if you got a bad scanner. Also, did you update your software? ScanSnap has released some updates to the software that comes on the DVD that made some really good fixes to the scan qualities.
As shown in this post, I get consistently good scans… no wavy text. Since you’ve already returned it, I can’t ask you to try a few things such as placing it near a window for natural light — I’ve discovered I get even BETTER results with natural sunlight falling on a book’s pages. I prefer to do my scanning during the day instead of at night — low light will work, but the light provided by the scanner can only do so much.
Sorry you had a poor experience. I’ve had nothing but good results from both my iX500 and SV600 and I’m sold on ScanSnap scanners. I cannot imagine trying to scan books without my SV600.