 KicCrab requires a decent amount of soldering and programming to get it going, so this project isn’t for the true beginner, but it’s not advanced. The KicCrab gets the first half of his name from his micro-controller. The KicChip 18 powers the little crab with room to spare for sensors and more. The Crab kit comes with 3 servos and two blue LED “eyes” that can be controlled with the KicChip. (Video after the jump)
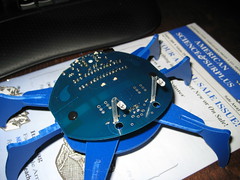
An unusual design element of the KicCrab is the shell. It is made of a flexible plastic circuit board and you actually bend it over one of the body parts before soldering the parts. The board arrives with a couple surface mount chips some SMD components already soldered in place, leaving just one 18 pin DIP socket and a handful of twin lead components for you. All but the two LEDs are soldered in place with the solder joints on top of the shell. You may want to practice a bit before tackling the Crab if you care about aesthetics.
The body of the crab is built out styrene plastic and appears to be milled. The milling process leaves behind some burs and rounded corners. You will need to dry fit all the parts and clean up any edges that don’t quite mesh. I didn’t have too many problems assembling the body until it came time to cut and bend the paper-clips to link the drive legs with the idler legs. I ended up having to cut the ends longer than described and bend them slightly to keep them in place.
Motivation is provided by three servos. One tips the crab side to side with the center legs while the other two control the fore and aft legs. The servos are pretty wimpy but sufficient to make the crab go. See the video for an example of how he walks. I have not had time to play with the programing, but it should be possible to get him to walk straight, turn, and spin on a dime. The later might require some modifications to the body, but it should be possible.
Video and conclusion after the jump.
The KicCrab is fun, but not too much fun to play with. For $80 he’s a rather expensive desk toy, but with a few sensors he could become a desk sentry which is way cooler. Power is by a 290 mah LiPo battery with onboard USB charger. I haven’t run the battery down all the way, but since it tops off every time you plug him in to charge it seems unlikely to happen.
Wired: Easy to build, easy to program, rechargable via USB and expandable.
Tired: Requires Windows USB drivers* and a Windows development environment. Needs sensors or remote to be really cool.
Notes: The USB chip is an FTDI 232 and should work as a virtual COM port under Linux. It isn’t recognized by the 2.6.28 kernel so I plan to look into that soon. Once the COM port works I should be able to get the programming environment fully working under Wine.


