

I have loved my month with a LulzBot Mini and am sad to see it go. The LulzBot was easy to use and required no tinkering or maintenance the entire time I had it. Using the Cura LulzBot edition software, I was able to find and print models easily, as well as design simple objects with Google’s SketchUp. My kids (11 and 13 years old) discovered how easy it was and, whenever the printer was idle, I found them searching for and printing all sorts of things.
Until working with the LulzBot my experience with 3D Printing was with a competitor’s assemble-it-yourself product that has yet to work. (When I hit my roadblock the competitor said they no longer supported the product. I think I have a bad controller board, but who knows?) My expectations were that there would be a great deal of setup, calibration, and on-going tinkering to use a 3D Printer, but the LulzBot was a snap and required no knowledge or skill to get going.
When the package arrived, I opened it and inspected the contents. It was well packed, preventing any parts from moving during shipping. The package contained the following items in addition to the printer:
- Quick Start Guide
- LulzBot Mini Reference Poster
- 5 Replacement Wiper Pads
- 2mm Allen Wrench
- Tweezers
- Dental Pick
- Flathead Bristle Brush
- Part Removal Knife (clam knife)
- USB and Power Cable – Tethered use with the USB cable connected is required to operate the LulzBot
- USB Drive with Source Files
- Quality-assurance print of an octopus


Specifications (From the LulzBot site)
- Print Surface: Heated borosilicate glass bed covered with PEI print surface
- Print Area: 152mm x 152mm x 158mm (6in x 6in x 6.2in)
- Print Volume: 3,650 cm3 (223 in3) of usable space
- Top Print Speed: 275mm/sec (10.8in/sec) at 0.18 layer height
- Layer Thickness: From 0.05mm to 0.50mm (0.002in – 0.020in)
- Capable Materials: ABS, PLA, HIPS, PVA, wood filled filaments, Polyester (Tritan), PETT, bronze and copper filled filaments, Polycarbonate, Nylon, PETG, conductive PLA and ABS, UV luminescent filaments, PCTPE, PC-ABS, Alloy 910, and more every day.
- Discouraged Materials: 3D printing with carbon fiber filaments is not recommended at this time because carbon fiber filaments can degrade both the nozzle and hot end of the LulzBot Mini Tool Head.
- Usable Filament Sizes: standard 3mm (0.1in)
- Multi-Software Compatible: Freedom to use any number of 3D printing software programs, Cura LulzBot Edition comes standard. Other compatible software includes OctoPrint, BotQueue, Slic3r, Printrun, MatterControl, and many more.
The LulzBot Mini currently available on Amazon for $1250.00 is an open source, RepRap printer capable of printing many of its own components. The only change I would make to the design is to put the USB port for the computer in the back of the machine so it’s out of the way.
From opening the box to my first print was a quick process. Within twenty minutes I was printing the sample model, the same octopus as the included quality-assurance print, but sporting a “rock on” hand sign. I could have been printing sooner but I was being careful to identify the components for review, as well as make sure I could repack it all. Setup included downloading the Cura software (also available on a USB flash drive), heating up the extruder to remove some HIPS filament that was left in place for travel, and inserting the short piece of filament that came with the printer for the test.

Note that I had to do no setup, no leveling, no calibration of any kind. The LulzBot, using Cura, self-levels with each print. I never saw any degradation in printing, or anything suggesting I need to calibrate in the time I had the printer. The image below shows my original first sample print, and then the same print weeks later after daily printing. The only difference is in the color of the material used.

I then started printing. There are so many models out there. Nearly anything you could want is available. One of the first things I tried was a full set of dice: d4, d6, d8, d10, d12, and d20. What I discovered is that dice are a difficult print task, as there is detail on every side and the heated bed side comes out slightly different from all the other sides. Given more time with the printer, I would instead print a negative mold and cast the dice. Chocolate dice anyone?


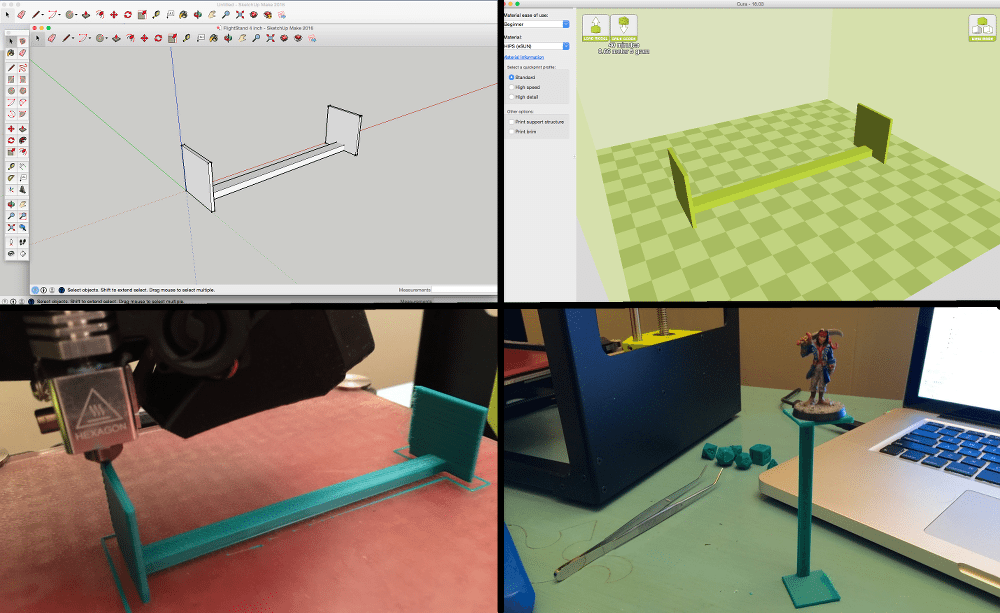
Printing other peoples’ models is one thing, but the true power in these printers is being able to conceive and print your own creations. For my next print, and my first creation, I decided to design flight-stands for miniatures for use in role playing games: basically, a platform to place a miniature at varying levels above a playing surface. The planned design was just a 1 inch by 1 inch platform, with a column holding up another 1 inch by 1 inch platform. I would make a few different height platforms.
With minimal prior experience (I made a cube once) I downloaded a trial of SketchUp Pro and set to making my platform. The first one I made was 4 inches tall, but I later made more heights. At this point, I had not yet discovered it, but later the STL Import and Export plug-in was and invaluable addition to SketchUp.
I then imported this into Cura and printed it. Just like that, in very little time the first night I had the printer, I was conceiving, designing, and printing real-world objects. Simply amazing, and the LulzBot printed away with no tweaking or difficulty.
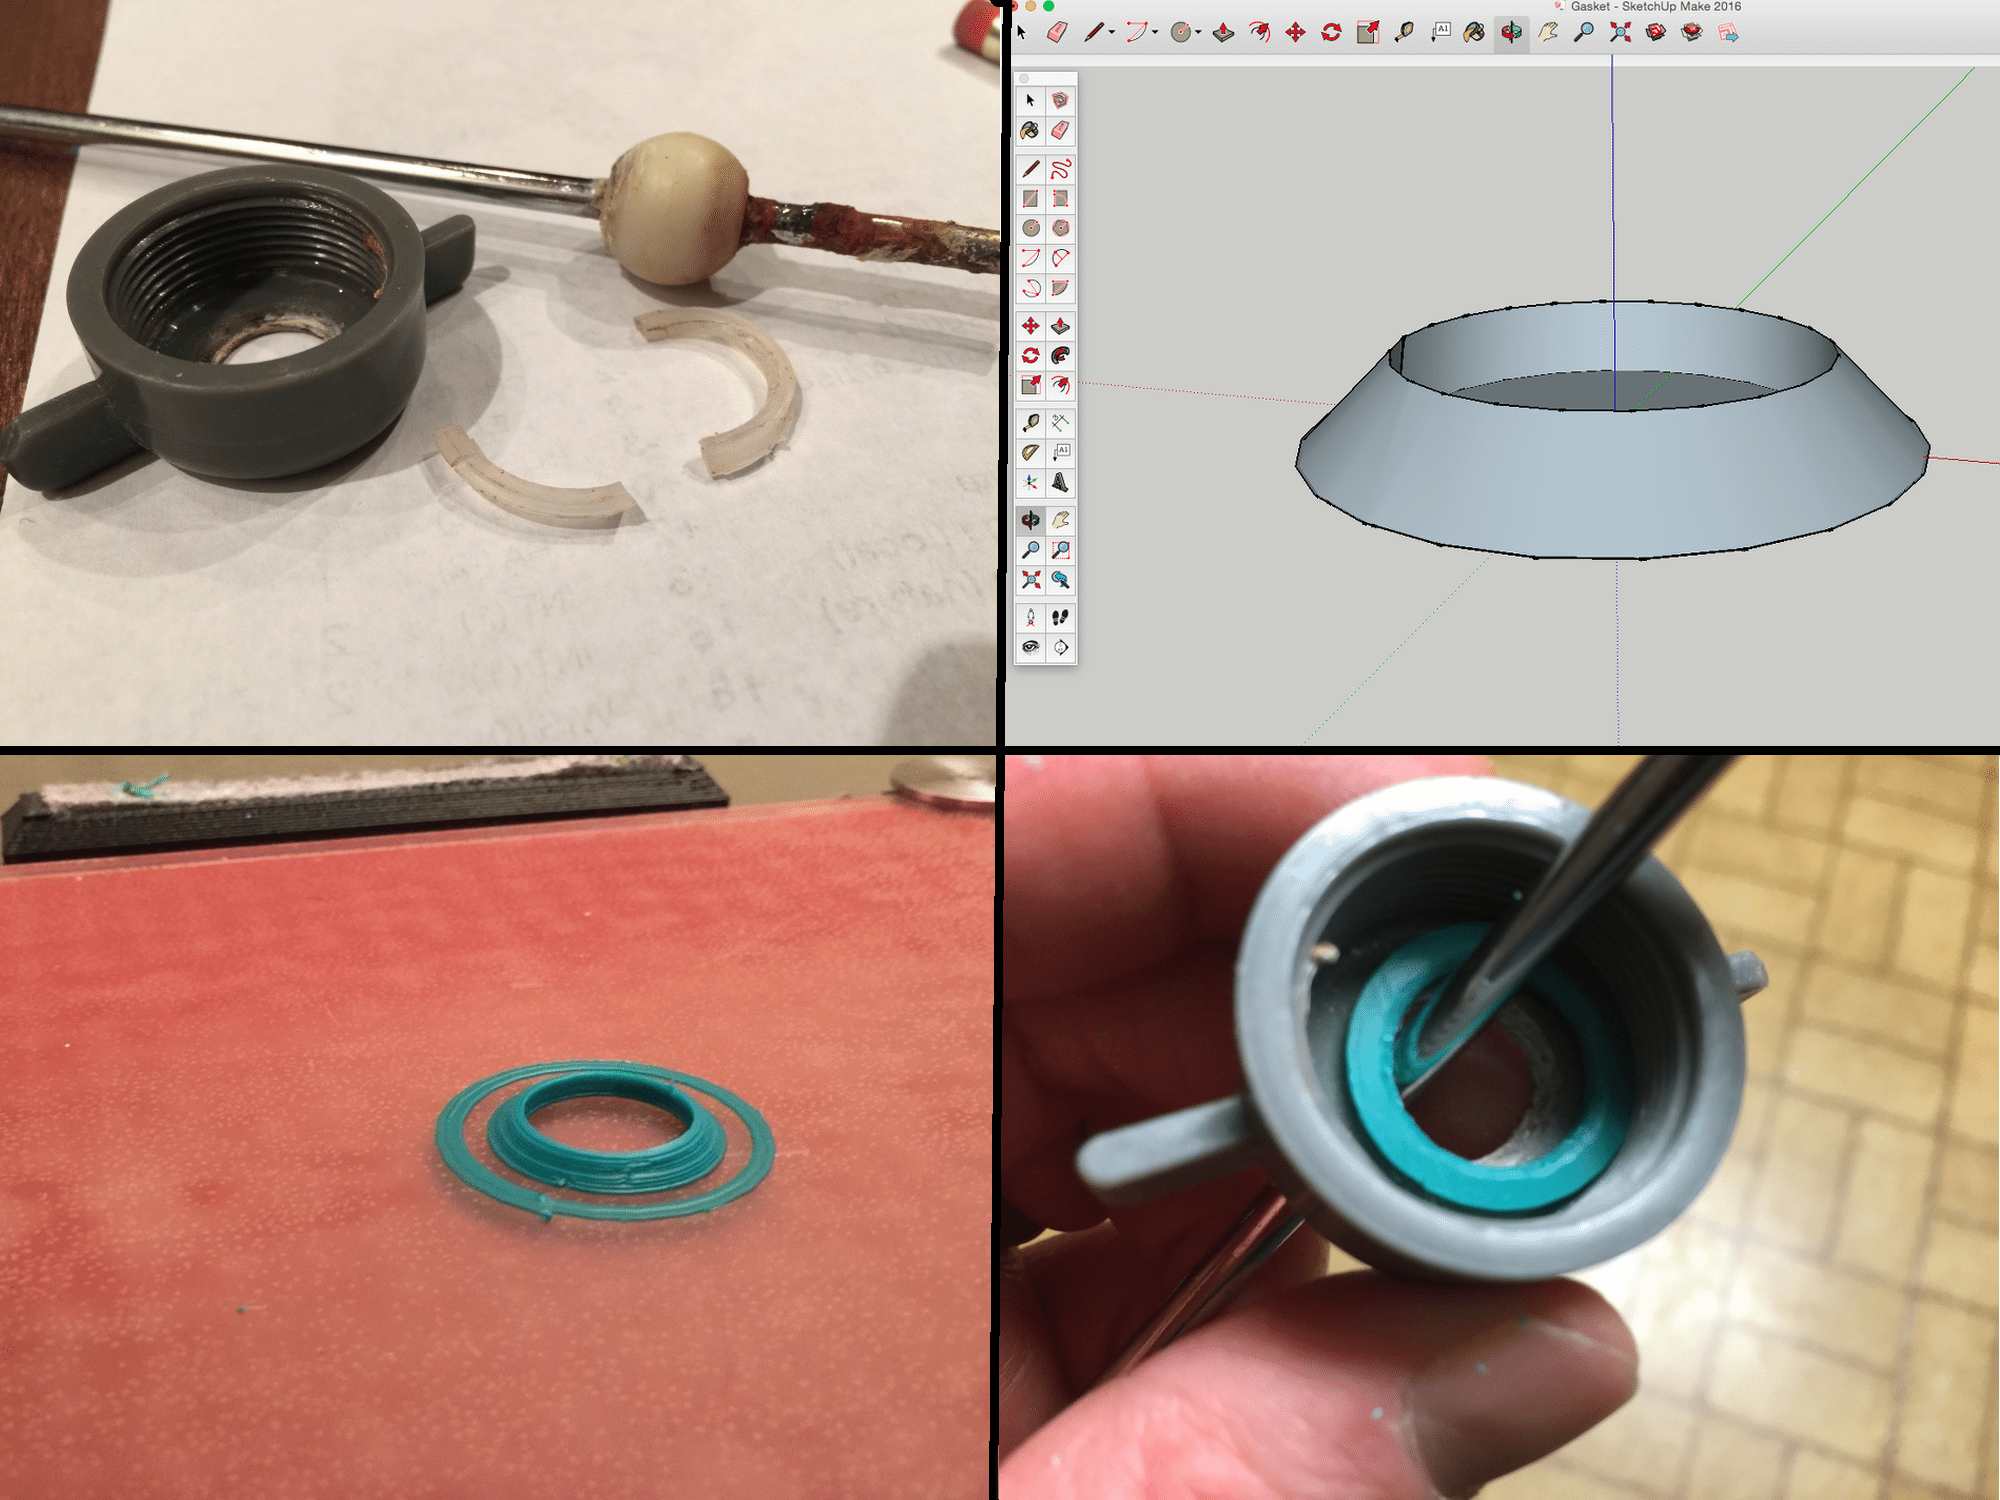
My wife saw that I was designing and making things and suggested I create a fix for a broken washer from the plunger connection of one of our sinks. So I did. A quick YouTube tutorial showed me how to use SketchUp to make a ring-like object in the shape I wanted and, voila, washer! My sink doesn’t leak anymore.
I have read that a 3D printer can pay for itself over a period of time by printing things that you would otherwise have to buy. I would love to spend a year with a 3D printer tracking everything I didn’t have to buy because of it. I think you’d want to track a couple of categories. First, stuff you didn’t need like toys and gaming aids, and second, prints that prevented you from having to find and purchase something–things you need. For instance, the cost of that washer is probably 50 cents at a home improvement store, but there’s cost of traveling to the store. Further, based on past experience, I would have purchased a washer which wouldn’t work, and then I’d have to go buy another. With a printer, I just modify and print again in less time than driving to the store.
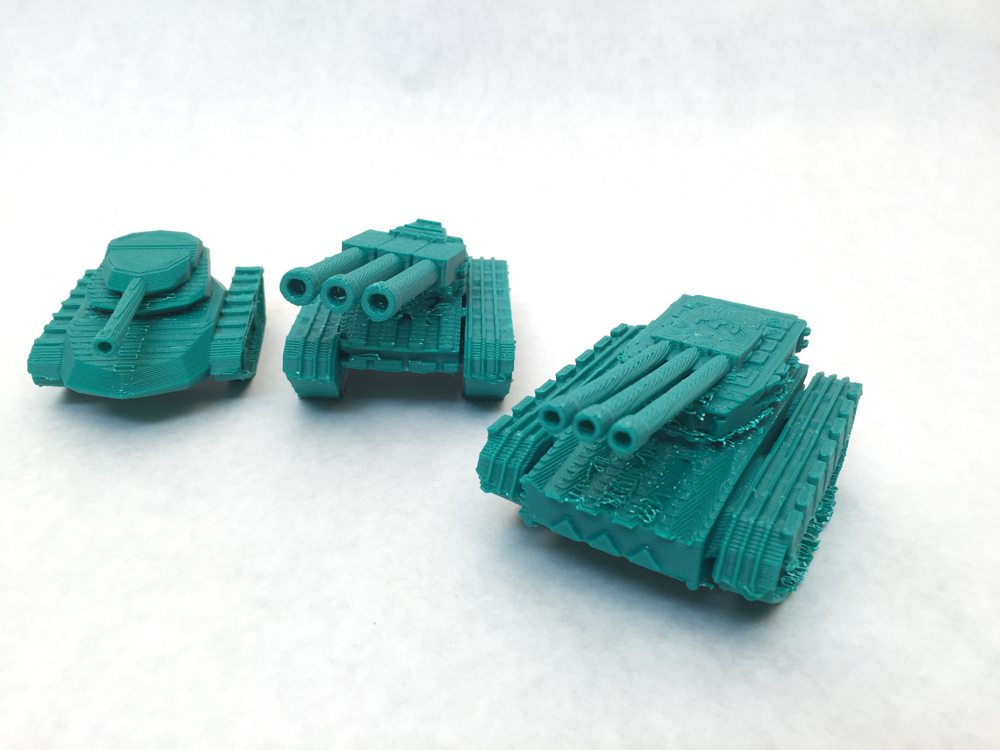
At one point I came home and found my kids printing away. I asked my kids what they were printing and they replied, “We’re printing tanks to replace cannons in Risk.” They ended up developing their own rules to use tanks as new pieces. They started printing every time they had a chance and developed a rather large force of varying size tanks, planes, articulated mechs, and the like. For images of many of the items we printed, check out this Flickr album.


The potential for this printer is enormous; from printing toys, to game aids, to cosplay items such as the hardware for Han Solo’s belt (I will show this off later if I get it assembled). Just having this capability makes me want to prototype my own tabletop games. You could easily pay for the printer just by printing miniatures and dungeon tiles in-lieu of purchasing ready-made products, and again, invaluable for do-it-yourself type fixes, such as the following solution to another long-broken item in our house. I used someone’s nut and bolt design and modified it to fix this issue.

Again, check out images of just a small fraction of the stuff we printed on my Flickr album.
While I was impressed that my kids were able to find models online and print them with no difficulty, the power of 3D printing is in the ability to conceive an idea, and to easily bring that idea into being. I wanted my kids to be creating like I was. Neither of them jumped on the idea of learning SketchUp, but I later discovered an alternative in a feature of Cura, “Import Minecraft Map.” At first this menu item didn’t jump out at me; while cool, how often would you really want to print your Minecraft world? Then the light went off and I realized you could use this feature to design whatever you wanted using Minecraft, a tool even a toddler can use.
This mind-blowing capability means that anyone who can build in Minecraft, can design and print real-world objects. This opens up the the benefits of 3D printing to preschool level children. This is also a quick and easy way for people of any age to start designing their own objects. I suggested my son create some objects using Minecraft to try it out. The objects he printed are rather blocky, but there’s nothing stopping you from creating a much larger object and then scale it down. The bigger your design, the more detail the object can have.

It’s not quiet. I measured a pretty constant 65-69 decibels sitting right next to it, with peaks in the mid-70’s, so you probably don’t want to put it in the dining room like I did. After running non-stop for a month, it was definitely leading to marital-strife.
What I notice about this review, though, is that it’s mostly about what I was able to create, as the printer was never in any way a hindrance to what I wanted to do. The LulzBot was never a problem, and never needed calibration. The LulzBot Mini simply allowed me to either find and print other peoples’ creations, or conceptualize, design, and print whatever I wanted. The LulzBot worked so well, I hardly noticed it.
When talking with LulzBot about getting this printer to review I was asked if I thought 3D Printing was mainstream yet. Given how easy this is to use, I think we’re there; this is the beginning of a revolution where anyone can be a maker. The LulzBot Mini is a 3D printer that anyone can use. No special knowledge, skills, or aptitude are necessary. Though, with the included Cura software having a multitude of advanced settings to tweak, and the many other compatible printing packages, the LulzBot is excellent for the advanced user as well. Given the 30 day money-back guarantee and one year warranty, there’s no going wrong with the LulzBot Mini.


Seriously…$1,250 for a cheap trinket maker…Don’t buy the MINI at all…once you get it you will regret not getting the larger TAZ. Once you get up the curve on printing, you will want to do bigger and more ornate things…the Mini wont allow this. After a few prints…you will say to yourself “shoot, I really messed up buying this”. Just look at the article, for those dumb print ideas…you would be better off buying a Mattel printer for 300-500 bucks. The Mini really should be in the 500-700 price range. Don’t buy the hype, take your time, you worked hard for your money so spend it wisely!
Thanks for the comment. The LulzBot Mini is currently $1,250 on Amazon (http://amzn.to/1VaNZoc). It has a print area of 152mm x 152mm x 158mm (6in x 6in x 6.2in). The LulzBot Taz is $2,200 on Amazon (http://amzn.to/1Spixha) and has a print area of 298 mm x 275 mm x 250 mm (11.7 in x 10.8 in x 9.8 in).
The Mini has automatic bed leveling, while the TAZ is only manual. The Mini must be connected by USB while the TAZ can utilize an SD card so your computer does not have to stay connected. The TAZ has the capability of dual extruders (A much more compelling reason to go with the TAZ than just print size! But this would add to the $2200 price tag.)
From their specs it looks as if the quality of the prints/the detail capable is identical. (The Amazon link has a comparison of the TAZ/Mini, prepared by LulzBot – http://amzn.to/1Spixha)
I did not get a chance to use the TAZ, but the ease of use of the Mini was a big selling point. Asking a user to level the print surface is like asking someone to manually align the sheet feeder in a regular paper printer. Fine for many people, but the masses just would not go for that. A $1250 device that “just works” (does not require manual leveling), and prints high-quality objects (just like the TAZ) is much more “mainstream” than a $2200 device that requires manual leveling.
What would I rather have? Probably the TAZ for the flexibility of larger prints and capability of adding dual-extruding. What is closer to a mainstream device? Probably the Mini given the cost and being slightly easier to use (I presume… again, I didn’t get to try the TAZ). I hope to get my hands on some $500 price-range printers to try, and then I’ll better be able to compare the capabilities of the Mini vs the “Mattel.” Until then, I know I’d be ecstatic to have a LulzBot Mini in my home.
Again, thanks for reading and commenting!