Building our own robots has been a topic in our house for a long time now: The kids are absolutely fascinated with robots and regularly fantasize about building robots for either doing the chores around the house or producing candy and toys.
More than a year ago, I had bought a robot kit, but I must confess that we did not get far with this particular kit. The construction with an Arduino board and a separate motor shield required wiring that was too complicated for kids, the robot could only be programmed in C, adding different sensors or actuators meant more wiring and C programming, etc. Nice for the GeekDad to play around with, but not an experience easily sharable with young kids.
Sometime in spring this year, one of my colleagues pointed me to a Kickstarter campaign by a company called Makeblock, which promised an educational robot for each kid with easy assembly, a modular concept for modification/extension, and a graphical programming environment.
I pledged for two robots and started to wait impatiently. The campaign was executed without a hitch and the robots sent on time. It was only due to an unfortunate combination of problems to do with custom regulations and the rather haphazard execution of these regulations by the parcel service (a story for a whole series of blog posts) that delayed the arrival of my two mBots.
When the mBots finally arrived, we found this in the box:

Three things stood out: the chassis of the robot is one solid piece of metal rather than some plastic contraption; there are no more than 40 parts; wiring between sensors and the Arduino board is realized with telephone (RJ25) jacks. So the hardware aspect definitely seemed kid-friendly enough. And, indeed, it was: left to my own devices, construction probably would have taken around 10 minutes per robot. With two kids, it took about three-quarters of an hour to build both robots: easy enough to complete before a preschooler’s attention starts to wander, but nevertheless a sense of achievement, of having constructed one’s first robot.
Naturally, once the robots were constructed, the kids wanted to see some robot action. Luckily, mBot comes with a pre-installed program that allows remote control with the infrared remote and features both a wall-avoidance mode (using the ultrasound sensor at the front), and a line following mode (using the optical sensor attached directly over the front “wheel”):
- Line following at first did not work very well, but we figured out the problem and then watched happily as the robot did his rounds. What was the problem? The mBot package includes a poster with a black track in the shape of a large “8”. This we spread out on the floor and put the robot on the track. The robot followed the track a bit, but then started dancing on the spot, wiggling left and right. It took a while, but finally we realized that because the poster is very glossy, the creases at which the poster had been folded reflected the light of the late afternoon sun that shone through the window. Thus the sensor registered “light” instead of “dark” whenever it came close to such a crease; hence, the robot found no way to progress and kept dancing on the spot.
- Wall avoidance works as well as can be expected with a single ultrasound sensor. Where it does not work (e.g., the robot “overlooking” a table leg or taking forever to maneuver itself out of a corner), observing the robot’s troubles serves as a nice lesson about the complications of robotics.
- Remote control of the robot via the IR remote also works nicely. Of course you cannot expect the comfort and responsiveness of what a more sophisticated, single-purpose remote-controlled toy has to offer: you control the robot by pressing one button at a time rather than with a multi-channel remote that has levers allowing for gradual control. Another issue with IR remote control is that you can only have one robot in the room, otherwise the IR signals will interfere; but you can switch over a robot to remote control by smartphone via Bluetooth: an app has been made available by Makeblock for both Android and IOS. Thus, both kids happily sent their robots driving around in our living room.
On the following day, we made our first attempts at programming mBot (actually, that is a lie: as soon as the kids were in bed, I started writing my first programs for mBot – just to make sure, that everything would work on the following day, of course …) Makeblock has made the wise decision to base the programming environment for mBot on the tried and tested Offline Editor for MIT’s Scratch 2. In Scratch, programs are created graphically by fitting together blocks that represent control structures, assignments, actions, etc. Makeblock has written an extension for mBot that offers mBot-specific blocks with which each of the sensors and actuators available for mBot can be queried and controlled, respectively.
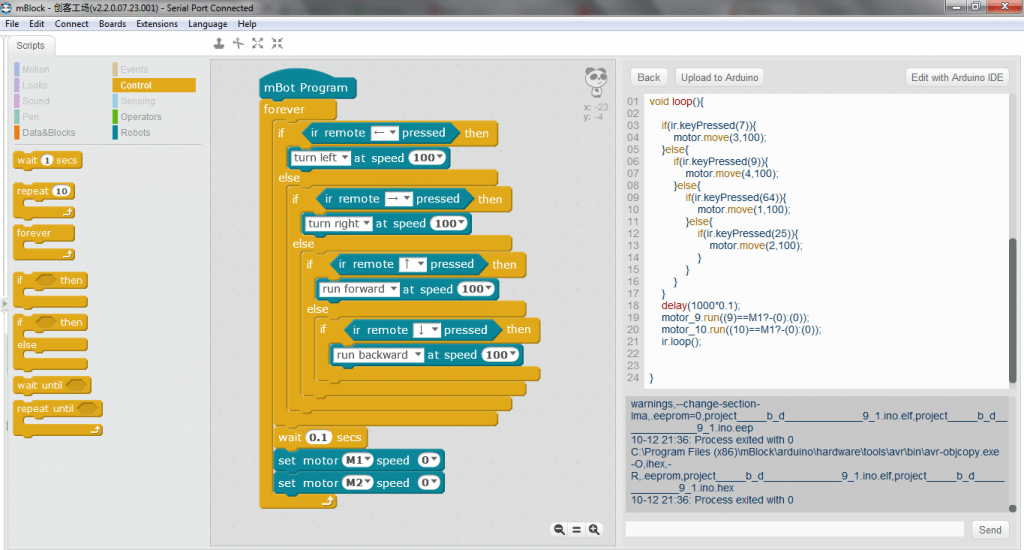
Below, for example, you can see a very simplistic program for a remote control. The brownish blocks are general-purpose blocks for managing control flow (here, one never-ending loop, several case distinctions and a “wait” statement). The blue blocks are specific for mBot: the hexagonal blocks query the IR receiver for signals sent by the remote control, the rectangular blocks are used to control the robot’s motors.

This very simple program is, of course, not perfect, because the motors are constantly switched on and off, no matter whether the command received from the remote control has or hasn’t changed. It would be much better to record the current state of the remote control in a variable, change the state according to the signal sent from the remote control, and only bother with motor control whenever a state change occurs. The point of the simple program is: kids can understand it. On our first day of programming the mBot, I started out with having the kids play around with the blocks that control the mBot: when you click on a command block with the mBot connected to the computer either via USB cable or Bluetooth, the command is carried out on the mBot. Then I showed them how to integrate some of these blocks into the simple program for remote control of the mBot shown above.
Recently, I used the mBot as part of a riddle to be solved during a birthday party (a secret code had to be entered on the remote control for the mBot to start flashing its LEDs in Morse code with instructions for the next riddle). Currently, we are contemplating improvements to the wall avoidance mode using two ultrasound sensors at once, unplugging the second sensor from the other mBot. Other projects will follow in our family’s hands-on exploration of robotics.
All in all, I am really happy with the result of the mBot Kickstarter campaign. Although, unless your kids are in their teens, I would modify mBot’s slogan “An educational robot for each kid” into “An educational robot for each kid and his/her parents”: mBot makes things quite easy, but younger children will certainly need guidance. Because I want to explore robotics together with my kids, I am just fine with that.


Looks amazing!
Assuming parental guidance, what would you say are appropriate ages to start with this?
Hi Itamar,
I’d say that a 6-year-old will get something out of building the robot together with his parent — and have lot’s of fun later with the remote-control function (and cool additions which his/her dad will code for him/her ;). As for programming: that is something you can try out easily also without the mBot: Take your kid to https://scratch.mit.edu/ and try out some Scratch programming. If your kid succeeds in “normal” Scratch programming, then he/she will also be able to program the mBot via Scratch!
Kind regards,
Bernd
cool, thanks!
Hey there. Thanks for this great site!
My kid has the basic mbot (he’s 10). He can program in Scratch and is fairly comfortable there, but we are struggling with what a number of the mbot blocks mean. Did you find a resources that can help with that? The scratch and robotics tutorials on the makeblock site are down (dropbox gives a 404 error) – so maybe the answers are there?
Hi Alex,
I have tried the links on the mBot website again, and they work for me. The mBot-specific scratch document is linked from http://learn.makeblock.cc/course-download/.
Having said that: documentation is not Makeblock’s strongest side, at least not yet. The mBot-specific documentation only turns in Chapter 9 to programming the mBot — chapters 1-8 are about Scratch programming with very little about mBot.
We have not explored every mBot specific block — where I wanted to know more, I had a look into the source code of the blocks — that is the nice thing about Open Source.
You could try getting in touch with Makeblock; I had found them very helpful when I had a question a few months ago.
Kind regards,
Bernd
Good information here! I got my son one for Christmas. I think he may have handled it to rough and the IR receiver came off. Does this snap back onto the motherboard or do I need to solder it back on, or is it easier to just try and get another board sent to me.
hi
i have programed mbot alot
what is new i can do
Hi carl,
you´ve said, you programed a lot. Do you have an example for the dancing cat, I bought the 3-in 1 pack, but till now not found any hint for writting a suitable code.
Anonther question, till now I have´nt found any information for the bluetooth connection if it is useable sending the code to the robot. Dont like the circumstances for connecting with the USB-cable after every change.
Regards
hello I have a problem with my mbot ranger I see this avrdude: stk500_getsync() attempt 10 of 10: not in sync: resp=0x30 every time I want to uploud my prograam
please help my how to fiks it