Last week I had the opportunity to conduct a camp titled Beginning Electronics and Robot Building (BERB) to a group of 21 kids, ages 8 to 12. It went great, and I’ll be holding the camp again for another group in late July. In addition to learning some basic electronics skills (such as soldering and breadboarding), the kids also got to build a full-fledged Arduino-based robot that they took home. It was a great week, and it also gave me an opportunity to introduce the kids to some other concepts and tools, including 3D printing.
On the last day of the camp (it ran M-F, 8am to 1pm), I had my new Printrbot Simple up and running before the kids began to arrive. I expected to spend about 30 minutes or so letting the kids watch the printer go and taking questions. I was way off target. For almost 90 minutes, the kids hit me with questions about CAD and 3D printing. What I came away with is this simple statement — kids are completely in love with 3D printing!
I passed around a couple copies of my new Tinkercad book while the kids took turns getting a close look the nozzle singing as the motors did their work. (It really does sound like singing as one camper pointed out to me.) One of the examples in my book showed how to use Tinkercad to create a 3D model and turn it into a mold for pouring in a melted crayon to create a custom crayon shape. The kids loved that, although time didn’t permit me to actually print out a mold. One really interesting question that came up related to the limitation of printing certain objects — the campers could see that layers were built upon previous layers, and a few quickly realized that some objects might have bits and parts that wouldn’t have support underneath them. One camper stood up and held his arms out, fingers pointing west and east. “How can you print my arms? Won’t the plastic just fall down from gravity?” Yes, it will.
3D printer hobbyists have found all sorts of methods for solving this problem, and the most popular involves printing supports that are cut away from the final model. But there’s another solution — splitting an object into halves, as I showed in the mold-making chapter, and reassembling them like the old snap-together plastic model kits. I told the campers I would write up a how-to and share it via GeekDad.com, so here goes. Keep in mind this is just one simple solution — there are likely many other methods, including much more accurate versions of the simple steps demonstrated here.
Step 1: Start by creating or importing your model with Tinkercad. For this example, I’ve chosen the Makey Robot from Make: Magazine, a familiar little robot shape that has two arms pointing in the air. Some 3D printers can print this little robot standing up as is, but I’ve not had much luck printing a high quality Makey without some sag and drip in the arms. (My test print of the little robot turned out okay, but once the nozzle reached about half-way up the chest and the shoulders, I started to get some sag as the curved shoulders began to build.)

Step 2: Create a copy of your object and line them up on a shared dark blue grid line. Tinkercad has deeper blue grid lines and light blue. As you can see in the next image, I’ve lined up both robots so the edges of their right feet are against the same dark blue grid line. (You can be as exact as you like, but it doesn’t have to be perfect.)

Step 3: While viewing both robots from the side, shift both robots using the arrow keys so that the rear of each foot is lined up on a light blue grid line. Try to have the feet the same distance from a solid blue line running parallel to the rear of the two feet. In the image below, you’ll see that I’ve shifted both robots so that there are three grid squares between the solid blue line behind each robot and the rear of the feet. The reason for this is so that you can split both robots into roughly equal halves, keeping the front-half of one robot and the rear-half of the other robot.

Step 4: Create a large rectangular-shaped box that would completely surround one robot. You want it wider than the distance between the two raised arms and taller than the robots. Make a copy of the box. Put one box behind one robot and one box in front of the other robot.

Step 5: Now here’s where you’ll see the benefits of having the robots “centered” over a shared grid line (light blue) as shown in the above image. What you’ll do is convert each box to a hole or negative (use the Hole tool after selecting both boxes). Each box will turn into translucent box as shown in the image below. Hole objects, when grouped with solid objects, will delete the parts of the solid object that share space with a hole object.

Step 6: If you haven’t guessed yet, you’ll next drag one rectangle so it covers half of one robot. The other rectangle will be placed so it covers the other half of the robot. Look at the image below and you’ll see why I chose to leave three grid boxes behind each robot — I can drag a Hole Box so that it rests on the solid blue line that’s near the middle of both robots.

The image below is zoomed out a bit — you can see that the visible red portions of each robot could be put together to form one complete robot.

Step 7: Select one Hole Box and one robot and click the Group button. Do this again with the other Hole Box and robot. What’s left over will be two robot halves like the ones below.

Step 8: Use the Rotate controls and rotate the robots. After rotating to a matched orientation, you may have to lower them so they are laying flat on the work plane as shown in the image below.

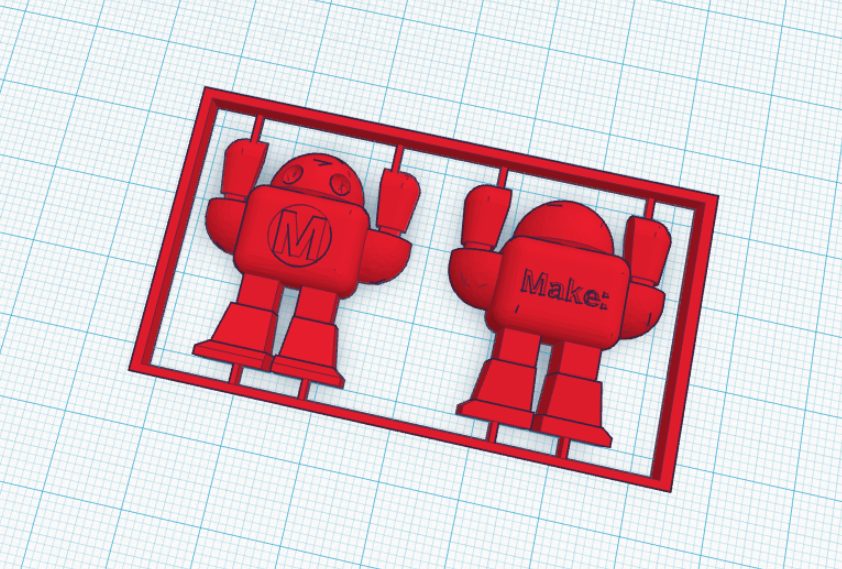
Step 9: Create a frame to go around your robot. Add small thin rectangles that will connect each robot half to the frame like this:

Step 10: Print it! You may have to do a few test prints to figure out the best height/thickness of the frame and little connector pieces, but you get the general idea. Print it out, use a knife to cut away the connectors, and then glue the two halves together. An alternative is to create small pegs — create holes in the back of each robot half that the pegs will insert into and allow the two parts to snap together. You’d probably want a peg on back of the head, one in the chest, and one in each foot and hand.
That’s it! Now you know one method (there are many, I’m sure) for taking a 3D model and breaking it into pieces that could be glued or snapped together. Fun, huh?


Awesome James! For the session in July, where is it being conducted and when, what cost . Could you please revert
The camp is at a private school in Atlanta, GA. Next summer I believe the school intends to open it to the public, but this first summer was closed to just the school’s current students.
James,
I’m working through your Gemini Station book with my 10-year old son and we’re having a great time.
His school also has the opportunity for parents to come in and teach a series of 5 2-hour sessions on any topic and I’d like to propose an Arduino workshop for the kids in grades 5-8. I saw your post here and wondered if you had any details on the BERB class you taught.
Hi, Rod.
Shoot me an email with your email address and I’ll fill you in… be warned, this first camp was a bit of wingin’ it and we didn’t dive deep into Arduino, just a very brief intro.